

Ever cut a piece of Aida cloth only to realize—halfway through—that you've miscalculated and won't have enough room for a border? We've all been there. A cross stitch calculator is the simple tool that prevents these headaches. It's not about being a math expert; it's about taking the guesswork out of your prep work.
These handy online tools help you figure out exactly how much fabric you need based on your pattern's stitch count and your chosen fabric. They can also give you a surprisingly accurate estimate of how much thread you'll go through, saving you from that dreaded mid-project trip to the store for a single skein of DMC 310.
Why a Calculator Is Your Most Important Stitching Tool
Before you even think about threading a needle, there's one tool that can sidestep the most common cross stitch frustrations. A cross stitch calculator isn't just a gadget for the metrically-minded; it’s a total game-changer for anyone who has ever played "thread chicken" and lost, or ended up with a piece of fabric way too small for framing.
This simple digital helper handles the tedious math so you can dive straight into the fun part: stitching. It's a must-have for beginners who need that extra boost of confidence and for experienced stitchers who want to plan their projects with precision.
Taking the Guesswork Out of Planning
The biggest win? Certainty. A good calculator translates the numbers on your pattern chart into real-world measurements you can actually use. No more holding a ruler up to your fabric and hoping for the best.
- Perfect Fabric Size: It doesn't just tell you the finished size of your design. It calculates the total piece of fabric you need to cut, factoring in the border you want for washing, finishing, and framing.
- Smarter Floss Buying: You get a solid estimate of how many skeins you'll need for each color. This means you can buy what you need upfront and avoid running out of a critical shade halfway through.
- The Right Needle: Many calculators will even suggest the best tapestry needle size for your chosen fabric count, which makes a huge difference in how smoothly your stitches lay.
This simple table breaks down exactly what a calculator does and what you need to provide.
What a Cross Stitch Calculator Does for You
| Calculator Output | How It Helps Your Project | Information You Provide |
|---|---|---|
| Finished Design Size | Shows the exact dimensions of your stitched area in inches or cm. | The pattern's width and height in stitches. |
| Total Fabric Size | Tells you what size to cut your fabric, including a border. | The "extra" margin you want on each side. |
| Floss/Thread Estimate | Predicts the number of skeins needed to complete the project. | The number of threads you're stitching with (2 is most common). |
| Stitch Coverage | Shows how much of the fabric your stitches will cover. | The fabric count (e.g., 14-count, 18-count Aida). |
Basically, you plug in a few details from your pattern, and the calculator gives you a complete blueprint for your supplies.
Here’s a look at what a typical online calculator looks like. This one is from Sewing Inspo.
See how it keeps things simple? You enter your pattern info, and it spits out the exact dimensions you need. This clarity is what makes it so easy to see how changing from 14-count to 18-count Aida will affect your final piece.
A well-planned project is a successful project. Using a calculator removes the biggest variables—fabric and floss—so you can stitch with peace of mind, knowing your supplies are perfectly matched to your design.
These tools have become a staple for stitchers everywhere. By just plugging in your design's dimensions and fabric choice, you can plan your entire project with accuracy. It saves time, prevents waste, and makes the whole process more enjoyable from start to finish. You can find more great insights on this from other sewing and crafting experts.
Gathering Your Project Details for Flawless Results
Any good cross-stitch calculator is only as smart as the information you give it. Think of this prep work as your "measure twice, cut once" moment. Getting these few key details right from the start is the difference between a project that fits your frame perfectly and one that runs right off the edge of the fabric.
First up, you need to find your pattern's dimensions. Forget any measurements in inches or centimeters for a moment. What you're looking for is the stitch count. Your chart will list this as width by height, usually right at the top or in the pattern key (for example, 140W x 98H). This is the pure, unfiltered size of your design.
Finding Your Core Numbers
Next, grab your fabric. You need to know its fabric count. Whether you're working with 14-count Aida, 28-count linen, or something else entirely, this number tells you how many stitches you can fit into one inch. This is a non-negotiable part of the equation because it directly controls how big your finished piece will be.
Finally, think about your framing allowance—the blank fabric border you want around your stitching. It's so much easier to plan for this before you start stitching. I usually recommend a 3-inch border on all sides. It might seem like a lot, but it gives your framer plenty of room to work their magic without pulling your stitches out of shape.
So, before you even open a calculator tab, have these numbers handy:
- Stitch Count (Width): The number of stitches across your pattern.
- Stitch Count (Height): The number of stitches from top to bottom.
- Fabric Count: Your fabric's stitches-per-inch number (e.g., 14, 16, 28).
- Desired Border Size: The extra fabric you want around the design (e.g., 3 inches).
Here's a pro tip: You can also work backwards. Let's say you have a leftover piece of 18-count Aida that's 12x15 inches. Plug those dimensions and your standard 3-inch border into the calculator to find out the maximum stitch count you can fit on it. It’s a fantastic way to "shop your stash" for your next small project.
Translating Pattern Stitches Into Fabric Size
This is where the real magic of a cross-stitch calculator comes into play. We're about to turn those abstract little squares on your pattern into the actual, physical piece of fabric you’ll be working with. The whole point is to take the guesswork out of cutting your fabric by translating the pattern's dimensions into a real-world size.
It all starts with two key numbers. First is the stitch count—that's just the number of squares your pattern takes up, both across (width) and down (height). The second is your fabric count, which tells you how many stitches fit into one inch of your material. Think 14-count Aida or 18-count linen. These two bits of info are all the calculator needs to get started.
A Practical Example in Action
Let's say you've picked out a lovely floral pattern. You look at the chart, and it tells you the design is 150 stitches wide and 95 stitches high. You've decided to stitch it on a nice piece of 16-count Aida.
So, how big will the actual stitched part be? The calculator does some quick math for you:
- Width: 150 stitches ÷ 16 stitches per inch = 9.38 inches
- Height: 95 stitches ÷ 16 stitches per inch = 5.94 inches
This means your finished, stitched floral design will measure about 9.4 by 6 inches. But hold on—that's just the design area. That’s not the size you'll cut your fabric. For that, we need to add a border.
The process itself is wonderfully simple, as you can see here.
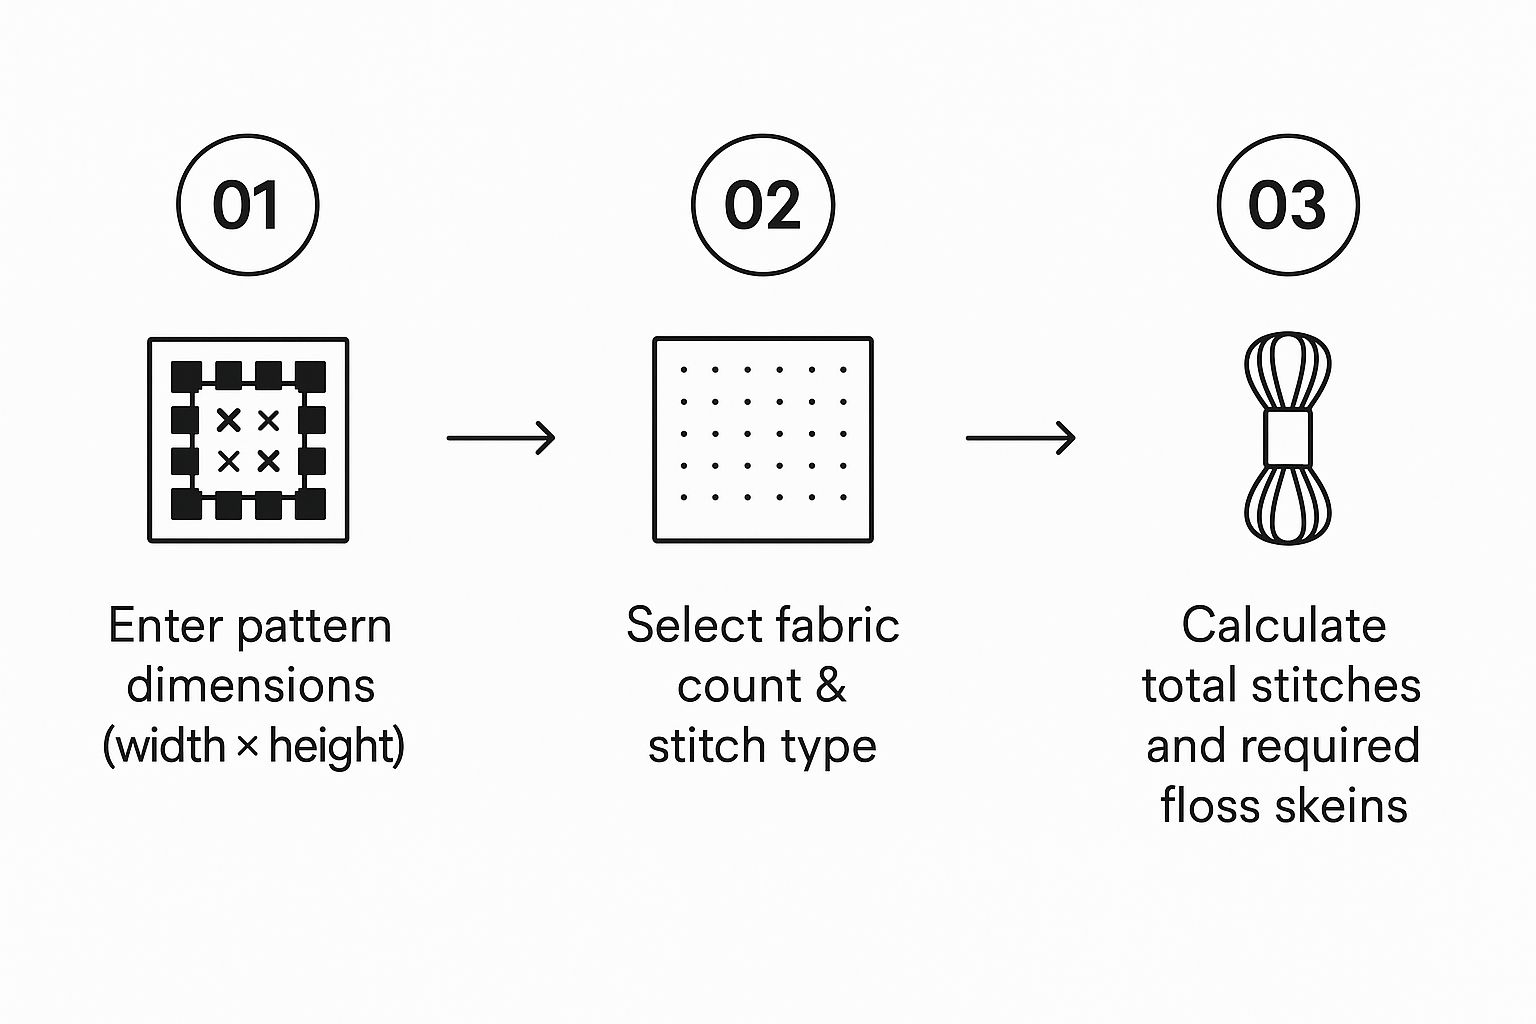
This visual really breaks it down: you plug in your pattern and fabric details, and the calculator gives you the exact numbers you need to get your supplies ready.
From Design Area To Cut Size
Now for that all-important border. From experience, I always recommend adding a 3-inch border on all sides of your design area. This isn't just extra fabric; it gives you plenty of room to secure your work in a hoop or Q-snap frame without getting too close to the edge. It’s also what a professional framer will need to mount your masterpiece properly later on.
A good calculator will handle this part for you, but it’s easy to understand. You need 3 inches on the left and 3 inches on the right, so that's a total of 6 inches added to the width. The same goes for the height (3 inches top + 3 inches bottom).
Let's go back to our floral example:
- Final Fabric Width: 9.38" (design) + 6" (border) = 15.38 inches
- Final Fabric Height: 5.94" (design) + 6" (border) = 11.94 inches
And there you have it. The calculator will tell you to cut a piece of Aida that’s roughly 15.5 by 12 inches. With these precise dimensions, you can cut your fabric with total confidence, knowing you have the perfect amount of space. Getting comfortable with these calculations is also a huge help when you start tackling more advanced cross stitch graphs down the road.
How to Figure Out How Much Floss You'll Actually Need

We've all been there—that sinking feeling when you realize you're about to run out of a crucial color with just a few hundred stitches left. It's the classic stitcher's nightmare. Fortunately, a good cross-stitch calculator can help you dodge this bullet by predicting your thread needs with impressive accuracy.
Estimating floss isn't quite as straightforward as calculating fabric size, though. The amount of thread you burn through depends on a bunch of factors, from the project itself to your own personal stitching habits. A quality calculator will prompt you for these details to give you the most reliable estimate.
What Determines Your Floss Usage?
To get a solid number, the calculator needs to know a few things about your project. The biggest variables are:
- Fabric Count: You'll use less thread stitching on 18-count Aida than you will on 11-count Aida. Why? The stitches are smaller, and the "legs" of the thread traveling across the back are shorter.
- Number of Strands: Most patterns call for two strands of floss, but if you're using three or four for better coverage, you'll obviously go through it faster.
- Your Stitching Style: How tightly you pull your stitches and how you carry your thread across the back of the fabric make a real difference. Calculators base their numbers on an average, but it’s a fantastic starting point.
All these details help determine how many stitches you can realistically get from a standard 8.7-yard skein of floss.
Think about it this way: a pattern with big, solid blocks of color is easy for a calculator to estimate. But what about a design full of "confetti stitches"—those scattered, individual stitches? You'll use way more thread because all the starting and stopping leaves more tails on the back.
This is exactly where a calculator shines, giving you a baseline for both simple and complex patterns. The demand for helpful tools like these is one reason the craft continues to grow. In fact, the global cross-stitch market was valued at USD 0.15 billion in 2024 and is still expanding, thanks in part to how accessible digital patterns and planning tools have become. You can dig into more details on the growth of the cross-stitch market if you're curious.
Even with the best calculator, I always recommend buying at least one extra skein of your main colors. A little peace of mind is worth it! And if you ever need to substitute a color, our guide to https://cross-stitched.com/blogs/what-is-cross-stitch/thread-color-conversion-chart can be a real lifesaver.
Taking Your Planning to the Next Level
Once you get the hang of the basics, a good cross-stitch calculator really starts to shine. It stops being just a tool for following a pattern and becomes a genuine creative partner, giving you the power to tweak, adapt, and customize your projects like never before.
One of the best advanced features is the ability to convert a pattern for a completely different fabric. Let's say you found a gorgeous pattern designed for 14-count Aida, but you've been dreaming of stitching it on a delicate 28-count linen for a more refined look. Just plug in the new fabric count, and the calculator instantly shows you how much smaller the finished piece will be. It’s a simple way to make any pattern fit your personal style.
How to "Shop" Your Fabric Stash
Here’s a fantastic trick I use all the time: plan your project in reverse. Instead of starting with a pattern you love, start with a beautiful piece of fabric from your stash that you're itching to use.
Enter your fabric's dimensions and the border size you want (a 3-inch margin is usually a safe bet). The calculator will then work its magic and tell you the maximum number of stitches that can fit on that fabric. This is a game-changer for a couple of reasons:
- Bust Your Stash: You can finally find the perfect small design for that oddly shaped leftover piece you couldn't bear to throw away.
- Stitch with Confidence: Browse for new patterns knowing exactly what size will work with the fabric you already have at home.
I lean on this "reverse calculation" method all the time, especially when I want to whip up a quick gift like an ornament or a stitched card. It completely removes the guesswork and makes sure those treasured fabric pieces don't just sit in a drawer.
Getting comfortable with these calculator tricks really opens up a world of possibilities. It gives you the confidence to plan more ambitious projects and explore advanced cross stitch techniques knowing your math is solid from the start.
The growing interest in needlecrafts shows just how important these planning tools have become. In fact, the market for needlecraft patterns is expected to grow by about 5% annually between 2025 and 2033. This trend is definitely helped by tools that make it easier for a new wave of stitchers to jump in. If you're curious, you can dig into the numbers in the full needlecraft market report.
Answering Your Cross Stitch Calculation Questions
Even the most seasoned stitchers run into questions when planning a new project. A good cross stitch calculator is a lifesaver, but a few common situations can still leave you second-guessing your math. Let's walk through the questions I hear most often so you can get your project set up perfectly from the very first stitch.
Getting these details right is what separates a smooth, enjoyable stitching experience from a frustrating one.
How Much Extra Fabric Do I Really Need for a Border?
This is, without a doubt, the number one question. The answer is simpler than you might think: a 3-inch border on all sides is your safest bet for most projects. It might seem like a lot, but that extra fabric is your best friend.
That generous margin gives your hoop or Q-snap frame plenty of room to grip without getting too close to your stitching area. Even more importantly, professional framers will thank you. They need that excess fabric to properly stretch and mount your masterpiece for a flawless, gallery-worthy finish.
- For most framed pieces: Stick with a 3-inch border. It's the professional standard for a reason.
- For small finishes like ornaments or cards: You can usually get away with a 2-inch border.
- For massive, heavy projects: Bumping up to a 4-inch border gives you extra security for mounting.
How Do I Calculate for Linen or Evenweave?
Stitching on linen or evenweave gives a project that beautiful, delicate look, but it often involves stitching "over two." This just means each of your cross stitches spans over two fabric threads instead of one block.
It sounds complicated, but the math is incredibly simple. All you have to do is divide the fabric's thread count by two.
For instance, if you're using a lovely 28-count linen and stitching over two, you'll enter "14" into the fabric count field on the calculator. This trick makes the calculator treat it just like 14-count Aida, giving you a perfectly accurate size calculation every time.
What if the Pattern Only Lists the Finished Size?
Every once in a while, you'll find a pattern that only gives you the final dimensions in inches or centimeters, not the stitch count. While you could try to reverse-engineer the numbers, it's always better to hunt down the actual width x height stitch count on the chart itself.
Why? Because a finished size is tied to the specific fabric count the designer used. If you want to stitch on 16-count Aida but the pattern's dimension is based on 14-count, your final piece will be a different size. The stitch count is the one true constant, allowing you to accurately recalculate the dimensions for any fabric you choose.
Ready to turn your favorite memories into a beautiful stitched masterpiece? At Cross Stitched, our custom kits make it easy. Just upload a photo, and we’ll send you everything you need—pre-sorted DMC threads, high-quality Aida fabric, and a clear pattern—to start creating. Start your personalized cross stitch project today!


