

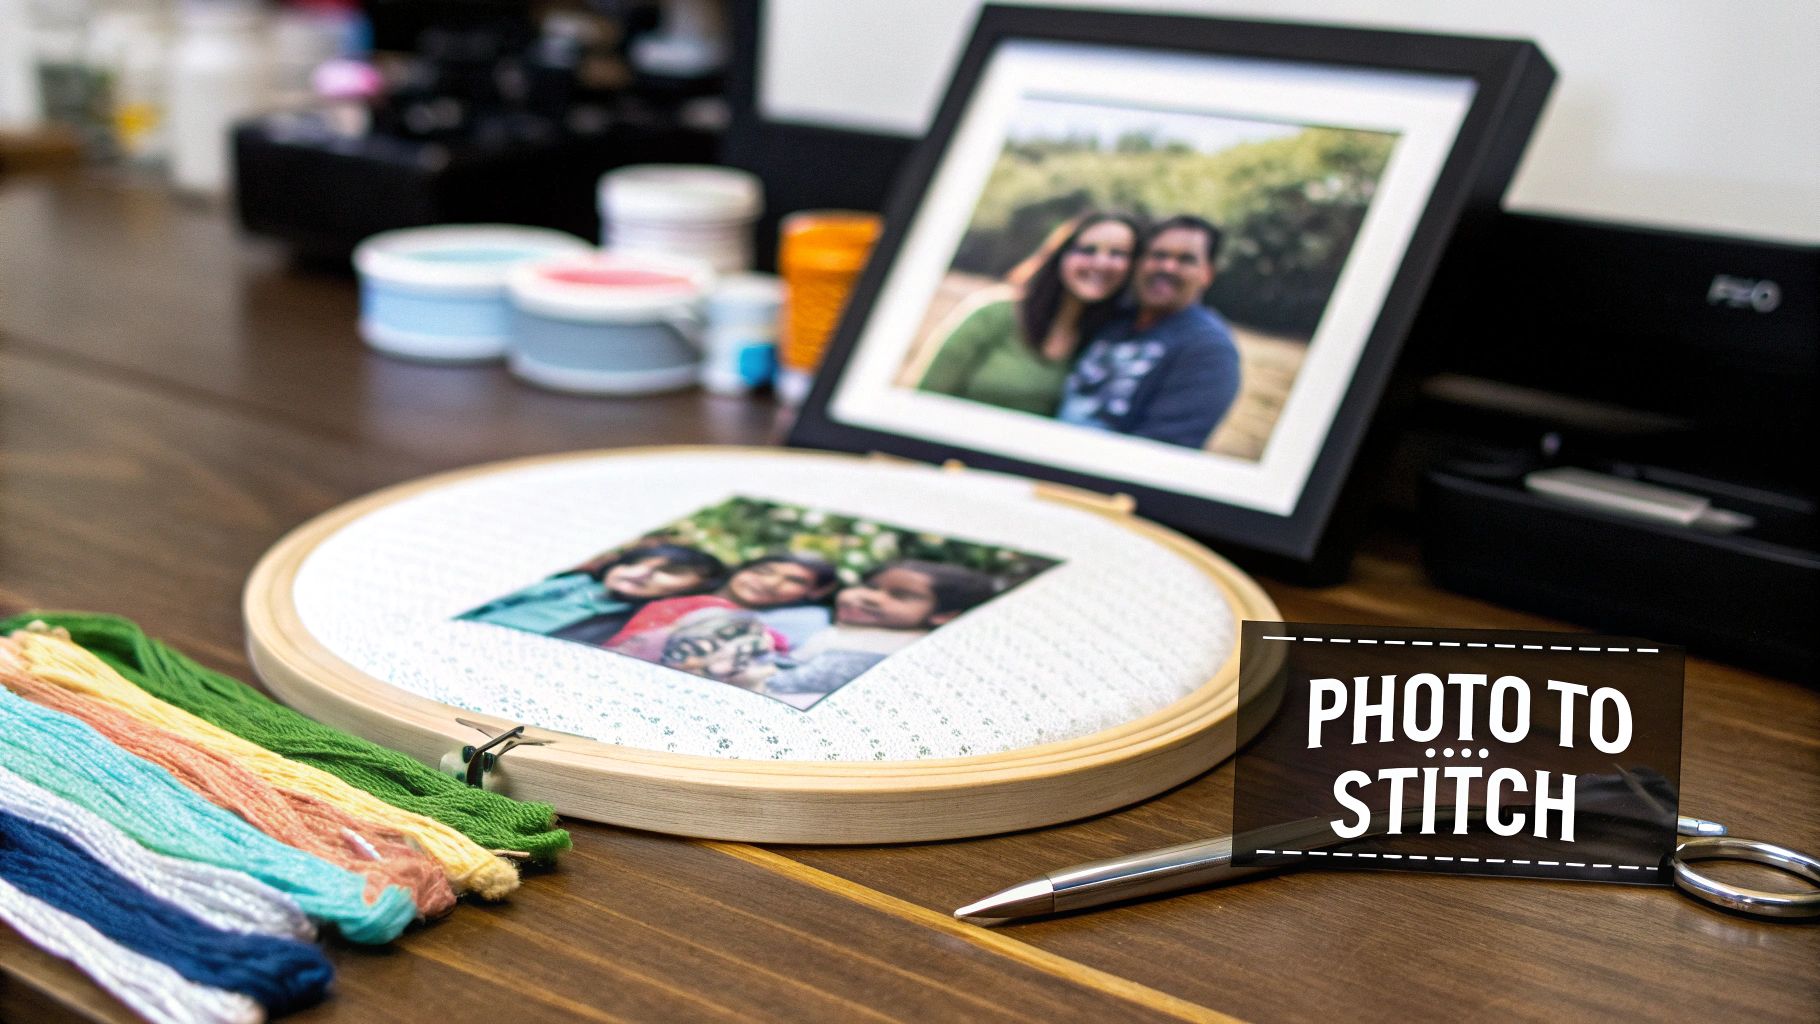
There's something truly special about taking a digital photo—a fleeting moment captured on a screen—and turning it into a tangible, handmade heirloom. The process is a fascinating mix of old and new: you use modern tools to convert your image into a stitchable pattern, then bring it to life with the timeless craft of a needle and thread.
Transforming Cherished Photos Into Stitched Art
 embroidery hoop displaying a photo to be cross-stitched, surrounded by colorful floss.">
Think about that one photo you absolutely love. Maybe it's a family portrait, a silly picture of your dog, or a breathtaking landscape from a memorable trip. Now, imagine recreating that image stitch by stitch, watching it emerge on the fabric. That’s the incredible result of turning a photo into a cross-stitch project. This guide is here to walk you through it all, from start to finish.
What makes these projects so meaningful is that they're deeply personal. You're not just following a generic pattern; every single stitch is part of a memory you already hold dear. It adds a whole new layer of love to the finished piece.
The Blend of Old and New
At its core, this craft is all about translation—turning digital pixels into physical stitches. We'll get into the nitty-gritty of what makes a good photo for cross-stitching, because the goal is a clear, vibrant piece, not a confusing mess of colors. I'll also break down the different tools you can use to make it happen.
You essentially have two main ways to tackle this:
- DIY Pattern Creation: You can use online generators or software to convert the image yourself. This gives you complete control over the size, the number of colors, and the level of detail in your final pattern.
- All-in-One Custom Kits: Alternatively, you can order a complete kit from a service like Cross Stitched. Their experts will handle the pattern conversion for you and send you a box with everything you need—the fabric, the pre-sorted floss, and the printed chart.
This guide will give you the foundation you need to dive into your first photo-to-stitch project with confidence. Once you understand the process, you'll be able to make choices that lead to a beautiful result you can't wait to show off.
Whether you've been stitching for years or are just picking up a needle for the first time, this is an incredibly rewarding and accessible project. Let's get started on the first steps.
Choosing the Right Photograph for Your Pattern
The success of your photo-to-cross-stitch project is pretty much decided before you even pick up a needle. It all comes down to the picture you start with. Think of it like building a house—if the foundation is shaky, it doesn't matter how well you build the rest; the whole thing will be wobbly.
A classic mistake is picking a photo purely for the sentimental value, ignoring its technical flaws. That fuzzy, dimly-lit picture from your favorite concert might mean the world to you, but it's going to translate into a muddy, undefined mess of stitches. The real trick is finding a photo that hits that sweet spot: full of meaning and visually ready to become a piece of art.
Start with High Resolution and Sharp Focus
Above all else, your photo has to be clear. High-resolution images pack in more digital information, and that's exactly what pattern-making software needs to create a detailed chart. A picture from a modern smartphone or a proper digital camera is almost always going to be better than one you've saved from social media. Platforms like Facebook and Instagram compress images heavily, often stripping out over 70% of the original detail.
Think of it this way: trying to stitch a detailed portrait from a low-resolution photo is like building a complex Lego sculpture using only big, chunky Duplo blocks. You lose all the nuance. A high-res photo, on the other hand, gives you all the tiny, specialized Lego pieces you need to capture the subtle curve of a smile or the glint in an eye. Make sure your main subject is tack-sharp, with no motion blur.
My Go-To Trick: Before committing to a photo, I always zoom way in on the most important parts, like faces or hands. If they dissolve into a blocky, pixelated mess when you magnify them, the resolution is probably too low for a great pattern.
Good Lighting and Strong Contrast are Your Best Friends
Lighting does more than just make a photo visible; it carves out shapes and creates depth. A picture taken in good, natural light shows off textures and defines edges—all things you want in a dynamic cross-stitch piece. Steer clear of photos with harsh, dark shadows that swallow up important features. The same goes for "blown out" shots with glaring bright spots, as these areas just turn into large, boring blocks of a single color.
Contrast is just as critical. We're talking about the difference between the light and dark parts of your image. A photo with good contrast makes your subject pop right out from the background.
Just imagine these two scenarios:
- Low Contrast: A white cat curled up on a cream-colored blanket in a dimly lit room. The colors are so similar they'll just blend into a washed-out, undefined blob in your pattern.
- High Contrast: That same white cat sitting on a dark green lawn in the bright morning sun. The sharp difference between the cat and the grass will create a clear, vibrant, and compelling stitched image.
A quick way to test this is to temporarily switch your photo to black and white. If you can still easily make out the subject and all its key details, you've probably got good contrast to work with.
A Few Simple Edits Can Make a Huge Difference
You don’t need to be a Photoshop pro to prep your image. Sometimes, a couple of small tweaks are all it takes to get your photo ready for conversion. The single most powerful edit you can make? Cropping.
By cropping your photo, you can get rid of busy, distracting backgrounds and put the focus squarely on what matters. Got a great shot of your kids, but the background is a messy living room? Crop in tight on their smiling faces. This not only makes for a better composition but also tells the pattern software to dedicate all those precious stitches and colors to the details you actually care about.
You can also try making small adjustments to the brightness and contrast. Most phones and computers have simple photo editing tools with easy-to-use sliders. Bumping up the brightness can reveal details lost in shadows, while a little boost in contrast can make the whole image more vibrant and defined. A few clicks here can set your project up for a truly stunning result.
To make things even clearer, here’s a quick checklist I use when I’m deciding on a photo.
Photo Selection Checklist for Cross Stitch
When you're staring at your camera roll, it can be tough to know which photo will translate best into stitches. This table breaks down what to look for versus what to run from.
| Characteristic | What to Look For (Ideal) | What to Avoid (Problematic) |
|---|---|---|
| Resolution & Clarity | Sharp, in-focus subject. High-resolution file from a camera or phone. | Blurry, pixelated images. Screenshots or photos saved from social media. |
| Lighting | Soft, natural light (e.g., outdoor shade, near a window). Evenly lit subject. | Harsh shadows, direct flash, "blown out" highlights, or very dim, yellow lighting. |
| Contrast | Clear difference between the subject and the background. A good range of light, mid, and dark tones. | Subject and background blend together. Washed-out or muddy colors. |
| Composition | Simple, uncluttered background. Subject is the clear focal point. | Busy or distracting backgrounds that compete with the subject. |
| Color | Rich, true-to-life colors that are distinct from one another. | Monochromatic scenes (e.g., all beige and white) which can look flat when stitched. |
Ultimately, a photo that ticks the "Ideal" boxes will give the pattern software much more information to work with, resulting in a more detailed and accurate cross-stitch chart.
Turning Your Photo Into a Workable Cross Stitch Pattern
This is where the real magic happens. You’ve picked the perfect photo, and now it’s time to translate that digital image into a tangible, stitchable blueprint. At this stage, you have a big decision to make: do you roll up your sleeves and create the pattern yourself with an online tool, or do you opt for the convenience of an all-in-one custom kit?
Both routes lead to a beautiful finished piece, but they appeal to different stitchers, timelines, and budgets. Let's dig into what each option really looks like so you can figure out the best path for your project.
The Do-It-Yourself Approach With Pattern Generators
If you’re the kind of stitcher who loves having total creative control, using a pattern generator is an incredibly rewarding choice. Free online tools, like the popular Pic2Pat generator (which is also featured on sites like Cross Stitched), let you upload your photo and instantly see how it translates into a cross-stitch chart.
This is your chance to play designer. These tools give you a handful of key settings to tweak, and each one has a direct impact on the final look and feel of your project.
You get to experiment with variables like:
- Fabric Count: You can select common Aida counts like 14, 16, or 18. This one setting determines the final size of your piece. A higher count, like 18-count, means smaller stitches and a more detailed, compact design.
- Pattern Size: Want it to fit a specific frame? You can set the finished dimensions in inches or centimeters, and the software will adjust the stitch count to match.
- Number of Thread Colors: This is arguably the most crucial setting. The tool analyzes your photo and suggests a palette of standard DMC floss colors needed to bring it to life.
Here's a quick look at how straightforward the interface is on a typical pattern generator.
As you can see, it’s designed to be simple. You upload your image and can immediately start playing with the settings to watch how the preview changes in real-time.
Playing with the color count is where your artistic vision really comes into play. If you go with a lower number of colors (say, under 25), you’ll get a more graphic, stylized, almost "posterized" effect. On the other hand, cranking it up to 40 or more colors will produce a much more photorealistic and nuanced piece with smooth gradients—but be warned, it will also be a far more complex and time-consuming stitch.
When you create a pattern from a photo, you’re essentially turning it into a form of data visualization. Each stitch represents a pixel of color, encoding a memory into a physical grid. It's a powerful way to preserve a moment in time.
It's fascinating to think about, right? This idea of cross stitch as data has even caught the eye of artists and data professionals. It turns out that stitching on 14-count fabric, which has 14 dots per inch (dpi), can create incredibly detailed visualizations that rival digital charts, which often operate at 72-300 dpi. Your photo project isn't just a craft; it's a unique data representation of a cherished memory. You can learn more about this cool intersection of craft and data by exploring how cross stitch has entered the world of data visualization.
The All-In-One Custom Kit Solution
If the idea of fiddling with settings and then hunting down all your own supplies sounds a bit overwhelming, or you'd just rather get straight to the stitching, ordering a custom kit is the perfect answer. This is the streamlined path where all the technical heavy lifting is done for you.
When you order a custom kit from a service like Cross Stitched, you just upload your photo, and their team of experts takes it from there. They'll professionally optimize your image, balance the color palette for the best blend of realism and stitchability, and generate a high-quality, easy-to-read pattern.
The biggest plus? You receive a complete package with everything you need to start the moment it arrives:
- A professionally printed color chart
- The correct size and count of Aida fabric
- All the necessary DMC embroidery floss, pre-sorted and labeled
- Tapestry needles
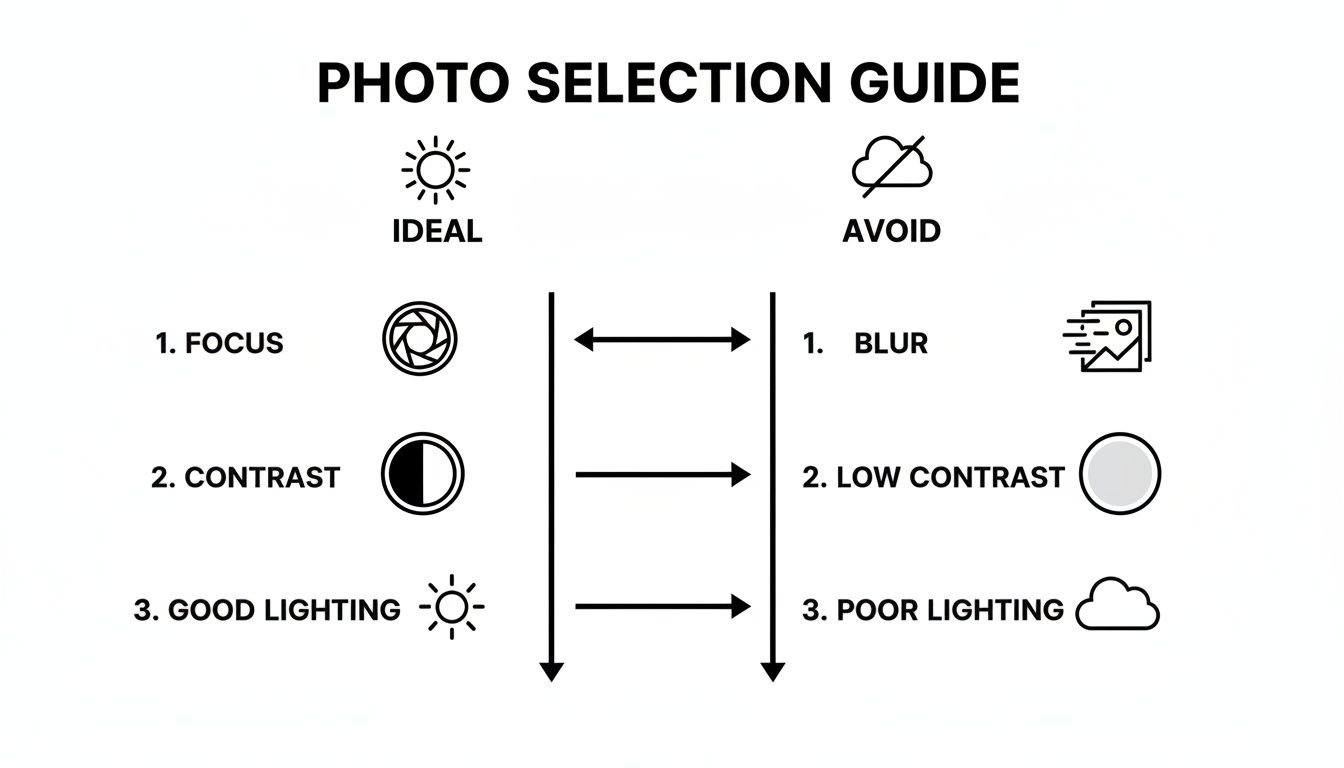
This infographic helps break down the core principles of what makes a good photo for a pattern, whether you’re going DIY or ordering a kit.
Just as the guide shows, a clear focus, good lighting, and strong contrast are the building blocks that ensure your digital photo can be successfully translated into a beautiful stitched pattern.
Going with a custom kit completely removes the guesswork. You won't have to second-guess whether you picked the right number of colors or worry about running out of a specific shade of thread mid-project. It's an excellent choice for beginners, for anyone stitching a gift against a deadline, or for stitchers who simply want to guarantee a professional-quality result without any trial and error.
In the end, it all comes down to what you enjoy more: the hands-on, customizable experience of being the designer, or the convenient, expertly-prepared project that's ready to go right out of the box.
Getting Your Cross Stitch Gear Together
Alright, with your pattern in hand, it's time for the fun part: gathering your supplies. This is where your picture starts to feel like a real project. Whether you're raiding a well-stocked craft stash or starting from scratch, having the right tools is the key to a great experience.
If you ordered a custom kit, you're pretty much set. Those usually come with the fabric, all the floss, and needles you'll need. But if you’ve generated your own pattern, think of this as your personalized shopping list.
Your Fabric: The Foundation of Your Project
The fabric you choose is literally the canvas for your art, and for photo projects, my go-to is almost always Aida cloth. That perfect, even grid of holes is exactly what you need for consistent, beautiful stitches.
The main thing you need to decide on is the fabric "count"—which is just a fancy way of saying how many stitches fit into one inch.
- 14-count Aida: This is a fantastic starting point, especially if you're new to this. The squares are bigger and easier on the eyes, giving your project a classic, bold cross stitch look.
- 16-count Aida: This is a popular sweet spot. It strikes a great balance between being easy to work with and allowing for more detail than 14-count.
- 18-count Aida: For those really detailed photo patterns, 18-count is king. The stitches are smaller, which lets you pack in more detail. The final result looks smoother and less "pixelated," more like a true photograph.
Just remember, a higher count like 18 means a smaller, more detailed finished piece. A lower count like 14 will give you a larger piece with more visible stitches. Your pattern software probably suggested a count, and honestly, it’s a good idea to trust it.
Choosing Your Thread
When it comes to embroidery floss, DMC six-strand cotton is the gold standard for a reason. It's high-quality, doesn't fade, and feels great to stitch with. But most importantly, its color numbering system is the universal language of cross stitch. The codes on your pattern will match the DMC skeins in the store perfectly.
Your pattern should give you a complete list of every DMC color number required, along with an estimate of how many skeins you'll need. Don't be surprised if a complex photo project calls for 30 to 50 different colors—all those subtle shades are what create the magic.
Quick tip from experience: This is not the project to save a few cents on off-brand thread. DMC's color consistency is absolutely critical for photo stitching. You need those shades to match perfectly to create the smooth, realistic gradients that make these pieces so stunning.
The Essential Stitching Tools
Beyond the basics of fabric and thread, a few other tools will make your life so much easier and your stitching so much better.
-
Tapestry Needles: These are different from regular sewing needles. They have a blunt tip that glides through the holes in your Aida without splitting the fabric threads, and a nice big eye that makes threading floss less of a chore. For most projects, a size 24 needle works great for 14-count Aida, and a size 26 is perfect for 16 and 18-count.
-
Embroidery Hoops or Q-Snaps: You absolutely have to keep your fabric tight for even stitches. A classic wooden or plastic hoop is perfectly fine. For bigger projects, though, a lot of us swear by a Q-Snap. It's a square frame that holds the fabric taut from all sides and is really comfortable to hold.
-
Sharp Scissors: A small, dedicated pair of sharp scissors is a must. Good embroidery scissors will snip your floss cleanly, preventing frayed ends. This makes a huge difference in how neat the back of your work looks, and it makes threading the needle a lot less frustrating.
Nice-to-Have Accessories
Once you have the essentials, a few extras can really level up your stitching game, especially when you're juggling dozens of colors for a photo pattern. A magnetic needle minder that sits on your fabric is a lifesaver for keeping track of your needle when you pause. And a thread organizer or a set of floss bobbins is practically a necessity to stop that mountain of colors from turning into a tangled mess.
If you're curious about other gadgets that can make stitching even more enjoyable, we've got a whole guide on helpful cross stitch accessories.
Bringing Your Photo to Life, One Stitch at a Time
You've got a beautiful pattern and all your supplies are laid out. Now for the best part—bringing your photo to life with a needle and thread. This is where your careful technique will transform a simple grid of squares into a stunning, recognizable image.
Before you make a single stitch, though, let's get you set up for success. Finding the exact center of your fabric is crucial. The easiest trick is to fold your Aida cloth in half lengthwise, then fold it again widthwise. The corner where the folds meet is your center point. I like to mark it with a pin or a tiny dot from a water-soluble pen. Your pattern will have arrows marking its center, too. Start your first stitch right there, and you’ll guarantee your design ends up perfectly positioned.
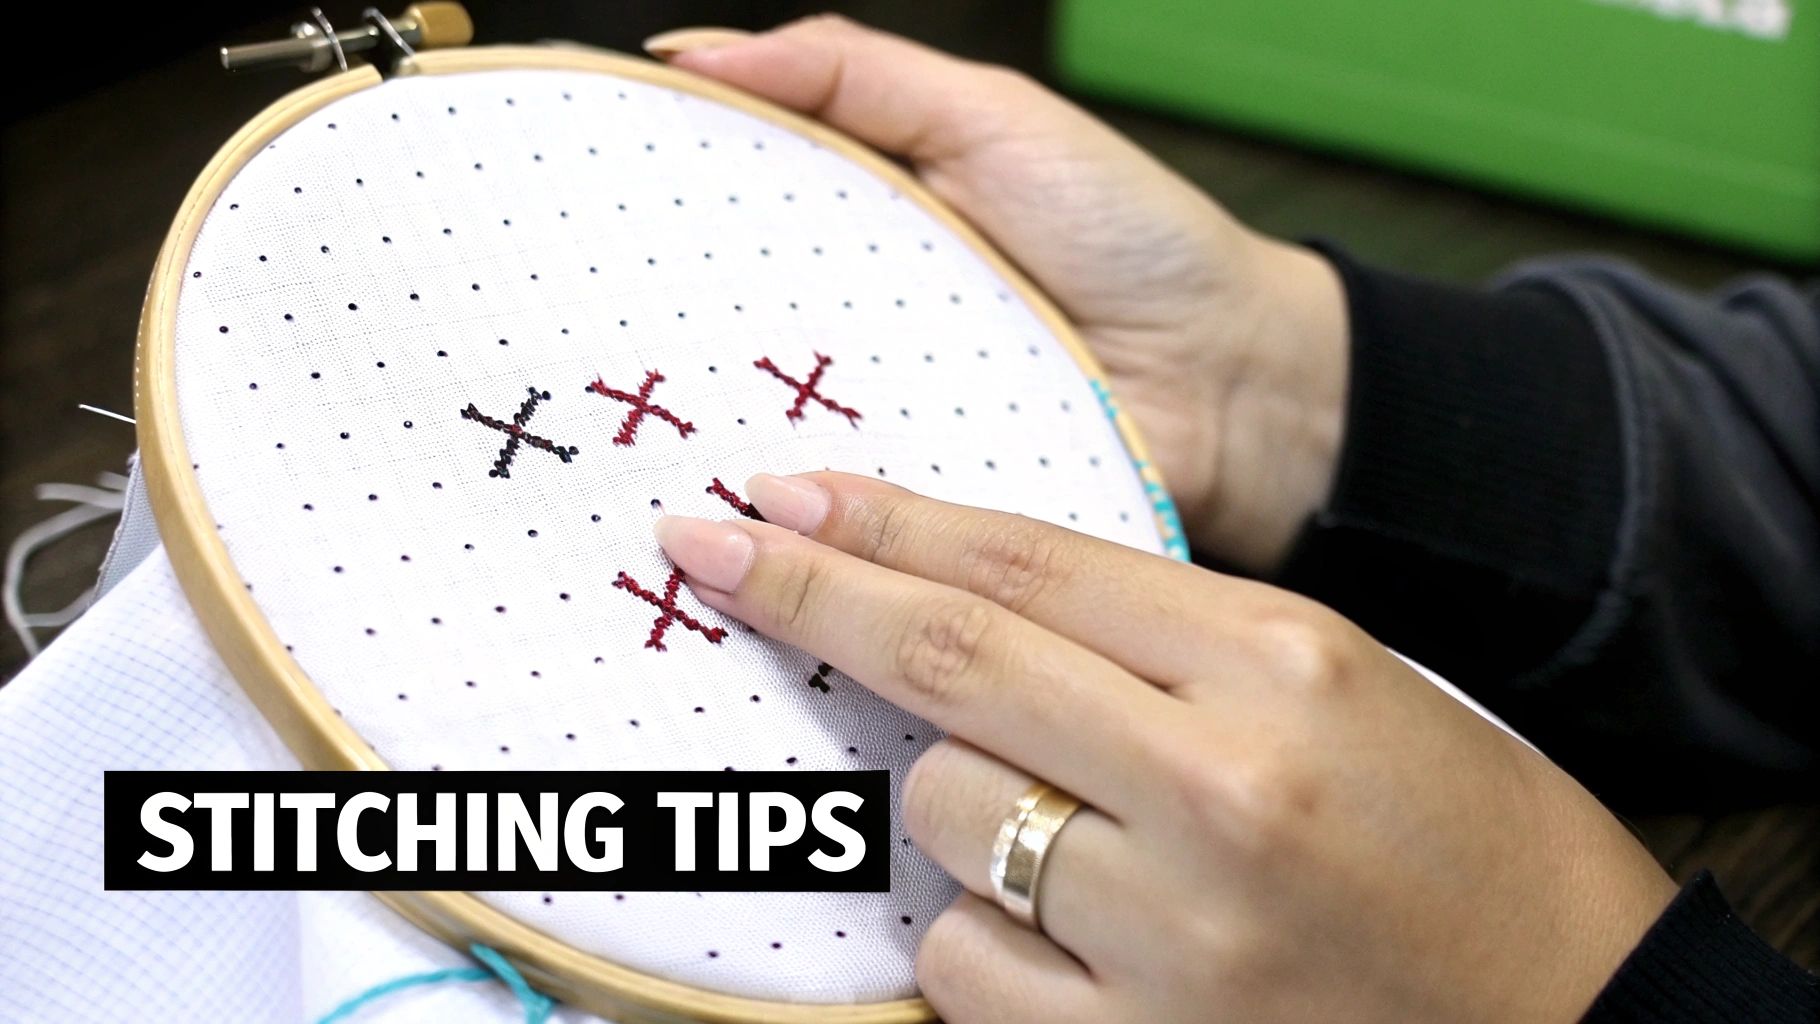
The Secret to a Flawless Finish
The beauty of cross stitch is its simplicity, but the real magic comes from consistency. Every single stitch is just two little diagonal lines forming an "X." The secret to a polished, professional look is making sure the top leg of every "X" faces the same direction across the entire piece.
For instance, maybe you always stitch the bottom leg from bottom-left to top-right (/), and the top leg from bottom-right to top-left (). Stick with it! This one tiny detail has a massive impact on how the light hits your finished work, creating a smooth, even texture that lets those subtle color changes really shine.
Taming the 'Confetti' Stitches
Photo-to-cross-stitch projects are famous for something stitchers affectionately call "confetti." This just means you have lots of single, isolated stitches of one color scattered around an area, almost like they were sprinkled on. They're absolutely essential for creating the shading and detail that makes a piece look like a real photo, but they can feel a bit fiddly.
Here are a couple of ways to tackle them:
- As you go: Stitch each confetti stitch as you come across it in the pattern. This can feel a little slow, but it guarantees you won't miss any.
- Save them for later: Some people prefer to stitch the larger blocks of color first, then go back and dot in all the confetti stitches at the end. It's really a matter of personal preference!
No matter which method you choose, remember that managing dozens of colors is part of the unique joy of this kind of project. Cross stitch has been evolving for over 2,500 years, with some of its earliest roots traced to Egypt around 500 AD. After a huge resurgence in the 1960s, its timeless appeal is still going strong.
Smart Thread Management
With so many color changes, the back of your work can get a little wild if you're not careful. When confetti stitches are just a couple of squares apart, it's fine to carry the thread across the back. If they're any further than that, you're better off ending the thread and starting fresh. This avoids long, loopy "floats" that can get snagged or even show through to the front.
For really complex patterns, many stitchers swear by a technique called "parking." This is where you stitch all of one color in a small area, then bring the needle up in the first square where that color appears next. You then "park" that threaded needle on your fabric while you work with another color. It’s a fantastic way to keep your threads organized and ready to go. If you're ready to level up your skills, our guide on advanced cross stitch techniques is a great next step.
Troubleshooting Common Hiccups
Even the most seasoned stitchers run into a few snags. Here’s how to handle some common issues you might face when you cross stitch from a photograph.
- Tangled Floss: Nine times out of ten, this is because your thread is too long. I’ve learned the hard way to stick to lengths no longer than 18 inches. If a knot does form, try to gently coax it out with the tip of your needle before it pulls tight.
- Uneven Stitches: If some of your stitches look tight and others look loose, it's a tension issue. The best fix is to use an embroidery hoop or a Q-snap frame to keep your fabric evenly taut. You're aiming for stitches that lie flat against the fabric without puckering the Aida.
- Oops, I Made a Mistake: It happens! Realizing a stitch is in the wrong spot is frustrating but totally fixable. I carefully use the eye of my needle or a seam ripper to gently lift and snip the incorrect stitch from the front. Then, I flip my work over and use tweezers to pull out the leftover bits of floss from the back.
Finishing and Framing Your Stitched Artwork
You’ve placed that very last stitch, and your incredible photo is now fully realized in thread. Take a moment and celebrate! Now comes the final, transformative stage: finishing and framing. This is where your project goes from a beautiful piece of stitching to a genuine heirloom, so a little care here goes a long way.
Giving Your Project a Gentle Clean
After all those hours of handling, your fabric has probably picked up some oils from your hands or maybe a little dust. Giving it a quick, gentle bath is the first step to making it look its absolute best.
Fill a clean sink or basin with lukewarm water and just a drop of a mild, clear dish soap. Submerge your project and swish it around gently. Let it soak for about 15 minutes, then give it a good rinse under cool, running water until you're sure all the soap is gone.
Whatever you do, don't wring it out! That can distort the stitches. Instead, lay the piece flat on a thick, clean towel, put another towel on top, and roll the whole thing up like a burrito. Press down firmly to squeeze out the excess water.
Pressing and Preparing for Display
Once your piece is just damp, it's time for a good press. Lay it face down on a fresh, fluffy towel and iron it from the back using a medium heat setting. The towel is key here—it acts as a cushion, protecting your stitches and stopping them from getting flattened, so they keep all their lovely texture and definition.
Now that your work is clean and crisp, you’ll want to mount it. This keeps the fabric taut and prevents any wrinkling inside the frame. I always recommend using acid-free foam core for this. It's an archival-quality material that won't yellow or damage your fabric over time, which is crucial for preserving your work.
There are a couple of ways to secure your fabric to the board. You can use stainless steel pins around the edges, but my preferred method is lacing. You essentially stitch back and forth across the back of the foam core, pulling the fabric tight. It creates perfectly even tension and is the gold standard for preservation. For a full tutorial, we have a complete guide on how to finish your cross stitch projects like a pro.
Choosing the right frame is just as important as the stitching itself. Your frame shouldn't compete with your artwork; it should complement it. A simple, clean frame often works best for a detailed cross stitch from a photograph, letting the image be the star.
Selecting the Perfect Frame
When you're looking at frames, think about the dominant colors in your stitched photo and the decor of the room where you plan to hang it. You can almost never go wrong with a simple black or a natural wood frame—they're classic for a reason.
I also highly recommend adding a mat. It creates a small air gap between your fabric and the frame's glass, which is vital for preventing any potential moisture buildup and protecting your stitches from being squashed.
With your masterpiece framed, all that's left is finding the perfect spot for it. For some great pointers on getting it just right, this guide on how to hang pictures perfectly is a fantastic resource. Following these final touches ensures your hard work is preserved and beautifully displayed for everyone to enjoy for years to come.
Got Questions About Stitching From a Photo? Let's Get Them Answered.
When you decide to turn a treasured photo into a cross stitch project, it's natural for a few questions to come up. Getting these sorted out from the start can save you a ton of hassle and help you create a piece you'll be truly proud of. Let's dive into some of the most common things people ask.
The fabric you choose is one of the first, and most important, decisions you'll make. It sets the stage for everything that follows, influencing both the final size and how much detail you can pack in.
What Fabric Count Is Best for Photo Projects?
For a project where detail is king, you'll want to reach for 16-count or 18-count Aida fabric. A higher count means the little squares in the fabric are smaller, so your stitches are tinier and packed closer together. This is the secret to getting that smooth, almost painted look that makes a finished piece look just like the original photo.
Sure, 14-count Aida is a fantastic choice for many projects and is often where beginners start, but the individual 'X' stitches will be more obvious. If you're ordering a custom kit, the experts have usually already figured this out for you, selecting the perfect count based on your photo and the size you want.
The number of thread colors you use is just as important as the fabric. This choice directly controls the realism of your project, turning a simple grid into a nuanced piece of art.
How Many Thread Colors Do I Really Need?
It's all about finding that perfect balance. A great starting point for most photo-to-cross-stitch patterns is somewhere between 30 and 50 different colors. This range gives you enough of a palette to create those subtle color shifts and capture fine details without making the project a nightmare to manage.
Here’s a quick guide to what you can expect from different color counts:
- Fewer than 25 colors: The result will be more graphic or "posterized." It's a cool stylistic choice, but not quite photorealistic.
- 30-50 colors: This is the sweet spot. You get fantastic realism, and the project stays fun and manageable.
- Over 60 colors: You can achieve mind-blowing detail with this many shades, but be prepared for a serious challenge in both time and complexity.
Most pattern generators and custom kit services will aim for that 30-50 color range because it consistently delivers the best results.
Can I Stitch a Black and White Photo?
You absolutely can! Black and white photographs make for incredibly striking cross stitch art. The process is exactly the same, but instead of a rainbow of colors, your pattern will use a carefully selected palette of greys, black, and white to create shading, depth, and contrast. It's a wonderful way to create a classic, timeless piece. For the best outcome, choose a black and white photo that already has strong contrast and a good range of tones.
Ready to turn your favorite photo into a masterpiece? Cross Stitched makes it easy with all-in-one custom kits containing everything you need to start stitching your memories.


