
Embroidery is a timeless art form that transforms simple fabric and thread into stunning works of art, personal keepsakes, and stylish embellishments. The secret to creating beautiful, textured designs lies in mastering the fundamental stitches that form the foundation of this craft. Whether you're a complete novice ready to thread your first needle or a seasoned stitcher looking to refine your technique, understanding the different types of embroidery stitches is crucial for bringing your creative visions to life.
This comprehensive guide is designed to be your go-to resource, breaking down seven of the most essential and versatile stitches in needlepoint. We will move beyond basic definitions to provide you with practical implementation details, actionable tips, and creative examples for each one. You'll learn how to execute everything from the foundational Running Stitch for simple outlines to the decorative French Knot for adding intricate texture.
By exploring the specific uses and unique characteristics of each technique, you'll gain the confidence to tackle any project. You will discover how to choose the right stitch for outlining, filling, and adding dimensional details. Let’s dive into the core stitches that will unlock your potential and elevate your embroidery projects from simple to spectacular.
1. Running Stitch
The running stitch is the cornerstone of hand embroidery, a simple yet profoundly versatile technique that every stitcher, from novice to expert, relies on. It consists of a line of small, straight stitches that move forward, with consistent gaps between each one. Think of it as the needle "running" through the fabric. Its simplicity is its greatest strength, making it the foundational stitch from which many other different types of embroidery stitches are built.

This stitch is perfect for creating clean outlines, adding delicate texture, or forming the base for more complex composite stitches like the threaded or whipped running stitch. Because it uses minimal thread, it's also ideal for basting fabric pieces together temporarily before sewing.
When to Use the Running Stitch
The running stitch is incredibly adaptable, serving both functional and decorative purposes. Its application spans across numerous embroidery styles and projects.
- Outlining and Lettering: Its clean, linear nature makes it perfect for defining shapes and stitching text.
- Quilting and Basting: In quilting, it's used to hold layers of fabric together. In garment making, it's used for temporary seams.
- Decorative Patterns: The Japanese art of Sashiko uses the running stitch to create stunning geometric patterns on indigo fabric.
- Filling Spaces: When worked in dense, parallel rows, it can be used to fill in large areas, creating a unique, textured effect.
Actionable Tips for a Perfect Running Stitch
Mastering this fundamental stitch requires attention to detail. Consistent tension and spacing are key to achieving a professional and polished look.
Key Insight: The true artistry of the running stitch lies in its rhythm. Aim for uniform stitch length and gap size to create a clean, cohesive line that enhances your design rather than distracting from it.
Here are a few tips to elevate your technique:
- Maintain Consistency: Strive to make each stitch and the space between them the same length for a neat, uniform appearance. Using a hoop will help maintain even fabric tension.
- Vary for Effect: Don't be afraid to play with stitch length. Long, expressive stitches can create a modern, minimalist feel, while tiny, seed-like stitches add delicate detail.
- Work Direction: For right-handed stitchers, working from right to left can offer better control and visibility of your stitch line.
2. Backstitch
The backstitch is a foundational technique prized for creating solid, unbroken lines, making it one of the most important different types of embroidery stitches for outlining and detail work. Unlike the running stitch, it forms a continuous, rope-like line by working backward. Each new stitch begins ahead of the previous one and then goes back into the fabric at the end of the last stitch, eliminating any gaps. This method produces clean, precise lines essential for professional-looking embroidery.
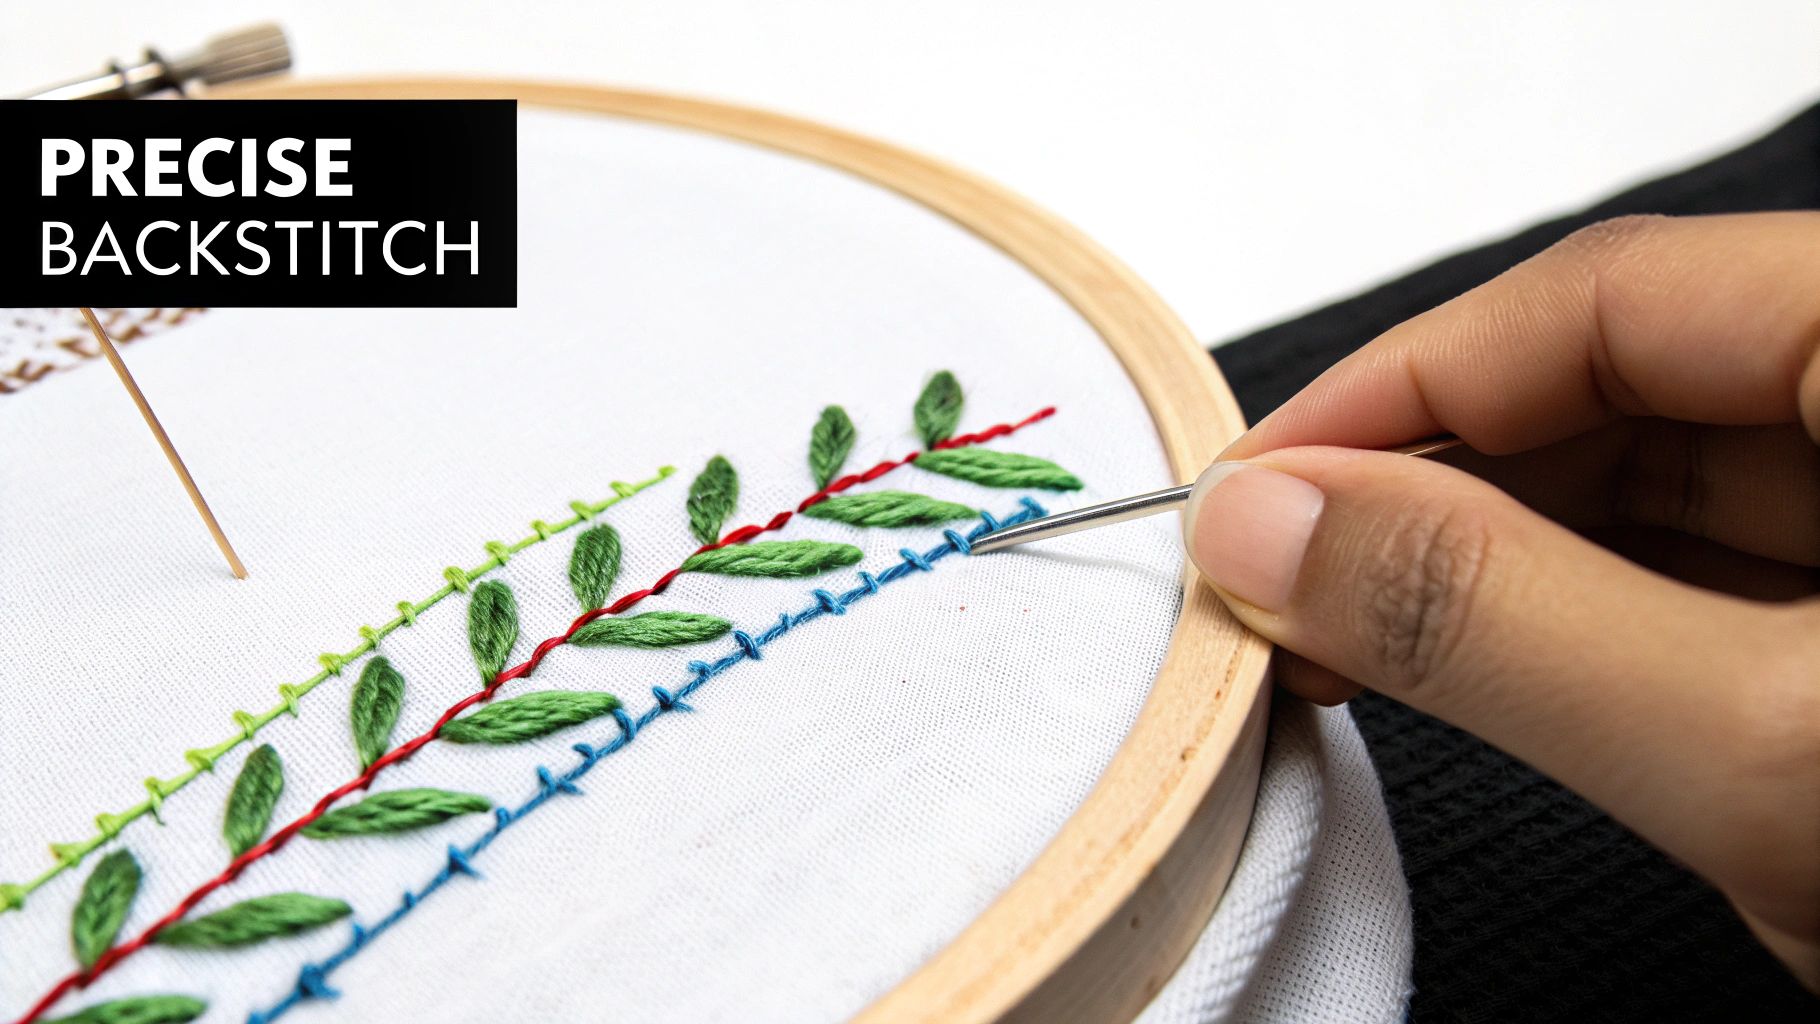
This stitch is incredibly strong and stable, providing structure to designs and ensuring text is crisp and legible. Its versatility makes it a staple in countless embroidery forms, from the intricate patterns of Blackwork to modern hand-lettering projects that demand clarity and precision. The Royal School of Needlework and celebrated author Mary Thomas have long championed its importance.
When to Use the Backstitch
The backstitch is the go-to choice for any element that requires a clear, defined, and continuous line. Its strength and neat appearance make it suitable for a wide range of applications.
- Outlining and Details: It excels at defining the borders of shapes in Crewel work or adding sharp details to floral and figurative designs.
- Text and Lettering: Its solid line is perfect for embroidering names, quotes, or monograms, ensuring every letter is easily readable.
- Blackwork Embroidery: This traditional style relies heavily on the backstitch to create its intricate, geometric patterns.
- Cross-Stitch Finishing: It is frequently used to outline cross-stitched areas, adding definition and making the design pop. Understanding which needle to use is crucial for this; discover more about selecting the right size needle for cross-stitch to perfect your technique.
Actionable Tips for a Perfect Backstitch
Achieving a flawless backstitch hinges on precision and consistency. The goal is to create a line so smooth it could be mistaken for a single, drawn line.
Key Insight: The secret to a perfect backstitch is treating it like a chain. Each stitch should link seamlessly to the last, creating a unified line where individual stitches are barely distinguishable.
Follow these tips to refine your backstitch:
- Keep Stitch Length Consistent: For straight lines, maintain a uniform stitch length to create a smooth, even appearance. A consistent rhythm is key.
- Use Shorter Stitches for Curves: When working on tight curves or circles, shorten your stitch length. This prevents the line from looking jagged or angular and helps it flow smoothly.
- Mark Guidelines: For text or complex geometric patterns, use a water-soluble fabric marker to draw guidelines first. This will ensure your lines are straight and perfectly placed.
- Manage Tension: Pull each stitch snug enough to lie flat against the fabric, but not so tight that it puckers the material. Consistent tension is vital for a professional finish.
3. French Knot
The French knot is a classic decorative stitch that creates small, raised dots on the fabric, adding dimension and intricate texture to any embroidery project. This technique is achieved by wrapping the thread around the needle one or more times before pulling it back through the fabric very close to its original entry point. Its ability to create beautiful, poppy-like accents makes it a favorite among the many different types of embroidery stitches for adding detail and visual interest.

This stitch is incredibly versatile; it can be used sparingly as a delicate accent or grouped together to create a richly textured, filled area. The size of the knot can be easily adjusted by changing the number of thread strands or the number of times the thread is wrapped around the needle.
When to Use the French Knot
The French knot excels at creating texture and small, impactful details. Its three-dimensional nature makes it stand out on the fabric surface.
- Floral Details: It's perfect for creating the centers of flowers, like daisies and poppies, or for stitching small buds like lavender.
- Adding Accents: Use it to create eyes on figures, polka dots on clothing, or stars in a night sky.
- Textured Fills: When stitched close together, French knots create a dense, bumpy surface ideal for filling in areas like sheep's wool, treetops, or decorative letters.
- Traditional Styles: It is a hallmark of French provincial embroidery and is often found in traditional samplers to add intricate details.
Actionable Tips for a Perfect French Knot
Creating a neat and uniform French knot can be tricky at first, but with practice, it becomes second nature. The key is controlling the thread tension throughout the stitch.
Key Insight: The secret to a successful French knot is to pull the needle through the wraps slowly and steadily while holding the working thread taut. This prevents the knot from collapsing or becoming tangled.
Here are a few tips to elevate your technique:
- Maintain Tension: As you wrap the thread around the needle, hold the working thread taut with your non-dominant hand. Keep this tension until the needle has pulled the thread completely through to the back.
- Don't Re-enter the Same Hole: Insert the needle back into the fabric very close to, but not in, the exact same hole you came up from. This prevents the knot from pulling through to the back.
- Pull Straight: After inserting the needle back into the fabric, pull it straight down. This helps form a tight, well-defined knot on the surface.
4. Satin Stitch
The satin stitch is celebrated for its ability to create a smooth, lustrous surface, making it one of the most elegant different types of embroidery stitches. It involves laying a series of straight stitches parallel and close to one another, completely filling a designated shape. The result is a solid, silk-like block of color with a beautiful sheen, which is why its mastery is often seen as a hallmark of a skilled embroiderer.
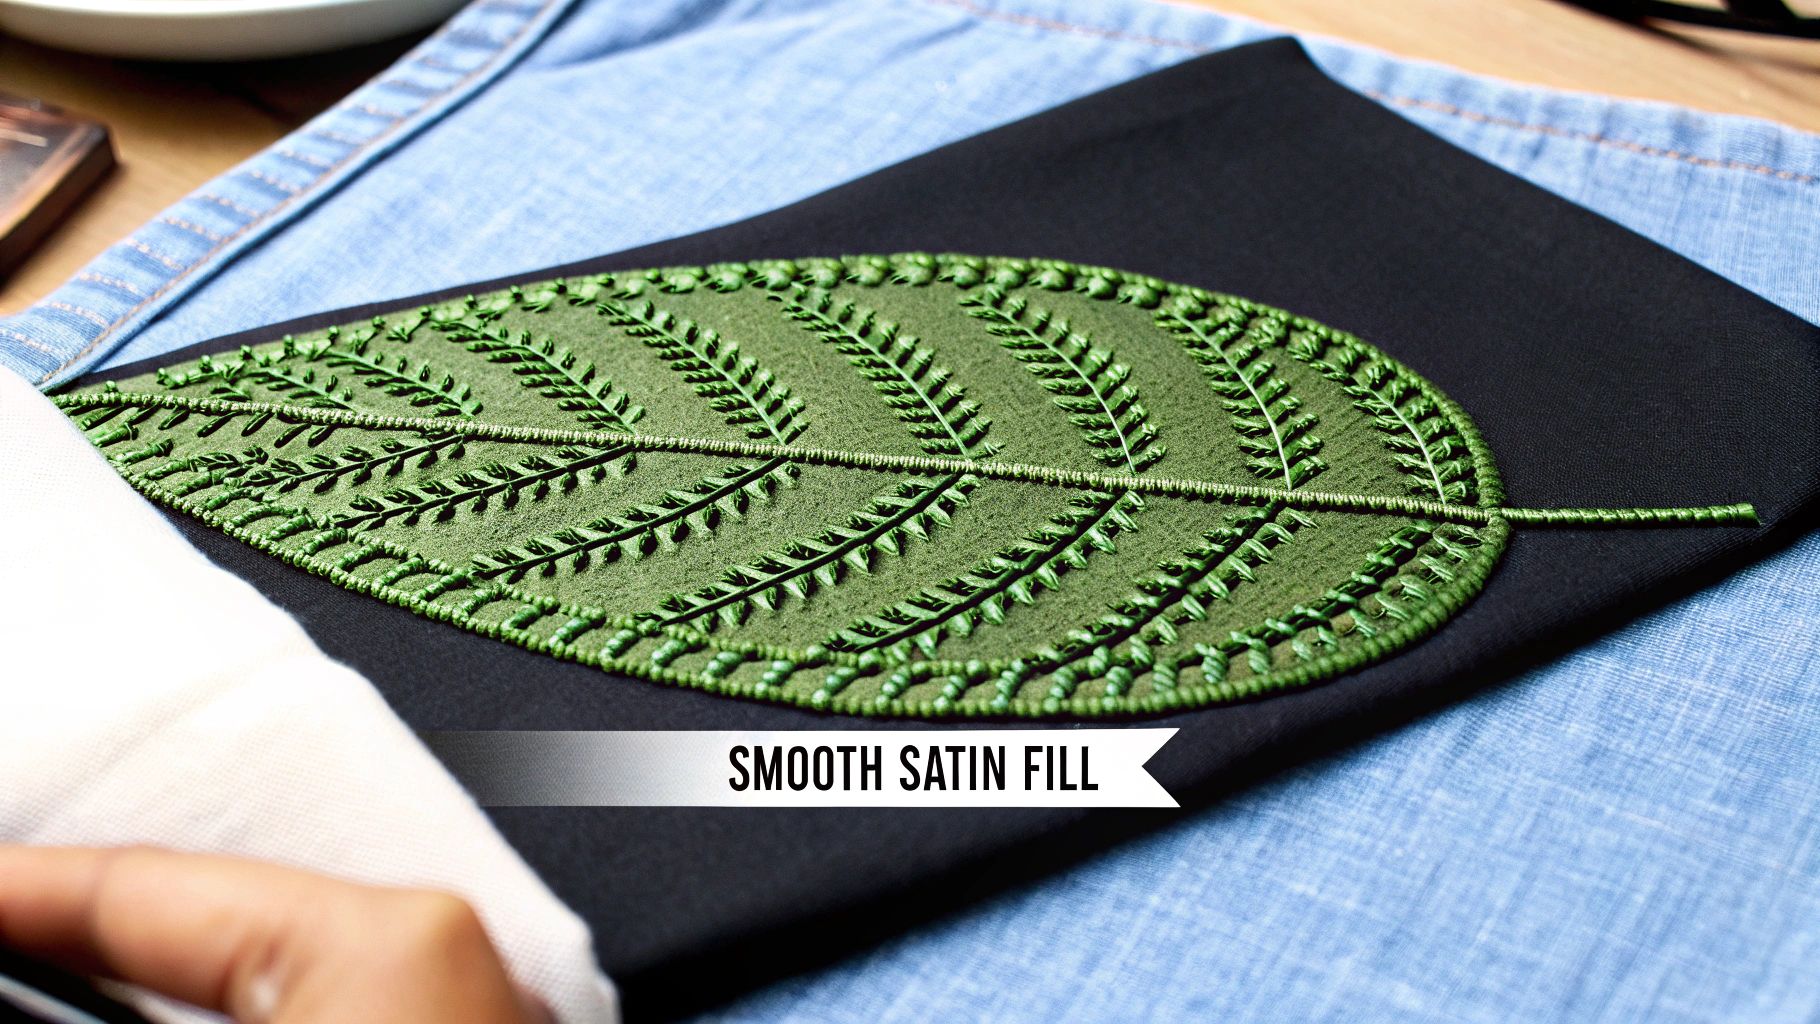
This stitch is perfect for bringing designs to life, adding dimension and a polished finish to elements like flower petals, leaves, monograms, and lettering. Its reflective quality catches the light beautifully, making the filled areas stand out with a rich, vibrant appearance. The key is to ensure the stitches lie flat and uniform without any fabric showing through.
When to Use the Satin Stitch
The satin stitch is primarily a decorative filling stitch, chosen when a design calls for a solid, glossy area of color. Its applications are common in both traditional and modern embroidery.
- Monograms and Lettering: It provides the smooth, professional finish required for elegant initials and text.
- Floral and Botanical Elements: It is ideal for filling leaves and flower petals, giving them a realistic, vibrant sheen.
- Corporate Logos: Machine embroidery often uses satin stitch to replicate the clean, solid colors found in company logos.
- Fine Needlework: It is a cornerstone of techniques like Madeira embroidery and traditional Chinese silk embroidery, where smooth texture is paramount.
Actionable Tips for a Perfect Satin Stitch
Achieving a flawless satin stitch requires patience and precision. The goal is to create an unbroken, even surface where individual stitches blend together seamlessly.
Key Insight: The secret to a perfect satin stitch is not just placing stitches close together, but managing the tension and angle of each one. A clean edge, often created with a split stitch outline, acts as a guide and prevents the satin stitches from becoming uneven.
Here are a few tips to elevate your technique:
- Create a Guide: Before you begin, outline your shape with a split stitch or backstitch. This creates a slightly raised edge to tuck your satin stitches under for a crisp, clean border.
- Maintain Parallel Lines: Each stitch must lie perfectly parallel to the last. Avoid pulling the thread too tight, which can pucker the fabric and create gaps between stitches.
- Work Consistently: Start at one edge of the shape and work your way methodically to the other. This helps maintain a consistent angle and prevents the stitches from slanting. Proper floss management is also key; exploring a thread color conversion chart can help you select the best shades for a smooth gradient effect.
5. Chain Stitch
The chain stitch is a foundational decorative stitch that forms a textured, rope-like line by creating a series of connected loops. This ancient technique, found in embroidery traditions worldwide, involves the needle passing back through the previous loop to secure it, creating an unbroken chain. Its versatility and visual impact make it one of the most essential different types of embroidery stitches for any stitcher’s toolkit.
This stitch is highly prized for its ability to create bold, continuous lines that flow gracefully around curves and corners. It works up relatively quickly compared to other outline stitches and can also be used as a filling stitch when worked in close, parallel rows, creating a beautiful, woven texture.
When to Use the Chain Stitch
The chain stitch's distinctive look lends itself to a wide range of applications, from intricate details to large, filled-in areas. It is a cornerstone of many cultural embroidery styles.
- Bold Outlines and Borders: It creates a more substantial line than the running stitch or backstitch, making it ideal for defining the edges of a design.
- Filling Areas: When stitched in tight rows, it forms a solid, textured fill perfect for petals, leaves, and other organic shapes.
- Lettering: Its continuous, flowing nature is perfect for creating beautiful cursive and script lettering.
- Cultural Embroidery: It is a hallmark of many traditional styles, including Indian Chikankari embroidery and colourful Art Nouveau designs. Practice this stitch with some free embroidery patterns for beginners to see its full potential.
Actionable Tips for a Perfect Chain Stitch
Achieving a beautiful, even chain stitch relies on consistent loop size and gentle tension. A fluid rhythm is key to making your lines look seamless and professional.
Key Insight: The magic of the chain stitch is in the tension. Pulling the thread too tight will cause the loops to pucker and disappear, while keeping it too loose will result in an untidy line. Aim for a soft, even pull that allows each loop to lie flat against the fabric.
Here are a few tips to elevate your technique:
- Maintain Consistent Loops: Strive to make each loop the same size and shape. This is crucial for creating a smooth, uniform line, especially on curves.
- Anchor Securely: Ensure the very first loop is started correctly and the final loop is anchored with a tiny straight stitch over it to prevent the entire line from unravelling.
- Don't Pull Too Tight: Avoid pulling your working thread too taut as you form each loop. This will flatten the "chain" and ruin the distinctive looped texture.
- Practice Curves: Before tackling a complex design, practice stitching curves on a piece of scrap fabric. This will help you master the control needed to guide the chain stitch smoothly around bends.
6. Blanket Stitch
The blanket stitch is a beloved looped stitch that serves both a functional and decorative purpose, creating a neat, reinforced edge along fabric. Originally conceived to prevent the edges of blankets from fraying, this stitch has become a staple in the world of needlecraft for its clean finish and charming appearance. It is formed by a series of straight stitches along an edge, with a perpendicular loop of thread securing each stitch at the top.
This stitch is not just for edges; it’s one of the most useful different types of embroidery stitches for appliqué, attaching one piece of fabric to another with a decorative and secure border. Its versatility also extends to creating outlines, filling shapes with texture, and even forming buttonholes.
When to Use the Blanket Stitch
The blanket stitch is highly adaptable, transitioning seamlessly from a practical edging technique to a key decorative element in various embroidery projects.
- Appliqué: It is the go-to stitch for neatly and decoratively attaching fabric shapes, like felt cutouts, onto a base fabric.
- Edge Finishing: Its primary use is to secure the raw edges of fabrics like fleece and wool, preventing unraveling while adding a polished look.
- Decorative Borders: Stitched along an outline within a design, it creates a bold, textured border that can define shapes or frame a motif.
- Felt Crafts and Ornaments: It is essential for joining two pieces of felt together to create stuffed ornaments, toys, and other three-dimensional items.
Actionable Tips for a Perfect Blanket Stitch
Achieving a professional-looking blanket stitch depends on maintaining evenness in both the height and spacing of your stitches. A steady hand and consistent rhythm are crucial.
Key Insight: The beauty of the blanket stitch is in its uniformity. Focus on making the vertical "posts" of the stitch parallel and the horizontal "loops" consistently taut to create a border that looks both handcrafted and impeccably neat.
Here are a few tips to elevate your technique:
- Consistent Spacing and Height: Use the fabric's weave or a water-soluble marker to guide your stitch placement, ensuring each stitch is the same height and an equal distance from the last.
- Cornering: To navigate a sharp corner, work three stitches into the same hole at the corner point. The first will finish the first side, the second will form the corner point, and the third will begin the next side.
- Thread Choice: Use a contrasting thread color to make your stitches a prominent design feature. For a more subtle effect, match the thread to your fabric.
- Work Direction: Most right-handed stitchers find it easiest to work from left to right, allowing a clear view of where the next stitch should be placed.
7. Lazy Daisy Stitch
The lazy daisy stitch is a charming, detached chain stitch that creates delicate, petal-like loops on the fabric's surface. Each stitch is formed individually, consisting of a single loop of thread that is secured at its open end with a tiny anchor stitch. This simple construction makes it one of the most beloved and recognizable different types of embroidery stitches for creating floral and organic motifs.
This stitch is a go-to for adding quick, decorative elements to any project. Arranged in a circle, a few lazy daisy stitches instantly form a flower. Used individually, they can represent leaves, teardrops, or even small decorative flourishes. Its ease of execution and beautiful results make it a favorite for both beginners and seasoned stitchers.
When to Use the Lazy Daisy Stitch
The lazy daisy stitch is predominantly used for decorative purposes, especially where natural, flowing shapes are desired. Its application is widespread in adding whimsical detail to various textiles.
- Floral and Botanical Designs: Its primary use is creating flowers and leaves in cottage garden or Scandinavian folk embroidery styles.
- Decorative Accents: It’s perfect for adding small, pretty details to vintage-style linens, pillowcases, and handkerchiefs.
- Children's Clothing: The sweet, simple look of the lazy daisy is ideal for embellishing kids' clothes, bibs, and blankets.
- Filling Small Areas: When clustered together, these stitches can fill small shapes with a unique, loopy texture that differs from traditional satin or long-and-short stitches.
Actionable Tips for a Perfect Lazy Daisy Stitch
Achieving a beautiful, uniform lazy daisy requires a gentle touch and an eye for placement. The key is to control the loop's shape and tension to create soft, rounded petals.
Key Insight: The beauty of the lazy daisy is in its softness. Avoid pulling the loops too tight; the goal is to create a rounded, teardrop shape, not a taut, straight line. The final anchor stitch is what defines the petal's tip.
Here are a few tips to elevate your technique:
- Vary Loop Sizes: For a more natural and dynamic look in floral arrangements, intentionally vary the size and angle of your lazy daisy loops. This mimics the organic imperfection found in nature.
- Gentle Anchoring: When making the small anchor stitch at the tip of the loop, be careful not to pull it too tightly. A tight anchor stitch will distort the loop's rounded shape.
- Combine with Other Stitches: Create more complex and detailed flowers by combining lazy daisy petals with other stitches. A French knot or a cluster of seed stitches makes a perfect flower center.
Basic Characteristics Comparison of 7 Embroidery Stitches
| Stitch | Implementation Complexity 🔄 | Resource Requirements ⚡ | Expected Outcomes 📊 | Ideal Use Cases 💡 | Key Advantages ⭐ |
|---|---|---|---|---|---|
| Running Stitch | Very low 🔄 | Very low ⚡ | Basic dashed lines, versatile foundation | Beginners, outlining, filling, simple decorative patterns | Easy, quick, minimal thread, highly versatile |
| Backstitch | Moderate 🔄 | Moderate ⚡ | Strong, continuous, clean lines | Text embroidery, detailed line work, structural seams | Professional finish, durable, excellent for curves |
| French Knot | High 🔄 | Low to moderate ⚡ | Raised, textured dots | Accents, small filled areas, floral/textural accents | Adds dimension, versatile sizing, visually striking |
| Satin Stitch | High 🔄 | High ⚡ | Smooth, lustrous filled areas | Filling letters, leaves, flowers, polished design elements | Bold, professional finish, excellent coverage |
| Chain Stitch | Moderate 🔄 | Moderate ⚡ | Connected loop lines, bold and visible | Outlining, borders, curved lines, decorative variations | Fast, bold lines, good thread coverage |
| Blanket Stitch | Moderate 🔄 | Low to moderate ⚡ | Functional decorative edge, prevents fraying | Edging blankets, appliqué, buttonhole finishes | Prevents fraying, decorative, easy to maintain |
| Lazy Daisy Stitch | Low to moderate 🔄 | Low ⚡ | Individual petal-shaped loops | Floral designs, scattered motifs, organic shapes | Quick, charming floral effects, beginner-friendly |
Stitch Your Story: Putting Your New Skills into Practice
You have just navigated a foundational tour of some of the most versatile and essential embroidery stitches in any crafter's toolkit. From the simple, elegant line of the running stitch to the bold, textural pop of a French knot, each technique offers a unique way to translate an idea into thread and fabric. We have explored the structural integrity of the backstitch for crisp outlines, the smooth, luxurious finish of the satin stitch for filling shapes, and the decorative potential of the chain and blanket stitches for creating dynamic borders and textures.
Mastering these different types of embroidery stitches is not just about memorizing movements; it is about building a visual language. You now possess the fundamental vocabulary to create everything from delicate floral motifs with lazy daisy stitches to intricate, layered landscapes that combine multiple techniques. The true value lies in understanding how these individual stitches work together to form a cohesive, beautiful whole.
From Knowledge to Mastery: Your Actionable Next Steps
The journey from learning a stitch to mastering it is paved with practice. The key is to move from theory to application with intention and curiosity. Here are some practical ways to solidify your new skills and build confidence:
- Create a Stitch Sampler: Before starting a large project, dedicate a small piece of fabric to practicing each stitch. This low-pressure exercise allows you to perfect your tension, experiment with stitch length, and see how different thread counts affect the final look. Label each stitch on your sampler for a handy future reference.
- Deconstruct and Replicate: Look at embroidery work you admire online or in person. Try to identify the stitches used. Can you spot the backstitch in a piece of lettering? The satin stitch in a filled-in leaf? This "reverse engineering" sharpens your eye and deepens your understanding of practical application.
- Experiment with Combinations: The real magic begins when you start combining stitches. Try outlining a shape with a backstitch and filling it with a satin stitch. Create a flower using lazy daisy stitches for petals and French knots for the center. This playful experimentation is where you will discover your unique artistic style.
The Broader Impact: More Than Just a Hobby
Embroidery is a powerful medium for self-expression and a mindful practice that connects you to a long lineage of artisans. Each stitch is a deliberate, focused action, offering a quiet escape from the digital noise of modern life. By investing time in learning these techniques, you are not just acquiring a new skill; you are unlocking a sustainable and deeply rewarding way to create personalized art, upcycle clothing, and craft meaningful, handmade gifts that carry a piece of you within their threads. The possibilities are truly as limitless as your imagination.
As you continue your journey, remember that every stitcher was once a beginner. Embrace the learning process, celebrate your progress, and never be afraid to try something new. You are now equipped with the foundational skills to stitch your own story, one thread at a time.
Ready to transform a personal memory into a tangible work of art? Cross Stitched specializes in creating custom, all-in-one embroidery and cross-stitch kits from your own photos. Put your newfound knowledge of these different types of embroidery stitches into practice on a project that truly matters by visiting Cross Stitched to start designing your personalized kit today.


