
When you're just starting out, the best cross stitch patterns free for beginners are usually on the smaller side. Look for simple designs that use full stitches and stick to a limited color palette—fewer than 20 colors is a great starting point. Grabbing a free pattern is the perfect, low-risk way to dip your toes into this incredibly calming hobby. You can learn the ropes without spending a dime.
Your Journey Into Cross Stitch Starts Here
Welcome to the wonderfully relaxing world of cross stitch! If you’ve ever looked at a beautifully stitched piece and thought, "I could never do that," I'm here to tell you that you absolutely can. Think of it like painting by numbers, but with thread. All it takes is a needle, some fabric, and a little bit of patience.

Kicking things off with cross stitch patterns free for beginners is a fantastic way to begin. It takes the pressure off buying a pricey, complicated kit and lets you focus on one thing: the pure joy of creating something with your own two hands. The rhythmic motion of stitching is incredibly soothing, making it a perfect way to unwind and unplug from the stresses of the day.
Why This Hobby Is So Accessible
One of the best things about cross stitch is that you don't need a fancy studio or a ton of expensive gear. You can honestly get everything you need to start for under $20. This low barrier to entry is a huge reason why it’s become so popular.
In fact, craft industry surveys from 2023 found that the hobby has attracted over 30 million global hobbyists, with free patterns being a huge part of that growth. A whopping 70% of new stitchers said they got their start with a free downloadable pattern, usually a simple design they could finish in just a few evenings. If you're curious, you can explore more 2023 cross stitch trends to see how the craft is changing.
There’s nothing quite like the feeling of watching an image slowly appear on a blank piece of fabric. It's a wonderful creative outlet that rewards your patience with a tangible piece of art you can hang on your wall or give as a thoughtful, handmade gift.
Cross stitch is more than just a craft; it's a form of active meditation. The focus it demands allows your mind to quiet down, providing a genuine sense of peace and accomplishment with every completed 'X'.
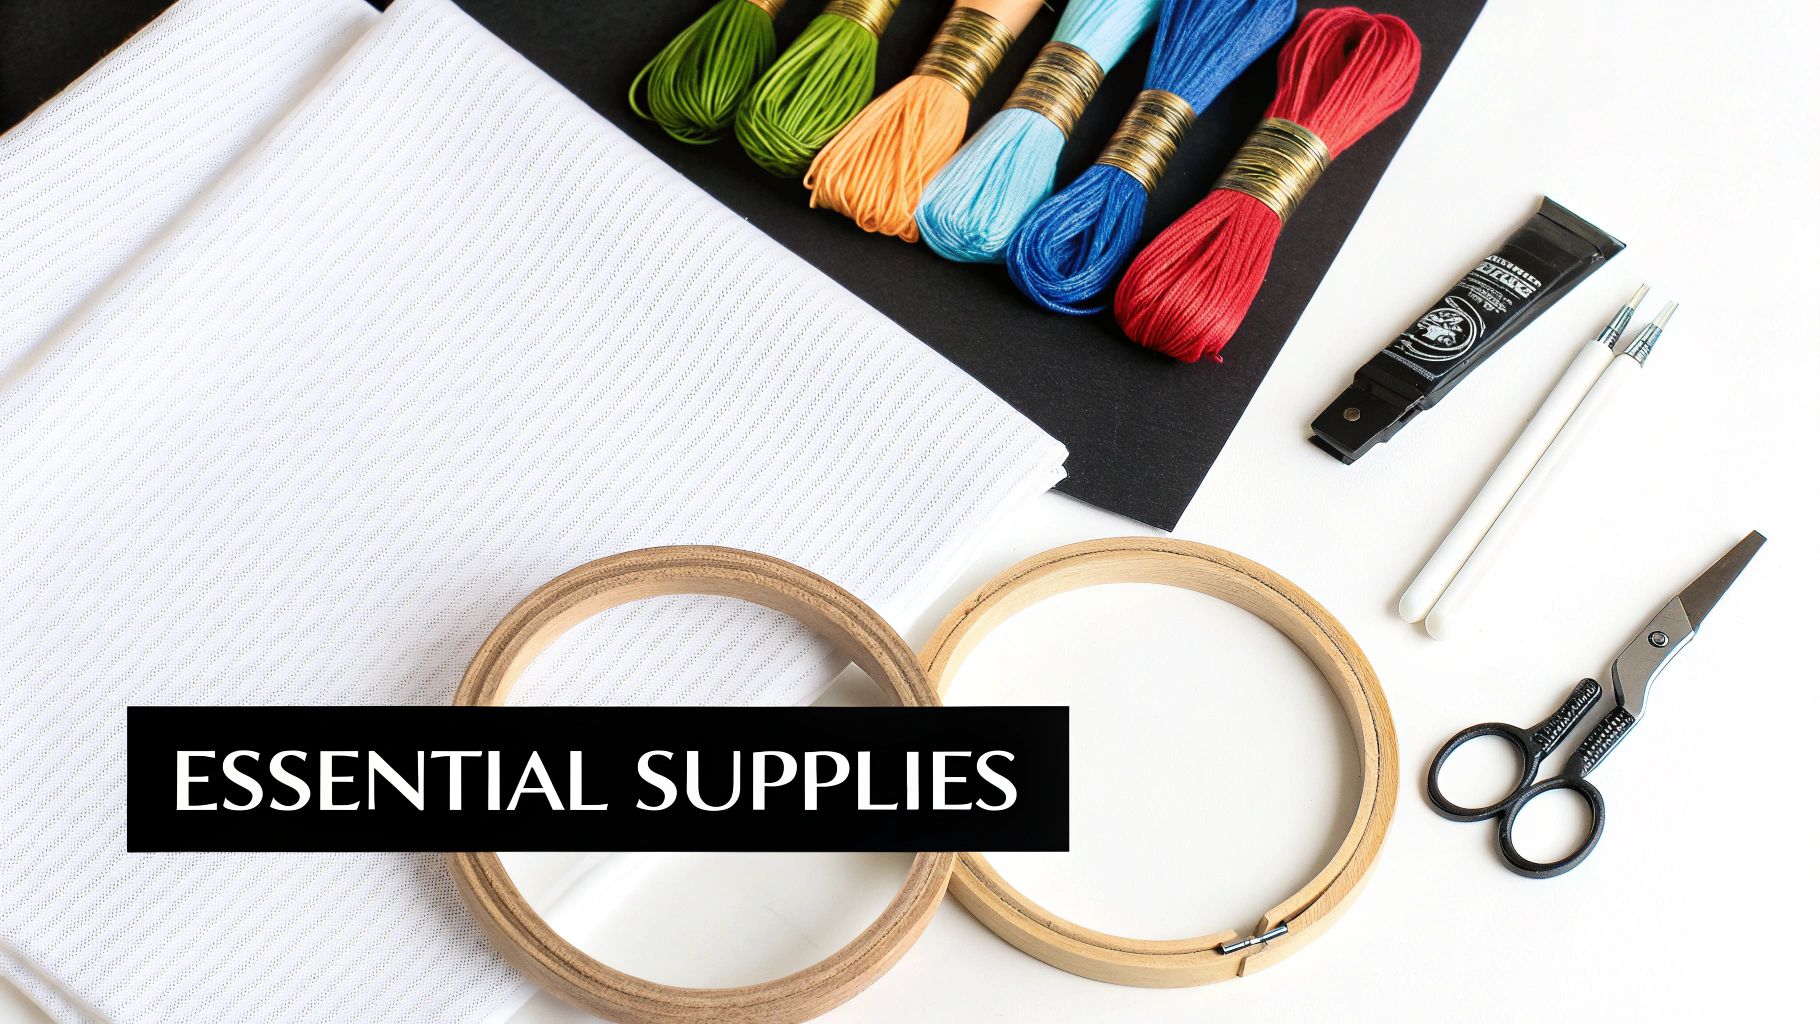
Before you can start stitching, you'll need to gather a few basic supplies. This simple shopping list covers the absolute must-haves for your first project.
Your First Cross Stitch Shopping List
Here's a quick rundown of the essential supplies you'll want to have on hand before diving into your first free cross stitch pattern.
| Supply Item | What It's For | Beginner-Friendly Tip |
|---|---|---|
| Aida Fabric | The gridded fabric you stitch on. | Start with 14-count Aida in a light color; the holes are easy to see. |
| Embroidery Floss | The colored thread used to create the design. | DMC brand is the standard, and its color numbers match most patterns. |
| Tapestry Needle | A blunt-tipped needle for stitching. | A size 24 tapestry needle works perfectly with 14-count Aida fabric. |
| Embroidery Hoop | Holds the fabric taut for even stitches. | A 5" or 6" wooden or plastic hoop is a great starting size. |
With these few items, you'll be all set to tackle your first piece.
This guide is here to walk you through everything, building your confidence and excitement for the skills you're about to learn. So, let's get your creative journey started
Choosing Your First Pattern: A Beginner's Guide
Jumping into cross-stitch is a fantastic feeling, but let's be honest—not all patterns are beginner-friendly. Picking the right first project is a bit like learning to cook; you start with a simple recipe that guarantees a win, not a five-course meal that ends in a kitchen fire. The whole point is to find a design that builds your confidence and gets you hooked.
Think of this first pattern as your training ground. It's where you'll get the hang of holding the needle, figure out how to make those neat little 'X's, and watch a picture magically appear from your stitches. A massive pattern with a zillion colors can be overwhelming, but a simple one feels like a fun puzzle you can't wait to solve.
The goal here is to finish your first piece and feel that rush of "I made this!" That's the feeling that will have you eagerly reaching for your next project. So, let's talk about what makes a pattern perfect for someone just starting out.
Keep the Color Count Low
One of the quickest ways to spot a great beginner pattern is to check how many colors it uses. Every time you switch colors, you have to stop, cut your thread, re-thread your needle, and find the new spot on your fabric. It's a normal part of the process, but juggling a huge palette right away can be a real headache.
Look for a pattern that uses fewer than 20 different colors. You'll find tons of beautiful, modern designs that use only 5-10 colors and look amazing. This lets you get into a nice, relaxing stitching rhythm instead of constantly stopping to change threads.
A small color palette doesn’t equal a boring design! It often creates a clean, graphic style that really pops—perfect for your first piece.
Stick to Full Stitches Only
The "cross" in cross-stitch is that basic 'X' you'll be making over and over again. But as you get more experienced, you'll find patterns that mix in other types of stitches to add fine details and texture. For now, it's best to steer clear of those.
When you're browsing patterns, look for ones that say "full stitches only." This means you won't have to worry about tackling these more advanced techniques just yet:
- Fractional Stitches: These are quarter (¼) or three-quarter (¾) stitches that help create smooth curves. They can be a bit fiddly to get right on Aida fabric when you're new.
- Backstitching: This is basically a simple line stitch used to outline shapes or add text. It's not super hard, but it's one less thing to worry about on your first go.
- French Knots: These are tiny, decorative knots used for details like eyes or polka dots. Honestly, they can frustrate even seasoned stitchers, so save them for later!
By choosing a pattern with only full stitches, you can focus all your attention on getting your 'X's looking neat and even. That's the most important skill to build right now. We've actually curated a whole collection of designs perfect for this in our guide to easy cross stitch patterns for beginners.
Go for a Small, Manageable Size
Your first project should feel doable, not like a marathon you didn't sign up for. A giant, wall-sized masterpiece might be your ultimate goal, but starting with one can quickly lead to burnout. Instead, find a pattern that's small and sweet.
A fantastic size for a beginner project is anything under 50x50 stitches. On the most common beginner fabric (14-count Aida), that works out to be just under 4x4 inches. This is the perfect size for a few reasons:
- Quick Wins: You can actually finish it in a weekend or a few evenings, which is incredibly motivating.
- Budget-Friendly: It uses very little fabric and thread, so it’s a low-cost way to try out the hobby.
- Easy to Handle: A small piece of fabric is so much easier to hold in your hands or manage in a little hoop.
Finishing a small design quickly gives you that awesome boost of confidence and leaves you with a finished piece you can be proud of right from the start.
How to Read a Cross Stitch Chart Like a Pro
Staring at a cross-stitch pattern for the first time can feel a little intimidating. It looks like a secret code—a grid packed with strange symbols, numbers, and lines that don't seem to have anything to do with the beautiful picture on the cover. But here's the secret: it's not a code, it's a map. And once you learn to read it, you can tackle any project with confidence.
Think of the chart as a direct, one-to-one blueprint for your Aida fabric. Every single square on that paper grid corresponds to one square on your fabric's weave. The symbol inside each square simply tells you which color of floss to use for a single 'X' stitch in that exact spot. That's it!
This visual breaks down the key things to look for in a good beginner pattern, which almost always have the easiest charts to follow.
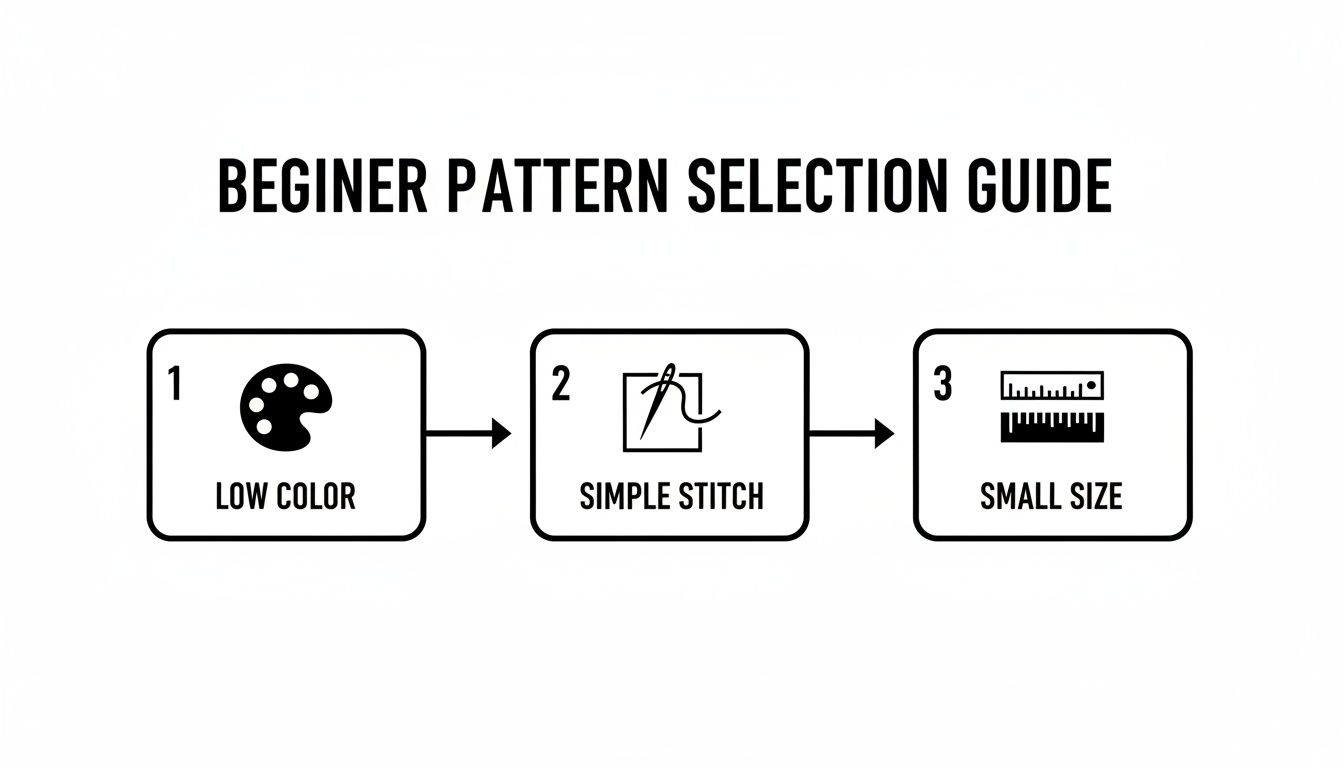
As you can see, the easiest charts to read come from patterns with a low color count, simple stitches (no fancy stuff!), and a small overall size.
Decoding the Pattern Key or Legend
Every map needs a key to make sense of it, right? In cross stitch, we call this the legend or symbol key. This is your personal translator. It’s a little table, usually tucked away on the side of your chart, that lists every symbol in the pattern and tells you exactly what it means.
Your typical legend will have three main columns:
- Symbol: This shows the unique character you'll see on the grid, like a tiny heart, a star, or just a letter.
- Color Number: This gives you the specific thread number. Most of the time, this will be a DMC number. For example, the symbol '●' might mean you need to grab your skein of DMC 310, which is black.
- Color Name/Swatch: This column often gives the color's name (like "Christmas Red") and sometimes includes a small colored box to give you a quick visual.
This is exactly why sticking with a well-known thread brand like DMC is a game-changer for beginners. Their numbering system is the universal language of cross stitch, so you can be sure the colors you buy will perfectly match what the designer intended.
Pro Tip: Before you even thread your needle, take a good look at the entire legend. It gives you a fantastic overview of how complex the pattern is and how many colors you'll be juggling.
Finding the Center of Your Universe
One of the most crucial steps before you make a single stitch is finding the center of both your fabric and your pattern. Why is this so important? Because starting in the middle guarantees your design will be perfectly centered on the fabric. No more crooked finishes or awkward framing!
Most patterns make this easy for you by marking the center with arrows or darker lines along the top and side. Where those lines meet, that's your starting point. To find the center of your fabric, just fold it in half lengthwise and make a soft crease. Then, fold it in half the other way and crease it again. The point where the two creases cross is the dead center.
I like to mark this spot on my fabric with a pin or a water-soluble marker. Now you're ready to make your very first stitch in the corresponding center square on your chart! This simple trick helps you avoid that dreaded moment when you run out of fabric before you've finished the design—a classic rookie mistake we've all made.
Getting Your Stitching Supplies Together
Okay, so you've found a free beginner cross-stitch pattern that you’re excited about. Awesome! The next step is getting your hands on the right tools. Having the proper supplies really is the secret sauce to a fun, relaxing stitching session instead of a frustrating tangle.
Think of it like baking a cake for the first time—following the recipe and using the right ingredients makes all the difference. We're not just going to give you a shopping list; we’ll explain why each item is important. Knowing your tools will help you start your new hobby with confidence.
The Best Fabric for Beginners: Aida Cloth
Your fabric is the canvas for your art, and for a beginner, there's nothing better than Aida cloth. It's the go-to for a reason. This fabric is specially woven into a grid of little squares with very obvious holes, making it incredibly simple to create neat, even "X" stitches every single time.
Aida fabric comes in different "counts," which just means how many squares fit into one inch. For your first project, 14-count Aida is the ideal choice. The squares are big enough to see and work with easily, but still small enough to make your finished design look great. Just remember, the higher the count number, the smaller the stitches will be.
A quick tip: When a pattern tells you the finished size of the design, that's almost always based on using 14-count Aida. Sticking with this standard ensures your project will turn out the size you're expecting.
The Go-To Thread: DMC Embroidery Floss
Now for the fun part—the color! Embroidery floss is what you'll use to create your design. While there are a few brands out there, DMC is the gold standard in the cross-stitch community. Pretty much every pattern you find, especially the free ones, will list the colors you need using DMC's number system.
Sticking with the recommended DMC floss guarantees your finished piece will look just like the designer intended. Each bundle of floss, called a skein, is made up of six smaller strands twisted together. For most projects on 14-count Aida, you'll gently separate these and use just two strands at a time for your stitches. This keeps them looking tidy and not too bulky.
Needles and Hoops to Set You Up for Success
The last few items you'll need are your needle and hoop. They might seem small, but they play a massive part in how your project turns out.
- Tapestry Needles: These aren't your typical sharp sewing needles. Tapestry needles have a blunt tip and a larger eye, which is perfect for cross-stitch. The goal is to glide the needle through the holes in the Aida, not to pierce the fabric itself. A size 24 tapestry needle is the perfect partner for 14-count Aida.
- Embroidery Hoops: A hoop is basically two rings that hold your fabric tight while you work. Keeping the fabric taut is crucial for making sure your stitches have nice, even tension. Without one, your fabric can pucker and your stitches can look a bit sloppy. A simple 5-inch or 6-inch wooden hoop is a fantastic and affordable place to start.
That's it! These are the core supplies you need to get stitching. If you want a deeper dive into these tools and a few other handy gadgets, check out our complete guide on what you need for cross stitch. With your gear ready, you're all set to make that very first stitch
Time to Make Your First Stitch!
Okay, you've got your pattern, your fabric is ready, and your threads are all lined up. Now for the fun part—actually stitching! This is where the magic happens, where all those little squares on the chart start turning into a real picture. Don't stress about making it perfect right away. Just focus on the simple, relaxing motion of the needle and enjoy watching your design come to life.
Believe it or not, the entire art of cross-stitch boils down to one thing: making a tiny "X" with your thread. That's it! There are a couple of popular ways to do this, and neither one is "correct." It's all about finding what feels right for you.
Two Ways to Make an "X"
Think of it like learning to write your name—you eventually find a grip on the pencil that’s most comfortable. The same goes for stitching. The two main techniques you'll hear about are the English and Danish methods. Many of the cross stitch patterns free for beginners you'll find online are perfect for trying out both.
-
The English Method (One by One): With this method, you complete one full "X" before moving on to the next square. You’ll bring your needle up from the back, make one diagonal stitch, and then immediately cross it to finish the "X". It’s a very deliberate approach that works great for single, scattered stitches that look like confetti on the pattern.
-
The Danish Method (Row by Row): This is usually the go-to for stitching bigger blocks of the same color because it's so much faster. First, you stitch a whole row of bottom stitches, all leaning the same way (like this: ///). Then, you work your way back along the same row, crossing each stitch to complete the "X"s (like this: \\).
Most people end up favoring the Danish method for its rhythm and efficiency, but the English method is a handy tool to have in your back pocket. The best way to decide? Grab a scrap piece of fabric and try a few rows of each. You'll quickly figure out which one clicks.
The Golden Rule for Tidy Stitches
No matter which method you settle on, there's one rule that every stitcher lives by to get that smooth, professional look: all your top stitches must face the same direction.
If the top leg of your first "X" goes from the bottom-right to the top-left, then every single top stitch in your entire project needs to do the exact same thing. This tiny bit of consistency makes a huge difference because it lets light bounce off the threads evenly, giving your finished piece a gorgeous, uniform sheen. When top stitches go in different directions, the final result can look a little chaotic and messy.
Get into this habit from the very first "X" you make. Pick a direction for your top stitch and commit to it. This single detail is one of the biggest things that separates a beginner's project from a truly polished piece of art.
How to Start and Stop Without Knots
Your first instinct might be to tie a knot in your thread, just like you would with regular sewing. But in cross-stitch, knots are the enemy! They create lumpy bumps on the back that can often be seen or felt from the front. Thankfully, there are much cleaner ways to secure your thread.
Starting Your Thread:
- The Loop Start: This is a game-changing trick when you’re using two strands of floss. Cut one long piece of floss, fold it perfectly in half, and thread the two cut ends through your needle, leaving a loop at the other end.
- Bring your needle up from the back of the fabric. Don't pull the thread all the way through—leave that little loop hanging out on the back.
- When you make the first leg of your stitch, just slip your needle through that loop on the back before pulling the thread tight. Voila! Your thread is locked in place, no knot needed.
Ending Your Thread:
- Once you have a few inches of thread left to work with, flip your project over.
- Carefully slide your needle under three or four of the stitches you just made on the back.
- Pull the tail through and snip off the excess thread right next to the fabric. This tucks the end away neatly and securely.
Making these knot-free techniques a habit from the get-go will pay off big time, giving you a finished piece that looks just as tidy on the back as it does on the front.
Creating Custom Patterns from Your Own Photos
After you’ve stitched a few free patterns and gotten the hang of things, you might feel that creative spark to make something truly your own. This is where cross-stitch gets really exciting—you can turn a treasured memory, like a family photo, a picture of your beloved pet, or a stunning vacation snapshot, into a work of art.
The thought of designing your own pattern might seem a bit daunting at first, but thankfully, modern tools make it surprisingly simple. Forget the old days of meticulously plotting out stitches on graph paper. Now, you can use a free pattern maker to do all the hard work, turning your digital photo into a ready-to-stitch chart in just a few minutes.
How a Free Pattern Maker Works
Think of a pattern generator as a digital artist's assistant. It looks at all the tiny pixels in your photo and translates them onto a grid, matching each little square to the closest DMC thread color. This makes creating custom cross stitch patterns free for beginners not just possible, but genuinely fun and easy.
Pic2Pat is one of the most popular and straightforward tools out there. The whole process is incredibly simple:
- Upload Your Photo: Just pick a high-quality, well-lit picture from your computer or phone.
- Choose Your Settings: You’ll tell it your fabric count (like 14-count Aida), how big you want the finished piece to be, and the maximum number of thread colors. Sticking to under 30 colors is a great starting point for your first custom project.
- Generate the Pattern: Click a button, and the tool instantly creates a complete PDF pattern for you to download, complete with a symbol chart and a DMC floss list.
It's an amazing bit of tech that closes the gap between following a pattern and becoming the designer yourself.
As you can see in the image above, you can easily upload a personal photo to have a custom kit made just for you. This kind of service is fantastic because it takes all the guesswork out of gathering supplies, sending you exactly the right amount of each thread color you'll need for your unique design.
Tips for a Great Photo Pattern
While the technology does most of the work, your final pattern is only as good as the photo you start with. A clear, sharp image with good contrast will always translate into a much better and more detailed chart. If you don't have a personal photo ready but still want to create something unique, you can always explore different image sources for inspiration.
The best photos for cross stitch have a clear focal point and an uncluttered background. This helps the pattern generator focus on the important details you want to capture in thread.
Turning a meaningful picture into a stitched heirloom is one of the most rewarding parts of this hobby. If you're ready to dive in, our detailed guide on how to turn a photo into a cross stitch pattern is packed with more pro tips to help you get the perfect result every time.
Your First Cross Stitch Questions, Answered
Once you've finished your first project, you'll feel a huge sense of accomplishment! But as you get deeper into this amazing hobby, you'll naturally run into a few little questions. It happens to everyone, and it's all part of the fun of learning.
We've gathered some of the most common head-scratchers that new stitchers ask. Think of this as your go-to guide for those "what do I do now?" moments.
How Should I Wash My Finished Cross Stitch Project?
After you’ve placed that final stitch, it's a great idea to give your piece a gentle wash. This little bath gets rid of any oils left behind by your hands and really makes the thread colors shine.
Simply hand wash your project in a bowl of cool water with just a drop or two of a mild, clear soap (like dish soap). Gently swish it around, then rinse it really well until the water is completely clear. Whatever you do, don't wring it out! Instead, lay it flat on a thick, clean towel, roll it up like a burrito, and press down to soak up most of the water. Then, just lay it flat on a fresh, dry towel and let it air dry.
What Is the Best Way to Separate Floss?
DMC embroidery floss is made up of six individual strands twisted together. For most beginner projects on 14-count Aida cloth, you'll only need to use two of those strands at a time. The trick is to separate them without creating a tangled bird's nest.
Start by cutting a piece of floss about 18 inches long—any longer and it tends to knot up while you're stitching. Pinch one end of the floss and, with your other hand, gently pull a single strand straight up and out from the others. Do this one more time to get your second strand, then put those two strands back together before threading your needle. This simple technique keeps your stitches looking neat and smooth.
Taking the time to pull out strands one by one might feel a bit slow, but trust me, it's a total game-changer. It's the secret to avoiding those frustrating knots that always seem to happen when you try to pull two strands out at once.
I Made a Mistake! How Can I Fix It?
First off, welcome to the club! Every single person who has ever cross stitched has made mistakes. The best part is, they are almost always easy to fix, so there's no need to panic.
In the stitching world, we call fixing a mistake "frogging"—because you have to "rip-it, rip-it!" If you've only made a few wrong stitches, you can use the tip of your needle to carefully unpick them. If it's a tiny mistake in an inconspicuous spot, sometimes the easiest "fix" is to just leave it be. For bigger mix-ups, though, it’s always worth the effort to correct them. You'll be so much happier with the final result!
Ready to transform your own favorite photo into a work of art? At Cross Stitched, we create custom kits with everything you need—from perfectly organized threads to high-quality fabric and a pattern made just for you. Create your personalized cross stitch kit today!


