

Quick answer: The main types of cross stitch are full cross stitch (the classic X), half cross stitch (one diagonal), three-quarter stitch (used for curved edges), quarter stitch, and backstitch (used for outlines). Broader categories include counted, stamped, Hardanger, blackwork, and Assisi cross stitch, each with distinct techniques and fabric requirements.
Frequently asked questions
What are the different types of cross stitch?
Common cross stitch types include full cross stitch, half cross stitch, three-quarter stitch, quarter stitch, and backstitch. At a broader level, counted cross stitch, stamped cross stitch, Hardanger, and blackwork are distinct styles each with its own approach.
What is a half cross stitch?
A half cross stitch is a single diagonal stitch covering one fabric square. It is used in needlepoint and occasionally in cross stitch to fill large backgrounds quickly or in areas where a full X is not required.
What is a three-quarter cross stitch?
A three-quarter stitch consists of one full diagonal plus a shorter stitch that pierces the centre of the fabric square. It is used to create smoother curves and diagonal edges in detailed cross stitch designs.
What is Hardanger cross stitch?
Hardanger is a Norwegian form of counted embroidery worked on evenweave fabric, combining satin stitches, drawn thread work, and cut thread work. It is more advanced than standard cross stitch and traditionally worked in white thread on white fabric.
Cross stitch is more than just making 'X's on fabric; it's a rich and diverse craft with a variety of techniques that can transform a simple pattern into a work of art. Whether you're turning a cherished photo into a timeless keepsake or exploring historical patterns, understanding the different types of cross stitch is the key to elevating your projects and achieving stunning results. This guide is your comprehensive resource for mastering the craft, moving beyond the basics to explore styles that add depth, texture, and intricate detail.
We will explore 8 essential styles and techniques, providing practical tips, project ideas, and insights to help you choose the perfect method for your next masterpiece. From the foundational counted cross stitch that powers most modern patterns to the fine details of fractional stitches, you'll discover how each type offers a unique way to express your creativity. This listicle is designed to be a practical, scannable reference, giving you the specific knowledge needed to tackle any project with confidence. Let's dive into the world of stitching and find the perfect technique to bring your vision to life, one stitch at a time.
1. Counted Cross Stitch: The Foundation of Personalized Art
Counted cross stitch is the most recognized and fundamental of all the types of cross stitch. Rather than following a design printed directly onto the fabric, this method involves working from a gridded pattern or chart. Stitchers must count the squares on a piece of even-weave fabric, such as Aida or linen, to place each 'X' stitch accurately according to the corresponding symbol on the chart.
This technique is the bedrock of modern, personalized needlework. It offers unparalleled precision and creative freedom, allowing for the creation of intricate, multi-colored designs with a clean, professional finish. It’s the core technology behind Cross Stitched's photo-to-pattern kits, which transform your personal digital images into detailed, countable charts, making custom art accessible to everyone.
Best Uses and Projects
This method is ideal for any project demanding detail and personalization. Its structured nature makes it perfect for rendering complex images with remarkable clarity.
- Custom Photo Kits: Converting family portraits, pet photos, or vacation landscapes into timeless keepsakes.
- Memorial Tributes: Creating heartfelt tapestries to honor loved ones.
- Personalized Gifts: Stitching names, dates, or monograms onto items for weddings, anniversaries, or birthdays.
- DIY Home Décor: Designing unique art pieces that perfectly match your home’s aesthetic.
Quick Tips for Success
Key Insight: The secret to mastering counted cross stitch is organization. A systematic approach prevents mistakes and makes the process more enjoyable.
To ensure your project is a success, follow these simple but effective strategies:
- Start with 14-count Aida fabric. Its larger weave is easier for beginners to see and count.
- Use pre-sorted threads. Organizing your floss from the start, as provided in Cross Stitched kits, eliminates color confusion.
- Mark your progress. Use a highlighter or pencil on a copy of your chart to mark off completed sections. This helps you keep your place and avoid miscounting.
- Work in small sections. Stitching one color block or a 10x10 grid area at a time is more manageable than completing scattered individual stitches.
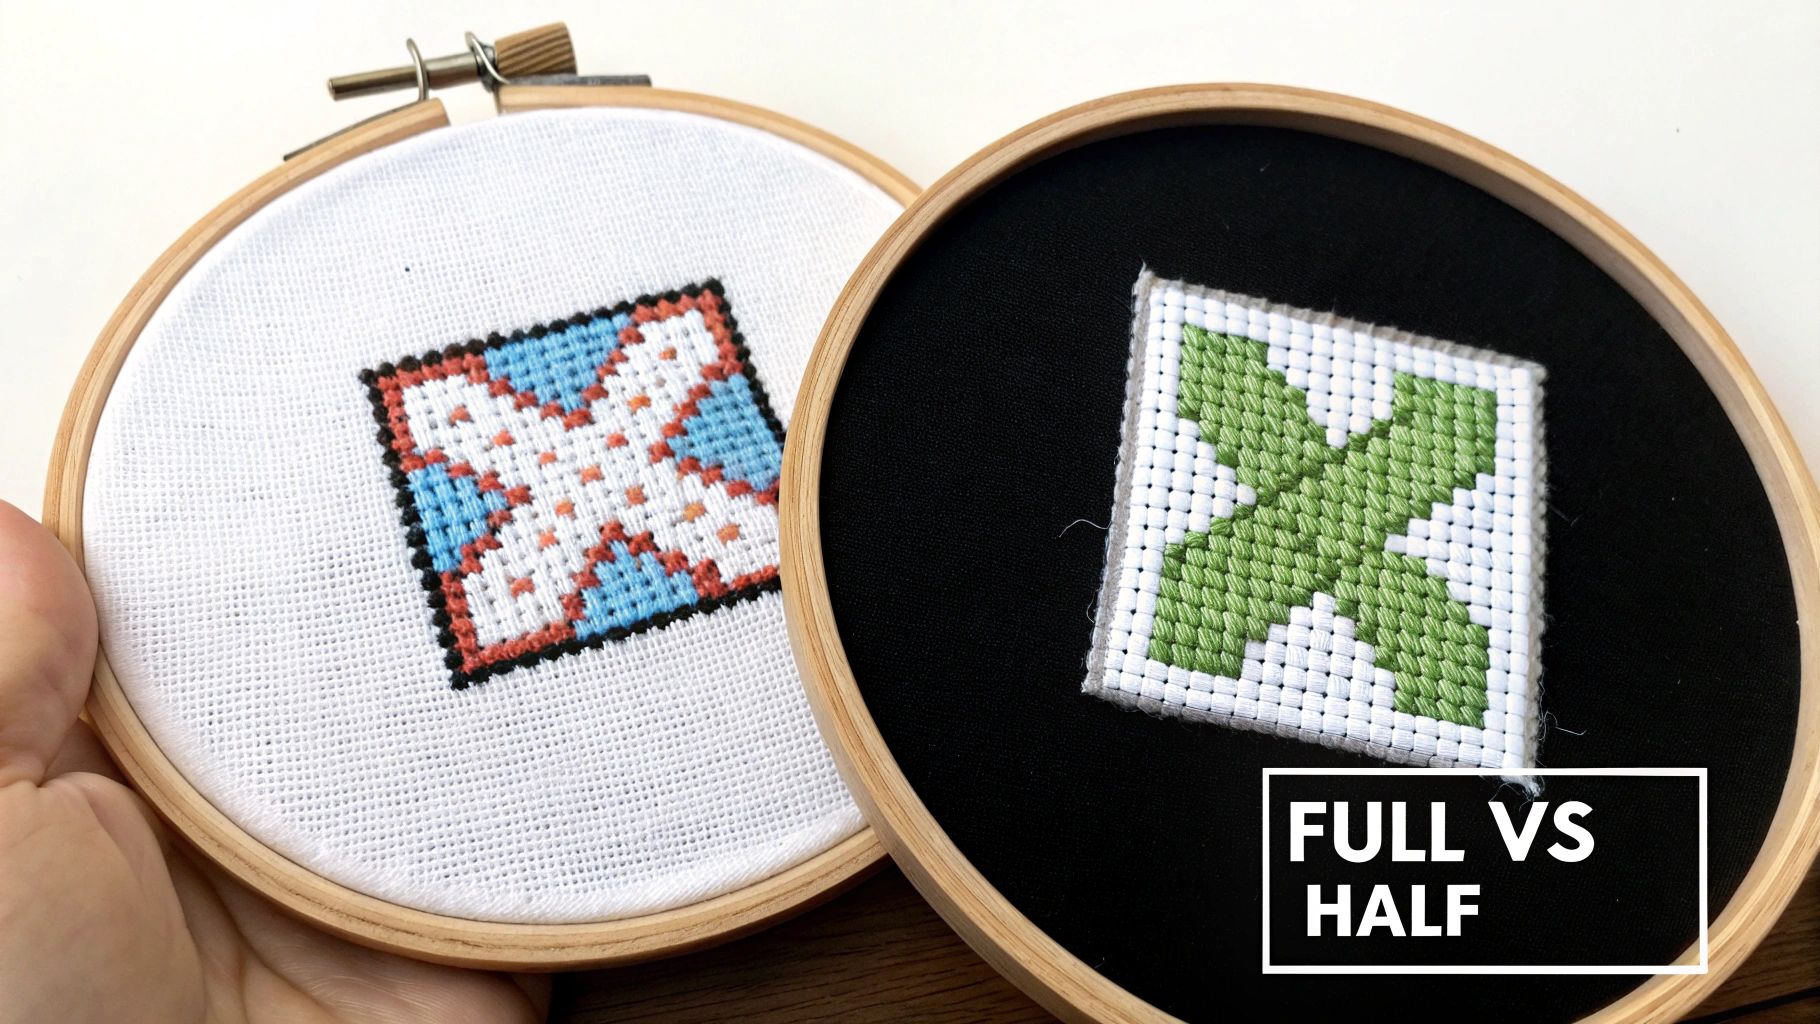
2. Full Cross Stitch vs Half Cross Stitch: The Art of Texture and Efficiency
Among the essential types of cross stitch techniques, understanding the difference between full and half stitches is key to creating depth and optimizing your work. A full cross stitch is the traditional 'X' shape, made of two diagonal threads crossing over a single fabric square. In contrast, a half cross stitch uses only one diagonal thread, creating a '/' shape.
This distinction is crucial for both aesthetic and practical reasons. While full stitches provide bold, complete coverage, half stitches offer a faster way to fill large areas, use less thread, and create a sense of distance or background texture. This strategic combination is often used in professional designs to guide the viewer’s eye and create a more dynamic final piece.
Best Uses and Projects
The choice between full and half cross stitch allows you to control the project's texture, detail, and completion time. Combining them adds a professional touch to any design.
- Background Fills: Use half stitches for skies, water, or simple backgrounds to speed up the process and save thread.
- Focal Points: Reserve full stitches for the main subjects of your piece, like facial features in a portrait or intricate details on a building.
- Creating Depth: In landscapes, use full stitches for foreground elements and half stitches for distant mountains or horizons to create perspective.
- Optimized Kits: Custom photo kits from Cross Stitched can be designed to use both, ensuring efficient thread use while highlighting key details.
Quick Tips for Success
Key Insight: Mastering the blend of full and half stitches is about strategic planning. Decide where each stitch type will add the most impact before you even thread your needle.
Follow these tips to use both stitch types effectively in your next project:
- Maintain consistency. Ensure all your half stitches slant in the same direction (e.g., all bottom-left to top-right) for a clean, uniform look.
- Plan your chart. Before starting, mark on your pattern which areas will use half stitches. This prevents confusion later.
- Use for shading. A half stitch uses less thread coverage, making the color appear slightly lighter than a full stitch of the same floss, which is perfect for subtle shading.
- Consider fabric count. Half stitches work best on 14-count Aida or higher, where the fabric weave is tight enough to prevent gapping.
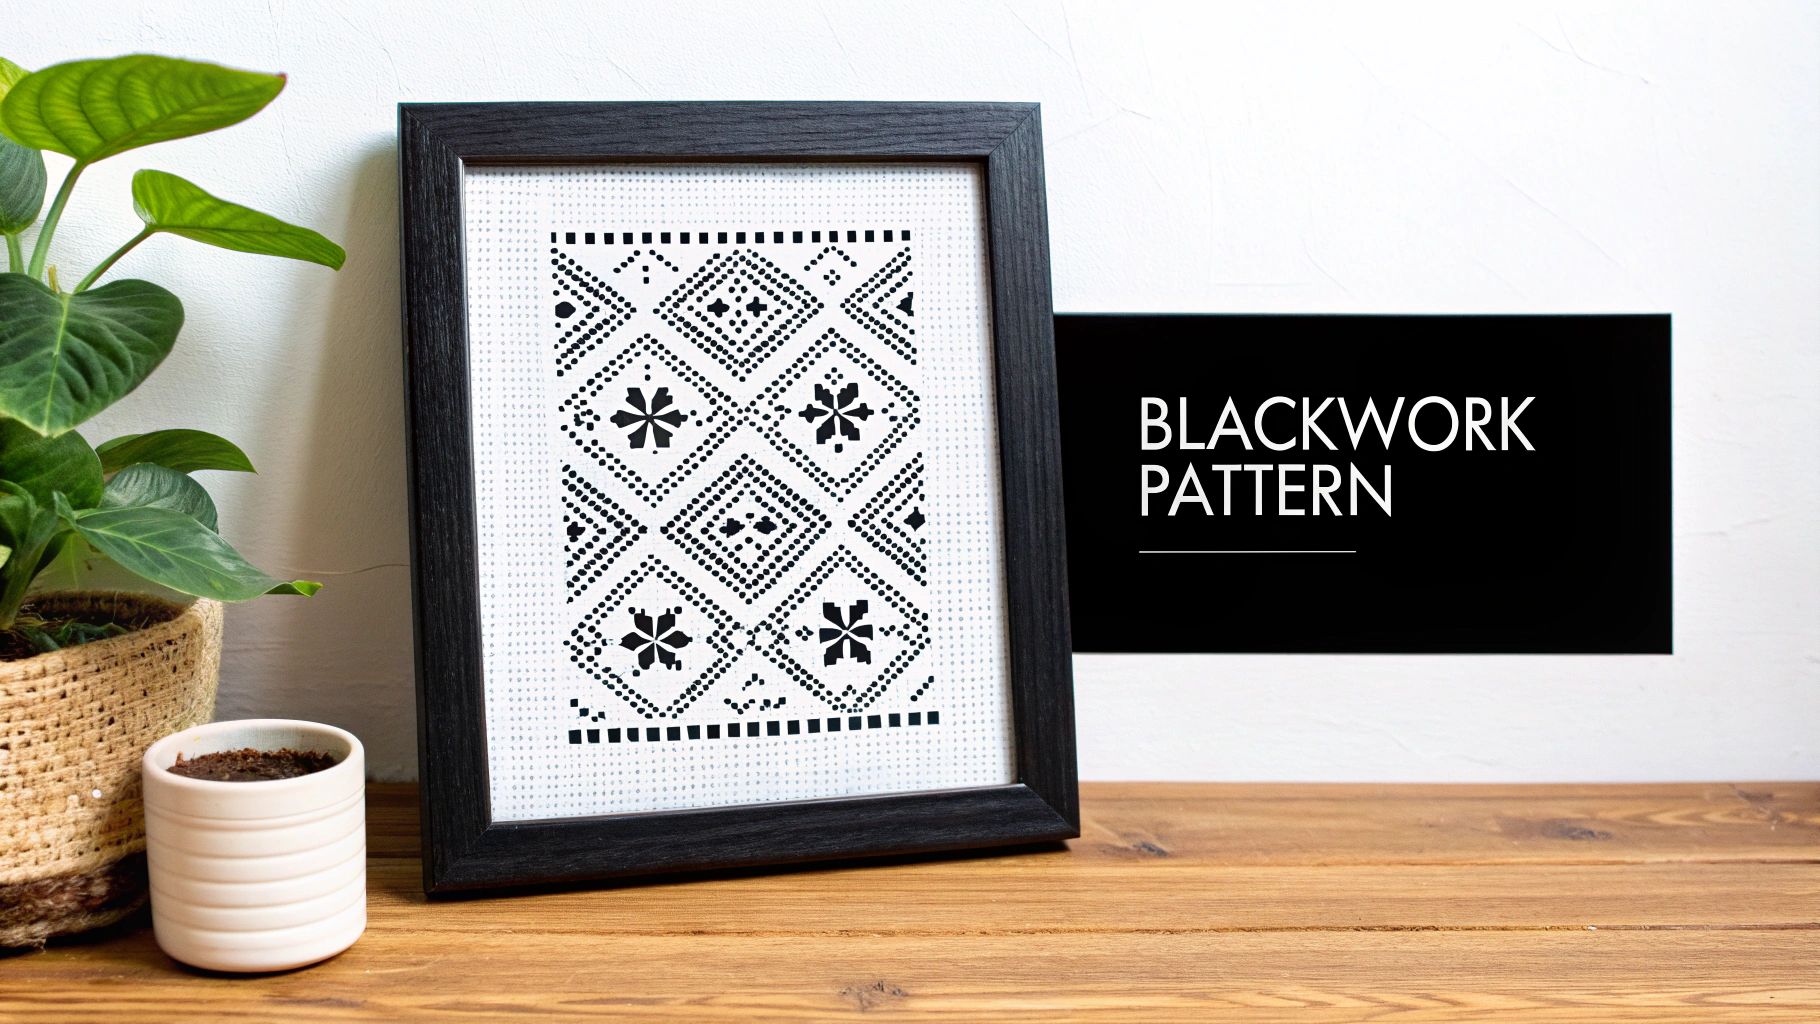
3. Blackwork (Holbein Stitch): Geometric Elegance in Monochrome
Blackwork is a historic and graphically striking embroidery style, often grouped with types of cross stitch due to its use of gridded fabric and charted patterns. Also known as the Holbein stitch, it traditionally involves creating intricate, lace-like geometric patterns with black thread on a white or light-colored fabric. This technique uses a reversible double running stitch to outline shapes, which are then often filled with repeating motifs, creating a stunning visual texture.
Unlike the pixelated look of standard cross stitch, blackwork focuses on lines and patterns, resulting in delicate yet bold designs. Its high-contrast, monochromatic appearance offers a sophisticated alternative for stitchers looking to explore historical embroidery techniques with a modern, minimalist appeal.
Best Uses and Projects
This method excels in projects where sharp lines, intricate patterns, and a sophisticated, classic aesthetic are desired. Its graphic nature makes it highly versatile for both decorative and functional items.
- Elegant Home Décor: Creating framed art with sophisticated, abstract geometric designs.
- Detailed Samplers: Stitching traditional samplers that showcase a variety of blackwork filler patterns.
- Decorative Borders: Adding intricate, repeating borders to table linens, towels, or clothing cuffs.
- Holiday Ornaments: Crafting unique, classic ornaments with snowflake or star-like geometric motifs.
Quick Tips for Success
Key Insight: Precision and thread tension are paramount in blackwork. Even, consistent stitches are what give the final piece its delicate, lace-like quality.
To achieve a professional and clean blackwork project, keep these tips in mind:
- Choose the right fabric. 14-count Aida is great for beginners, while 28-count evenweave or linen allows for finer, more detailed work.
- Grid your fabric. For complex or symmetrical patterns, marking out a grid with a water-soluble pen will help prevent counting errors and ensure perfect alignment.
- Vary your thread weight. Use a thicker floss (like two strands) for outlines and a thinner floss (one strand) for delicate inner fill patterns to create depth.
- Master the double running stitch. Practice creating even, reversible lines, as this foundational stitch is key to the entire technique.
4. Backstitch and Outlining: The Art of Definition
Backstitch is a finishing technique rather than one of the standalone types of cross stitch, yet it is essential for creating crisp, polished designs. Used to outline shapes, add fine details, and create text, this linear stitch acts like a pen stroke that brings clarity and definition to a finished piece. It transforms blocks of 'X' stitches from pixelated shapes into recognizable, well-defined images.
This technique is crucial for adding the small details that make a design come to life. In a portrait, backstitching defines the curve of an eyelid or the line of a smile, while in a landscape, it can delineate a tree branch or a window pane. It's the key to elevating a good cross-stitch project into a great one by adding a layer of professional refinement.
Best Uses and Projects
Backstitching is ideal for any project where small details are critical to the final appearance. It provides the sharp edges and fine lines that cross stitches alone cannot achieve.
- Portrait Details: Defining facial features like eyes, lips, and eyebrows in photo-to-pattern kits.
- Text and Lettering: Creating clear, readable names, dates, or quotes on personalized gifts.
- Architectural Elements: Outlining buildings, windows, or intricate patterns in landscape pieces.
- Border Designs: Framing a central motif with a clean, sharp border to give it a finished look.
Quick Tips for Success
Key Insight: The power of backstitch lies in its strategic use. It should enhance the cross stitches, not overpower them, adding just enough detail to make the image pop.
To add professional-looking outlines to your work, apply these focused strategies:
- Choose the right color. Select a backstitch floss that is one or two shades darker than the area it's outlining for subtle definition.
- Use a single strand. For most fine details on 14-count Aida, a single strand of floss is sufficient and prevents the lines from looking too bulky.
- Stitch after completing sections. Add backstitching once all the cross stitches in an area are finished to avoid stitching over your outlines.
- Keep your thread short. Working with a shorter length of thread (around 12 inches) gives you better control for creating straight, clean lines. Learn more about the specific steps in our guide to backstitching in cross stitch.
5. Fractional Stitches: Achieving Photorealistic Detail
Fractional stitches are advanced techniques used to add incredible detail and smoothness to a design, moving beyond the standard blocky 'X'. These partial stitches, including quarter (1/4), three-quarter (3/4), and even one-eighth (1/8) stitches, occupy only a portion of a fabric square. This precision allows for the creation of delicate curves, subtle gradients, and sharp lines that full stitches cannot achieve.
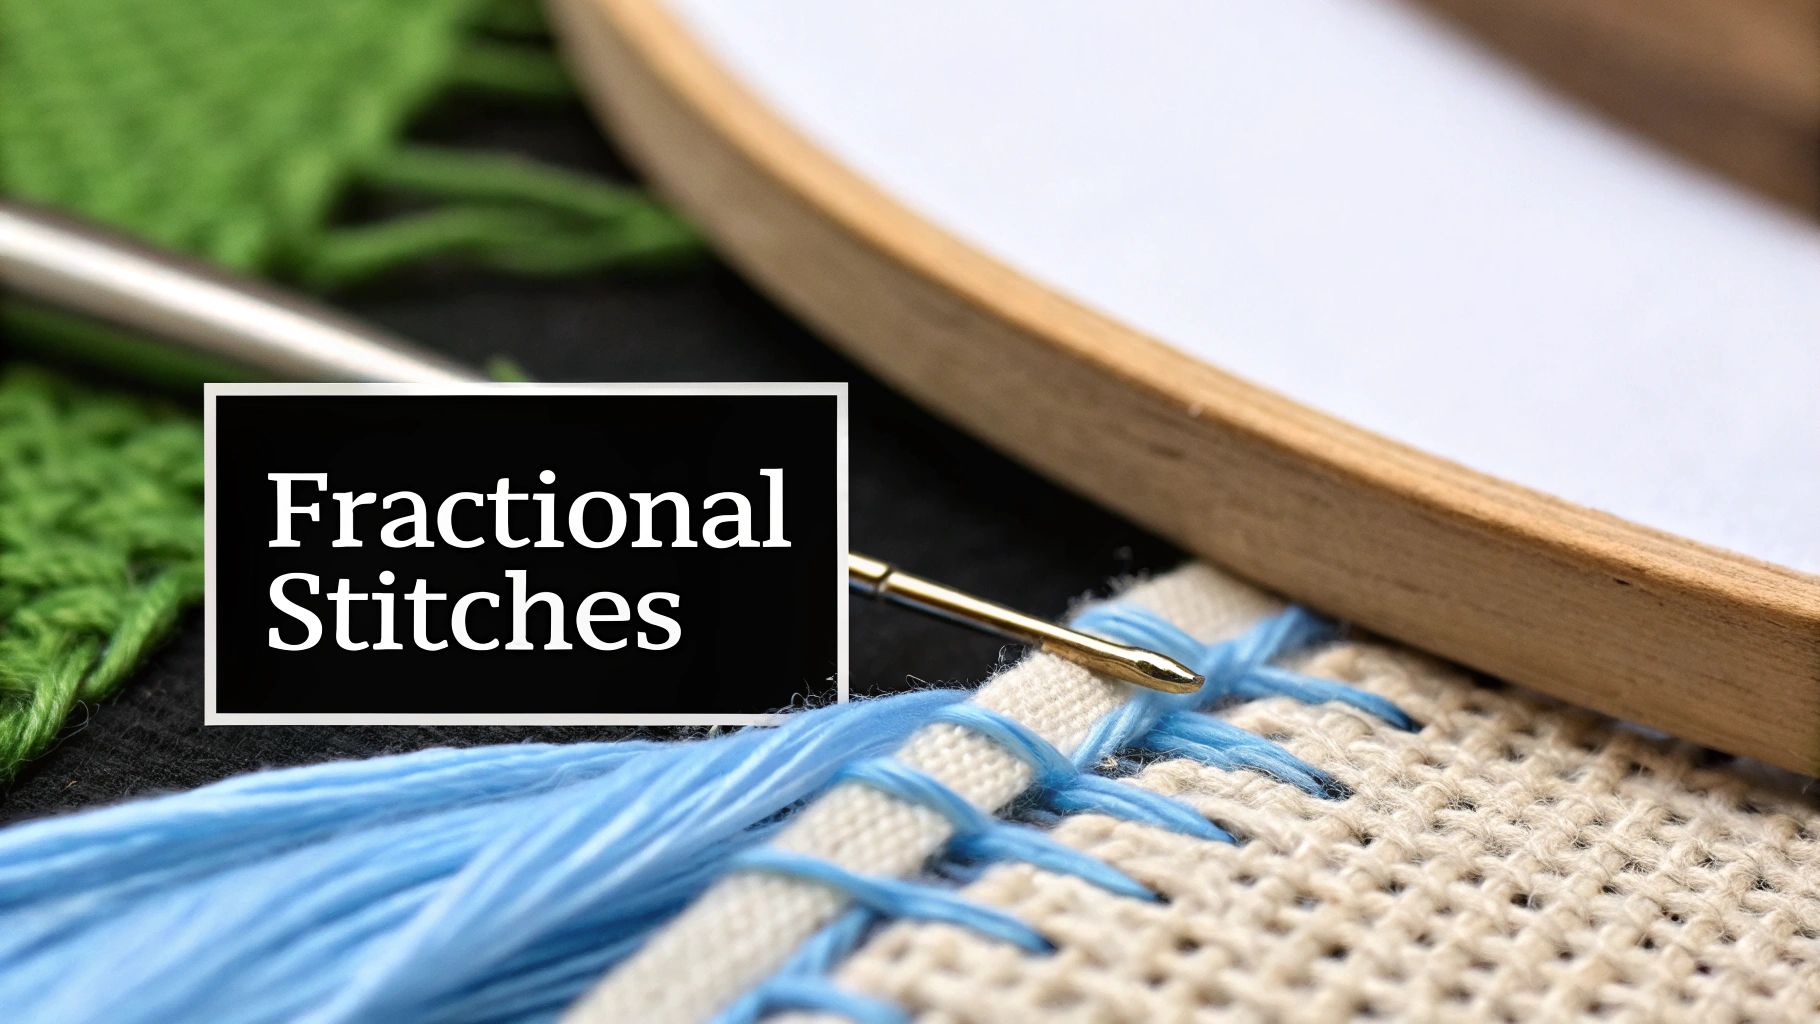
This method is the key to transforming a standard cross stitch piece into a high-definition work of art. It’s particularly vital for photo-to-pattern conversions where capturing nuance is everything. For instance, the subtle shading on a cheek in a portrait or the soft edges of a cloud in a landscape are made possible by mastering these different types of cross stitch.
Best Uses and Projects
Fractional stitches are essential for any project where realism and fine detail are the primary goals. They elevate the final product from a charming craft to a stunning piece of art.
- Detailed Portrait Kits: Capturing the precise contours of a face and the gentle gradients in skin tone.
- Photorealistic Pet Portraits: Rendering the soft texture of fur and the sparkle in an animal’s eye.
- Landscape Pieces: Creating smooth transitions in skies, water, and other natural elements.
- Fine Art Reproductions: Replicating the delicate brushstrokes of famous paintings with threaded precision.
Quick Tips for Success
Key Insight: Precision is paramount with fractional stitches. The right tools and a careful approach turn a challenging technique into a rewarding one.
To successfully incorporate fractional stitches into your work, consider these expert tips:
- Use high-count fabric. Choose at least 18-count Aida or a linen/evenweave fabric. The tighter weave provides better support for partial stitches.
- Invest in good lighting. A quality magnifying lamp is a game-changer, reducing eye strain and helping you accurately pierce the fabric.
- Use a smaller needle. A #26 or #28 tapestry needle makes it easier to navigate the smaller holes and center of the Aida square without distorting the weave.
- Practice on scrap fabric. Before starting your main project, practice making quarter and three-quarter stitches to get a feel for the tension and placement.
6. Needlepoint and Petit Point: Cousins to Cross Stitch
While not strictly a cross stitch technique, needlepoint and its finer variation, petit point, are closely related needlework arts that belong in any discussion about the different types of cross stitch. Instead of forming an 'X' on fabric, these methods use a diagonal "tent stitch" on a stiff, open-weave mesh canvas. Petit point is simply needlepoint performed on a higher-count canvas (typically 18-mesh or higher), resulting in smaller stitches and exceptionally fine detail.
Both techniques share cross stitch’s grid-based logic, making them perfectly suited for pattern charts and photo-conversion technology. This shared foundation allows for the same level of personalization, transforming detailed images into stunning, textured artworks on canvas. Learn more about the specific differences in our guide, Needlepoint vs. Cross Stitch.
Best Uses and Projects
The durable canvas and dense stitch coverage make needlepoint ideal for functional items and heirloom-quality art that requires a sturdier finish than fabric.
- Personalized Upholstery: Creating custom designs for cushions, chair seats, or footstools.
- Photo-Converted Portraits: Using petit point to render facial features and fine details with painterly quality.
- Fashion Accessories: Crafting decorative handbags, wallets, and belts with a unique, handmade touch.
- Heritage Keepsakes: Designing long-lasting heirlooms like family crests or decorative wall hangings.
Quick Tips for Success
Key Insight: Success in needlepoint and petit point hinges on consistent tension and full canvas coverage to create a lush, uniform surface.
To achieve a professional and durable finish with your needlepoint projects, keep these essential strategies in mind:
- Choose the right canvas. Start with 18-mesh canvas for petit point projects to capture intricate details effectively.
- Use appropriate thread. Use thicker wool or multiple strands of cotton floss to ensure the tent stitches completely cover the canvas mesh.
- Control your tension. Unlike the looser weave of Aida, canvas is rigid. Pulling stitches too tight can warp the canvas and create uneven texture.
- Consider professional finishing. Due to stitch tension, finished pieces often need to be blocked (stretched and squared) to restore their intended shape.
7. Specialty Threads and Effects: Adding Luster and Dimension
While not a distinct stitching method, using specialty threads is a technique that transforms the texture and visual impact of any project, making it a unique category among the types of cross stitch. This approach moves beyond standard cotton floss to incorporate threads like metallics, silks, and variegated floss. Each type introduces a different effect: metallics add shimmer, silks provide a luxurious sheen, and variegated threads create subtle color shifts from a single strand.
This technique elevates a finished piece from a flat image to a dynamic work of art with depth and character. Incorporating these threads allows for artistic expression that mimics light, reflection, and natural color gradients, adding a sophisticated, professional finish. For a deeper dive into the world of floss, you can learn more about the different embroidery floss options available for cross stitch.
Best Uses and Projects
Specialty threads are perfect for adding accents and highlights that make a design pop. They are most effective when used thoughtfully to draw attention to specific details.
- Holiday Décor: Using metallic threads for ornaments, snowflakes, or stars to create a festive sparkle.
- Heirloom Pieces: Stitching wedding or anniversary gifts with silk floss for an elegant, timeless luster.
- Artistic Landscapes: Employing variegated threads to create realistic-looking water, skies, or foliage.
- Fantasy and Sci-Fi Designs: Adding metallic accents to swords, armor, or futuristic elements for a touch of magic.
Quick Tips for Success
Key Insight: The trick to working with specialty threads is to adapt your technique. These threads often require more patience and slightly different handling than standard cotton.
To incorporate these beautiful threads without frustration, follow these expert tips:
- Use shorter lengths. Cut metallic or silk threads to 12 inches or less to minimize tangling and fraying.
- Condition your thread. A product like Thread Heaven or beeswax can make temperamental threads much smoother and easier to work with.
- Stitch slowly. Rushing can cause knots and snags, especially with delicate silks or wiry metallics.
- Use a larger needle. A needle with a slightly bigger eye can reduce the friction and wear on specialty threads as you stitch.
8. Seasonal and Themed Collections: Stitching Life’s Moments
While not a distinct stitching technique, seasonal and themed collections represent a major category within the types of cross stitch, focusing on curated designs for specific occasions. This approach organizes patterns around holidays, seasons, or life events, making it easy for stitchers to find the perfect project for a particular time of year or a special person. It’s about creating timely, relevant art that celebrates moments big and small.
This trend is driven by the desire to create meaningful, personalized gifts and decor. Instead of searching through endless patterns, stitchers can browse dedicated collections for Christmas, anniversaries, or even pet portraits with a seasonal twist. Cross Stitched's curated collections and seasonal blog projects are perfect examples, offering everything from autumn coasters to holiday ornament kits that transform personal photos into festive keepsakes.
Best Uses and Projects
This category is perfect for anyone looking to create timely and occasion-specific pieces, whether for gifting or personal enjoyment. The themed nature provides inspiration and a clear purpose for each project.
- Holiday Décor: Crafting custom ornaments, stockings, and wall hangings for Christmas, Halloween, or Easter.
- Seasonal Gifts: Creating personalized wedding or anniversary portraits for a summer celebration.
- Milestone Tributes: Stitching birthday-themed designs or memorial pieces that align with a specific time of year.
- Pet Portraits: Capturing a furry friend against a backdrop of spring flowers or autumn leaves.
Quick Tips for Success
Key Insight: Planning ahead is crucial for seasonal stitching. Starting your projects 2-3 months in advance ensures you have a beautiful, finished piece ready in time for the occasion.
To make the most of themed stitching, a little forward-thinking goes a long way:
- Create a Stitching Calendar. Map out your desired projects for major holidays and birthdays at the start of the year.
- Follow Themed Guides. Look for gift guides or seasonal blog tutorials for inspiration and technique tips tailored to the project.
- Embrace Limited Editions. Take advantage of limited-run kits or patterns to create a truly unique and urgent project.
- Share Your Work. Participate in seasonal social media trends by sharing your finished pieces to connect with other crafters.
8-Point Comparison of Cross-Stitch Types
| Technique | 🔄 Complexity | ⚡ Resource requirements | ⭐ Expected outcomes | 📊 Ideal use cases | 💡 Key advantages / tips |
|---|---|---|---|---|---|
| Counted Cross Stitch | Medium — fundamental counting and chart reading | Moderate — 14‑count Aida, DMC threads, chart, hoop | Accurate, replicable finishes suitable for varied designs | Personalized photos, beginner projects, scalable designs | Start on 14‑count Aida, use pre-sorted threads, mark charts as you go |
| Full Cross vs Half Cross | Low–Medium — simple stitches; mixing needs consistency | Low — same supplies; half uses ~50% less thread | Full = polished, dense coverage; Half = lighter, efficient fill | Half for large backgrounds; Full for focal detail and definition | Use half for big fills, full for faces; keep stitch direction consistent |
| Blackwork (Holbein Stitch) | Medium — precise counting, repetitive motifs | Low — monochrome thread, standard fabric | High-contrast, elegant geometric results | Borders, samplers, framed décor, historical-style pieces | Use 14‑count Aida or 28‑count linen; try metallics sparingly for variation |
| Backstitch & Outlining | Medium — requires steady hand and accuracy | Low — single-strand threads, shorter lengths | Sharp definition that enhances professional appearance | Facial details, text, outlining color blocks and borders | Apply after main stitch, use slightly darker thread, work with short lengths |
| Fractional Stitches (¼, ¾, 1/8) | High — advanced placement and counting | High — 18+ count fabric, fine needles, magnifier | Photorealistic shading and very fine detail | Realistic portraits, pet photos, fine art reproductions | Use 18+ count, magnification, short threads, practice on scrap first |
| Needlepoint & Petit Point | Medium–High — canvas techniques and tension control | High — canvas (18+ mesh for petit point), heavier strands, finishing tools | Durable, very fine detailed pieces suitable for functional use | Cushions, upholstery, decorative accessories, luxury keepsakes | Use 18‑mesh for detail, heavier threads for coverage, control tension carefully |
| Specialty Threads & Effects | Medium — handling fragile or slippery threads | High — costly metallics, silks, variegated floss, thread conditioners | Luxurious sheen, texture, automatic shading with variegated threads | Wedding pieces, holiday accents, premium kits and heirlooms | Use short lengths, combine with cotton for economy, use thread conditioner |
| Seasonal & Themed Collections | Low — curated patterns simplify execution but need planning | Variable — depends on kit; usually moderate | High engagement and relevance; encourages repeat purchases | Holiday gifts, seasonal promotions, themed blog/tutorial projects | Plan 2–3 months ahead, create gift guides, showcase user projects |
From Stitches to Stories: Start Your Next Project Today
Your journey through the diverse world of cross stitch has equipped you with a powerful new vocabulary of techniques. From the foundational grid of counted cross stitch to the intricate linework of Blackwork, you now understand that this craft is far more than just making X's. Each stitch is a deliberate choice, a tool in your creative arsenal to build texture, depth, and personality into every piece you create.
We've explored how a simple switch from a full cross stitch to a half stitch can create a sense of distance in a landscape, or how incorporating fractional stitches can soften the curves of a floral motif, transforming it from blocky to beautifully realistic. The knowledge of when to use a bold backstitch for definition versus letting the stitches themselves form the image is what separates a good stitcher from a great one. This understanding of the different types of cross stitch is your key to unlocking truly artistic and personalized needlework.
Key Takeaways for Your Stitching Journey
Mastering these techniques isn't just about following a pattern more accurately; it's about gaining the confidence to adapt, improvise, and design. Think of it this way:
- You are the artist: You now have the skills to decide if a design needs the subtle shading of fractional stitches or the dramatic flair of metallic threads. You can choose the right technique to capture the delicate detail of a portrait or the bold, graphic style of a seasonal decoration.
- Problem-solving becomes easier: When a standard cross stitch feels too bulky or undefined, you now know to consider a three-quarter stitch for a sharper corner or a backstitch to clean up an edge. This technical fluency makes tackling complex projects less intimidating.
- Your projects gain professional quality: By strategically combining different stitch types, such as using petit point for a face and standard stitches for the background, your finished work will have a level of sophistication and detail that truly stands out.
Your Actionable Next Steps
Feeling inspired? The best way to solidify your new knowledge is to put it into practice. Don't wait for the perfect moment or the "easy" project. Choose a design that excites you and dive in.
- Review a Current Project: Look at a piece you are working on or have finished. Could a different stitch type have improved a certain area? Perhaps adding a backstitched outline or using a variegated thread? This critical eye will train you for future projects.
- Start a Small Sampler: Dedicate a small piece of Aida or evenweave fabric to practicing. Create a row of quarter stitches, try outlining a simple shape with the Holbein stitch, and experiment with blending specialty threads. This low-pressure practice builds muscle memory.
- Choose Your Next Masterpiece: Think about a project that truly means something to you. A family portrait, a beloved pet, or a favorite vacation photo. These personal projects are the most rewarding and provide the perfect canvas for experimenting with the rich variety of cross stitch types you've learned.
Each stitch you make is part of a larger story, a narrative woven with thread and time. You are no longer just coloring by numbers; you are painting with floss, making conscious artistic decisions that bring a flat chart to life. Embrace this new level of creative control and watch as your needlework transforms into cherished art.
Ready to turn a treasured memory into a tangible work of art? Cross Stitched makes it simple by creating a custom kit from your favorite photo, providing you with the perfect pattern and all the high-quality materials you need. Explore your creativity with a personalized project from Cross Stitched and start stitching your story today.


