

Absolutely! You can convert a photo to a cross stitch pattern free of charge using a variety of online tools. These clever converters essentially translate the pixels from your image into a stitchable grid, complete with a corresponding thread colour key. In just a few minutes, you can have a complete, downloadable chart ready to go.
Turn Your Favorite Photo Into a Cross Stitch Masterpiece
Imagine turning that cherished family portrait or a funny snapshot of your pet into a beautiful, hand-stitched piece of art. It’s more accessible than you might think, and you don't need expensive software or any artistic skills to get started. This guide is here to walk you through the entire process, from picking the perfect picture to generating a pattern you can start stitching immediately using free tools like Pic2Pat.
When you turn a digital memory into a physical heirloom, you create something truly special. We'll break down the tricky parts like colour matching and pattern generation, giving you the confidence to tackle a project that preserves your memories one stitch at a time.
The Growing Appeal of Personalized Needlecraft
There's a real joy in stepping away from our screens to create something tangible and meaningful. This desire for unique, handmade items has fuelled a huge boom in crafting, and cross-stitch is right at the heart of it. The ability to create a pattern from any photo has welcomed a whole new generation of stitchers who want their projects to tell their own personal stories.
This isn't just a niche hobby anymore. The global needlecraft patterns market was valued at approximately USD 34 billion in 2023, which really shows the mainstream appeal of crafts like cross-stitch. It's clear that tools that help convert photos into patterns are tapping into a massive and wonderfully creative community.
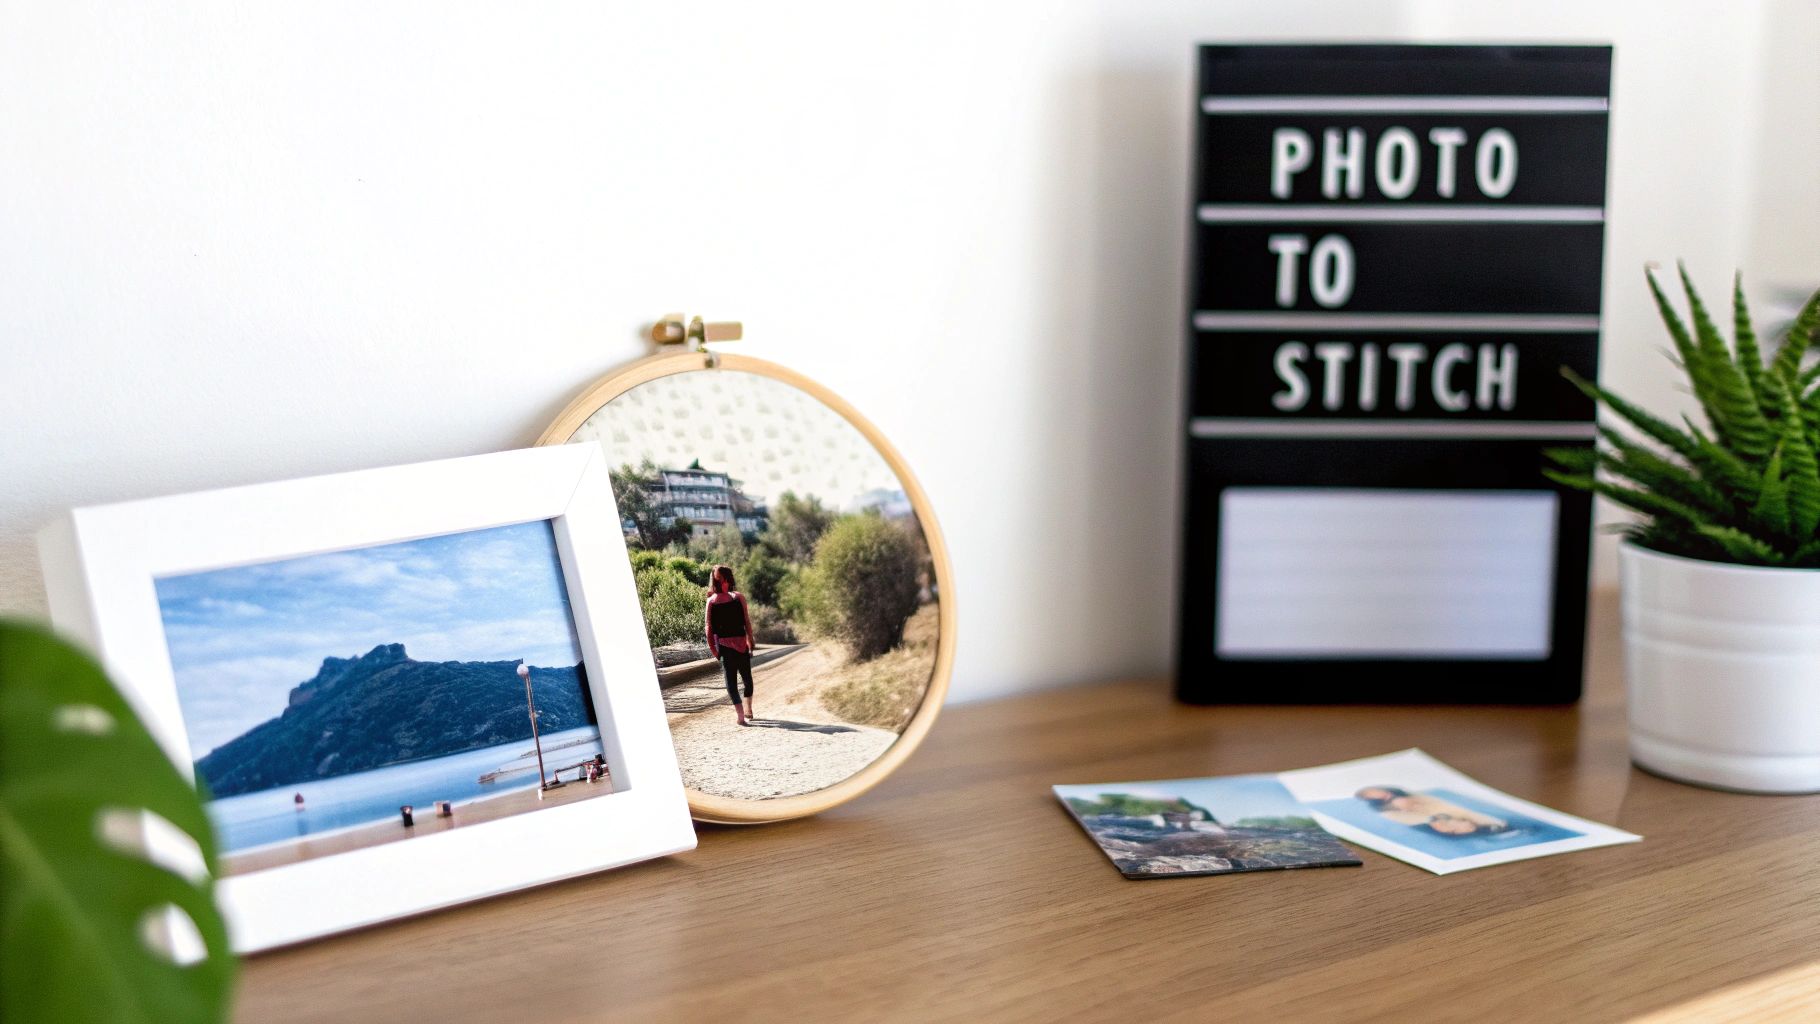
Once you’ve stitched your masterpiece, you can frame it to create your own unique personalized wall art.
Why Create Your Own Pattern?
Making a pattern from your own photo lets you capture a specific moment in a way no pre-made kit ever could. These projects become more than just decorations—they are heirlooms in the making.
The most rewarding part is seeing a familiar face or a beloved place emerge from the fabric, stitch by stitch. It’s a wonderfully tactile way to connect with your memories.
Whether it's a wedding photo, a baby's first smile, or a landscape from a favorite trip, your finished piece will be a one-of-a-kind treasure. Let's get into the practical steps to make it happen.
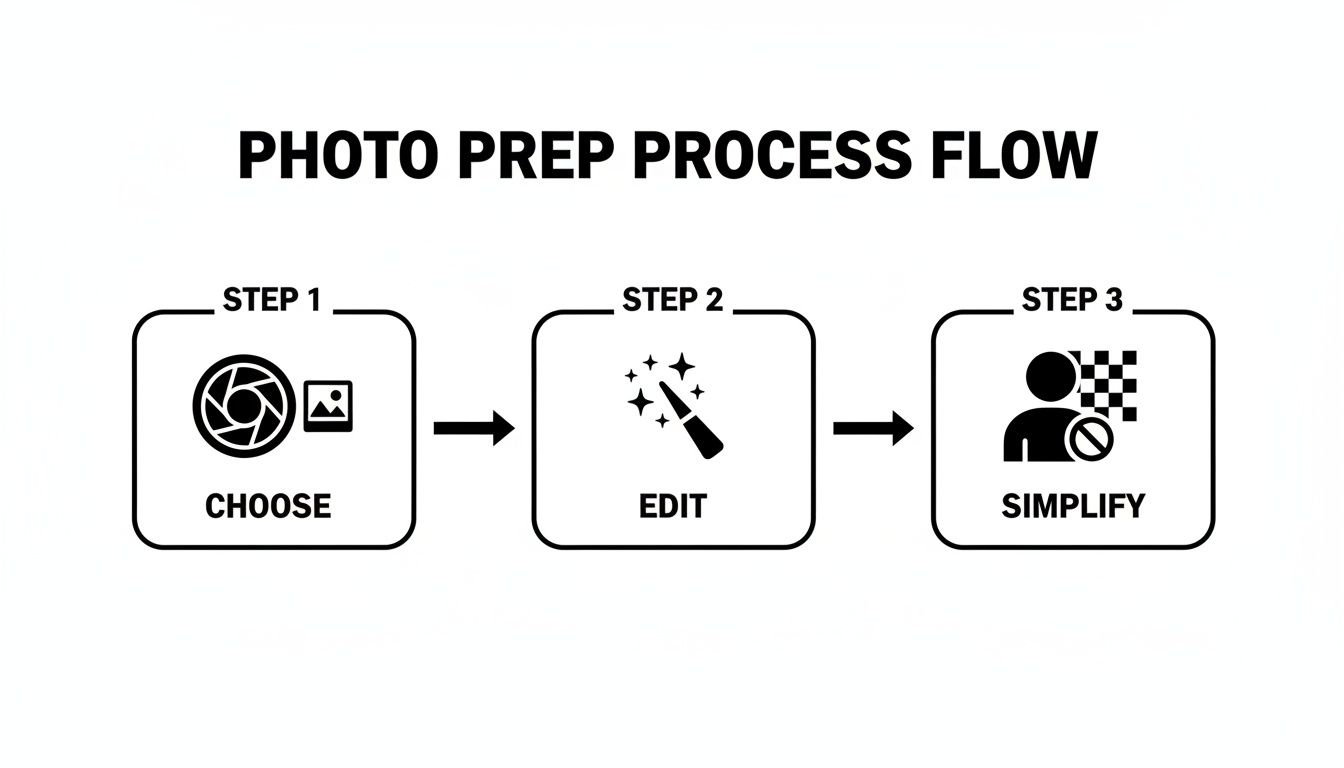
Before we dive deep into the how-to, here's a quick look at the journey ahead. This table breaks down the main stages of turning a photo into a cross-stitch pattern, so you know exactly what to expect.
Quick Overview of the Photo to Pattern Process
| Stage | Objective | Key Action |
|---|---|---|
| 1. Photo Preparation | Optimise the source image for clarity and detail. | Crop, adjust brightness/contrast, and remove background clutter. |
| 2. Pattern Generation | Convert the digital image into a stitchable grid. | Upload the photo to a free converter tool like Pic2Pat. |
| 3. Colour & Size Setup | Define the pattern's dimensions and colour palette. | Choose the fabric count, stitch count, and number of thread colours. |
| 4. Refinement & Export | Fine-tune the pattern and save it. | Adjust colour mapping and download the final PDF chart. |
| 5. Stitching & Finishing | Bring the pattern to life with needle and thread. | Gather materials, stitch the design, and prepare it for display. |
This overview gives you a solid roadmap. Now, we'll explore each of these stages in much greater detail, providing the practical tips you need to succeed.
Getting Your Photo Ready for a Flawless Pattern
The real secret to a beautiful cross stitch pattern isn't just the software you use—it's the photo you start with. I always think of it like cooking: the better your ingredients, the tastier the final dish. When you're looking to convert photo to cross stitch pattern free, spending a few minutes prepping your image can save you hours of stitching headaches later on.
The main goal here is to give the pattern generator a clean, clear image to analyze. A high-resolution photo with a simple composition and great lighting is the absolute best-case scenario. If you feed it a blurry, dark, or cluttered image, you’ll get back a messy pattern filled with "confetti" stitches—those random, single-colored stitches that are a total nightmare to work with.
Choosing a Winning Photo
Before you even touch an editing tool, you need to pick the right picture. The best photos for cross stitch have one clear, undeniable focal point. For a portrait of a person or a pet, this means their face is sharp and well-lit. For a landscape, look for a defined subject, like a solitary tree or a cozy cottage, not a busy scene with a dozen things fighting for your attention.
Here's what I always look for:
- High Resolution: The more pixels your photo has, the more detail the converter can pull from it. Try to avoid using screenshots or images you've saved from social media, as they're often compressed and low-quality.
- Good Contrast: You want clear differences between the light and dark areas. This helps the software identify shapes and edges much more accurately. A photo taken in bright, even daylight is usually a great starting point.
- Simple Composition: A single subject against a plain background is the dream. A portrait taken against a simple wall will convert infinitely better than one snapped in a cluttered living room.
Simple Edits That Make a Huge Difference
You don't need fancy, expensive software to get your photo in shape. Free, easy-to-use tools like Photopea or Canva are more than enough for these essential tweaks.
Crop to Create Focus First things first, crop that image! Get rid of any distracting background noise and put your subject front and center. If you're stitching a portrait of your golden retriever, you definitely don't need the corner of the sofa or a stray floor lamp in the pattern. This one simple step instantly simplifies the conversion and makes sure the finished piece is all about what you love.
Boost the Brightness and Contrast Next, play with the brightness and contrast settings. Gently bumping up the contrast can make the edges of your subject much crisper, giving the pattern generator a cleaner outline to follow. A little boost in brightness can also bring out details that might have been hiding in the shadows.
I can't stress this enough: don't skip these little adjustments. Taking just five minutes to crop your photo and tweak the contrast can dramatically cut down on the number of "muddy" or confusing color blocks in your final pattern. It’s a tiny time investment for a huge payoff.
Tidy Up the Background This is a total game-changer, especially for portraits. If your photo has a busy, distracting background, it's going to compete with your main subject. Thankfully, many free editing tools now have a one-click background removal feature.
Swapping out that cluttered backdrop for a solid, neutral color ensures that your beloved pet or family member truly stands out. From my experience, this is one of the most effective ways to turn an ordinary snapshot into a pattern that looks polished and professional. These small edits really are the key.
Bringing Your Pattern to Life with Free Online Tools
Okay, you've prepped your photo and it looks fantastic. Now for the fun part: turning that image into a real, stitchable cross stitch pattern. You don't need to buy any fancy software for this. There are some excellent free websites out there that can do all the heavy lifting for you, creating a custom chart in just a few minutes.
Getting the photo right first—choosing a good one, editing it, and simplifying the details—is the secret to a great pattern. It's the foundation for everything that comes next.
Think of it this way: the better the image you feed into the pattern generator, the cleaner and more enjoyable your final chart will be to stitch.
A Quick Tour of a Free Pattern Converter
For this walkthrough, we’ll use Pic2Pat, which is a popular and really straightforward tool. It's a great choice if you're new to this because its interface is so clean. Most free converters work in a similar way, so the skills you learn here will apply elsewhere.
After you upload your edited photo, you'll be greeted with a few key settings. These choices are what define the final size, detail, and overall complexity of your project. Online converters have really opened up the world of pattern design, making it accessible to everyone. Some, like Stitch Fiddle, can process your uploaded image (JPEG, PNG, etc.) and show you a preview in about 30 seconds. This turns what used to be a very manual, tedious task into something you can do instantly.
Setting Up Your Pattern Dimensions
First things first, you need to decide on your fabric count. This is just the number of stitches you can make per inch of fabric. The count you choose has a huge impact on the final size and detail of your piece.
Common choices include:
- 14-count Aida: Perfect for beginners. The stitches are larger and easier to see.
- 16-count Aida: A fantastic middle ground. It gives you more detail than 14-count without being too tiny.
- 18-count Aida: This creates a much more detailed, almost "pixel-perfect" image with smaller, tighter stitches.
Your choice here directly affects the finished dimensions. For instance, a design that is 140 stitches wide will measure 10 inches on 14-count Aida. But that same design will only be 7.8 inches wide on 18-count Aida. Don't worry about the math—the converter tool calculates all of this for you.
If you're curious about other great software options, our guide to the best cross stitch pattern makers is a great place to explore more tools.
Finding the Perfect Color Balance
Next up is the color palette, and this is arguably the most critical step for getting a beautiful result. Most free tools default to DMC threads, which is the industry standard and makes floss easy to find.
The main task here is to select the maximum number of colors your pattern will use. It's a bit of a balancing act. If you use too few colors, a portrait can end up looking flat and posterized. But if you use too many, you'll be stuck with a blizzard of "confetti"—those frustrating single stitches of one color scattered all over the place.
From my experience, starting with around 30-40 colors is the sweet spot for most portraits. It provides enough different shades to create realistic depth without overwhelming you with a shopping list of a hundred similar floss colors.
This is where you want to lean heavily on the preview function. Play around with the color count. Move it up and down and watch how it affects the image. Does the detail in a face sharpen? Does the texture of a pet's fur soften? Keep tweaking until you find a version that looks detailed but still feels manageable to stitch. Once you're happy with it, you’re ready to generate and download your PDF pattern.
Reading and Refining Your New Cross Stitch Pattern
So, you’ve run your photo through a converter and have a shiny new PDF pattern in hand. Fantastic! This file is your complete roadmap, but knowing how to read it—and more importantly, how to fine-tune it—is what separates a good project from a great one. Think of this generated pattern as a first draft; a few smart tweaks now will make the whole stitching experience much more enjoyable.
The heart of your new pattern is the symbol chart. This is basically a grid where every single square, marked with a unique symbol, represents one cross stitch you'll make. It’s the visual map you'll follow stitch by stitch.
Of course, that chart wouldn't mean much without the color key. This key is your translator, linking each symbol on the chart to a specific DMC thread color. For example, you might see that a black circle symbol (●) means you should use DMC 310 (Black), while a small triangle (▲) calls for DMC 742 (Tangerine). If you want a deeper dive into how these charts work, check out our guide on reading cross stitch graphs.
Dealing with Digital Noise and "Confetti" Stitches
Alright, let's get into the nitty-gritty of refinement. Automated tools are incredibly helpful, but they aren't perfect. They often create what we call digital "noise" in the form of confetti stitches. These are those annoying, isolated stitches of one color completely surrounded by another. Imagine stitching one single red stitch in a vast sea of blue—it’s a pain, and it often doesn't add anything meaningful to the final look.
When you spot these little outliers, you’ve got a couple of choices:
- Merge It: If a lone stitch is very close in shade to the colors around it, just swap it out. For instance, if you find one dark grey stitch floating in a large block of black, just stitch it with black floss. This move simplifies your work without changing the overall picture.
- Ignore It: Sometimes, a single confetti stitch is there for a reason. In highly detailed areas, like the glint in an eye or a tiny highlight on a petal, that one stitch can be crucial. In these cases, it’s best to trust the pattern and leave it in.
My personal rule of thumb is this: if a single stitch is more than two squares away from another stitch of the same color, I almost always change it to match the surrounding area. This simple guideline has saved me countless unnecessary thread changes and makes the stitching flow so much better.
Streamlining Your Color Palette
Another powerful way to refine your pattern is by merging similar colors. Your generated chart might list three or four shades of blue that are practically identical to the naked eye. You might see calls for DMC 3752, DMC 3753, and DMC 931—all very similar medium-dark blues.
Scan your color key for groups of shades like this. By deciding to use just one of those colors (say, DMC 931) for all three symbols, you can shrink your thread shopping list and make the stitching process far less complicated. This kind of thoughtful editing is what transforms a computer-generated chart into a truly personal, handcrafted project. It puts you back in creative control and ensures your effort is spent on what really matters.
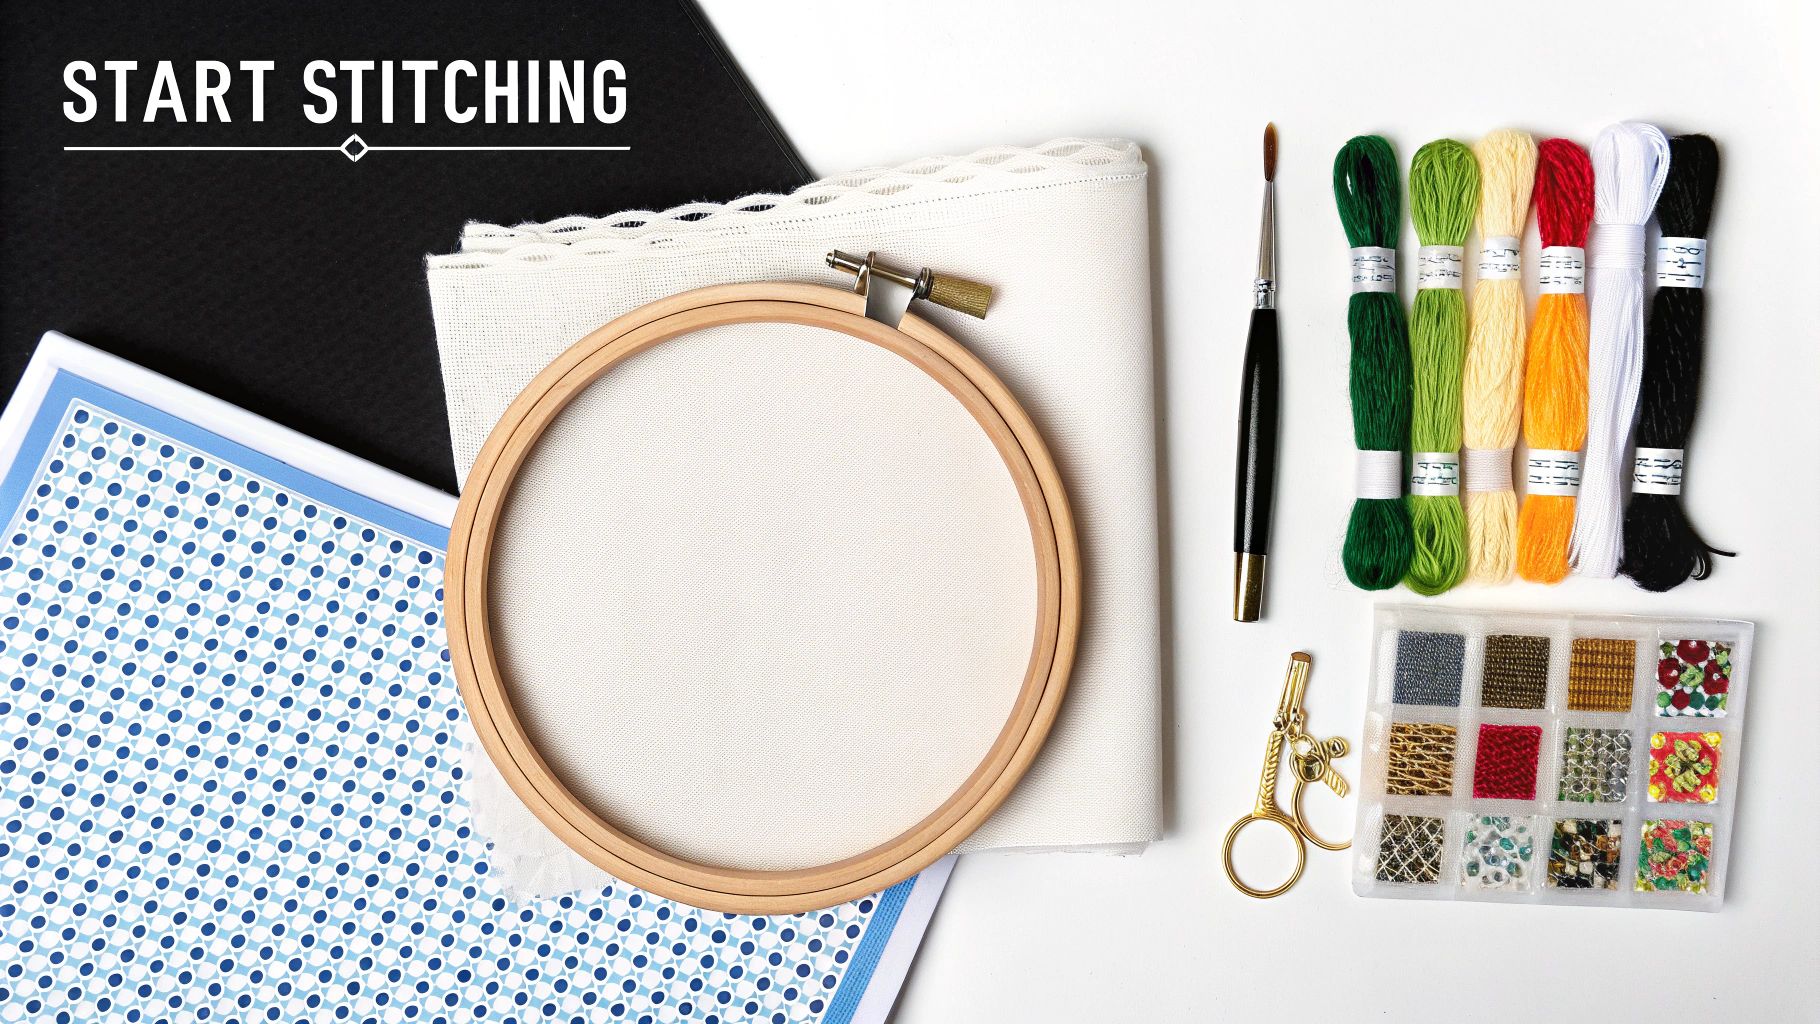
Gathering Your Supplies and Starting Your Project
Alright, you've got your digital pattern perfected and ready to go. Now for the really exciting part: turning that file on your screen into a real, tangible piece of art. This is where the magic happens, but first, you'll need to get everything organized.
It’s easy to forget how much things have changed. Not long ago, the only way to do this was to meticulously plot out designs on graph paper. It took ages, required a ton of patience, and mistakes were common. Today, most stitchers I know lean on the speed and accuracy of online tools, especially when they need to convert a photo to a cross stitch pattern for free just for a fun personal project.
From PDF to Shopping List
The PDF you downloaded is more than just a chart; it's your treasure map. The first thing to look for is the color key or floss legend. This is your shopping list, and it tells you every single DMC floss number you'll need to bring your picture to life.
With that list in hand, you're ready to gather your materials.
- DMC Floss: Head to your local craft store or browse online. I always suggest buying one skein of each color to start. You can always grab more later if you notice you're running low on a specific shade, especially for large blocks of color like a sky or a background.
- Aida Fabric: Your pattern should tell you the finished dimensions based on a certain fabric count (like 14-count or 18-count). A golden rule is to always buy a piece of fabric that’s at least three inches larger on all sides. This extra margin gives you plenty of room for handling, fraying, and eventually framing.
- Needles: You can't go wrong with a size 24 tapestry needle for 14-count Aida—it's the workhorse of the cross-stitch world. If you're using a finer fabric like 18-count, a size 26 needle will glide through the smaller holes much more easily.
If you want a more detailed rundown of all the gear, check out our complete guide on what you need for cross stitch.
Printing and Preparing Your Chart
When it's time to print, you've got a couple of choices. For a small, simple pattern, printing a single page in color can be helpful. But for bigger, more complex projects, I actually prefer printing in black-and-white. The symbols often stand out more clearly without the distraction of color, making them easier to read over long stitching sessions.
Large photo-to-stitch patterns are often tiled across multiple pages. Just print them all out, line up the edges, and tape them together to create one big master chart. It's so much easier to see the whole picture and track your progress this way.
My go-to trick: Use a highlighter to mark off the stitches on your paper chart as you complete them. It’s such a simple thing, but it’s a lifesaver for keeping your place, especially when you have to put your project down and come back to it later.
Setting Up for the First Stitch
Before you even thread your needle, a little bit of prep work will save you a world of headaches down the line. First, tackle those raw edges on your Aida. A quick run of masking tape around the border or a simple whip stitch will stop it from fraying into a mess while you work.
Another game-changing technique, particularly for these big, detailed photo conversions, is gridding. You can use a water-soluble fabric pen or even a strand of a contrasting thread to lightly stitch a 10x10 grid onto your fabric. This grid matches the darker lines on your pattern, making it ridiculously easy to count stitches and pinpoint exactly where you are. It’s the best way to make sure your project gets off to a perfect start.
Common Questions About Turning Photos into Patterns
When you first dip your toes into converting photos into cross-stitch patterns, you're bound to have some questions. It’s a process that’s part art, part technical know-how, and getting it right can save you a ton of frustration down the line. I've seen these same questions pop up time and again, so let's walk through them.
Getting a fantastic result really boils down to the choices you make before a single thread is pulled. Let’s tackle some of those key decisions right now.
What Kind of Photos Make the Best Cross-Stitch Patterns?
The secret to a great pattern is a great source photo. You'll want to start with a high-resolution image where your main subject is crystal clear. Think of a portrait where a person or a pet is in sharp focus, ideally against a simple, uncluttered background. Good, even lighting and strong contrast are your best friends here.
On the flip side, some photos just don't translate well. You'll want to steer clear of images that are:
- Blurry or low-resolution: If the original image is fuzzy, the pattern will be too. The software needs enough pixel data to create a clean design, otherwise, you'll get a muddy, indistinct final product.
- Poorly lit: Photos with harsh, dark shadows or blown-out, super-bright highlights will lose a lot of detail. The conversion software simply can't "see" what's not there.
- Overly cluttered: A busy background is the enemy of a good pattern. All those tiny details will fight for attention with your main subject, creating a messy chart full of what we call "confetti" stitches.
How Many Colors Should I Choose for My Pattern?
This is the ultimate balancing act. If you use too few colors, a detailed photo can look flat, almost like a cartoon. But if you use too many, you'll end up with a project that’s not only incredibly complex but also very expensive to buy all the floss for.
From my experience, a palette of 30 to 50 colors is the sweet spot for most photo conversions, especially portraits. This range gives you enough shades to create realistic depth and smooth color transitions without getting overwhelming.
The preview feature in your pattern converter is your most important tool here. Play around with the color count. Slide it up and down and watch how it affects the image. The goal is to find the lowest number of colors that still captures all the important details you love about your photo.
My Pattern Has Too Many "Confetti" Stitches. How Can I Fix It?
Ah, confetti—those tiny, isolated single stitches that pop up all over a generated pattern. They're a classic issue with automated conversions, but you can definitely manage them. The best fix happens before you even upload the photo. Try tweaking the image a bit by increasing the contrast or even slightly blurring the background. This simplification helps the software make cleaner color blocks.
If you’ve already generated your pattern and it’s a confetti-fest, you still have options. You can manually edit the chart, looking for those lone stitches and changing their symbol to match a larger color block right next to them. Some of the more advanced converters also have a built-in "reduce confetti" or "smoothing" option you can try during the conversion process itself.
Can I Sell Patterns I Create with a Free Online Converter?
This is a really important one, and the answer is almost always no. There are two main hurdles here. First, you have to own the copyright to the original photograph. You can't just grab an image from the internet and turn it into a pattern—that’s a clear violation of intellectual property laws.
Second, even if it's your own photo, you need to check the fine print. Most free online converters explicitly state in their terms of service that any patterns you create are for personal, non-commercial use only. If you’re hoping to sell your designs, you’ll need to invest in software that grants you a commercial license for your creations. Always, always double-check the usage rights of any tool before you start a business with it.
Ready to skip the trial and error and get a perfect, stitch-ready kit delivered to your door? At Cross Stitched, we transform your favorite photos into beautiful, all-in-one custom cross stitch kits. Visit us at https://cross-stitched.com to start your masterpiece today.


