
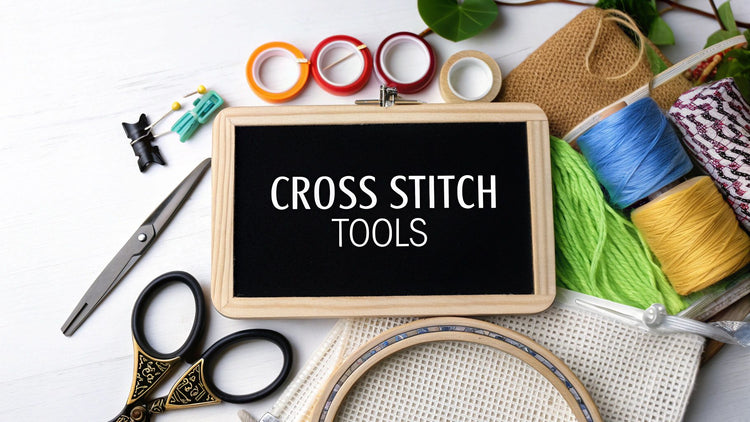
Before you ever thread a needle, gathering your tools is the first step in any successful cross stitch project. Think of it like a chef prepping their ingredients—having everything you need on hand makes the entire process smoother, more organized, and way more fun.
Building Your Foundational Stitching Toolkit
Trying to cross stitch without the right gear is a recipe for frustration. Each accessory, from the fabric you stitch on to the scissors you snip with, plays a vital role. The good news? Your starting toolkit is refreshingly simple, but every single piece is critical for turning that blank fabric into a work of art.
At the heart of it all are four key players: your fabric, your floss, a needle, and the pattern. The fabric is your canvas, the floss is your paint, the needle is your brush, and the pattern is your guide. You can't stitch without them.
The Essential Quartet of Cross Stitching
Before you get tempted by all the fancy gadgets out there, getting comfortable with these four basics is the most important thing. They all work together to help you create those neat, even little 'X's that define cross stitch.
- Fabric: Most stitchers, especially beginners, start with Aida cloth. Its evenly woven squares create a natural grid that makes counting and stitching a breeze.
- Floss: This is just the fancy name for the colored thread you'll be using. DMC cotton floss is the gold standard in the stitching world, loved for its high quality and huge range of colors.
- Needles: You'll want to use tapestry needles. These have a blunt tip and a large eye, which is perfect for slipping through the holes in Aida cloth without splitting the fabric threads.
- Pattern: This is your roadmap! A pattern chart uses symbols to show you exactly which color of floss to use for every single stitch.
This image lays out how these basic tools form the foundation of your kit.
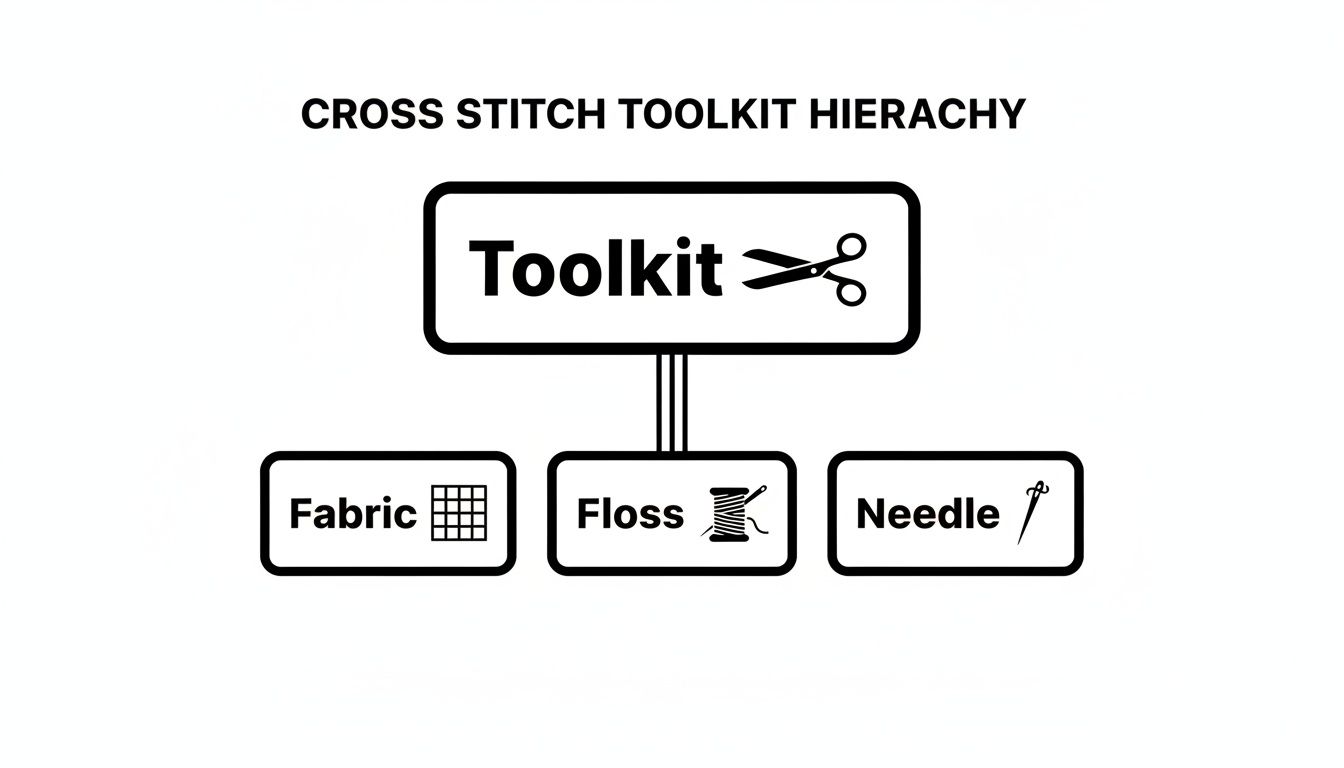
As you can see, everything builds on that core trio of fabric, floss, and a needle. Those are the absolute must-haves.
Must-Have vs Nice-to-Have Cross Stitching Accessories
When you're starting out, it can be tough to know what's truly essential versus what's just a helpful extra. This table breaks it down, helping you prioritize what you need to buy first.
| Accessory Type | Essential for Beginners? | Primary Function | Recommended For |
|---|---|---|---|
| Fabric (Aida) | Yes | Provides the gridded canvas for stitching. | All stitchers, especially beginners. |
| Floss (Embroidery Thread) | Yes | The colored thread used to create the design. | All stitchers. |
| Tapestry Needles | Yes | Used to pull floss through the fabric. | All stitchers. |
| Pattern/Chart | Yes | The instructional guide for the design. | All stitchers. |
| Embroidery Hoop/Frame | Yes | Holds fabric taut for even tension. | All stitchers for best results. |
| Embroidery Scissors | Yes | For cleanly snipping thread. | All stitchers. |
| Needle Minder | No | A magnetic holder for your needle when not in use. | Stitchers who often lose their needles. |
| Highlighter/Pen | No | For marking off completed sections of a pattern. | Stitchers working on complex projects. |
| Magnifier/Light | No | Enhances visibility of fabric and stitches. | Stitchers with vision challenges or who work in low light. |
| Floss Organizer | No | Keeps floss bobbins or skeins tidy. | Stitchers with a large collection of colors. |
Ultimately, starting with the essentials ensures you have a great foundation. You can always add the "nice-to-haves" later as you discover what would make your personal stitching experience even better.
Tools for Tension and Precision
Once you have your core materials, the next priority is managing your fabric tension and making clean cuts. This is where hoops and scissors become your best friends. If your fabric is loose, you'll end up with uneven, puckered stitches that are a real headache to fix later on.
An embroidery hoop, whether classic wood or modern plastic, holds your fabric tight like a drum. This creates a beautifully stable surface to work on. Many stitchers love the traditional feel of wooden hoops, while others prefer plastic ones that often have a small lip to grip the fabric extra securely.
The secret to professional-looking cross stitch isn't just skill—it's tension. A properly tensioned fabric allows the needle to glide through smoothly and helps each 'X' form perfectly, laying flat without distorting the material around it.
A good pair of scissors is just as crucial. You'll need small, sharp embroidery scissors to snip your floss close to the fabric without accidentally cutting your stitches. And for those times when you make a mistake (it happens to all of us!), a seam ripper is a lifesaver, letting you carefully pull out stitches without damaging your fabric.
The love for this craft just keeps growing. The global cross-stitch market was valued at USD 0.15 billion and is expected to keep climbing, fueled by the DIY movement and the desire for personalized projects. For a more detailed look at what you need to get started, you can also check out our guide on what do you need for cross stitch.
Organizing Your Supplies for a Seamless Workflow
Let's be honest: a messy workspace is a creativity killer. When you spend more time untangling a bird's nest of floss or hunting for the right needle than you do actually stitching, your relaxing hobby starts to feel like a chore. The good news is that creating a calm, efficient stitching corner isn’t about buying fancy furniture. It's all about setting up smart systems for your gear.
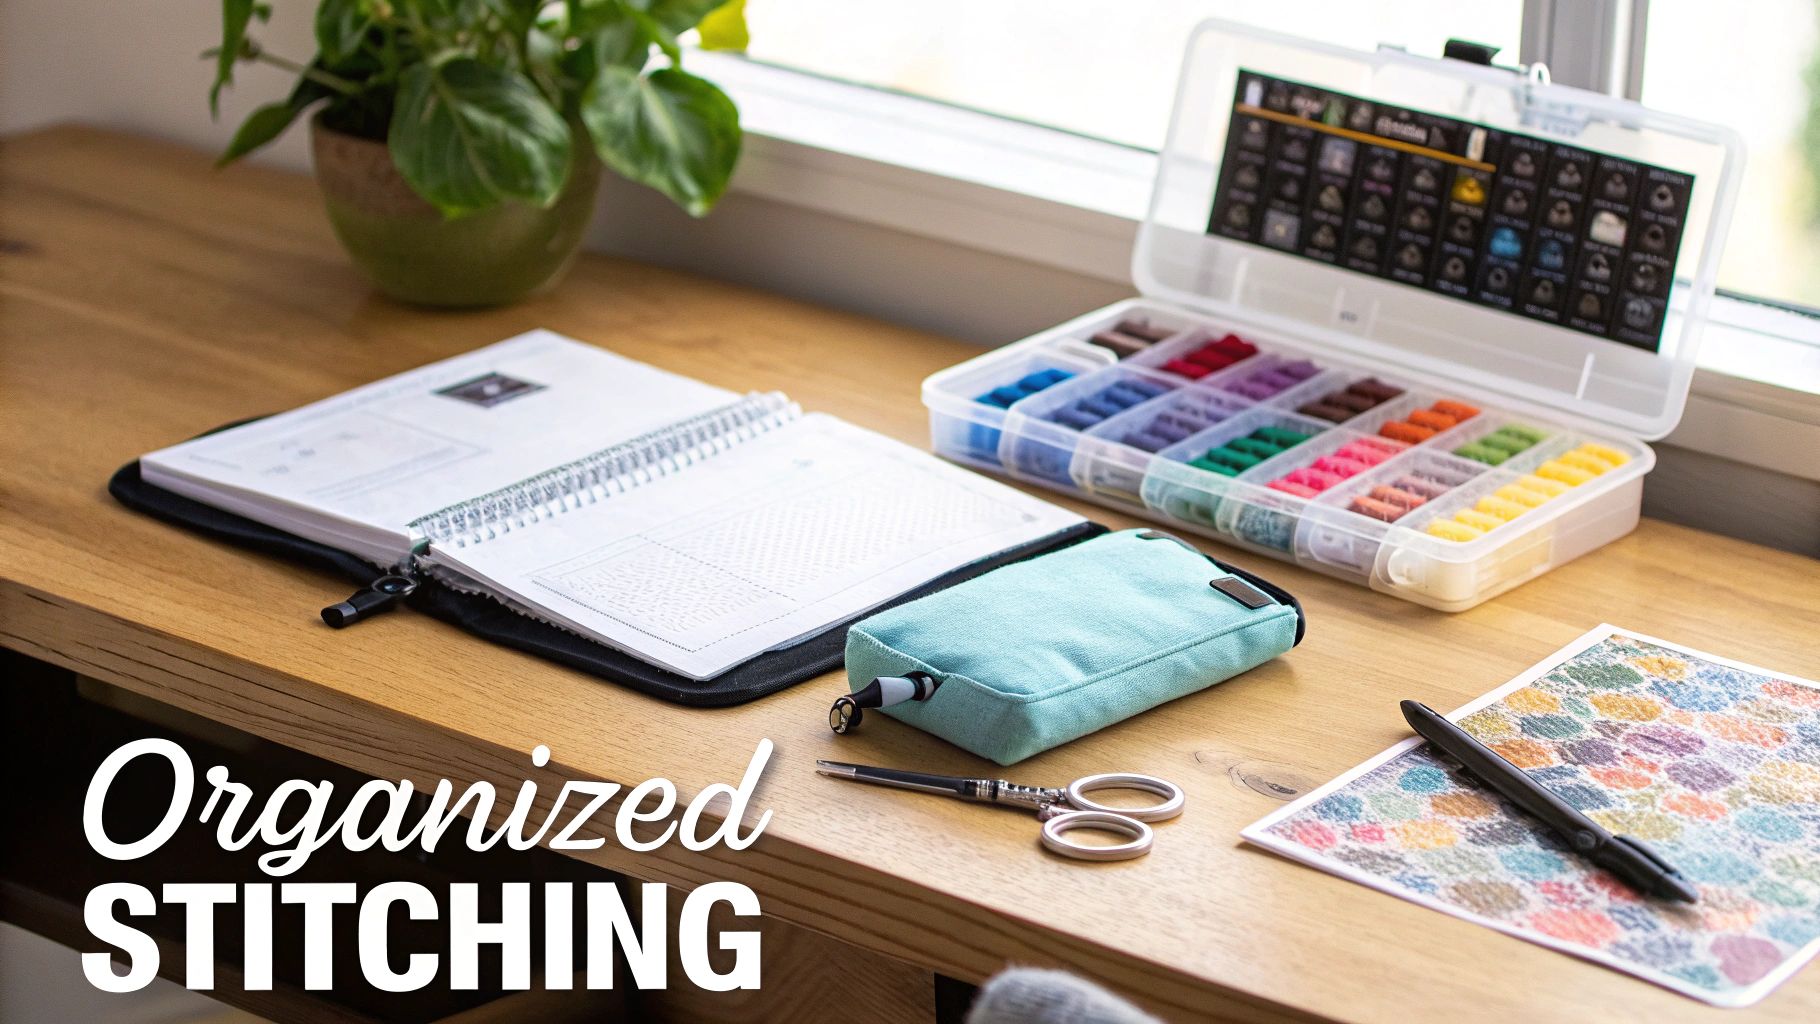
The goal here is simple. We want to build a seamless workflow so you can grab your project and be stitching in seconds, not minutes. A little organization protects your supplies and, more importantly, frees up your mind to focus on the fun part: creating something beautiful.
Taming the Thread Rainbow
Embroidery floss has a natural tendency to tangle into an impossible knot if you just look at it wrong. A solid organization system is a must, especially as your collection grows from a few basic colors to dozens or even hundreds of skeins.
For most people, the journey starts with winding floss onto cardboard or plastic bobbins. You just wrap the thread, label the bobbin with the DMC number, and file it away. Pop them into a clear plastic divider box, and you can see your entire palette at a glance. It's a cheap, easy, and incredibly effective method.
An organized floss collection does more than just prevent tangles; it inspires creativity. When you can easily see all your colors laid out, you're more likely to experiment with palettes and take on more ambitious projects.
As your stash grows, you might want to look at other options. Floss drops are a great alternative; you simply loop the original skein through a hole on a tag. Many stitchers then group these on metal rings or store them in binders, almost like a "floss library" perfect for huge projects. If you're weighing the options, our guide on choosing a cross stitch thread organiser can help you find the system that's right for you.
Protecting Your Work in Progress
Your current project needs just as much TLC as your stashed supplies. Leaving your hoop out on the couch is an open invitation for dust, pet hair, and the occasional coffee spill to ruin your hard work. This is where dedicated project bags and guards are worth their weight in gold.
- Project Bags: Think of these as a dedicated home for your active project. They’re typically zippered pouches with enough room for your hoop or frame, the threads you're using, your scissors, and the pattern. It keeps everything in one place and makes your project portable enough to take anywhere.
- Grime Guards: This is a clever little accessory. It’s a fabric tube with elastic that fits snugly around your hoop, covering the excess fabric. It keeps the oils from your hands off the cloth, preventing that dreaded discoloration along the edges after hours of handling.
If you want to go deeper into conquering creative chaos, checking out a guide on how to organize craft supplies effectively can give you some fantastic, universal strategies that work for any hobby.
Smart Solutions for Needles and Notions
We’ve all done it—stuck a needle in the arm of the sofa and promptly lost it. Not only is it frustrating, but it’s also a safety hazard! Keeping your needles sorted is crucial, especially since you’ll be using different sizes for different fabrics.
A magnetic needle minder is an absolute game-changer. It's a small, often decorative, magnet set that attaches right to your fabric. It gives you a safe place to "park" your needle when you're changing colors or taking a break. No more lost needles!
For storing the rest of your needle collection, a couple of solutions work beautifully:
- Pincushions: The classic tomato pincushion is a classic for a reason! Many modern ones even come with a built-in sharpener to keep your needle tips in top shape.
- Needle Cases: For a more organized approach, small cases or "needle books" with felt pages are perfect. You can sort your tapestry needles by size (like size 24, 26, and 28) so you can instantly find the right one for your project.
Putting these simple systems in place clears the clutter and lets your creativity flow without interruption.
Elevating Your Craft with Advanced Stitching Tools
So, you've got the basics down. Your workspace is tidy, you know your way around a hoop and needle, and you’re feeling confident. But as you start eyeing those bigger, more detailed patterns, you might begin to feel the limits of your starter kit. This is where the world of advanced accessories opens up, and trust me, it’s a game-changer.
These aren't just fancy gadgets; they're smart investments that solve the real-world problems every dedicated stitcher eventually runs into—eye strain, fabric management, and getting that picture-perfect finish.
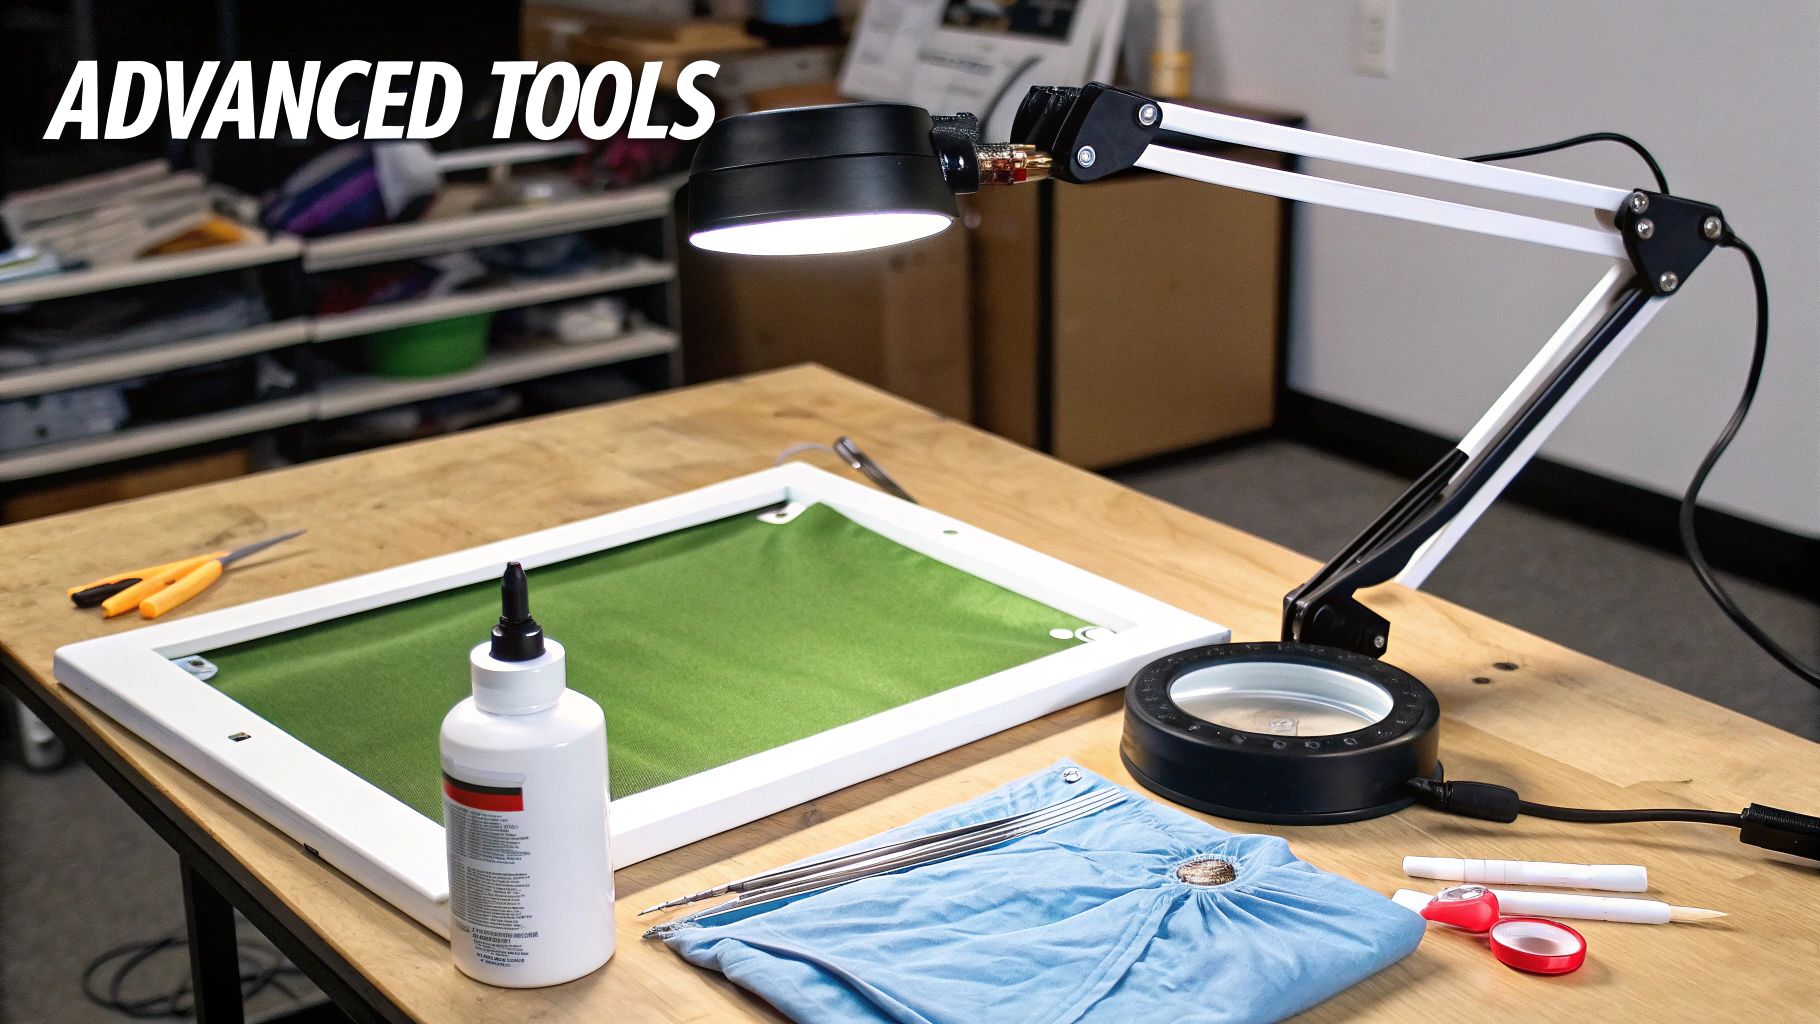
Think of it this way: anyone can take a decent photo with a smartphone. But a professional photographer uses a DSLR with different lenses to get stunning, high-quality shots. Your basic tools get the job done beautifully, but the advanced gear gives you a whole new level of control and creative freedom.
Seeing Your Stitches in a New Light
Let's be honest, one of the biggest challenges in cross-stitch is simply seeing what you're doing. Working on high-count fabrics like 28-count linen or stitching late into the evening can turn a relaxing hobby into a headache-inducing squint-fest. That's where proper lighting and magnification come to the rescue.
A floor-standing craft lamp with a built-in magnifier is the holy grail for many stitchers. These lamps flood your work with bright, daylight-quality light, which means you see the true colors of your thread and banish annoying shadows. The magnifier makes every tiny square of fabric pop, letting you place your stitches with perfect accuracy.
If a big lamp isn't your style, wearable options are fantastic alternatives. Lighted head visors or neck lights put a focused beam exactly where you’re looking, moving right along with you. They’re great for travel or for zeroing in on a tricky section.
Mastering Fabric Tension Beyond the Hoop
That trusty wooden hoop is perfect for small projects. But when you graduate to a full-coverage masterpiece, constantly moving the hoop becomes a real pain. It can crush the stitches you’ve already completed and leave stubborn creases in the fabric. This is exactly why advanced framing systems were invented.
- Scroll Frames: These are brilliant for large pieces. Your fabric attaches to two rollers, and you simply scroll through the project as you work. The unused fabric stays neatly rolled up and clean, and you get amazing, consistent tension across your entire stitching area. No more hoop marks!
- Q-Snaps: A more modern favorite, Q-snaps are lightweight PVC frames. You lay your fabric over the frame, and clamps snap on to hold it tight. They’re super easy to use and give you drum-tight tension without squashing your beautiful stitches.
Upgrading your framing system is one of the most impactful changes a serious stitcher can make. It not only protects your project but also improves your stitching posture and speed, as you're not constantly adjusting a small hoop.
The passion for this kind of detailed craft is only growing. The needlecraft patterns market was valued at around USD 500 million and is expected to hit USD 776 million by 2033. That proves a lot of people are discovering the joy of precision crafts, where the right tools truly elevate the experience. You can read more about the needlecraft patterns market and its growth on Archive Market Research.
Achieving Flawless Stitches with Specialized Tools
Ready to get into the finer details? A few smaller accessories can take your work from "nicely done" to "wow, that's flawless!"
A laying tool is a perfect example. It's essentially a smooth, pointed stick (made of wood, metal, or even bone) that you use to guide your strands of floss as you pull them through the fabric. This simple action, often called "railroading," makes the threads lie down flat and parallel, giving your stitches a silky-smooth finish and a beautiful sheen.
Another little luxury many stitchers swear by is thread conditioner. Usually made from beeswax or a synthetic alternative, you just pull your thread through it before stitching. This stuff works wonders—it tames flyaways, reduces static, and helps the thread glide through the fabric like butter. The result? Fewer knots, less fraying, and a much less frustrating stitching session.
While you don't need it, it’s one of those small upgrades that makes a big difference, much like how a magnetic cross stitch needle minder quickly becomes something you can't live without.
Investing in your craft is about making the process more enjoyable and the results more professional. The table below breaks down some of the best upgrades to consider as you get more serious about stitching.
Strategic Upgrades for Serious Stitchers
| Accessory | Primary Benefit | Ideal For | Average Price Range |
|---|---|---|---|
| Magnifying Craft Lamp | Reduces eye strain and improves accuracy with bright, magnified light. | Stitchers working on high-count fabric, in low light, or with complex patterns. | $50 - $200+ |
| Scroll Frame or Q-Snap | Provides even, consistent tension across large projects, eliminating hoop marks. | Large, full-coverage designs or delicate fabrics that can't be creased. | $20 - $80 |
| Laying Tool | Ensures floss strands lie flat and parallel for a smooth, professional finish. | Stitchers who want to perfect their stitch appearance and texture. | $5 - $30 |
| Thread Conditioner | Reduces tangles, knots, and fraying, making thread easier to manage. | Anyone working with metallic, silk, or finicky cotton threads. | $5 - $15 |
By adding these advanced tools to your collection over time, you’ll not only tackle more ambitious projects with confidence but also find a deeper satisfaction in the beautiful work you create.
Choosing Between Kits and Individual Supplies
Your first foray into cross-stitching probably starts with a kit. It’s that inviting little package that has everything you need, taking all the overwhelming guesswork out of the equation so you can just start stitching. But after a project or two, you'll likely feel the pull to start hand-picking your own cross stitching accessories.
This is a classic crossroads for every stitcher: stick with the convenience of a kit or go à la carte? Neither path is wrong, but they offer very different experiences. The best choice really boils down to where you are in your stitching journey and what you hope to create.
The Allure of the Cross Stitch Kit
If you’re just dipping your toes in, a cross stitch kit is your best friend. Think of it like a meal delivery kit—all the ingredients are pre-measured, the recipe is clear, and you're pretty much guaranteed a great result without having to wander the aisles of a giant grocery store.
This all-in-one approach is fantastic for a few key reasons:
- Zero Hassle: Kits mean no agonizing over fabric counts, matching dozens of thread shades, or figuring out what needle size you need. It’s all there, ready to go the moment you open the box.
- Budget-Friendly: Buying a kit is almost always cheaper than sourcing all the supplies separately, especially if you're just trying the hobby out. It's a low-risk way to see if you even like cross-stitching.
- Simple Start: The floss is often pre-sorted and the fabric is cut to the perfect size for the pattern. This smooths out the learning curve and lets you focus on the simple, satisfying rhythm of stitching.
Of course, that convenience has its limits. The tools included, like the needle or hoop, are usually pretty basic. And, most importantly, you’re locked into the design and materials in the box, which doesn’t leave much room to put your own creative spin on things.
The Freedom of Choosing Your Own Supplies
After you've finished a few projects, you’ll start to figure out what you like. Maybe you realize you prefer working with a specific type of fabric or fall in love with a pair of super-sharp scissors. This is when buying your supplies individually starts to feel less like a chore and more like a creative adventure.
Building your own toolkit piece by piece lets you:
- Control the Quality: You can choose to invest in the good stuff—premium DMC floss that gleams, high-quality Zweigart fabric that feels great in your hands, or scissors that snip threads cleanly every single time. This upgrade makes a real difference in both the process and the final product.
- Customize Everything: This is where the real fun begins. You can take any pattern and make it your own by swapping out the colors, stitching it on navy blue Aida instead of white, or even adding beads and other embellishments.
- Build a Lasting Collection: Every tool you buy becomes a trusted part of your crafting arsenal, ready and waiting for whatever project catches your eye next.
Assembling your own supplies is like a painter curating their personal set of brushes and paints. It gives you complete freedom to bring your unique vision to life, one stitch at a time.
This choice between individual items and a pre-made set pops up in lots of hobbies. For example, artists often debate buying single coloring markers versus organized crafting pen sets. Both options serve a purpose, just at different stages of a creative journey.
Ultimately, there’s no right or wrong here. I know plenty of seasoned stitchers who still love grabbing a simple kit for a quick, relaxing project. At the same time, some ambitious beginners are ready to jump right into a custom project. By knowing the pros and cons, you can decide which path feels right for you and your next creative spark.
Maintaining Your Tools and Preserving Your Projects
Think of your cross-stitching accessories as trusted partners in your creative journey. A chef keeps their knives sharp, a gardener tends their tools, and a stitcher should do the same. Giving your gear a little care ensures they perform beautifully for years to come, making sure every stitch you create is as perfect as the last.
Proper maintenance isn't just about making your tools last longer; it's about avoiding common frustrations. It stops hoops from warping, needles from rusting, and scissors from chewing through your floss instead of cutting it cleanly. And once the stitching is done, the final steps you take are what truly elevate your work from a finished project to a timeless heirloom.
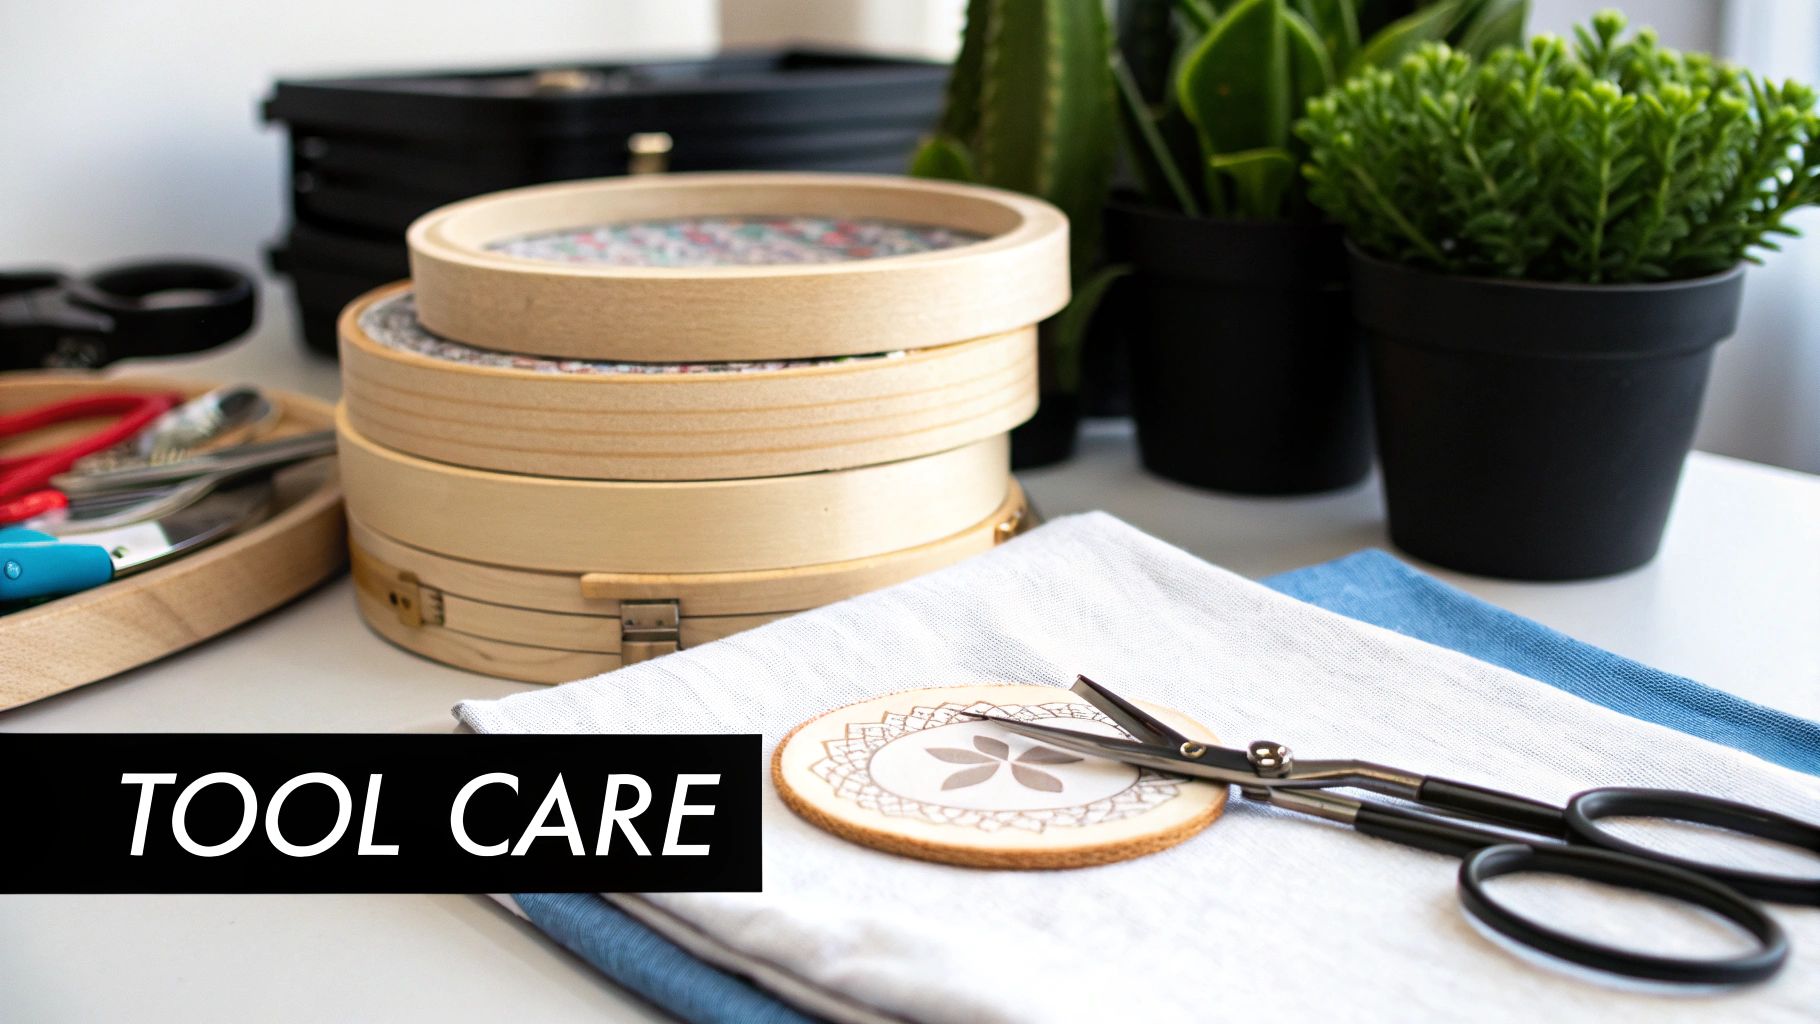
Keeping Your Toolkit in Prime Condition
A little proactive care really does go a long way. Spending just a few minutes on maintenance after a project can save you from having to buy replacements and, more importantly, it protects the quality of your work. Each tool has its own needs.
Wooden embroidery hoops, for example, can absorb oils from your hands or moisture from the air, which might cause them to warp over time. A simple wipe-down with a clean, dry cloth after a long project does wonders. Be sure to store them flat in a drawer or on a shelf—hanging them can let gravity pull them out of shape.
Your needles and scissors are just as crucial.
- Needle Care: Keep your needles safe from rust by storing them in a pincushion filled with emery sand (that little strawberry often attached to the classic tomato pincushions) or on a magnetic needle minder. This not only keeps them clean and sharp but also protects them from moisture.
- Scissor Sharpening: There’s no substitute for sharp embroidery scissors. If you notice them starting to fray your floss instead of making a clean snip, it’s time for a tune-up. A dedicated scissor sharpener works great, but in a pinch, you can carefully snip through a folded piece of fine-grit sandpaper a few times to hone the edge.
Taking care of your tools is an act of respect for your craft. A well-maintained toolkit not only lasts longer but also makes the act of stitching smoother, more precise, and far more enjoyable.
The Final Steps: Washing and Ironing
When you’ve put in that final stitch, the fabric has likely collected some oils from your hands, a bit of dust, and maybe some stubborn hoop marks. Gently washing your project is the secret to making your colors pop and giving the finished piece a professional, polished look.
Start by filling a clean basin with lukewarm water and adding a small amount of gentle, pH-neutral soap—a specialized quilt wash or even a mild dish soap will do. Submerge your project and let it soak for about 15 minutes, swishing it around gently. Never scrub or wring it out, as you could easily distort the stitches you worked so hard on.
Rinse it thoroughly under cool, running water until the water runs clear. Next, lay the wet piece flat on a thick, clean towel. Roll the towel up with the project inside and press gently to soak up the excess water.
To iron it, place the still-damp piece face-down on another clean, thick towel. With a dry iron on a medium-low heat setting, press the back of the fabric. The towel underneath is key; it protects your stitches from being flattened and helps them keep their lovely, plump texture.
Preserving Your Masterpiece for the Future
After investing hours of care into your project, you'll want to protect that investment. Proper storage and framing are what shield your work from dust, sunlight, and other environmental damage, ensuring your art can be admired for generations.
If you aren’t framing it right away, store your finished piece by rolling it around a cardboard tube. Just be sure to place a layer of acid-free tissue paper between the fabric and the tube. Keep it in a cool, dark, and dry place. Never fold your projects! This can create permanent creases that are almost impossible to get out later.
When you're ready to frame, using archival, acid-free materials is non-negotiable.
Key Framing Components for Preservation
- Acid-Free Matboard: This creates a small air gap between the glass and your stitching, preventing moisture from getting trapped and keeping the glass from squashing your work.
- UV-Protective Glass: This is one of the single best investments you can make. It’s like sunscreen for your project, filtering out the harmful ultraviolet rays that cause floss colors to fade over time.
- Proper Mounting: Stick to archival methods like lacing or pinning the fabric to an acid-free foam core board. Steer clear of tapes and glues, which can yellow and damage the fabric over the years.
The embroidery market, which includes our beloved craft of cross-stitch, is experiencing fantastic growth. It hit a global value of USD 3,712.1 million and is projected to climb to USD 7,731.47 million by 2033. This just goes to show how many people are pouring their passion into creating beautiful textile art. You can discover more about the expanding global embroidery market on Cognitive Market Research. Taking these final preservation steps ensures your own unique contribution to this art form will endure for years to come.
A Few Common Questions About Cross Stitch Accessories
As you get more into cross stitch, you’re bound to hit a few snags—and I don't just mean with your thread! Every stitcher, from the absolute beginner to the seasoned pro, runs into questions. How do I handle this giant project? Am I using the right needle? Why does my thread keep tying itself into a bird's nest?
Don't worry, we've all been there. Let’s tackle some of the most common questions that pop up about cross stitch accessories. Think of this as a little chat with a friend who's seen it all.
What’s the Best Frame for a Huge Cross Stitch Project?
When you commit to a big, full-coverage piece, a standard embroidery hoop just won't cut it. You'll spend half your time moving it around, and all that re-hooping can crush your beautiful stitches and leave stubborn creases in your fabric. For the big stuff, you need to bring in the right tools.
Most experienced stitchers will point you toward either scroll frames or Q-snaps. These are the two heavy hitters for managing large-scale projects, and each has its own fan club.
- Scroll Frames: Imagine your project neatly rolled up on two bars, keeping the fabric perfectly taut from top to bottom. That’s a scroll frame. It completely gets rid of hoop marks and keeps the parts of your fabric you aren't working on rolled up, clean, and out of the way.
- Q-Snaps: These are wonderfully simple and effective. They're square or rectangular frames made of PVC pipes, and you use little clamps to "snap" your fabric into place. They give you fantastic, drum-tight tension and come in all sorts of sizes. You can even mix and match parts to build a custom size for your project.
Honestly, you can't go wrong with either. Both do a fantastic job of preventing fabric distortion, which helps your stitches lay down smoothly and evenly across a massive canvas.
How Do I Pick the Right Needle Size for My Fabric?
The needle-and-fabric relationship is key to getting those neat, plump stitches we all crave. The rule of thumb is simple: the higher your fabric count (meaning more stitches per inch), the smaller your needle needs to be. It's all about finding that perfect fit.
If your needle is too big, it will force the holes in the fabric open, leaving you with gaps and a messy-looking finish. On the flip side, a needle that's too small will be a pain to thread and can fray your floss or even snag the fabric as you pull it through.
Think of it like a key in a lock. The right needle will glide through the fabric's holes without any effort. The wrong one will either jam in the hole or rattle around, and neither makes for a good experience. The secret to perfect stitches is a perfect fit.
Here’s a quick cheat sheet for matching your needle to your Aida fabric:
- For 11 to 14-count Aida, a size 24 tapestry needle is your best friend.
- For 16 to 18-count Aida, you’ll want to step down to a slightly finer size 26 needle.
- For really fine fabrics like 22-count Hardanger, grab a slender size 28 needle.
What on Earth Is a Needle Minder, and Do I Actually Need One?
A needle minder is one of those wonderfully simple cross stitching accessories that, once you have one, you’ll wonder how you ever stitched without it. It's basically a cute little magnet that sits on top of your fabric, held in place by a second magnet on the back. It gives you a safe place to "park" your threaded needle when you pause to switch colors or take a break.
So, is it essential? No, you can technically stitch without one. But does it solve the age-old problem of lost needles? Absolutely. No more finding a needle in the sofa cushion (or worse, with your foot!). It also stops you from poking the needle into your fabric to hold it, which can leave a permanent hole or even a tiny rust spot over time. It's a cheap, cheerful, and practical little tool.
How Can I Stop My Floss From Tangling All the Time?
Ah, the dreaded floss knot—the bane of every stitcher's existence. It's a rite of passage, but there are definitely a few tricks to keep those tangles at bay.
First off, work with a shorter length of thread. It’s tempting to cut a long piece so you don’t have to re-thread as often, but that’s a recipe for knots. A piece about 18 inches long, or roughly the distance from your fingertips to your elbow, is the sweet spot.
Second, always separate your strands before you start stitching. Even if a pattern calls for two strands, pull them out one at a time from the main skein, let them hang for a moment to untwist, and then group them back together. It feels like an extra step, but it makes a world of difference.
Finally, you might want to try a thread conditioner. Something as simple as beeswax can work wonders. Just run your floss lightly over the wax, and it will glide through your fabric like butter, cutting down on friction and stopping knots before they even think about forming.
Ready to turn your favorite memories into timeless works of art? At Cross Stitched, we make it easy with custom kits that include everything you need to get started.


