
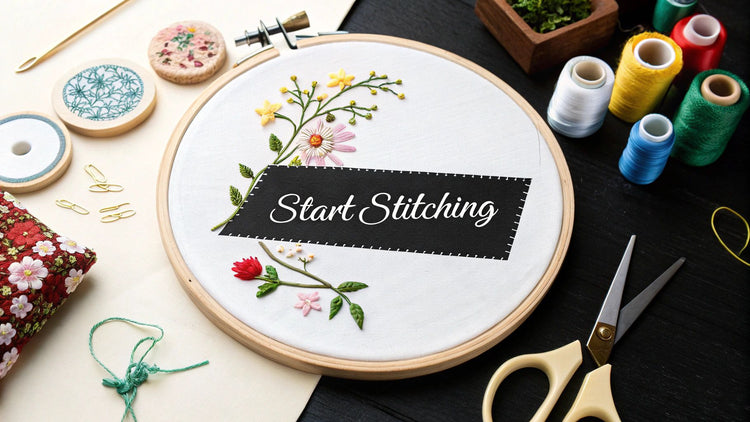
Ready to dive into the relaxing and rewarding world of embroidery but unsure where to begin? That first stitch can feel daunting, but with the right project, it becomes an exciting first step. This guide is designed to bypass the confusion and get you creating something beautiful right away. We've curated a list of eight fantastic beginner embroidery projects that are not only achievable but also incredibly satisfying to complete.
Each project serves as a mini-lesson in essential techniques, designed to build your confidence and spark your creativity. From simple hoop art to personalized tote bags, these ideas will introduce you to fundamental skills without overwhelming you with complex patterns. Before you start, it's helpful to have a grasp of the core techniques. To effectively embark on your stitching journey, understanding the fundamental stitches is key, and this guide on basic embroidery stitches for beginners provides an excellent starting point.
This collection focuses on simple, modern projects that will make you fall in love with embroidery. And for those looking to turn a cherished memory into a timeless piece, platforms like Cross Stitched offer custom photo-to-pattern kits that transform personal photos into guided embroidery projects, making the craft accessible and deeply personal from day one. Let's explore the projects that will launch your amazing stitching journey.
1. Hoop Art with Simple Line Drawings
Hoop art is one of the most accessible and rewarding beginner embroidery projects, focusing on creating a finished piece of art directly within the embroidery hoop that doubles as its frame. This method involves stretching fabric tightly in a hoop and stitching a simple design, often a line drawing, onto the fabric. The result is a self-contained, decorative piece ready for display.
Its popularity, especially among modern embroidery artists on platforms like Etsy and Instagram, stems from its simplicity and immediate gratification. You don’t need complex patterns or a vast array of stitches to create something beautiful. A single, well-executed stitch can bring a minimalist design to life, making it a perfect entry point for anyone new to the craft.

Why It's Great for Beginners
This project is ideal for learning foundational skills without feeling overwhelmed. By focusing on basic outline stitches like the backstitch or running stitch, you build muscle memory and learn to control thread tension. The confined space of the hoop helps you manage the project size, ensuring you can complete it in a reasonable timeframe and feel a sense of accomplishment.
Project Ideas & Implementation
Get started with designs that rely on clean lines rather than dense, filled-in areas.
- Botanical Outlines: A single monstera leaf or a delicate floral sprig.
- Simple Quotes: An inspirational word or short phrase in a scripted font.
- Geometric Patterns: A constellation, a minimalist mountain range, or a simple mandala.
To get your design onto the fabric, a water-soluble transfer pen is your best friend. It allows you to draw your design directly onto the fabric and the markings disappear with a dab of water after you’re done stitching. For more detailed guidance, you can explore various methods for transferring embroidery designs to fabric. For a clean, delicate line, use only two or three strands of embroidery floss.
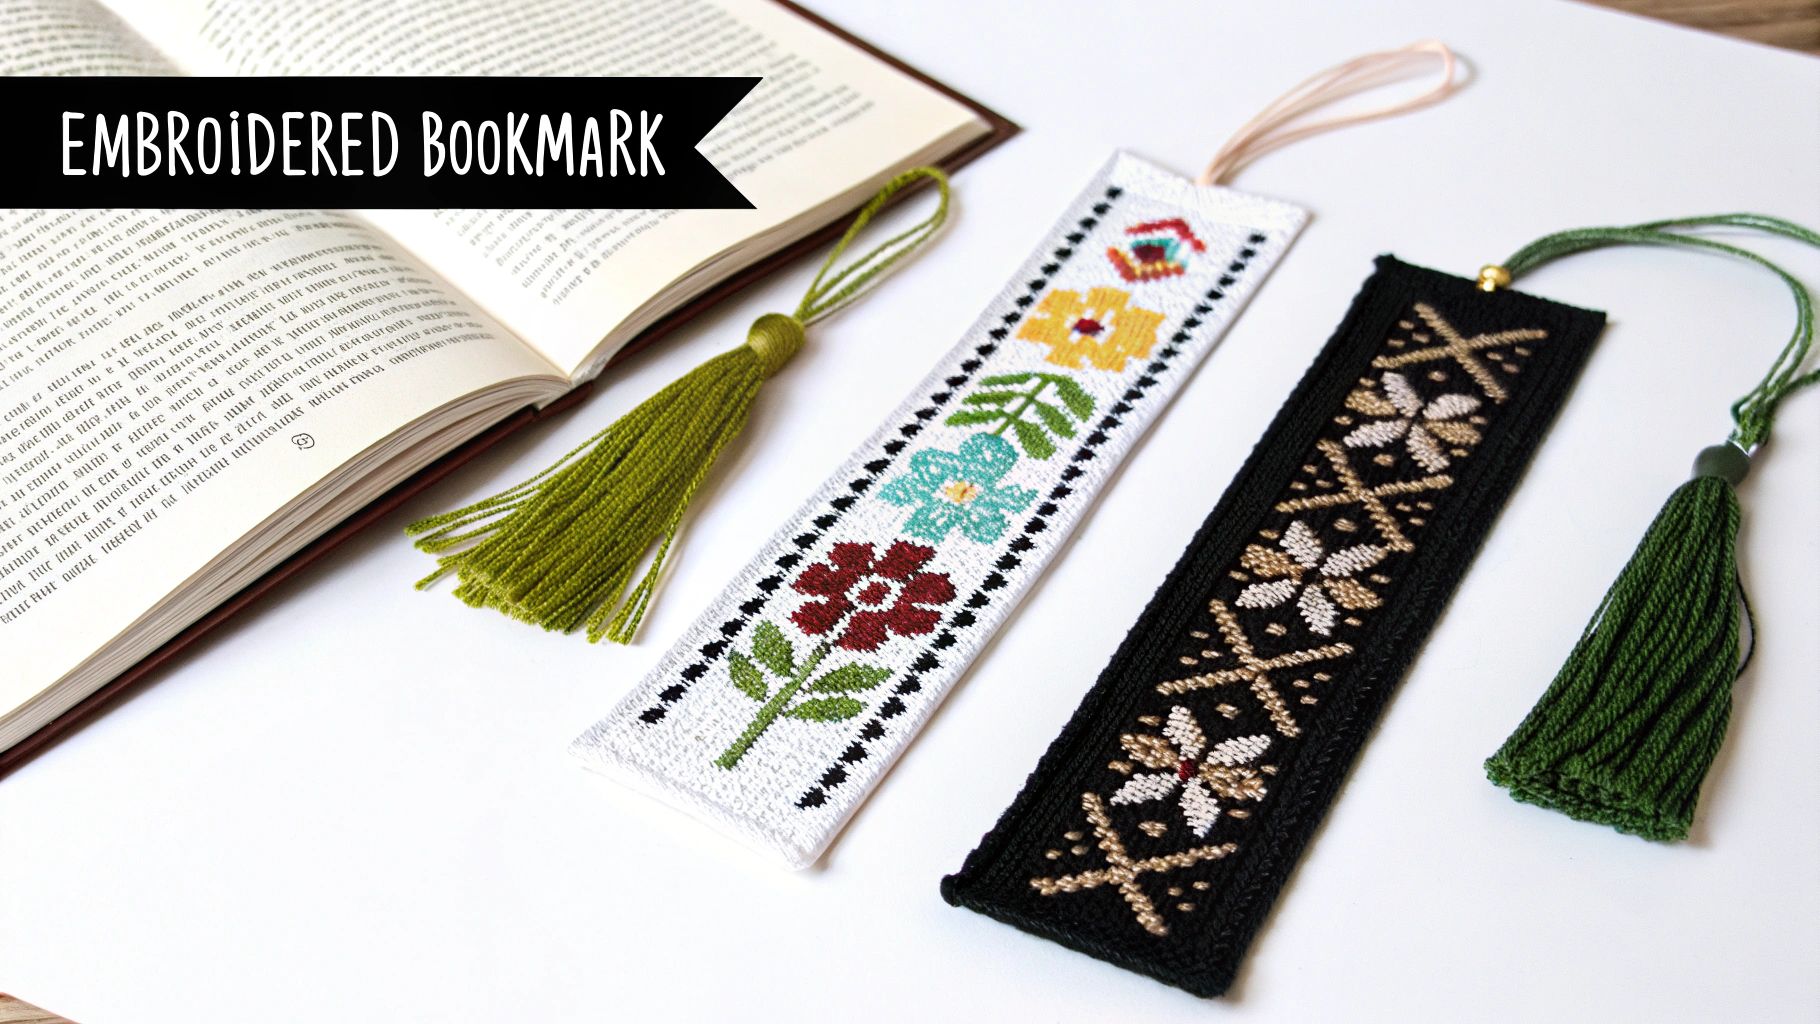
2. Embroidered Bookmarks with Basic Stitches
Embroidered bookmarks are one of the most charming and practical beginner embroidery projects, allowing you to create a beautiful, functional item while practicing fundamental skills. This project involves stitching simple designs onto long, narrow strips of fabric like Aida or linen. The result is a personalized keepsake that makes a thoughtful, handmade gift for any book lover.
The popularity of embroidered bookmarks on platforms like Pinterest and Etsy showcases their appeal as small-scale, satisfying creations. They don't require a large time commitment or extensive materials, making them a perfect weekend project. You can produce something useful and lovely while building your confidence with a needle and thread.
Why It's Great for Beginners
Bookmarks are ideal for beginners because their small size makes them less intimidating than larger projects. They provide a perfect canvas for practicing a variety of foundational stitches without overwhelming complexity. You can experiment with the running stitch for borders, the chain stitch for textured lines, or even simple cross stitches for geometric patterns, all on one manageable piece.
Project Ideas & Implementation
The narrow shape of a bookmark lends itself well to linear and repeating designs. Consider these ideas to get started:
- Floral Borders: A simple vine with lazy daisy stitch flowers running up the side.
- Geometric Patterns: A repeating pattern of colorful cross stitches or triangles.
- Personalized Initials: A single, bold initial or a name stitched in block letters.
- Seasonal Themes: Small snowflakes in winter, tiny suns in summer, or autumn leaves.
For easy, even stitching, use 14-count Aida cloth or felt. To prevent the edges from fraying, you can finish them with pinking shears or a decorative zigzag stitch. If you want to explore more options, you can discover more about the different types of embroidery stitches to add variety to your designs. For extra durability, consider backing the finished bookmark with a piece of felt or even laminating it.
3. Cross Stitch on Pre-Made Kits
Cross stitch is a popular form of counted-thread embroidery where X-shaped stitches are used to form a picture. For those new to stitching, a pre-made kit is one of the best beginner embroidery projects because it removes all the initial guesswork. These kits typically include everything you need: aida fabric with a pre-printed or charted pattern, all the necessary colored threads, a needle, and instructions.
The structured nature of cross stitch, following a gridded pattern, makes it less intimidating than freeform embroidery. It functions almost like a pixel-based art form, where each "X" corresponds to a colored square on a chart. This guided process, heavily promoted by brands like DMC and Dimensions, ensures a pleasant and successful first experience, building a strong foundation for more complex needlework.
Why It's Great for Beginners
A cross stitch kit is a self-contained lesson. It teaches you how to follow a pattern, manage multiple colors of floss, and create uniform stitches. The gridded aida fabric makes it easy to count and place your stitches accurately, while the all-in-one package means you don’t have to worry about gathering supplies. This structured progression helps build confidence and provides a clear path to a finished piece.
Project Ideas & Implementation
Beginner kits often feature charming, simple designs that are quick to complete.
- Simple Animal Designs: A small fox, a cute cat, or a colorful bird.
- Alphabet and Number Samplers: Classic patterns that help you practice basic shapes and letters.
- Holiday-Themed Patterns: Small ornaments or motifs for Christmas, Halloween, or other holidays.
For a smooth start, choose a kit with a low number aida fabric, like 11 or 14-count, as the larger squares are easier to see and stitch. Always keep your thread lengths to around 18 inches to prevent tangles and knots. It's also a good practice to work from the center of the design outward, which ensures your project is perfectly centered on the fabric. If you want to dive deeper, you can find many great options by exploring the best beginner cross stitch kits for adults.
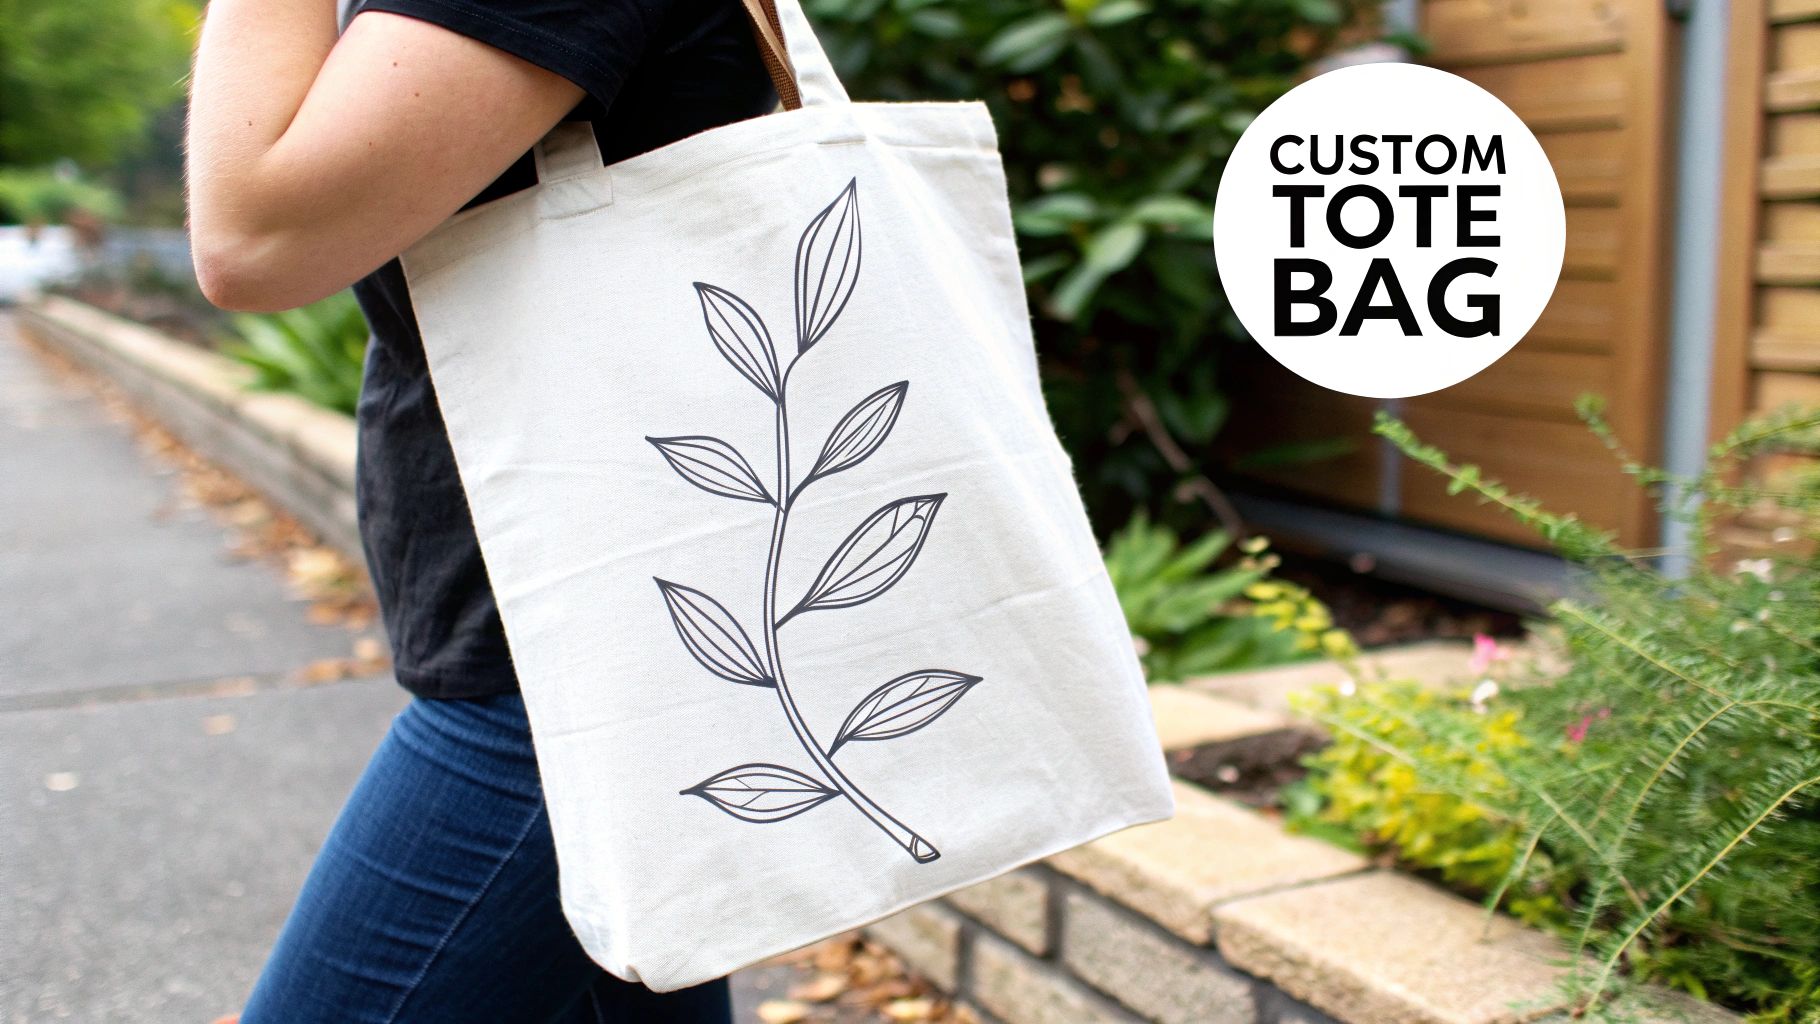
4. Hand-Embroidered Tote Bag with Simple Motif
Embroidering on a tote bag is a fantastic way to create a beautiful, functional item you can use every day. This is one of the most rewarding beginner embroidery projects because it takes the skills learned in static hoop art and applies them to a practical, wearable piece. The process involves stitching a simple motif or design onto a plain canvas or cotton tote bag, instantly transforming a basic accessory into a personalized statement.
This project has gained popularity thanks to the sustainable fashion movement and DIY lifestyle bloggers, who champion the art of upcycling and personalizing clothing and accessories. Unlike a purely decorative piece, an embroidered tote bag serves a purpose, making the time spent stitching feel incredibly productive and satisfying.
Why It's Great for Beginners
Working on a tote bag teaches you how to handle different fabric weights and textures outside the controlled environment of an embroidery hoop. The larger, sturdier canvas is forgiving and easy to stitch on, while the simple design requirement keeps the project from becoming overwhelming. It’s an excellent way to practice stitches like the satin stitch for filling small areas or the lazy daisy for simple flowers, creating a visible, impressive result with minimal complexity.
Project Ideas & Implementation
Choose a simple, bold design that will stand out on the fabric. The goal is to make an impact without needing intricate detail.
- Simple Floral Spray: A few interconnected flowers and leaves on the front.
- Initials or Monogram: A classic personalization stitched neatly in a corner.
- Minimalist Line Art: A simple animal outline, face profile, or abstract shape.
- Geometric Pattern: A repeating pattern on the pocket or along the top edge.
For a durable finish, use a medium-weight canvas or thick cotton tote. Stabilize the area you’re stitching with a tear-away backing to prevent the fabric from puckering. Transfer your design using carbon paper or a fabric-safe pencil. Using two or three strands of floss will ensure your stitches are robust enough for daily use, and finishing your threads with secure French knots on the back will prevent them from unraveling over time.
5. Simple Embroidered Pillow Cover with Basic Shapes
Transforming a plain pillow cover into a personalized piece of home décor is a fantastic and functional beginner embroidery project. This project involves stitching simple designs, like geometric shapes or minimalist motifs, onto a ready-made or self-sewn cotton pillow cover. The result is a beautiful, tangible item that you can use and display immediately.
The appeal of this project, often highlighted on home décor Instagram accounts and by Etsy makers, lies in its practical application. Unlike practice swatches, an embroidered pillow cover provides instant gratification and a visible sense of accomplishment. It demonstrates how a few basic stitches can elevate an everyday object, making it a perfect introduction to embroidering on functional items.
Why It's Great for Beginners
This project is ideal for learning how to handle larger pieces of fabric and understanding design placement on a three-dimensional object. You will practice fundamental stitches like the satin stitch for filling shapes and the stem stitch for elegant outlines. Working on a pre-made item also teaches you how to maneuver your hoop and needle without distorting the fabric, building skills essential for future clothing or accessory projects.
Project Ideas & Implementation
Choose simple, bold designs that make a statement without requiring intricate detail. Consider placing your design in a corner or off-center for a modern look.
- Geometric Patterns: A series of overlapping circles or a repeating triangle motif.
- Simple Florals: A minimalist tulip or a few scattered daisy heads.
- Abstract Shapes: A cluster of organic, free-form blobs for a contemporary feel.
- Cute Animal Faces: A simplified cat or bear face using just a few lines and circles.
For easy marking, use a tailor’s chalk pencil, as the lines brush off easily once you’re finished. If your fabric is thin, place a piece of stabilizing fabric behind your design area to prevent puckering. A key tip is to stitch your design before sewing the pillow cover closed if you are making it from scratch. Using three strands of embroidery floss provides a clean, visible line that is substantial but not bulky.
6. Embroidered Handkerchief with Corner Monogram
Adding a monogram to a handkerchief is a classic and elegant beginner embroidery project that teaches precision and the art of stitching letters. This project involves embroidering initials onto the corner of a plain cotton or linen handkerchief, transforming a simple item into a personalized, practical keepsake. It’s a small-scale project that packs a big impact.
This traditional form of embroidery has seen a resurgence thanks to the vintage craft revival movement. It introduces beginners to the delicate work of creating clean, legible text with a needle and thread. The finished piece is not just practice; it's a functional and thoughtful item, perfect for gifting or personal use, connecting modern crafters to a timeless needlework skill.
Why It's Great for Beginners
A monogrammed handkerchief is ideal for beginners because it requires only a small amount of stitching in a concentrated area. This helps you focus on mastering letter forms and achieving clean lines without the commitment of a larger design. Using a small 4 to 6-inch hoop provides excellent fabric tension and control, making it easier to execute precise stitches like the backstitch, which is perfect for creating sharp letter edges.
Project Ideas & Implementation
The key is to keep the design refined and simple, letting the letters be the star.
- Cursive Initial: A single, flowing initial in a decorative script.
- Interlocking Monogram: Two or three initials creatively woven together.
- Block Letter with Flourishes: A simple block initial embellished with tiny stitched leaves or dots.
To start, lightly trace your chosen letter onto the corner of the fabric with a pencil or a water-soluble marker. For crisp, defined letters, use just two or three strands of embroidery floss. It's a great idea to practice your letter shapes on a scrap piece of fabric first to get a feel for the curves and straight lines before committing to the final handkerchief.
7. Embroidered Iron-On Patch Creation
Creating your own iron-on patches is one of the most functional and fun beginner embroidery projects, allowing you to turn your stitching into wearable art. This project involves embroidering a design onto a sturdy piece of fabric, which is then backed with a heat-activated adhesive. The finished patch can be ironed onto jackets, backpacks, hats, or jeans for instant personalization.
The appeal of patch-making lies in its blend of traditional craft and modern customization, a trend popularized by Etsy creators and DIY fashion communities. It provides a tangible outcome that goes beyond decorative wall art. While embroidery creates a textured, handmade feel, it's useful to understand how this differs from other popular customization methods. For instance, knowing What are DTF transfers can clarify the unique value and aesthetic of a hand-stitched patch versus a printed design.
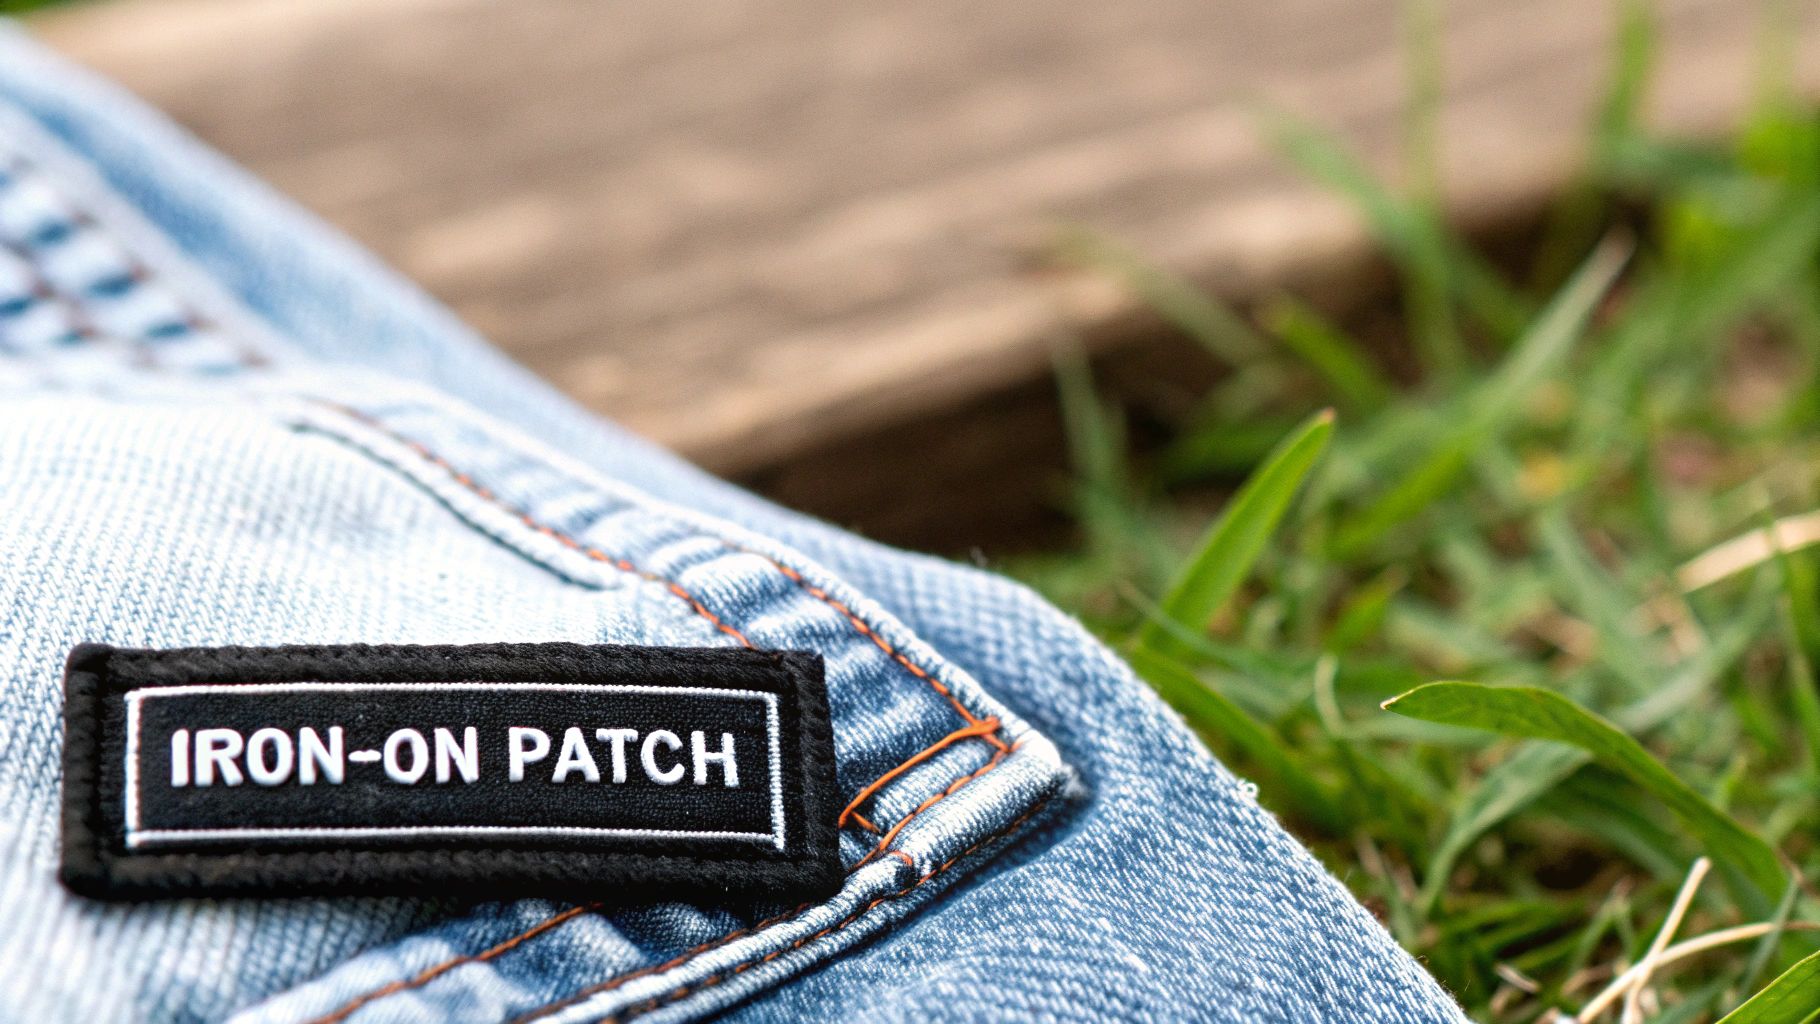
Why It's Great for Beginners
Patch creation is an excellent way to practice stitches on a small, manageable scale. The project teaches you how to create dense, solid-filled areas with the satin stitch and clean, bold outlines with the backstitch. Since patches are small, they are quick to complete, offering a fast and satisfying reward. You also learn a practical finishing skill: how to turn a stitched design into a durable, functional accessory.
Project Ideas & Implementation
Choose bold, simple designs that translate well to a small format and have clear, defined edges.
- Music & Pop Culture: A favorite band logo or a symbol from a beloved movie.
- Cute Characters: A simple animal face, a smiling planet, or a cartoon-style flower.
- Quotes & Words: A single empowering word or a short, punchy phrase on a rectangular background.
Use a sturdy, non-stretch fabric like cotton canvas or felt. For bold, visible stitches, use three to four strands of embroidery floss. After stitching, trim the fabric around your design, leaving a small border. Apply an iron-on adhesive sheet to the back, following the product instructions. To prevent unraveling, stitch a tight border around the entire patch or apply a liquid seam sealant like Fray Check to the edges.
8. Embroidered Greeting Card with Fabric Insert
An embroidered greeting card is a thoughtful, handmade beginner embroidery project that combines the art of stitching with paper crafting. This project involves stitching a small, simple design onto a piece of fabric, which is then mounted onto a blank card. The result is a beautifully textured, multi-dimensional card that stands out from store-bought alternatives.
The popularity of this craft, driven by handmade marketplaces like Etsy and DIY tutorials on Pinterest, lies in its ability to create a personalized and giftable item quickly. It's a wonderful way to practice precise stitching on a small scale, turning your newfound hobby into a heartfelt present for birthdays, holidays, or special occasions.
Why It's Great for Beginners
This project is perfectly suited for beginners because it requires minimal fabric and time, allowing you to complete a satisfying project in a single sitting. The small scale makes it less intimidating than a larger piece, and the final application as a greeting card offers a clear purpose for your work. You can experiment with basic stitches and color combinations without committing to a massive undertaking.
Project Ideas & Implementation
Focus on small, simple motifs that can be completed with just a few basic stitches like the backstitch or French knots.
- Heart Motifs: A simple stitched heart for a Valentine's Day or anniversary card.
- Snowflake Patterns: A delicate snowflake design using white or metallic floss for a holiday greeting.
- Floral Sprigs: A tiny bouquet or single flower for a birthday or thank-you card.
- Monograms: An embroidered initial for a personalized touch.
To create your card, start by stitching your design onto a small square of even-weave linen or Aida cloth. For stability, you can use a tear-away backing while you stitch. Once finished, carefully trim the fabric and mount it onto the front of a blank, card-weight paper using a strong, acid-free adhesive or double-sided tape for a clean, professional finish.
8 Beginner Embroidery Projects Compared
| Project | Implementation Complexity 🔄 | Resource & Cost ⚡ | Expected Outcomes 📊 | Ideal Use Cases & Tips 💡 | Key Advantages ⭐ |
|---|---|---|---|---|---|
| Hoop Art with Simple Line Drawings | Very low — basic backstitch/running stitch and simple transfer | Minimal: hoop, fabric, thread. Estimated $5–15 | Small framed, immediately displayable artwork; basic stitch skills learned | Quick wall decor or beginner practice; tip: use water-soluble pen and 2–3 strands | Immediate display, low cost, confidence builder |
| Embroidered Bookmarks with Basic Stitches | Low — narrow format, several basic stitches but simple patterns | Minimal: fabric/cardstock, thread. Estimated $3–10 | Practical, giftable bookmarks; practice multiple stitch types | Great for gifts, scrap use, classroom projects; tip: use 14‑count aida and pinking shears | Teaches stitch variety, highly customizable, portable |
| Cross Stitch on Pre-Made Kits | Low–moderate — counted technique but guided by chart | Kit supplies included; higher cost $15–40 | Predictable, polished counted-cross results; chart reading skills | Ideal for beginners who want guided projects; tip: work from center and count often | All-in-one kit, reliable outcomes, wide theme selection |
| Hand-Embroidered Tote Bag with Simple Motif | Moderate — larger surface, thicker fabric, placement considerations | Medium: tote + supplies; $8–25+. May need larger hoop/stabilizer | Functional wearable with visible motif; practical embroidery skills | Personalized gifts and wearable art; tip: stabilize with tear-away backing | Highly visible, functional, forgiving large area |
| Simple Embroidered Pillow Cover with Basic Shapes | Low–moderate — placement on finished item, multi-stitch combos | Medium: pillow/cover + thread; $10–20 | Usable home décor piece; design planning and mixed stitches | Home décor or gift projects; tip: stitch before assembly and use stabilizer | Forgiving surface, customizable to room palette |
| Embroidered Handkerchief with Corner Monogram | Low but precision-focused — small detailed work | Minimal: handkerchief + floss; $5–12 | Small personalized heirloom; fine-detail lettering skills | Quick personalized gifts or practice fine stitches; tip: backstitch letters and use 4–6" hoop | Portable, fast, teaches precision and lettering |
| Embroidered Iron-On Patch Creation | Low–moderate — small designs but requires backing/sealing | Low–medium: fusible web, fabric, thread; $3–8 per patch | Durable, wearable patches for garments; bold stitch techniques | Fashion customization, batch production; tip: stitch perimeter and seal edges | Versatile application, bold visual impact, batchable |
| Embroidered Greeting Card with Fabric Insert | Low — small-scale stitching plus card assembly | Minimal: fabric insert, cardstock, thread; $2–5 per card | High-presentation, personalized cards; small-scale design control | Occasion cards and batch crafting; tip: stabilize insert and use acid-free adhesive | Impressive presentation, low cost, mixes crafts for unique gifts |
From First Stitch to Finished Masterpiece: What's Next?
You have now journeyed through a curated collection of beginner embroidery projects, each designed to be an accessible and rewarding entry point into the world of needle and thread. From the minimalist charm of line art in a hoop to the practical elegance of a monogrammed handkerchief, you've seen how basic stitches can transform simple materials into beautiful, personalized items. The goal of this roundup was not just to present ideas, but to demonstrate that embroidery is a craft built on a foundation of simple, repeatable actions.
The key takeaway is that every intricate masterpiece begins with a single, humble stitch. The projects we explored, such as the embroidered tote bag or the fabric-insert greeting card, reinforce this principle. They show that you don't need to master dozens of complex techniques to create something truly special. Instead, focusing on consistency with a few foundational stitches like the backstitch, satin stitch, and French knot will carry you surprisingly far.
Turning Inspiration into Action
The true value of mastering these initial projects lies in the confidence and muscle memory you build. Each completed bookmark, patch, or pillow cover is more than just a finished object; it's a testament to your growing skill and a stepping stone to more ambitious undertakings. You are no longer just an admirer of the craft but an active participant, ready to take the next step.
So, what does that next step look like? It's about personalizing your journey and continuing to build on what you've learned. Consider these actionable pathways forward:
- Combine Techniques: Try adding a simple monogram (like the handkerchief project) to the corner of a tote bag. Or, use the iron-on patch method to create a removable decoration for a pillow cover. Mixing and matching these skills solidifies your learning.
- Introduce New Stitches: Once you feel comfortable with the basics, introduce one new stitch at a time. For example, learn the chain stitch to create a bolder outline for your hoop art or the lazy daisy to add simple floral elements to your designs.
- Experiment with Color and Texture: Don't feel confined to the colors suggested in a pattern. Play with different floss types, like variegated threads that change color automatically, or metallic threads for a touch of sparkle. This is where your unique artistic voice begins to emerge.
Your Creative Journey Awaits
Embroidery is a profoundly personal and meditative craft. It offers a welcome escape from the digital world, allowing you to create tangible art with your own hands. The beginner embroidery projects outlined here are your launchpad. They prove that with a little patience and a willingness to learn, you can produce beautiful, functional, and heartfelt creations. The journey from your first tentative stitch to a finished piece you're proud of is incredibly gratifying. Embrace the process, celebrate your progress, and remember that every stitcher, no matter how advanced, started exactly where you are now. The world of embroidery is vast and welcoming, so pick the project that sparks your joy and begin your creative adventure today.
Ready to turn a cherished memory into your next work of art? Cross Stitched makes it easy by transforming your favorite photos into custom, easy-to-follow cross-stitch patterns and all-in-one kits, perfect for applying your new skills to a deeply personal project. Visit Cross Stitched to start creating a unique keepsake that tells your story, one stitch at a time.


