
You’ve placed that final, satisfying stitch... so, what's next? Knowing how to end a cross stitch is every bit as important as knowing how to start one. A clean, secure finish is what turns your beautiful work into a piece of art that will look fantastic for years to come.
The Secret to a Professional Cross Stitch Finish
This is where the magic really happens. Properly finishing your cross-stitch project is what separates a pretty hobby from a polished, display-ready piece. It’s the final lap where all your careful stitching pays off, but it's a stage that many stitchers, especially newcomers, tend to rush through.
Finishing is so much more than just snipping the last thread. It’s a thoughtful process of securing, cleaning, and presenting your work so it looks its absolute best.
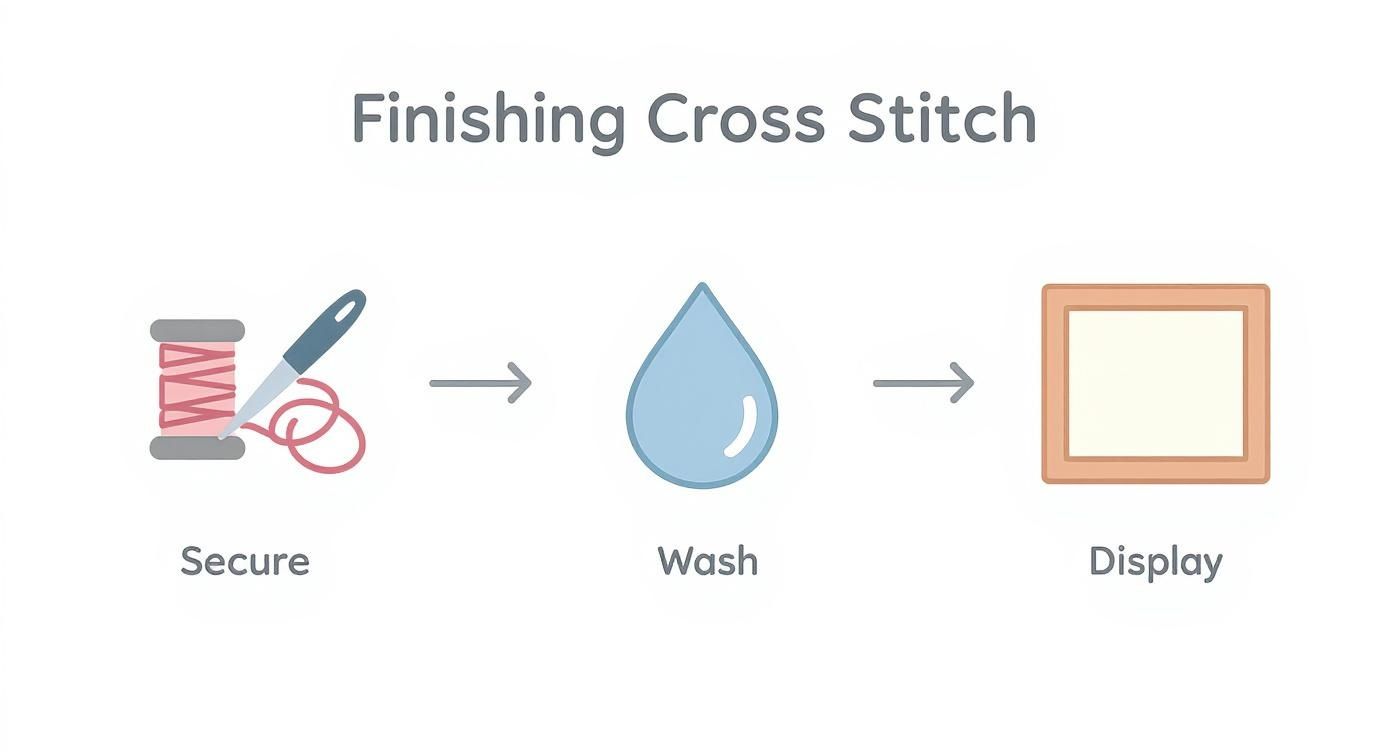
The whole journey to a perfect finish really boils down to three core stages. Think of it as a mini-project in itself.
Here's a quick look at the three core phases you'll go through to get your piece ready for its debut.
Three Core Phases of Finishing Your Cross Stitch
| Phase | Objective | Key Techniques |
|---|---|---|
| Securing Your Threads | Anchor floss invisibly on the back to prevent any unraveling. | Pin stitch, loop start/end, weaving under existing stitches. |
| Washing and Pressing | Remove oils, dirt, and hoop marks, leaving the fabric crisp and flat. | Gentle hand washing, rolling in a towel, ironing from the back. |
| Choosing a Display | Select a final presentation method that complements your work. | Framing, mounting in a hoop, creating a pillow, or making a banner. |
Mastering these steps ensures your hard work doesn't just look incredible the day you finish it, but stays pristine for the long haul.
It's a surprising fact, but while the needlecraft world is booming, industry data shows that while 65% of stitchers buy new patterns, a much smaller number actually see them through to a display-ready state. Often, it's these final technical steps that feel intimidating.
If you want to dive deeper into the nitty-gritty of different methods, you can explore various cross stitch finishing techniques in our detailed guide.
Securing Your Threads for a Flawless Finish
We've all heard it: the back of your work should be as neat as the front. While that's a bit of an old-school rule, there's a lot of truth to it. A clean back isn't just about pride—messy knots and bulky threads can actually create lumps and shadows that show through on the front, especially with lighter fabrics like linen or pale Aida.
Learning how to end your threads without a knot is one of those little skills that takes your work from "hobby" to "heirloom." The idea is to securely weave your thread tail under stitches you've already made on the back. This keeps everything flat, prevents unraveling, and gives your project that polished, professional look. It’s a simple change that makes a huge difference.
The Weaving Method for Most Stitches
For most areas on your project, especially where colors are packed together, burying the thread is the way to go. Once you've made your last stitch in a section, just flip your work over.
Carefully slide your needle under the back of 3 or 4 nearby stitches, pulling the thread tail through. Don't yank it too tight, or you'll pucker the fabric. All you need is a gentle tug to make it snug. Then, just snip the thread off close to the fabric. This is the perfect technique when you're ending a color that’s surrounded by plenty of other stitches.
My Go-To Tip: I always try to run the thread under stitches of the same color. It makes the tail practically invisible and stops any dark threads from peeking through lighter stitches on the front.
This handy infographic shows exactly where this step fits into the overall finishing process.
As you can see, locking in those threads is the first thing you do before you even think about washing or framing.
The Pin Stitch for Isolated Stitches
But what happens when you have a single, lonely stitch out in the middle of nowhere? Think of those "confetti stitches" that give a project detail and shading. There's nothing nearby to weave your thread under.
This is exactly what the Pin Stitch was made for. It’s a tiny, almost invisible stitch that anchors your thread right into the weave of the fabric without adding bulk. You create a tiny loop over a single fabric thread on the back, secure it, and then bury the tiny remaining tail under the main stitch itself. It’s a lifesaver for those tricky, isolated details.
Getting Your Piece Ready for Its Debut
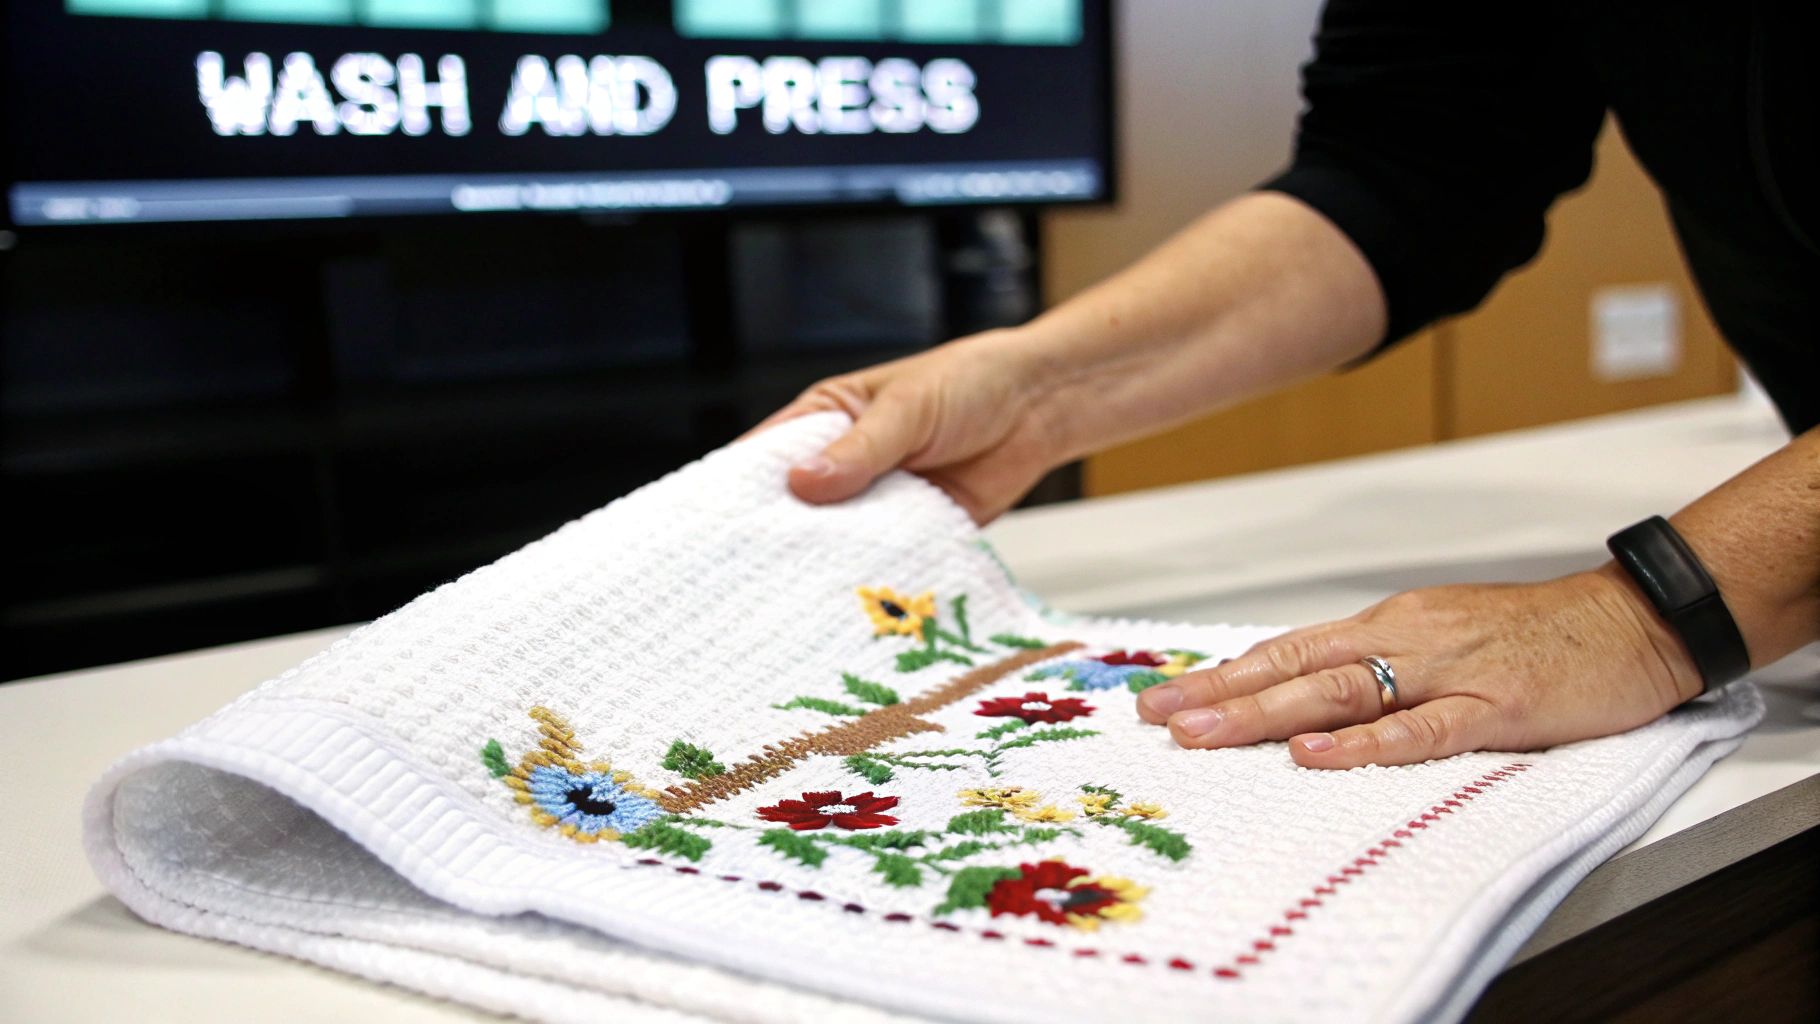
After you've put in the final stitch, your project might look a little… well, loved. It's been handled for hours, gathering oils from your hands, a bit of dust, and probably has some pretty stubborn creases from its time in the hoop or q-snap.
Giving it a gentle wash and a good press is the final bit of magic. This isn't just about cleaning; it’s about making the colors pop, smoothing out the fabric, and creating a perfectly flat, professional-looking piece that’s ready to be shown off. Think of it as the spa day your artwork deserves.
The Gentle Wash
First things first, fill a clean sink or basin with cool or lukewarm water. I can't stress this enough: stay away from hot water! It’s the number one culprit for bleeding floss, especially those gorgeous, saturated reds and deep blues.
Add just a few drops of a very mild, pH-neutral soap. I personally like to use a dedicated quilt wash, but a tiny bit of clear, unscented dish soap will do the trick in a pinch.
Let your piece soak for about 15-20 minutes. You can give it a gentle swish, but whatever you do, don't scrub or twist it. That’s a fast track to fuzzy, damaged stitches. Once it’s had a nice soak, drain the basin and rinse your project under cool, running water until the water runs clear and all the suds are gone.
For a more detailed look at this process, we've put together a complete guide on https://cross-stitched.com/blogs/what-is-cross-stitch/how-to-clean-a-cross-stitch.
Pro Tip: If you used hand-dyed floss or you're just feeling a bit nervous about a particular color, it's always a good idea to do a quick spot test. Just stitch a few X's on a scrap piece of the same fabric and give it a wash first. It’s a tiny bit of extra work that can prevent a lot of heartache.
Drying and Pressing for a Flawless Finish
The golden rule of drying is never wring out your fabric. Twisting and squeezing will pull your stitches out of shape and can create creases that are nearly impossible to get out.
Instead, lay your freshly rinsed piece flat on a thick, clean towel. Gently roll the towel up, like you're making a Swiss roll, with your cross stitch nestled inside. Press down on the roll to soak up most of the water.
Now, unroll it right away. While your project is still damp, place it face-down on a fresh, dry towel. With your iron on a medium setting (and the steam turned off!), press the back of the fabric. Keep the iron moving until the piece is completely dry and beautifully smooth. Pressing it face-down protects your stitches, keeping them looking plump and defined instead of squashed flat.
Taking the time for these final steps is what separates a finished project from a truly finished one. It's a satisfying ritual that makes all those hours of stitching worth it.
Creative Ways to Display Your Cross Stitch
So, you've secured the last thread, washed and pressed your masterpiece, and now it’s time for the fun part: showing it off. How you decide to finish and display your cross stitch can completely change its vibe, turning that square of fabric into a piece of art that perfectly suits your home.
A classic frame is always a great option, of course. But there are so many other creative ways to present your hard work. Sometimes, thinking about the final display before you even start stitching can help you plan your fabric size and layout. Other times, the inspiration for the perfect finish doesn't strike until after that very last stitch is in place.
Beyond the Traditional Frame
One of my favorite modern finishing methods is to display the piece right in the embroidery hoop I stitched it in. It’s a fast, budget-friendly option that gives your work a charming, rustic feel that looks fantastic in today's homes. This is an especially brilliant choice for smaller projects or gifts you need to finish quickly.
Another fantastic approach is turning your cross stitch into something both beautiful and useful.
- Decorative Pillows: Sewing your finished piece onto a fabric backing to create a custom pillow adds such a cozy, personal touch to a living room or bedroom. This works really well for medium-sized projects with a strong central design.
- Wall Banners: Got a long or awkwardly shaped design? Turning it into a wall banner is a super stylish solution. Just hem the edges, attach a dowel to the top, and you've got a sophisticated, tapestry-like display.
- Ornaments and Small Crafts: Never underestimate the power of a small finish! Tiny projects can become adorable Christmas ornaments, handy needlebooks, pincushions, or even one-of-a-kind greeting cards.
Pro Tip: Think about the project's theme and where it's going to live. A quirky, modern pattern might feel perfectly at home in a brightly painted hoop, while a traditional sampler might shine in a classic frame or as a sewn banner.
Matching the Method to Your Project
The best display method really comes down to the piece's size, its style, and your own comfort level with crafting. Finishing a piece in a hoop, for example, is incredibly beginner-friendly. All it takes is a few simple steps to trim the excess fabric and cover the back, usually with a neat circle of felt.
Making a pillow, on the other hand, calls for some basic sewing skills but the result is wonderfully tactile and satisfying. The goal is always to pick a method that not only protects your stitching but also makes you smile every time you see it. Don't be afraid to experiment—trying out different finishes is all part of the fun and a huge part of the creative journey.
How to Frame Your Cross Stitch Like a Pro
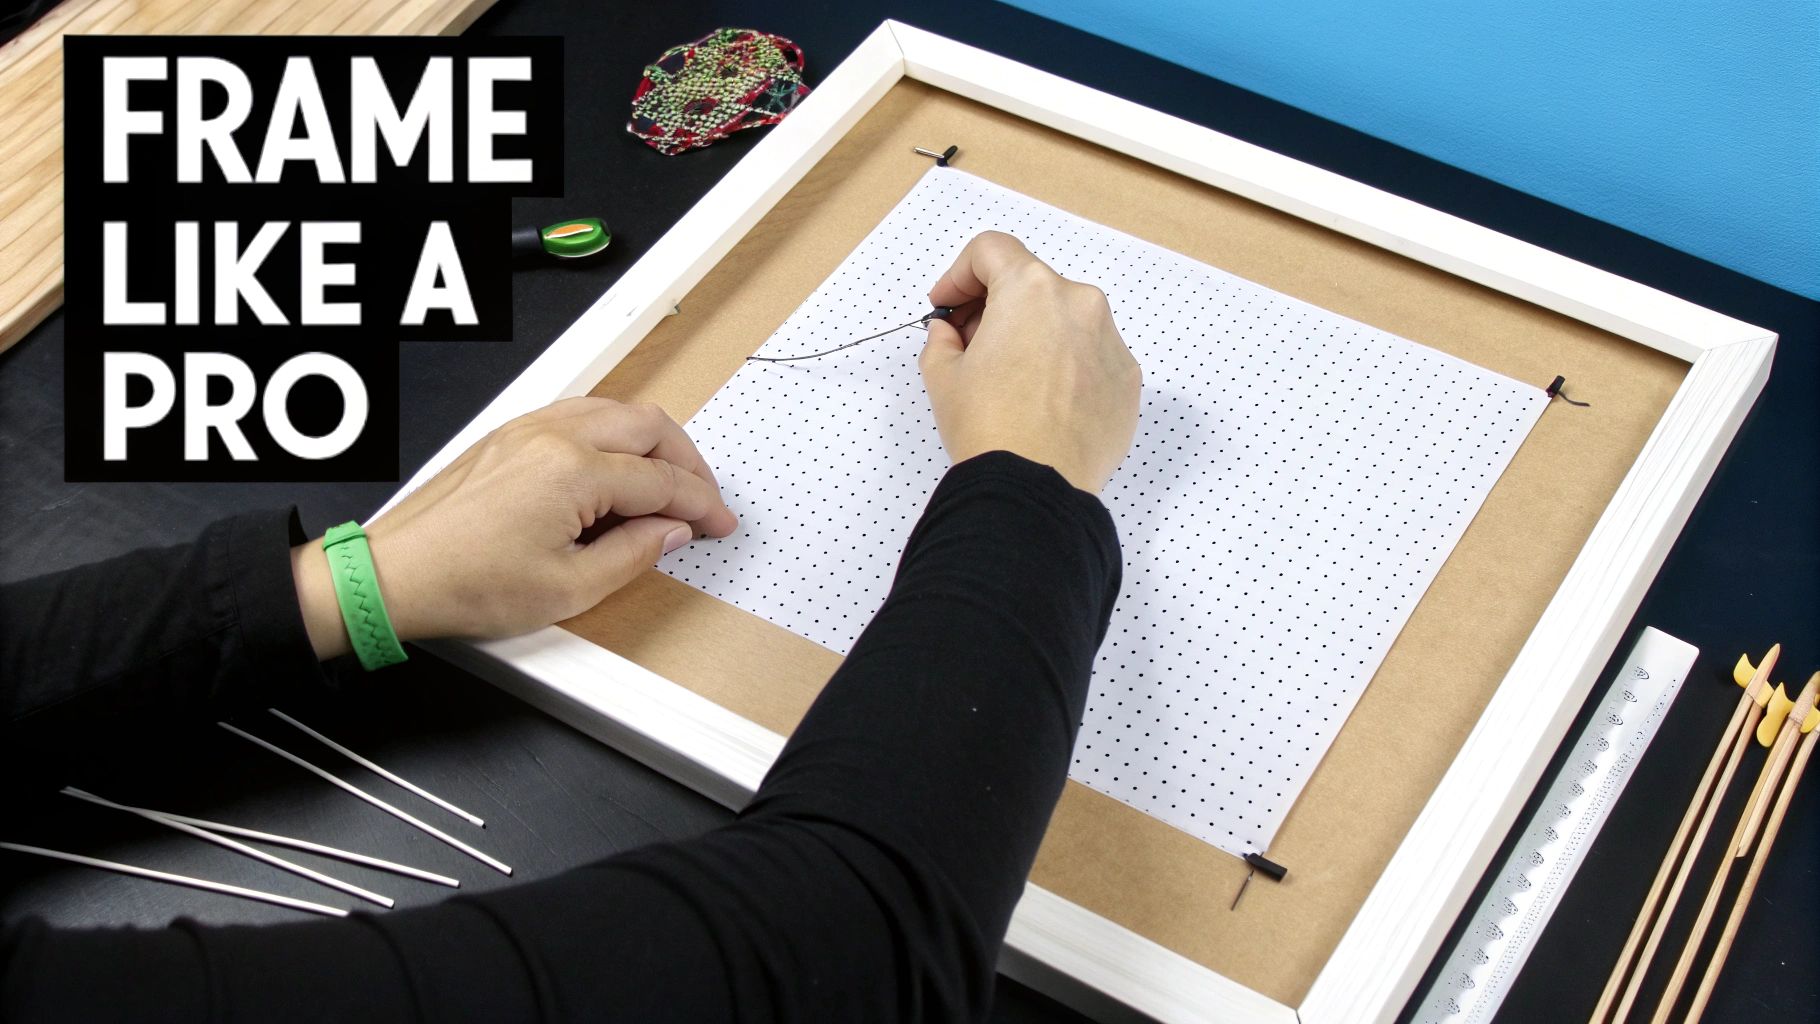
Alright, you’ve put in the hours and your stitching is done. Now for the fun part: turning that beautiful piece of fabric into a real showpiece for your wall. Framing can feel a little intimidating, but trust me, you can get a professional-looking result right at home. It’s all about protecting your hard work and giving it that polished finish it deserves.
First things first, you'll need a frame and a mat board. The trick here is to choose something that complements your stitching without stealing the show. I find that a simple, clean frame often lets the detail of the cross-stitch really pop. The mat board is also your best friend—it creates a bit of space so the fabric and your stitches aren't pressed right up against the glass.
Mounting Your Masterpiece
This is where the magic happens. The key to a great-looking framed piece is getting the fabric mounted just right: perfectly straight, smooth, and taut. You want to pull it tight enough to be flat, but not so tight that you start distorting those perfect little 'x's you worked so hard on.
The two best ways to do this are by pinning or lacing.
Pinning: This is a fantastic, straightforward method. You'll stretch your clean, ironed fabric over a piece of acid-free foam core. Seriously, don't skip the acid-free part. Regular foam core will yellow your fabric over the years. Once your design is centered, you just use rust-proof pins to secure the fabric to the back of the board.
A Crucial Takeaway
Use acid-free materials for everything that touches your fabric—the mounting board, any tape, and the matting. This one small choice is the best thing you can do to prevent discoloration and keep your thread colors vibrant for years to come.
Lacing: This is the more traditional, archival method. It gives you incredibly even tension across the whole piece and is completely reversible, which is a huge plus. After centering your fabric on the foam core, you’ll use a strong thread to lace the back, almost like a corset, pulling the fabric edges toward the middle.
It creates an unbelievably secure and flat mount. For a full tutorial on this technique, we have more detailed guidance on framing counted cross stitch pictures right here.
Whichever method you pick, just take your time. Constantly check from the front to make sure your design is centered and the fabric grain is straight. A little patience here is what makes the difference between a good finish and a great one.
Answering Your Final Finishing Questions
Once you’ve placed that very last stitch, a whole new set of questions can pop up. It’s totally normal! Knowing how to handle these final little details is what really makes the difference between a finished piece and a well-finished piece.
Let's dive into some of the most common things stitchers ask when they're ready to wrap things up.
How Short Should I Trim My Threads on the Back?
I always aim to leave a tail of about half an inch (roughly 1.5 cm) after I've secured the thread. If you snip it right up against the fabric, you run the risk of it working its way loose over time, especially if you plan on washing the piece. On the flip side, leaving the tails too long can create lumpy bulk that you might be able to see from the front.
My Fabric is All Puckered! Can I Fix It?
Don't panic! This is one of the most common side effects of using a hoop or q-snap frame. The tension that holds your fabric taut while you work can leave its mark, but it's almost always fixable.
The best solution is to give your piece a gentle bath in cool water. Afterward, lay it face-down on a thick, clean towel and press it with an iron while it's still damp. This simple trick relaxes the fabric fibers and lets your stitches nestle in perfectly, leaving you with a beautifully flat project.
A Quick Tip: Puckering from a hoop is rarely permanent. Think of a good wash and press as a reset button for your fabric—it smooths out all those tension marks and prepares it for its final display.
Is Washing My Cross Stitch Really Necessary?
Even if your project looks spotless, I highly recommend giving it a wash. As you pour hours into stitching, oils from your hands and microscopic dust particles inevitably settle onto the fabric and floss.
A quick, gentle wash does wonders. It removes all that invisible grime, makes your thread colors pop, and helps the whole piece look more polished and professional before you frame it.
What Kind of Soap is Safe to Use?
You’ll want to reach for something very gentle and pH-neutral. The key is to use a soap free from harsh chemicals, dyes, or fragrances.
- Ideal Choice: Specialized soaps made for quilts or delicate fabrics are your best bet.
- Good Alternative: A tiny drop of a mild, clear dish soap (like the original blue Dawn) also works beautifully in a pinch.
Whatever you do, stay away from regular laundry detergent. It's often too aggressive and can cause those vibrant floss colors you worked so hard on to fade or, even worse, bleed.
Ready to turn your favorite memories into a work of art? At Cross Stitched, you can create a custom kit from any photo. Find your next project and all the supplies you need at https://cross-stitched.com.


