
So, you want to learn counted cross stitch? It all boils down to three things: learning to read a pattern, making that simple 'X' stitch, and counting squares on your fabric. That’s really it. It's a beautifully mindful craft where you bring the design to life on blank fabric just by following a grid, rather than stitching over a pre-printed picture.
Your Creative Journey Into Counted Cross Stitch
Welcome to the wonderfully rewarding world of counted cross stitch. I'm excited for you! This craft is so much more than a hobby; it’s a way to turn tiny, simple 'X's into something genuinely beautiful. The magic is right there in the name—"counted." It’s this technique that gives you the freedom to work on any blank, evenly woven fabric you like, using a chart as your treasure map.

This method lets you create incredibly detailed and precise designs. When you start your first counted cross stitch project, you're tapping into a craft with nearly 900 years of documented history. Between 1100 and 1492 AD, Islamic artisans were developing true counted cross stitch on hemp cloth, building designs from tiny crosses aligned to the fabric's weave—the very same idea we still use today. If you're a history buff like me, you can dive deeper into the history of cross stitch and its fascinating evolution.
Unboxing Your First Kit
Honestly, the easiest way to get your feet wet is with an all-in-one kit. It takes all the guesswork out of gathering supplies and lets you jump right into the fun part: stitching. Let’s peek inside a typical beginner’s kit, like the ones from Cross Stitched, to get you acquainted with the tools of the trade.
Here's what you'll almost always find inside:
- Aida Fabric: This is your best friend as a beginner. It's a stiff cotton fabric woven with very obvious, evenly spaced holes, which makes it a breeze to see where your needle should go. You'll see it listed in different "counts," like 14-count, which just means there are 14 squares (and potential stitches) per inch.
- Pre-sorted DMC Threads: You'll get all the thread colors you need for your design, usually neatly organized on a little cardboard holder. DMC is a top-notch brand known for its vibrant, fade-resistant colors.
- Needles: Cross stitch needles are a bit different. They have a blunt tip and a large eye, designed to glide through the holes in Aida fabric without accidentally splitting the threads of the fabric itself.
- The Pattern Chart: This is your map! It's a grid where every single square represents one cross stitch. The symbols inside the squares tell you exactly which thread color to use.
At its heart, counted cross stitch is a beautiful blend of art and mindfulness. It’s about slowing down, focusing on one stitch at a time, and watching a picture emerge from a blank canvas through your own effort.
Getting to know these components is your first real step. The Aida is your canvas, the threads are your paint, and the chart is your guide. They all work together to set you up for a great experience, right from your very first stitch.
How To Read Your First Cross Stitch Pattern
Think of your cross stitch chart as the roadmap for your project. At first, it might look like a jumble of symbols and squares, but it's actually a simple, color-coded map that tells you exactly what color to use and where to place each stitch. Once you learn to read it, you'll have unlocked the most important skill in cross stitching.
The whole process boils down to this: find a symbol on the gridded chart, look at the key to see which thread color it stands for, and then make one cross stitch on the matching square of your fabric. That's really all there is to it.
Decoding The Chart Grid and Symbols
The heart of your pattern is the chart grid. You'll notice that the grid lines are usually darker every 10 squares, creating a pattern of 10x10 blocks. Trust me, these blocks are your best friend. They make counting and keeping your place so much easier, preventing you from going cross-eyed trying to track tiny squares.
Each little square on that grid contains a symbol—it might be a letter, a shape, a number, or a simple color block. Every unique symbol stands for a specific color of thread. Your job is to play detective and match the symbol on the chart to the right color in your kit.
To help you get the hang of it, here’s a quick rundown of what you’ll see on a typical chart.
Understanding Cross Stitch Chart Symbols
This little table is your cheat sheet for decoding any counted cross stitch chart you come across.
| Element | What It Represents | How to Use It |
|---|---|---|
| Grid Lines | The primary map of your design, showing stitch placement. | Count the squares on the chart to find out where each stitch goes on your fabric. |
| Center Arrows | Arrows on the top and side of the chart that meet at the center point. | Follow the arrows to their meeting point to locate the exact center of your design. |
| Symbol Key | The legend that translates symbols into thread colors. | Match the symbol in a grid square to the corresponding DMC thread number in the key. |
| DMC Number | The unique code for a specific shade of embroidery floss. | Use this number to find the correct thread from your pre-sorted floss card or in a craft store. |
This systematic "counted" approach is what gives this craft its name. You are literally counting the squares from the chart and stitching them onto your fabric.
Finding The Center: The Key to a Perfect Start
Before you even thread your needle, the most important thing you can do is find the center of your project. Starting in the middle guarantees your design will be perfectly positioned, saving you from the nightmare of running out of fabric on one side.
It's a simple two-part process:
-
Find the Center of Your Chart: Look for the small arrows along the top and side edges of your pattern grid. Follow them with your fingers until they meet. The square where they intersect is the dead center of your design.
-
Find the Center of Your Fabric: Take your piece of Aida fabric and gently fold it in half one way, then fold it in half the other way. The point where the two creases cross is the physical center of your fabric. Give it a little pinch to mark the spot.
Once you’ve found both center points, you’re good to go! The symbol at the chart's center corresponds to the very first stitch you'll make on your fabric's center point.
Pro Tip: I like to use a pin or a temporary loop of thread (called a waste knot) to mark the fabric's center before I put it in the hoop. It just makes it easier to find again once the fabric is pulled taut and ready for stitching.
From this central anchor point, you can confidently stitch outwards in any direction, knowing your entire design will be perfectly placed.
For example, look at how a regular photo gets turned into a stitchable pattern with a tool like Cross Stitched’s Pic2Pat tool.
As you can see, the complex image is broken down into a simple grid of colored symbols. Each symbol points to a specific DMC thread, giving you a clear, step-by-step guide. Learning to make this mental leap from symbol to stitch is what will make you a confident cross stitcher.
Mastering the Foundational Stitching Techniques
Alright, you've got the hang of reading a pattern. Now for the best part—actually putting thread to fabric and watching your design come to life. Counted cross stitch is built on one beautifully simple stitch: the "X." But how you make that 'X' can make a big difference in how your project looks and how quickly you can finish it.
We're about to walk through the essential techniques you'll need to create those neat, uniform stitches everyone loves. Don't stress about getting it perfect right away. The real goal here is to find a comfortable rhythm and build some muscle memory. Before you know it, these stitches will feel like second nature.
This little flowchart breaks down the basic process, from looking at your chart to making that very first stitch.
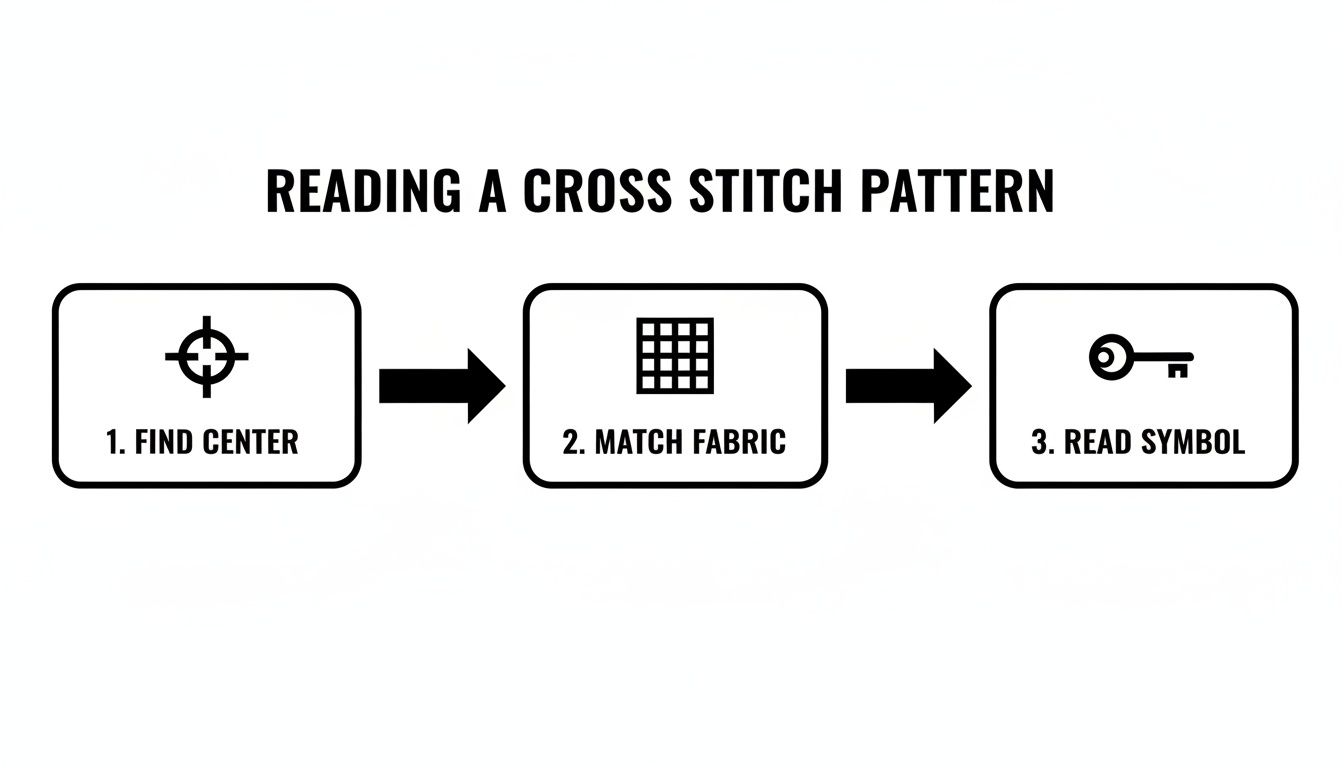
It's a great visual reminder of how simple it is: find your spot on the fabric, identify the square, and match the symbol on your chart to the right thread color.
Creating the Perfect Full Cross Stitch
The full cross stitch is the heart and soul of your design. It's just two small diagonal stitches that cross over each other to form a perfect 'X'. Simple, right? But there are two main ways to go about it, and each has its moment to shine.
Picking the right method for the right section of your pattern can seriously speed things up and just make the whole process more enjoyable. Let's look at both.
The English Method: One Stitch at a Time
With the English method, you complete one entire 'X' before moving on to the next. You'll bring the needle up from the back, make your first diagonal half stitch (say, bottom-left to top-right), and then immediately cross it with the second half stitch (bottom-right to top-left) to finish it off.
This method is your best friend when you're dealing with "confetti" stitches—those random, single stitches of one color scattered all over the place. Finishing each 'X' on the spot means you won't have long, messy threads trailing across the back of your fabric.
The Danish Method: Stitching in Rows
The Danish method is my personal go-to for big blocks of color. It's so efficient. You stitch a whole row of just the first half of the stitch (like this: /////), and then you come back along the same row, completing each 'X' with the top stitch (like this: \\).
This creates an incredibly neat and uniform look on the front, and I find it's much faster once you get into a good rhythm. It's perfect for backgrounds or any large, solid-colored area.
The single most important rule for a polished finish is consistency. Always make sure the top leg of your 'X' is going in the same direction for every single stitch in your project. Pick a way—either /// then \\ or the other way around—and stick with it.
Adding Definition with Backstitching
After all your cross stitches are in place, you’ll often use backstitching to add outlines, details, and text that make your design pop. It’s exactly what it sounds like: you work backward to create a solid line. Come up one stitch length ahead of where you want the line to start, then go back down into the previous hole.
This simple stitch is what gives a project that crisp, professional look. Your pattern will show backstitching as bold, solid lines, and it's almost always done with just one strand of floss to keep the line fine and delicate.
If you want to explore these stitches in more detail, our guide to the essential types of cross stitch stitches has more examples and handy tips.
Fractional Stitches for Finer Details
You probably won't see these in a basic beginner kit, but it's good to know about fractional stitches. They are partial stitches used to create smoother curves and more intricate details than a full square stitch can manage.
You might come across a few different kinds:
- Quarter Stitch (¼): A single diagonal line from a corner to the very center of an Aida square.
- Half Stitch (½): Just the bottom leg of a full cross stitch. It's often used for shading or creating depth in a landscape.
- Three-Quarter Stitch (¾): This is a combo of a quarter stitch and a half stitch, which forms a little 'Y' shape. It’s perfect for detailing things like eyes or rounding the edges of letters.
Your chart will show these with special symbols or by placing a symbol in just one part of a grid square. They can seem a little fiddly at first, but they are a fantastic tool for taking your work to the next level. Getting comfortable with these foundational techniques is the key to confidently tackling any pattern you find.
Getting Your Stitching Station Ready
Before you even thread a needle, taking a few minutes to set up your space can make all the difference. This isn't just about having the right tools; it's about arranging them so your stitching time is relaxing and frustration-free. The goal is to create a cozy, organized corner where you can lose yourself in the craft.
A well-planned setup means you can simply reach for what you need without breaking your creative flow. For some great tips that you can easily apply to a crafting nook, check out these general workspace organization ideas.
Getting the Fabric Tension Just Right
If you want your stitches to look plump, even, and professional, the secret is all in the tension. Stitching on loose, saggy fabric is a recipe for wonky, uneven stitches. You're aiming for your Aida cloth to be taut—like the head of a tiny drum. This is where your hoop or frame becomes your best friend.
- Embroidery Hoops: The classic choice for a reason. Just loosen the screw, pop the inner ring out, lay your fabric over it, and then press the outer ring down on top. Tighten the screw until the fabric is nice and firm.
- Q-Snap Frames: I'm a big fan of these. They're square plastic frames that use clamps to hold the fabric. They are lightweight, easy on the hands, and don't leave those stubborn "hoop burn" marks on your finished piece.
Whichever you use, the goal is the same: the fabric should be tight enough that you could almost bounce a coin off it, but not so stretched that you’re distorting the weave. Nailing this tension makes it infinitely easier to guide your needle through the correct holes.
Don't hesitate to move your hoop or frame around as you stitch different areas. Keeping that tension consistent across the entire project is one of the biggest factors in a polished final result.
Taming Your Thread from the Get-Go
Embroidery floss has a notorious habit of turning into a tangled mess if you let it. Since most patterns call for using just two strands out of the six, the first skill to learn is how to separate them without creating a bird's nest.
Start by cutting a piece of floss that’s a comfortable length to work with. I find about 18 inches is perfect—any longer and you’re just asking for knots. Pinch the floss at one end, and with your other hand, gently pull a single strand straight up and out. The other strands might bunch up a bit, but they’ll straighten right out once the single strand is free. Just repeat until you have your two strands.
For a beautifully clean start, you have to try the loop start method. This little trick is a game-changer, but keep in mind it only works when you're stitching with an even number of strands (like two, four, etc.).
- Cut one strand of floss, but double the usual length (so, about 36 inches).
- Fold it perfectly in half.
- Thread the two cut ends through the eye of your needle. You'll have a neat little loop at the other end of your thread.
Now, when you make your first stitch, come up from the back of the fabric, but don't pull the floss all the way through. Flip your work over, and you'll see that loop. Just pass your needle through it and pull gently. Voila! Your thread is securely anchored with zero bulk and no messy knot. It's one of those small habits that makes the back of your work look as good as the front.
If you're curious about the other handy tools that can make your stitching life easier, we've covered them all in our guide to essential cross stitch accessories.
Navigating Common Beginner Stitching Mistakes
Everyone who picks up a needle and thread for the first time has those "oops" moments. It's just part of the learning curve! The trick isn't avoiding mistakes altogether, but knowing how to fix them without getting flustered. Think of this as your field guide to troubleshooting the most common slip-ups.
One of the first things you'll want to get the hang of is keeping your stitches consistent. A very common beginner mistake—and a subtle one—is letting the top leg of your 'X' stitches go in different directions. For that smooth, almost painted look you're after, every single top stitch needs to slant the same way across the whole piece.
Keeping Your Stitches Uniform
The easiest way to nail this is to just pick a direction and stick with it. Decide right now: will your top stitch go from bottom-left to top-right (), or from bottom-right to top-left (/)? It honestly doesn't matter which you choose, as long as you commit.
This is pretty easy to manage when you're working in tidy rows with the Danish method. The real challenge comes with "confetti" stitches—those single, scattered stitches where you're using the English method. It's so easy to lose track. Make it a habit to pause every few minutes, hold your work at arm's length, and just check that all your little 'X's are marching in formation.
Quick Fix: Spotted a rogue stitch going the wrong way? Don't panic. If it’s not in a super noticeable spot, you can probably just leave it. But if it’s driving you crazy, you can carefully snip only that stitch with a pair of sharp, fine-tipped scissors and gently pull the threads out.
Untangling Thread and Tension Troubles
Ah, tangled floss and wonky tension. Welcome to the club! A knotted bird's nest of thread usually happens for one of two reasons: your thread is too long, or it's gotten twisted up on itself. A simple rule of thumb is to keep your working length of floss to about 18 inches. Any longer and you're just asking for tangles.
If you feel your thread starting to twist and coil as you stitch, just stop for a second. Let your needle and floss dangle freely from the fabric. Gravity is your friend here; it will naturally unwind everything for you.
Uneven tension—where some stitches look tight and pinched while others are loose and loopy—is almost always solved by using your hoop correctly. Before you start stitching, make sure your Aida fabric is pulled taut like the head of a drum. This gives you a firm, stable surface and helps you pull each stitch through with the same amount of pressure. It's all about finding that comfortable, repeatable rhythm.
The Art of Frogging Without Fear
So, it happened. You've stitched an entire block of color only to realize it's the wrong one. It's time to "frog" it—so called because you have to "rip-it, rip-it." This sounds scary, but it doesn't have to be.
Here's how to frog your stitches without wrecking your fabric:
- Flip your work over to the back.
- Use the tip of your needle to gently slide under and loosen the last few stitches you made.
- Carefully pull the thread out, one stitch at a time.
- For a bigger mistake, you can gently snip a stitch right in the middle of the wrong section and carefully unpick the threads from there.
Learning how to learn counted cross stitch properly means learning how to fix mistakes cleanly, protecting your fabric from getting stretched or damaged. The skills you're building with these kits tap into a much larger world of embroidery. In fact, some reports show that 68% of textile brands now use embroidery for branding, highlighting how this timeless skill remains incredibly relevant. You can discover more about the market growth of embroidery and see just how your new hobby fits into a huge creative industry.
Finishing and Displaying Your Stitched Art
That feeling when you put in the very last stitch is just incredible, but you're not quite at the finish line yet! The final steps are what really elevate your project from a piece of stitched fabric into a polished work of art, making sure it looks amazing for years to come.
The first thing I always do is give my project a gentle wash. No matter how careful you are, oils from your hands, a bit of dust, and even marks from the hoop can build up. A quick, careful bath makes the fabric and thread colors pop right back to life.
Washing and Pressing Your Work
Grab a clean sink or basin and fill it with lukewarm water. Add just a tiny drop of a mild, clear soap or a special fabric wash. Gently push your cross-stitch piece into the water and just let it soak for about 15 minutes. Whatever you do, don't scrub or wring it out—that's a surefire way to warp the stitches you worked so hard on.
Once it's soaked, rinse it completely under cool running water until there are no suds left. To get the excess water out, lay the piece flat on a thick, clean towel, roll it up like a burrito, and press gently.
Pro Tip: The best trick I've learned is to iron your piece from the back while it's still a little damp. Lay it face-down on another thick, fluffy towel and use a medium-hot iron. The towel acts like a cushion, so you don’t flatten your beautiful, plump stitches.
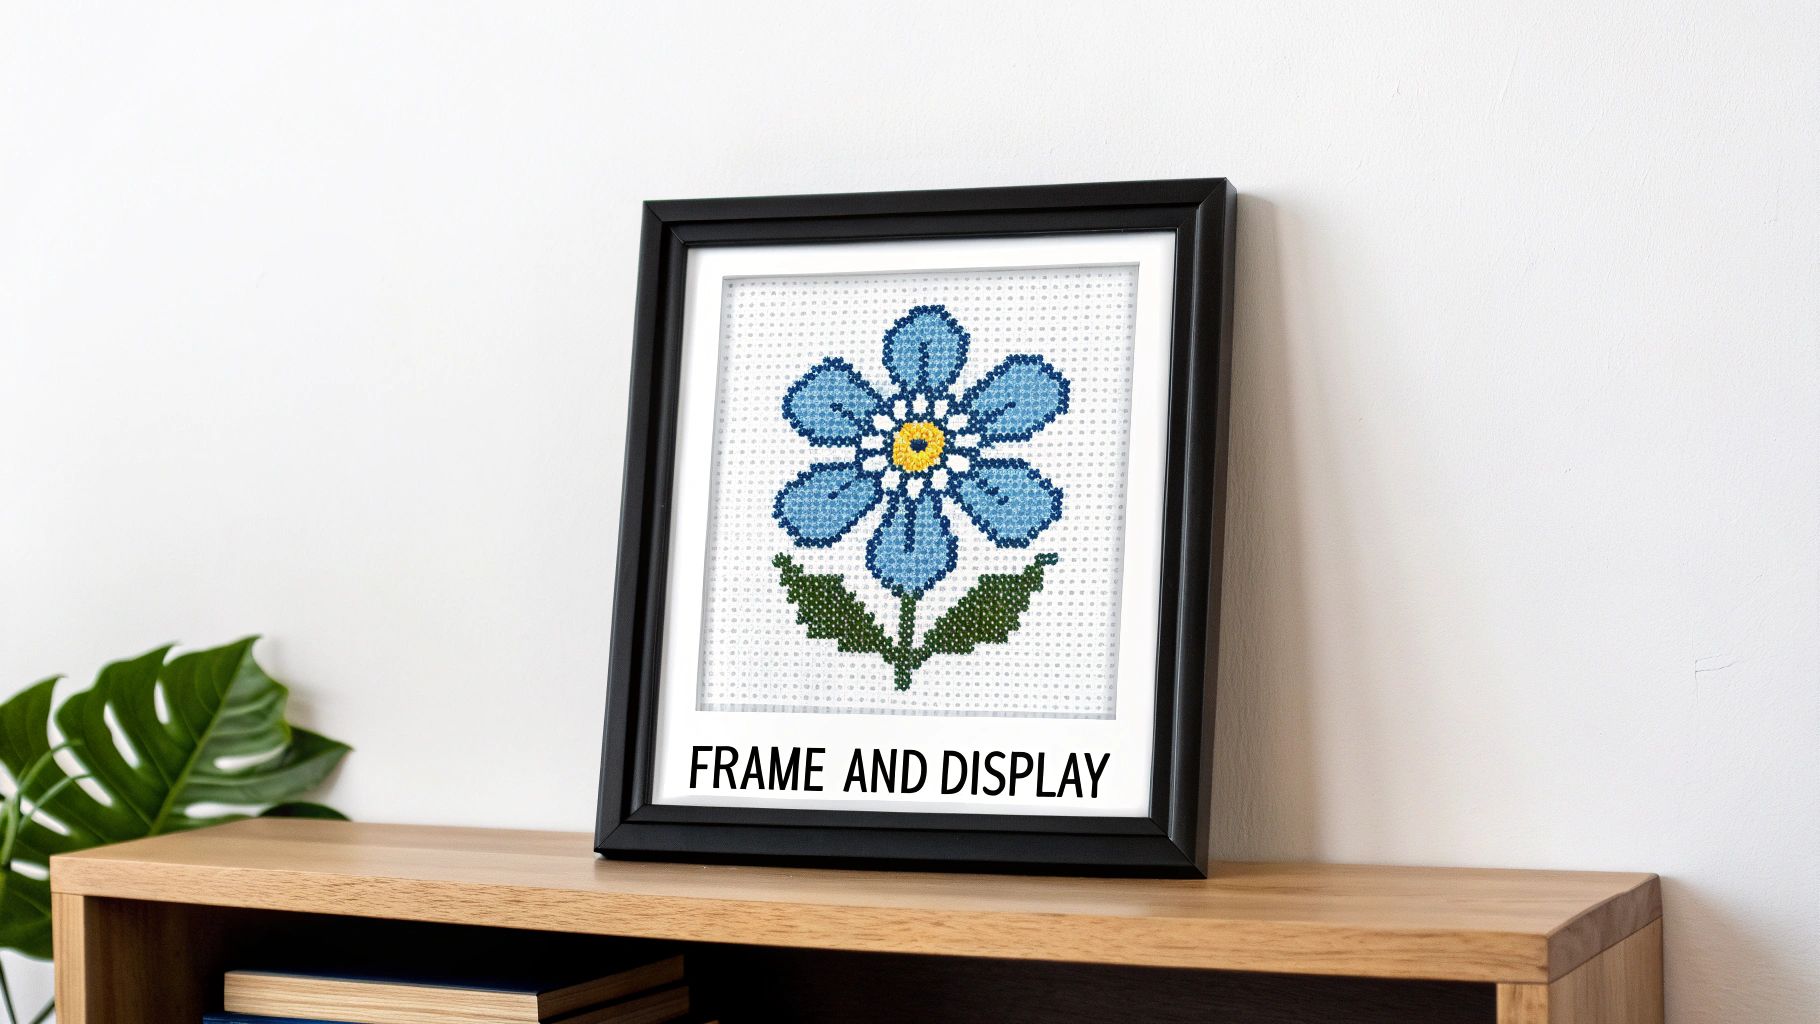
Framing and Creative Displays
With your piece all clean and pressed, it's ready for its big debut! Framing is the classic choice, and for good reason—it protects your art from dust and looks so elegant. After putting so much effort into your work, it’s worth learning a few tricks on how to frame your cross-stitch art to make it look professionally done.
But don't feel limited to just frames! There are so many other creative ways to show off your work.
- Decorative Pillows: A smaller design can easily be turned into a fantastic accent pillow.
- Ornaments: I love using tiny patterns to make one-of-a-kind Christmas ornaments or gift tags.
- Needle Books or Pincushions: A really small project can become a beautiful and functional piece for your sewing box.
Getting these final steps right is a huge part of the satisfaction you get when you learn counted cross stitch. If you want to dive deeper into mounting and finishing techniques, we have a detailed guide on how to finish a cross stitch project like a pro.
Your Top Cross-Stitch Questions Answered
When you first pick up a needle and thread, a million questions can pop into your head. It's totally normal! Getting a few key answers upfront can save you a lot of headaches and make your first project a joy instead of a chore.
Let's dive into some of the most common questions I hear from people who are just starting out.
What's the Best Fabric Count to Start With?
If you're a complete beginner, my go-to recommendation is always 14-count Aida fabric. Hands down, it’s the best place to start.
The "count" just means how many stitches you can fit into one inch of fabric. A lower number like 14 means the little woven squares are bigger, which makes them so much easier to see and stitch through. It’s the perfect middle ground—you get a beautiful, detailed picture without having to squint.
How Many Strands of Thread Should I Use?
That thick embroidery floss you have is actually made of six individual strands. You'll almost never use all six at once! You need to separate them before you start.
For most projects on 14-count Aida, you’ll use two strands for your standard cross stitches. This gives you nice, full coverage so you can't see the fabric peeking through. If you’re doing finer details like backstitching for an outline, the pattern will usually call for just one strand.
Pro Tip: Your pattern's key is your best friend. Always check it first! It will tell you exactly how many strands to use for every symbol and stitch type in your design.
How Do I Start and End My Thread Without Making Knots?
This is a big one. Knots are the enemy in cross stitch because they create little bumps on the back that you can often see from the front. We want a smooth, flat finish.
Instead of a knot, there are much cleaner ways to secure your thread. When you're starting with two strands, the "loop start" method is a game-changer. It's perfectly flat and incredibly secure.
To finish off a length of thread, just flip your hoop over. Gently slide your needle under the last three or four stitches you made on the back, pull the thread through, and snip off the tail. That’s it! Your thread is locked in place, no bumps required.
Ready to turn your favorite photo into a work of art? With Cross Stitched, you can create a custom kit from any picture, and we'll send you everything you need to get started.
Design your personalized cross stitch kit at cross-stitched.com


