
Cross stitching is more than just making simple 'X's on fabric; it's a rich and diverse art form with a surprising variety of techniques and styles. While the classic full stitch is the foundation, a whole world of different stitches and approaches awaits to add stunning depth, intricate texture, and lifelike realism to your projects. Understanding the various types of cross stitching is the key to transforming a basic pattern into a breathtaking, personalized work of art.
Whether you're aiming for the smooth gradients of a photorealistic portrait, the crisp lines of a graphic design, or the tactile appeal of textured embellishments, mastering these core techniques will fundamentally elevate your craft. This comprehensive guide serves as your roadmap. We will walk you through the most essential stitch types and methods, from the foundational to the more advanced, providing actionable tips to help you choose the right approach for your next masterpiece.
This isn't just a list; it's a practical toolkit. For each type, we will explore precisely what makes it unique, its ideal applications, and how to execute it with confidence and precision. You'll gain a clear understanding of when to use a simple half stitch versus a detailed three-quarter stitch, and why mastering techniques like backstitching or French knots can make all the difference. Get ready to expand your stitching repertoire, move beyond the basics, and bring your most ambitious creative visions to life with newfound skill and control.
1. Full Cross Stitch
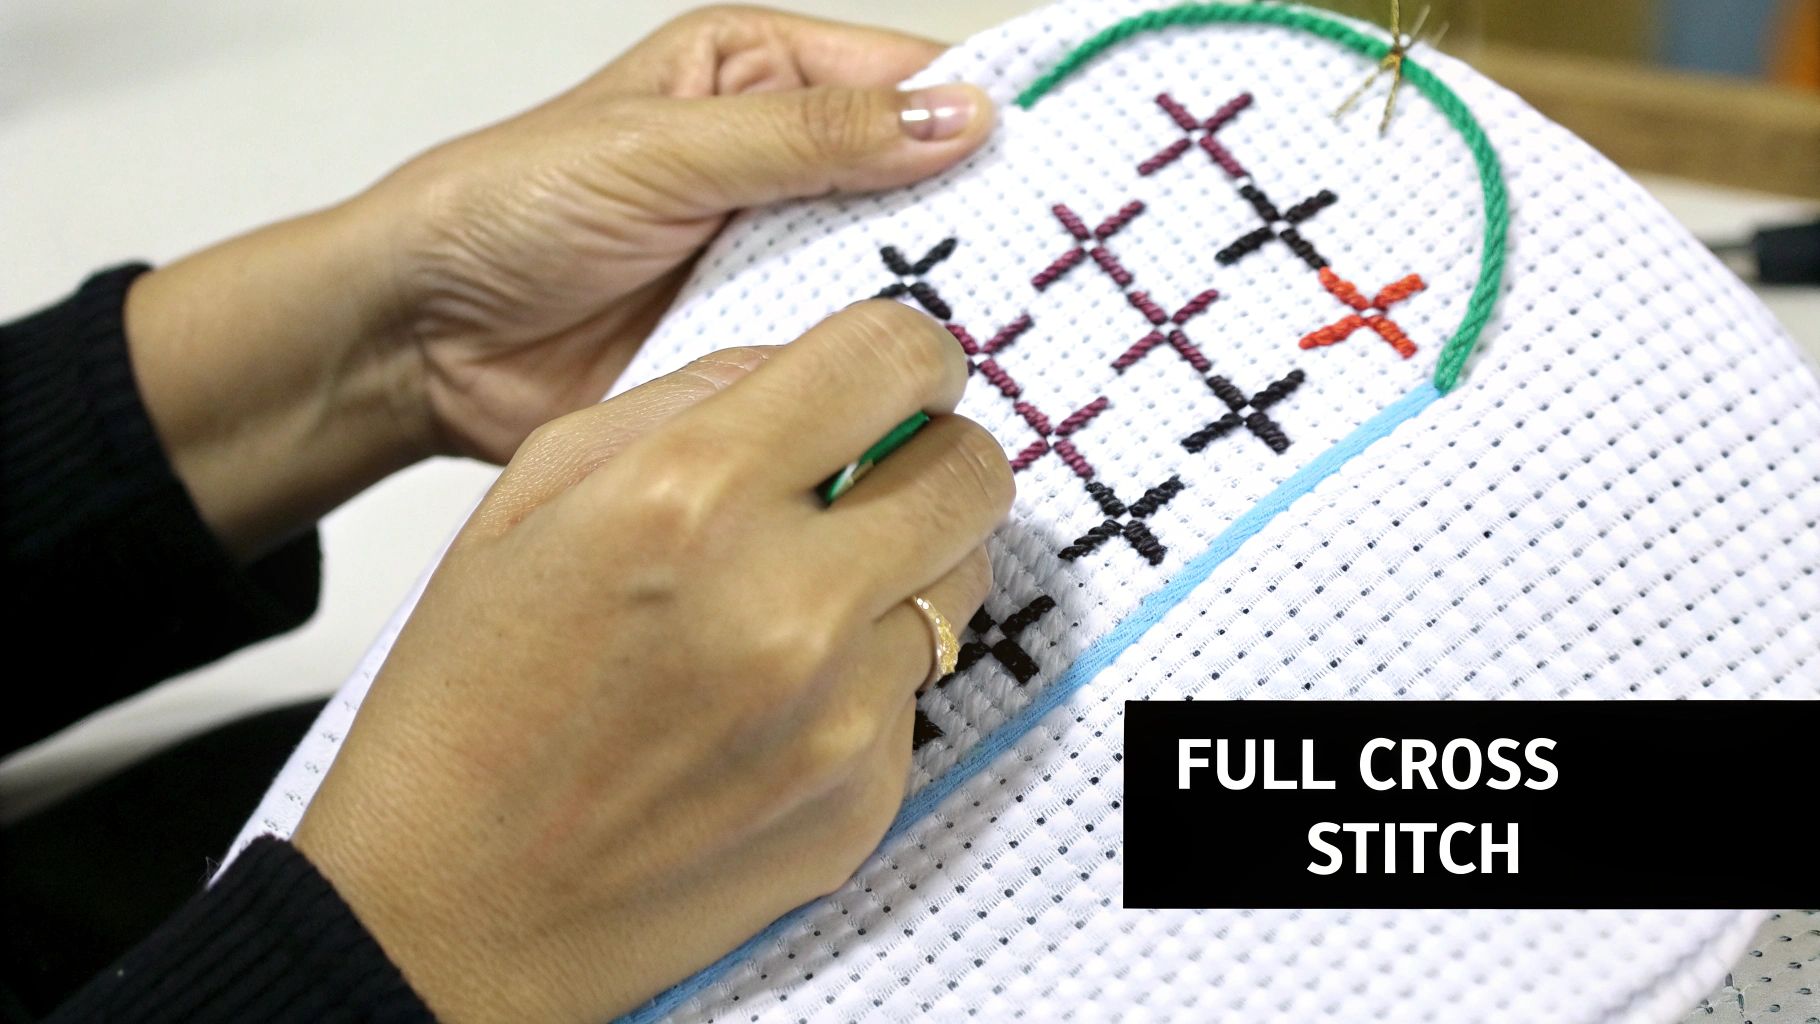
The full cross stitch is the foundational building block of nearly all cross stitch projects. It is the first and most essential technique every stitcher learns. This stitch consists of two diagonal half stitches that cross over each other to form a perfect "X" shape on the fabric grid. The first stitch typically runs from the bottom-left corner to the top-right corner of a single fabric square, while the second stitch crosses over it, running from the bottom-right corner to the top-left corner.
This simple, symmetrical stitch is the reason the craft is named "cross stitch" and forms the basis for creating detailed, pixel-like images. Its uniform appearance creates a smooth, tiled effect that is ideal for filling in large areas of color and creating clear, defined shapes. It’s the primary stitch used in most patterns, from beginner kits to complex, full-coverage art pieces.
Key Characteristics and Implementation
The full cross stitch is celebrated for its simplicity and versatility, making it one of the most widely used types of cross stitching. It works beautifully on any even-weave fabric, such as Aida, linen, or even-weave, where the grid structure makes it easy to create perfectly square stitches.
- Stitch Formation: A complete "X" is formed in one square of the fabric grid.
- Fabric: Best suited for Aida cloth for beginners, but works well on any even-weave material.
- Difficulty: Beginner. It’s the first stitch taught in nearly all tutorials and kits.
- Thread Count: Typically, 2-3 strands of embroidery floss are used on 14-count Aida for optimal coverage without bulky stitches.
Best Practices for Perfect Full Cross Stitches
Achieving a professional, polished look relies on consistency. Even small variations can affect the final appearance of your project.
Pro Tip: The most crucial rule for a uniform texture is to ensure your top stitches all cross in the same direction. Whether you prefer the top leg to slant left () or right (/), stick with that choice for the entire project.
Here are a few actionable tips:
- Work in Rows: For efficiency, complete a row of bottom half stitches first (////), then work your way back, completing the top half stitches (\\) to finish the "X"s.
- Consistent Tension: Apply gentle, even tension to each stitch. Pulling too tight will pucker the fabric, while leaving stitches too loose will make them look uneven.
- Separate Your Floss: Before threading your needle, separate each strand from the main piece of floss. This helps the strands lay flat and prevents twisting, resulting in fuller, smoother stitches.
2. Half Cross Stitch
The half cross stitch is exactly what its name implies: a single diagonal stitch that forms one half of a full cross stitch. Instead of creating a full "X," this stitch consists of just one diagonal line, typically running from the bottom-left corner to the top-right corner of a fabric square. This simple, elegant stitch is a powerful tool for creating texture, depth, and subtle details in a design.
Using only a single diagonal pass, the half cross stitch provides lighter coverage than its full counterpart, making it ideal for shading, creating backgrounds, or suggesting distance. It uses approximately 50% less thread and can be completed much faster, offering an efficient way to cover large areas without overwhelming the composition. Its delicate appearance is often used in photorealistic patterns to create smooth color gradations and nuanced details.
Key Characteristics and Implementation
While simpler in form, the half cross stitch is a versatile technique used in many types of cross stitching to achieve specific artistic effects. Its use is a deliberate design choice intended to add sophistication and visual interest. Contemporary photorealistic artists, like Maria Dieva, often leverage this stitch to achieve incredible detail in portraits.
- Stitch Formation: A single diagonal line (/) is formed in one square of the fabric grid.
- Fabric: Works on any even-weave fabric, but its delicate nature is especially beautiful on linen.
- Difficulty: Beginner. The stitch itself is simple, but knowing when to use it effectively is an intermediate skill.
- Thread Count: Often done with 1-2 strands to create a light, airy effect, but can be adjusted based on the desired coverage.
Best Practices for Perfect Half Cross Stitches
Consistency is the key to making half stitches look intentional and polished rather than unfinished. The uniform direction of your stitches creates a smooth, satin-like sheen on the final piece.
Pro Tip: Always ensure every half stitch on your project slants in the same direction. This consistency is non-negotiable for creating a professional and visually coherent texture.
Here are a few actionable tips:
- Maintain Direction: Decide on a single direction (e.g., bottom-left to top-right) and use it for every half stitch in the project.
- Vary Thread Strands: Use fewer strands (e.g., one strand) for distant elements or subtle shading and more strands for areas needing slightly more coverage.
- Combine with Full Stitches: Use half stitches for backgrounds or skies and full cross stitches for foreground elements. This contrast makes the main subject pop.
3. Three-Quarter Cross Stitch
The three-quarter cross stitch is an advanced technique used to create smoother curves and finer details where a full stitch would be too blocky. This stitch is a hybrid, combining a half stitch with a quarter stitch, filling three-quarters of a single fabric square. It allows stitchers to soften the pixelated edges inherent in standard cross stitch, making it essential for rendering realistic portraits, delicate floral patterns, and intricate landscapes.
This technique is a game-changer for moving beyond simple, grid-based designs. By sharing a fabric square between two different colors or creating a rounded edge, the three-quarter stitch enables a level of nuance and realism that is impossible with full stitches alone. It is a hallmark of complex, high-detail patterns, often found in fine art reproductions and photorealistic projects.
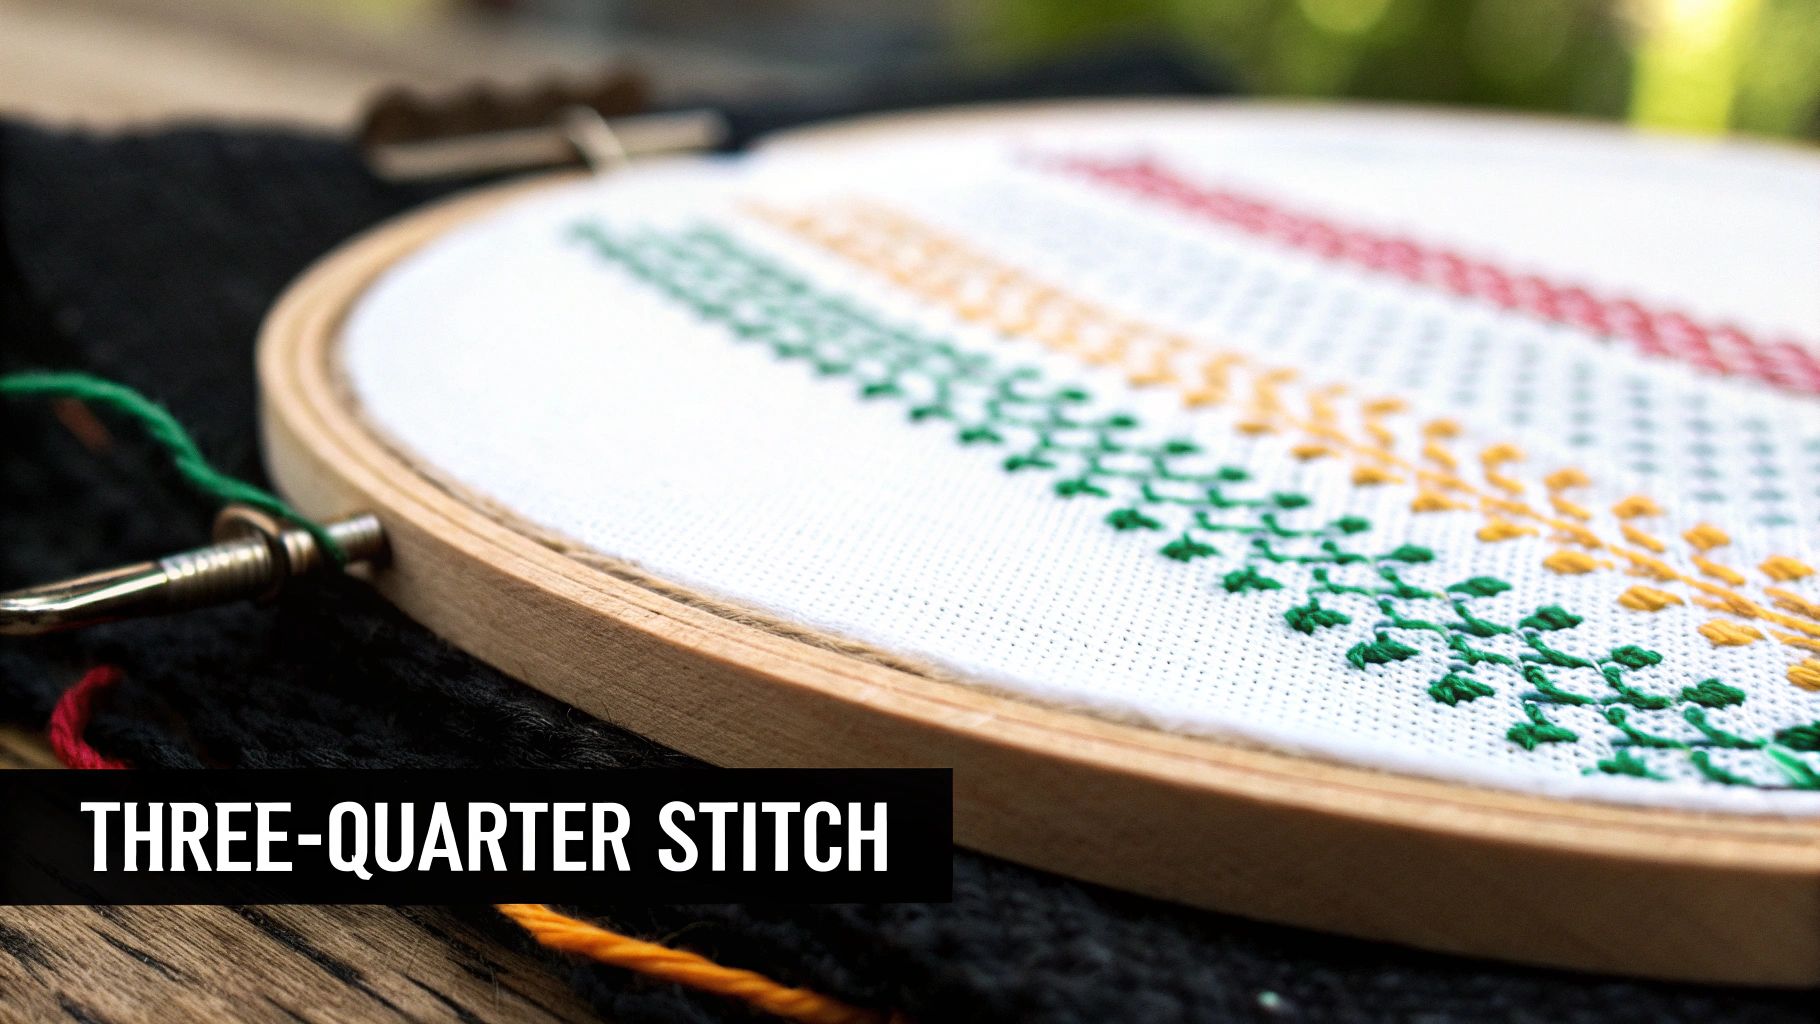 embroidery hoop showcasing vibrant green, yellow, and red three-quarter stitches on white fabric.">
Key Characteristics and Implementation
The three-quarter stitch is prized for its ability to add sophistication and precision, making it one of the more artistic types of cross stitching. This stitch is best executed on even-weave fabrics like linen or Monaco, where piercing the center of a fabric square is easier than on the more rigid Aida cloth.
- Stitch Formation: Consists of one half stitch (diagonal from one corner to another) and one quarter stitch (from a corner to the center of the square).
- Fabric: Best suited for even-weave fabrics where the needle can easily pierce the center of a weave. It can be done on Aida, but it requires more effort.
- Difficulty: Intermediate to Advanced. It demands precision and careful chart reading.
- Thread Count: Typically performed with one strand of floss to ensure the detail isn't lost and the shared hole doesn't become overcrowded.
Best Practices for Perfect Three-Quarter Stitches
Mastering this stitch requires patience and a steady hand, but the results are well worth the effort. The key is careful placement and consistency in how the stitch is formed.
Pro Tip: When a pattern chart shows two different symbols in one square, it typically indicates two three-quarter stitches of different colors sharing that square. Ensure the quarter stitches meet neatly in the center without overlapping to create a clean, defined line.
Here are a few actionable tips:
- Use a Sharp Needle: A sharper needle, such as a crewel or embroidery needle, makes it easier to pierce the center of the fabric square, especially on Aida cloth.
- Magnification is Key: Use a magnifying lamp or glasses to see your fabric grid clearly. This helps ensure you are piercing the exact center for a perfect quarter stitch.
- Plan Your Stitch Path: Before starting, look at the pattern to decide which color or section should be stitched first to avoid pulling previous stitches out of shape when sharing a hole.
4. Backstitch
While not a cross stitch itself, the backstitch is an indispensable supplementary technique used to outline, define, and add fine details to a cross stitch project. It acts as the "pen" to the cross stitch "crayon," transforming blocks of color into recognizable shapes and figures. This linear stitch is created by bringing the needle up through the fabric and then taking it backward to the end of the previous stitch, creating a solid, continuous line.
This technique is what gives a finished piece its sharpness and clarity. It’s essential for creating facial features, lettering, delicate tendrils on a plant, or defining the edges between two adjacent colors. Without backstitching, many intricate designs would appear blurry or undefined, making it a critical skill for elevating a project from good to great.
Key Characteristics and Implementation
The backstitch is a fundamental outlining stitch and one of the most common finishing types of cross stitching techniques. Its power lies in its ability to create clean lines and intricate details that cross stitches alone cannot achieve. It is usually the final step in a project, performed after all cross stitches are complete.
- Stitch Formation: A straight, linear stitch formed by bringing the needle up ahead of the last stitch and back down into the same hole.
- Fabric: Works perfectly on Aida, linen, and any even-weave fabric used for cross stitch.
- Difficulty: Beginner. While simple to execute, achieving perfectly straight and even lines requires practice.
- Thread Count: Typically, one strand of floss is used for delicate, fine lines, though a pattern may call for two strands for a bolder outline.
Best Practices for Perfect Backstitches
Consistency is key to making your backstitch look clean and professional rather than jagged. The goal is to enhance, not distract from, your cross stitch work. For a complete guide, you can learn more about how to backstitch in cross stitch.
Pro Tip: To create smooth curves, use smaller, shorter backstitches. Longer stitches are great for straight lines but will appear angular and disjointed on a curve.
Here are a few actionable tips:
- Stitch After Washing: To prevent colors from bleeding onto your backstitch lines, complete all backstitching after you have washed and ironed your finished cross stitch piece.
- Maintain Even Length: Try to keep your stitch lengths as uniform as possible, unless a pattern specifically calls for varied lengths. This creates a much cleaner, more polished outline.
- Use a Sharp Needle: A sharper needle, such as a crewel or embroidery needle, can make it easier to pierce the fabric precisely, especially when your stitch doesn't land in a pre-made Aida hole.
5. French Knot
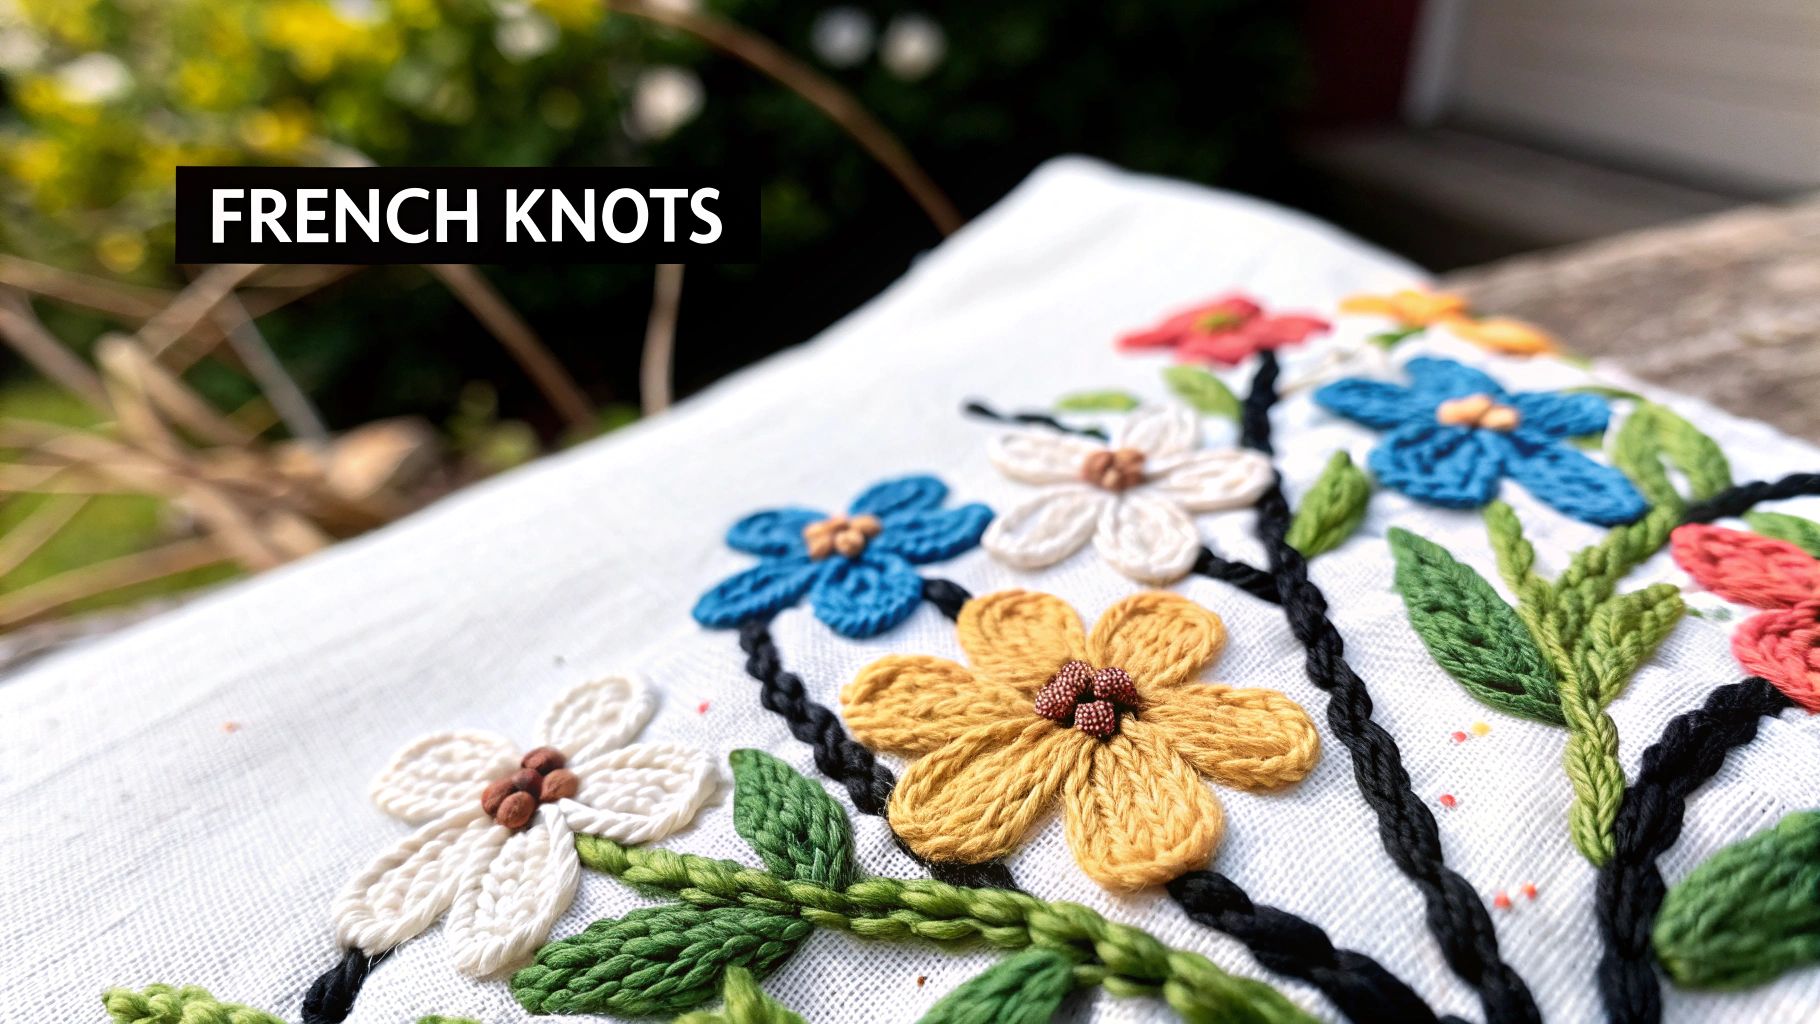
The French knot is a classic decorative stitch used in embroidery to add texture and dimensional detail to cross stitch projects. While not a "cross" stitch itself, it is frequently incorporated into patterns to create small, raised dots that stand out from the flat surface of the fabric. This is achieved by wrapping the embroidery floss around the needle one or more times before inserting it back into the fabric very close to where it emerged.
This technique is invaluable for adding fine details that would be difficult to render with standard cross stitches. It allows stitchers to create features like eyes on an animal portrait, the center of a flower, or scattered stars in a night sky. The tactile quality of French knots adds a sophisticated, three-dimensional element to otherwise flat designs, making it a favorite embellishment among both traditional and contemporary stitchers.
Key Characteristics and Implementation
Often considered a more advanced embellishment in the world of types of cross stitching, the French knot is celebrated for its ability to create beautiful, textured accents. Mastering this stitch requires practice, but its visual impact is well worth the effort. For a detailed guide on the technique, you can learn more about how to do a French knot on cross-stitched.com.
- Stitch Formation: A raised, textured knot is formed by wrapping the thread around the needle.
- Fabric: Can be worked on any cross stitch fabric, including Aida, linen, and even-weave.
- Difficulty: Intermediate. It requires careful tension control and precise needle placement.
- Thread Count: Typically 1-2 strands of floss are used for delicate knots. The number of wraps (usually 1-3) determines the knot's size.
Best Practices for Perfect French Knots
Consistency is key to making your French knots look uniform and professional. A little practice on a scrap piece of fabric can make a significant difference in your confidence and the final result.
Pro Tip: Maintain consistent tension on the floss as you form the knot. Hold the working thread taut as you pull the needle through to the back; this prevents the knot from becoming loose or misshapen.
Here are a few actionable tips:
- Needle Placement: When re-inserting the needle, place it in an adjacent hole of the fabric weave, not the same one it came out of. This anchors the knot securely.
- Vary Knot Size: Adjust the size of your knots by changing the number of times you wrap the floss around the needle. One wrap creates a tiny dot, while two or three wraps create a larger, more prominent knot.
- Secure the Back: To ensure your knots don't pull through, you can secure them on the reverse side with a tiny backstitch or by running the thread under several nearby stitches.
6. Specialty Stitches (Long Stitch, Satin Stitch, Seed Stitch)
Beyond the foundational "X," the world of cross stitch incorporates various embroidery techniques known as specialty stitches. These stitches are used to add texture, dimension, and intricate detail that cross stitches alone cannot achieve. Instead of forming a simple grid, specialty stitches like the long stitch, satin stitch, and seed stitch introduce different shapes and coverage styles to a project. The long stitch creates straight lines of varying lengths, the satin stitch fills areas with smooth, parallel stitches, and the seed stitch adds scattered, delicate texture.
These supplementary techniques are what elevate a standard pattern into a more dynamic and visually complex piece of fiber art. They are often used to create specific effects, such as flowing water with long stitches, shiny flower petals with satin stitches, or a speckled field with seed stitches. Integrating these among the more traditional types of cross stitching allows for a rich, mixed-media feel on a single piece of fabric.
Key Characteristics and Implementation
Specialty stitches are the artistic flourishes that can define a project’s character. While not strictly "cross" stitches, their inclusion in patterns is common for adding highlights and unique textures.
- Stitch Formation: Varies greatly; includes straight lines (long stitch), smooth filled blocks (satin stitch), and tiny individual straight stitches (seed stitch).
- Fabric: Best suited for even-weave fabrics like linen or Monaco, where stitch placement is more flexible than on the rigid grid of Aida.
- Difficulty: Intermediate to Advanced. Requires careful stitch placement and tension control to execute cleanly.
- Thread Count: Varies by stitch and desired effect. Satin stitches often use fewer strands for a smoother finish, while long stitches may use more for bold lines.
Best Practices for Integrating Specialty Stitches
Successfully using specialty stitches is all about control and intentional placement. They should enhance, not overpower, the primary cross-stitched design.
Pro Tip: Before starting a project with specialty stitches, create a small sampler on a scrap piece of the same fabric. Practicing each stitch type helps you master tension and placement without risking your main project.
Here are a few actionable tips:
- Study the Pattern: Pay close attention to the pattern’s key and instructions. Designers often provide specific diagrams for how to form each specialty stitch correctly.
- Maintain Tension: Even tension is critical for these stitches. Satin stitches, in particular, must lay flat and parallel, while long stitches can warp the fabric if pulled too tightly.
- Use as Accents: Reserve these techniques for focal points or specific textures. Use them to make an element pop, such as adding a satin stitch sheen to an eye or a long stitch to create the illusion of rain.
7. Counted Cross Stitch
Counted cross stitch is the most popular and widespread form of the craft, representing what most people envision when they think of modern cross stitching. Unlike other methods that provide a pre-printed design on the fabric, this technique involves working from a separate chart or pattern. The stitcher meticulously counts the squares on a blank piece of even-weave fabric (like Aida or linen) and uses the corresponding symbols on the chart to place each stitch of the correct color.
This method offers unparalleled precision and creative freedom, allowing for the recreation of incredibly detailed and complex images, from photorealistic portraits to intricate traditional samplers. Its reliance on a grid-based chart is what gives the final piece its characteristic pixel-art appearance. Counted cross stitch is the foundation for the vast majority of kits and patterns available today, favored by designers and stitchers for its clean finish and limitless possibilities.
Key Characteristics and Implementation
The essence of counted cross stitch is the translation of a symbolic chart onto blank fabric, making it one of the most skill-building types of cross stitching. This process demands careful attention to detail and patience but rewards the stitcher with a professional, crisp-looking project without any printed lines showing through. To get a deeper look into the specifics of this popular method, you can find a complete guide about what counted cross stitch is and how to master it.
- Stitch Formation: Stitches are placed by counting squares on blank even-weave fabric, following a separate pattern chart.
- Fabric: Always performed on even-weave fabric, with Aida being the most common for its clear grid. Linen and evenweave are used for more advanced projects.
- Difficulty: Beginner to Advanced. Simple patterns are perfect for newcomers, while complex, full-coverage art pieces challenge even the most experienced stitchers.
- Thread Count: Varies based on fabric count and desired coverage, but 2 strands on 14-count Aida is a standard starting point.
Best Practices for Perfect Counted Cross Stitches
Success in counted cross stitch hinges on accuracy and organization. Keeping track of your position on both the fabric and the chart is paramount to avoiding frustrating mistakes.
Pro Tip: Always start your project from the center of the fabric and the center of the chart. This ensures your design is perfectly centered and prevents you from running out of fabric on one side.
Here are a few actionable tips:
- Mark Your Progress: Use a highlighter or a pencil to mark off completed sections on your paper chart. For digital patterns, pattern-keeping apps can track your stitches for you.
- Grid Your Fabric: For larger projects, use a water-soluble fabric marker or a special thread (called a gridding thread) to draw 10x10 grid lines on your fabric that match your pattern. This makes counting much easier and reduces errors.
- Use a Chart Holder: A magnetic board or a stand to hold your pattern makes it easier to reference while you stitch, improving your posture and stitching speed.
8. Freestyle/Improvised Cross Stitch
Freestyle or improvised cross stitch breaks free from the structured confines of patterns and charts, inviting stitchers to treat fabric as a blank canvas. This highly artistic approach is about personal expression and intuition, where the design evolves organically under the needle. Instead of following a pre-made guide, the artist stitches directly onto the material, letting creativity dictate color choices, stitch placement, and overall composition.
This technique transforms cross stitching from a craft of replication into a medium for original art. It often incorporates various stitch types, textures, and even mixed-media elements, resulting in one-of-a-kind pieces that reflect the creator's unique vision. It’s an ideal method for creating abstract fiber art, personalized journal covers, or expressive wall hangings that are truly spontaneous and personal.
Key Characteristics and Implementation
Embracing spontaneity is at the core of this technique, making it one of the most liberating types of cross stitching. It allows for a fluid, meditative process where the final outcome is often a delightful surprise. Any fabric can be used, though a plain, un-gridded material often encourages more organic shapes.
- Stitch Formation: Can include traditional cross stitches alongside any other embroidery stitch the artist chooses.
- Fabric: Works on any fabric, including Aida, linen, felt, or even clothing items. Aida is not necessary as there is no chart to follow.
- Difficulty: Intermediate to Advanced. It requires a good understanding of stitch mechanics and a confident creative vision.
- Thread Count: Varies entirely based on the desired artistic effect, from single strands for delicate details to all six for bold texture.
Best Practices for Freestyle Cross Stitch
Success in freestyle stitching comes from letting go of perfectionism and embracing the creative journey. The process is just as important as the final product.
Pro Tip: Don't be afraid to make "mistakes." An unplanned stitch or an unexpected color choice can often lead to the most interesting and beautiful parts of your design. Lean into the improvisation.
Here are a few actionable tips to get started:
- Start with a Sketch: Lightly sketch a basic outline or key shapes onto your fabric with a water-soluble pen or pencil to provide a loose guide.
- Experiment with Color: Pull a palette of threads that inspires you before you begin. Don't feel bound to traditional color rules; experiment with bold and unusual combinations.
- Vary Your Texture: Combine standard cross stitches with French knots, backstitches, satin stitches, and more to add depth, dimension, and visual interest to your work.
- Embrace Mixed Media: Consider incorporating beads, sequins, or even small pieces of fabric into your design for a truly unique mixed-media textile piece.
8 Cross Stitch Types Compared
| Technique | Complexity (🔄) | Resources & Speed (⚡) | Expected results / Impact (⭐📊) | Ideal use cases (💡) | Key advantages |
|---|---|---|---|---|---|
| Full Cross Stitch | 🔄 Low — beginner-friendly | ⚡ Moderate speed; higher thread consumption | ⭐📊 Bold, uniform coverage; predictable finish | Traditional samplers, ornaments, framed designs | Easy to learn; versatile; forgiving tension |
| Half Cross Stitch | 🔄 Low–Moderate — needs precision | ⚡ Faster and ~50% thread savings; less bulky | ⭐📊 Lighter, translucent shading; subtle transitions | Portrait shading, photorealistic areas, fine detail | Economical thread use; good for smooth shading |
| Three-Quarter Cross Stitch | 🔄 High — advanced planning & skill | ⚡ Slow; requires detailed charts, magnification | ⭐📊 Very high detail; smooth curves and realistic edges | Realistic portraits, fine-art reproductions | Superior edge definition; photorealistic detail |
| Backstitch | 🔄 Low–Moderate — steady hand required | ⚡ Low material use; can be time-consuming for large outlines | ⭐📊 Crisp lines and lettering; enhances clarity | Outlining, facial features, text and fine details | Adds professional definition with minimal thread |
| French Knot | 🔄 Low–Moderate — practice for consistency | ⚡ Low material per knot; slow if used extensively | ⭐📊 Raised, tactile accents; high visual impact in small areas | Eyes, flower centers, small textured accents | Adds dimension and texture; high-impact small details |
| Specialty Stitches (Long/Satin/Seed) | 🔄 Moderate–High — varied techniques | ⚡ Variable; often time-consuming and needs practice | ⭐📊 Rich texture and varied surfaces; focal interest | Mixed-stitch fiber art, textured focal points | Expands texture & realism; artistic expression |
| Counted Cross Stitch | 🔄 Moderate — careful counting required | ⚡ Moderate; depends on project size; needs charting tools | ⭐📊 Predictable, repeatable results from charts | Pattern-based projects, samplers, wall art | Reliable precision; vast pattern availability |
| Freestyle / Improvised | 🔄 Moderate–High — design skill & confidence | ⚡ Flexible resource use; speed varies with planning | ⭐📊 Unique, one-of-a-kind artistic outcomes (less predictable) | Experimental textiles, personal art pieces, journals | Creative freedom; therapeutic; highly original results |
Bringing Your Vision to Life with the Right Stitches
You've just journeyed through the diverse and dynamic world of cross stitch, from the foundational full cross stitch to the intricate details of specialty stitches. The path from a blank piece of Aida cloth to a finished masterpiece is paved with these techniques, and understanding the unique role of each one is the key to unlocking your full creative potential. It's easy to see them as separate, individual skills, but their true power emerges when you view them as a cohesive toolkit.
The core lesson is one of versatility and intention. The simple, uniform grid created by full cross stitches provides structure and clarity, ideal for bold, graphic designs. Yet, the subtle shading achieved with half stitches or the smooth, rounded edges formed by three-quarter stitches can transform that same grid into a canvas for photorealistic detail. This is the essence of mastering the different types of cross stitching: knowing when to use which technique to achieve a specific visual effect.
From Knowledge to Application: Your Creative Next Steps
Moving forward, the goal is to transform this newfound knowledge into muscle memory and creative intuition. The best way to do this is by actively seeking opportunities to practice. Don't just stick to patterns that only use the full cross stitch; challenge yourself with designs that incorporate a variety of techniques.
Consider these actionable steps to solidify your skills:
- Start a "Stitch Sampler": Dedicate a small piece of fabric to practicing each stitch. Create rows of full, half, and three-quarter stitches to compare their coverage. Add lines of backstitching and clusters of French knots. This no-pressure project serves as a physical reference you can turn to anytime.
- Analyze Your Patterns: Before you begin your next project, take a close look at the pattern key. Identify which stitches are used and think about why the designer chose them for specific areas. Is backstitching used to define a subject? Are French knots adding texture to flowers or eyes?
- Experiment with Blending: For your next piece, try intentionally blending techniques. Use half stitches in the background to create a sense of depth, making the full-stitched foreground pop. Outline a section with backstitching to see how it adds definition and contrast to the surrounding stitches.
Key Takeaway: The true artistry of cross stitch lies not just in executing a single stitch perfectly, but in skillfully combining multiple types of cross stitching to create texture, depth, and detail. Each stitch is a tool, and a well-rounded stitcher knows which tool to pull from their kit for the job at hand.
Unlocking a World of Creative Expression
Mastering these techniques does more than just make you a better stitcher; it fundamentally changes how you approach the craft. A challenging pattern is no longer intimidating but becomes an exciting opportunity to apply your skills. You gain the confidence to not only follow complex designs but also to adapt them or even create your own from scratch. Imagine transforming a beloved family photograph into a stitched heirloom, using fractional stitches to capture the subtle curve of a smile and French knots to add a sparkle to an eye.
This craft is a journey of continuous learning and creative expression. By embracing the full spectrum of stitches available, you're not just following a pattern; you're painting with thread, one deliberate cross at a time. You are the artist, and these stitches are your palette.
Ready to put your knowledge of the different types of cross stitching into practice on a truly personal project? Cross Stitched specializes in creating custom, all-in-one kits from your favorite photos, providing the perfect canvas to use full stitches for broad color fields and fractional stitches for those precious details. Visit Cross Stitched to see how you can turn your cherished memories into a beautiful, hand-stitched work of art today.


