
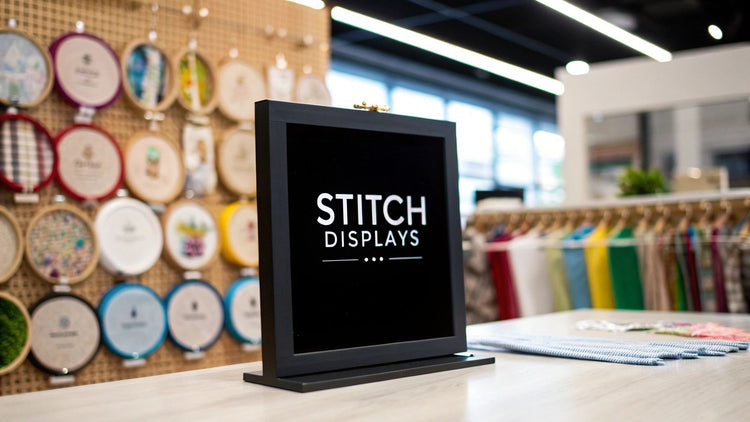
You’ve poured hours into your latest cross stitch project, carefully placing each 'x' to create a beautiful piece of art. The final stitch is in, but now comes the big question: how do you display it? While a traditional frame is a classic choice, it’s far from your only option. Many modern stitchers are looking for more creative, personal, and functional ways to showcase their work that go beyond the expected.
Framing can be expensive, time-consuming, and may not fit the aesthetic of every piece or home. For those seeking unique solutions, this guide explores eight inventive and practical alternatives to framing cross stitch. We will offer fresh ideas to turn your needlework into everything from functional home decor and wearable art to three-dimensional displays.
Whether you've just completed a custom photo pattern or a small seasonal design, these methods provide actionable steps to celebrate your craft in a style that's uniquely yours. Prepare to transform your finished pieces into pillows, coasters, tote bags, and even resin-embedded keepsakes. This list is designed to inspire your next finish and give your hard work the spotlight it deserves, no frame required.
1. Hoop Art Display
One of the most popular and aesthetically pleasing alternatives to framing cross stitch is to display the finished piece directly in its embroidery hoop. This method transforms the humble hoop from a practical tool into a key part of the artwork's final presentation. The raw, natural look of a wooden hoop provides a rustic, modern, and minimalist frame that complements a wide range of decor styles, making it a go-to choice for stitchers looking for a simple yet effective display solution.
This approach celebrates the crafting process itself. By keeping the project in its hoop, you retain an authentic, handmade feel that can be lost with traditional, formal framing. It’s a budget-friendly and accessible method that requires minimal extra materials and skills, perfect for both beginners and seasoned crafters.
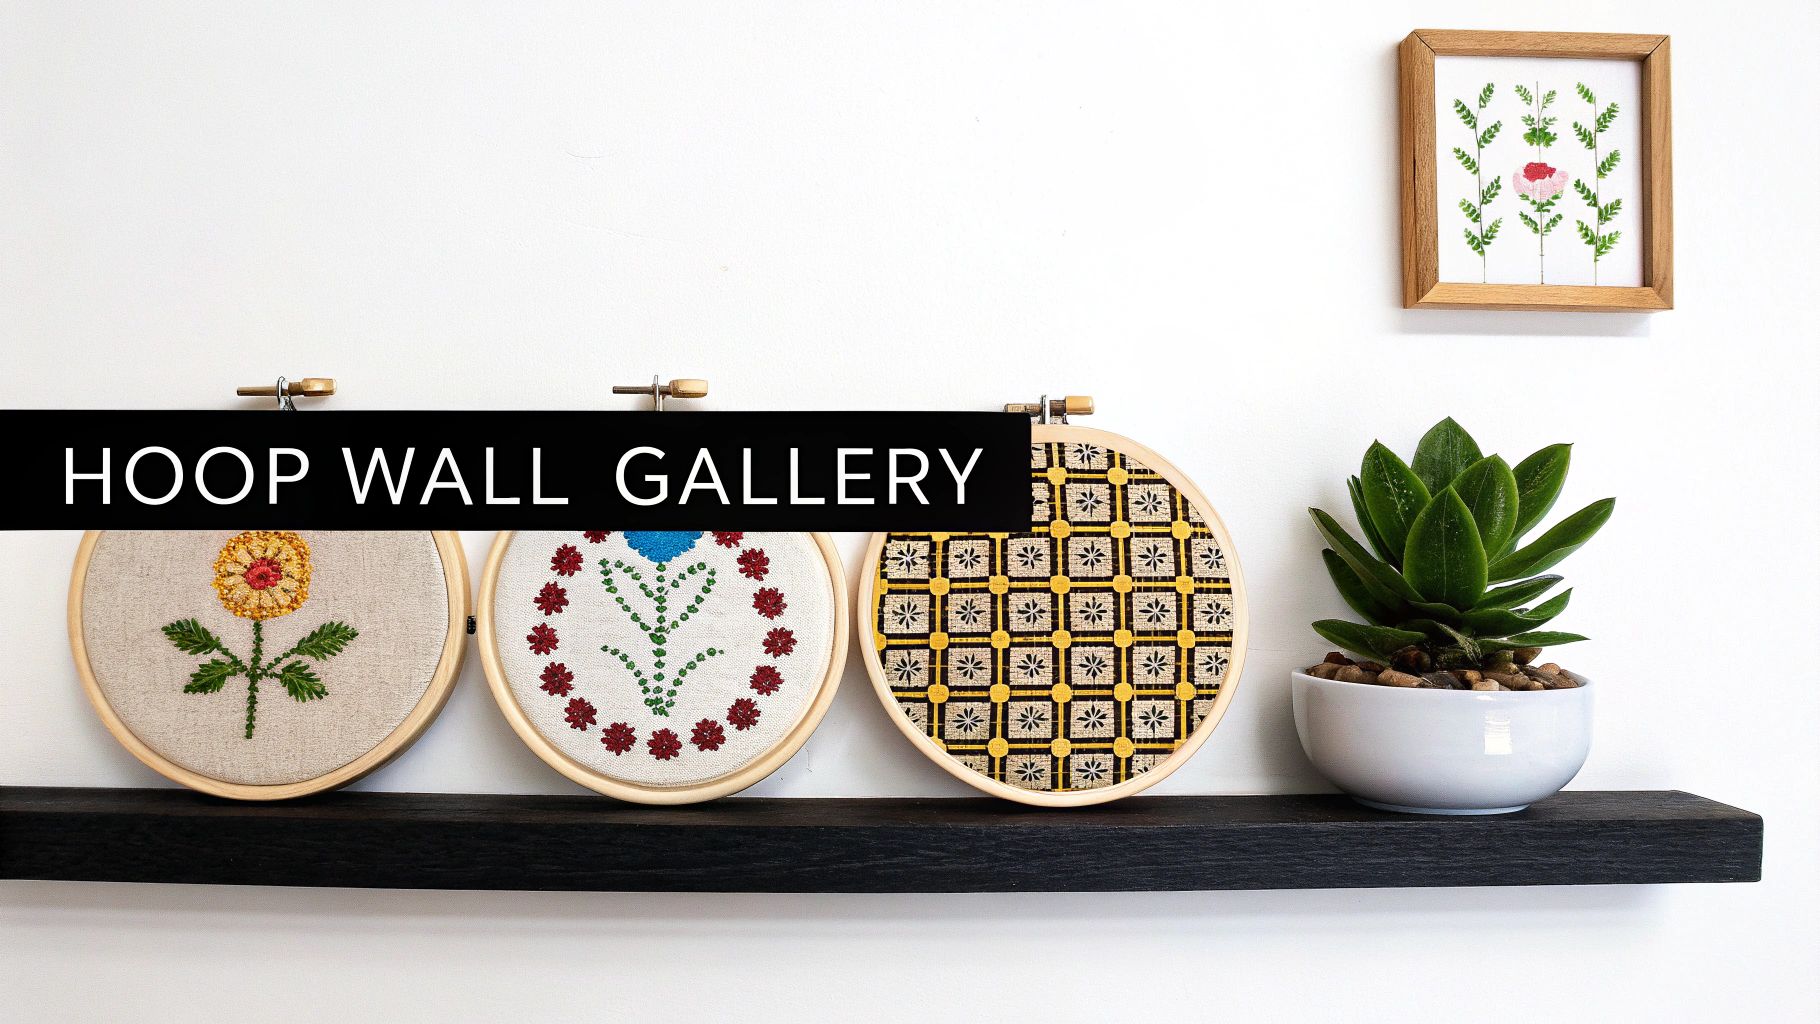
Why Choose Hoop Art?
The beauty of the hoop art display lies in its simplicity and versatility. It is ideal for smaller projects, samplers, or modern patterns with negative space that looks striking against the fabric. This method is particularly effective for creating a dynamic gallery wall. By grouping hoops of various sizes and displaying them together, you can create a stunning visual focal point in any room. The lightweight nature of hoops also makes them easy to hang with a simple nail or adhesive hook.
How to Finish Your Hoop for Display
Proper finishing is key to turning your hooped cross stitch into a lasting piece of art. Follow these steps for a clean, professional look:
- Secure the Fabric: Once your project is centered, tighten the hoop's screw firmly. Be careful not to warp the fabric or stitches by overtightening.
- Trim Excess Fabric: Leave about a 1- to 2-inch border of fabric around the outside of the hoop. Trim away any excess beyond this margin.
- Finish the Back: Use a running stitch around the edge of the remaining fabric and pull it tight like a drawstring to gather the fabric neatly at the back. Alternatively, you can glue the fabric to the inside of the inner hoop.
- Add a Backing: To protect your stitches and give the piece a polished finish, cut a piece of felt or acid-free cardstock to the size of the inner hoop and glue it onto the back. This conceals the messy threads and prevents dust from gathering.
2. Pillow and Cushion Conversion
One of the most practical and charming alternatives to framing cross stitch is to convert your finished work into a custom pillow or cushion. This approach transforms your needlework from a purely decorative wall hanging into a functional piece of home decor. By incorporating your stitched art into a throw pillow, you create a beautiful and tactile item that adds a personalized, handmade touch to any living space, from sofas and armchairs to beds.
This method seamlessly blends art with utility, allowing you to enjoy your cross stitch in a more interactive and cozy way. It is a fantastic option for larger projects or pieces with sentimental value, such as family name samplers or holiday-themed designs, turning them into cherished home accessories. For those looking to elevate their interior, exploring ideas on how to use throws and pillows for a luxurious home look can provide excellent inspiration.
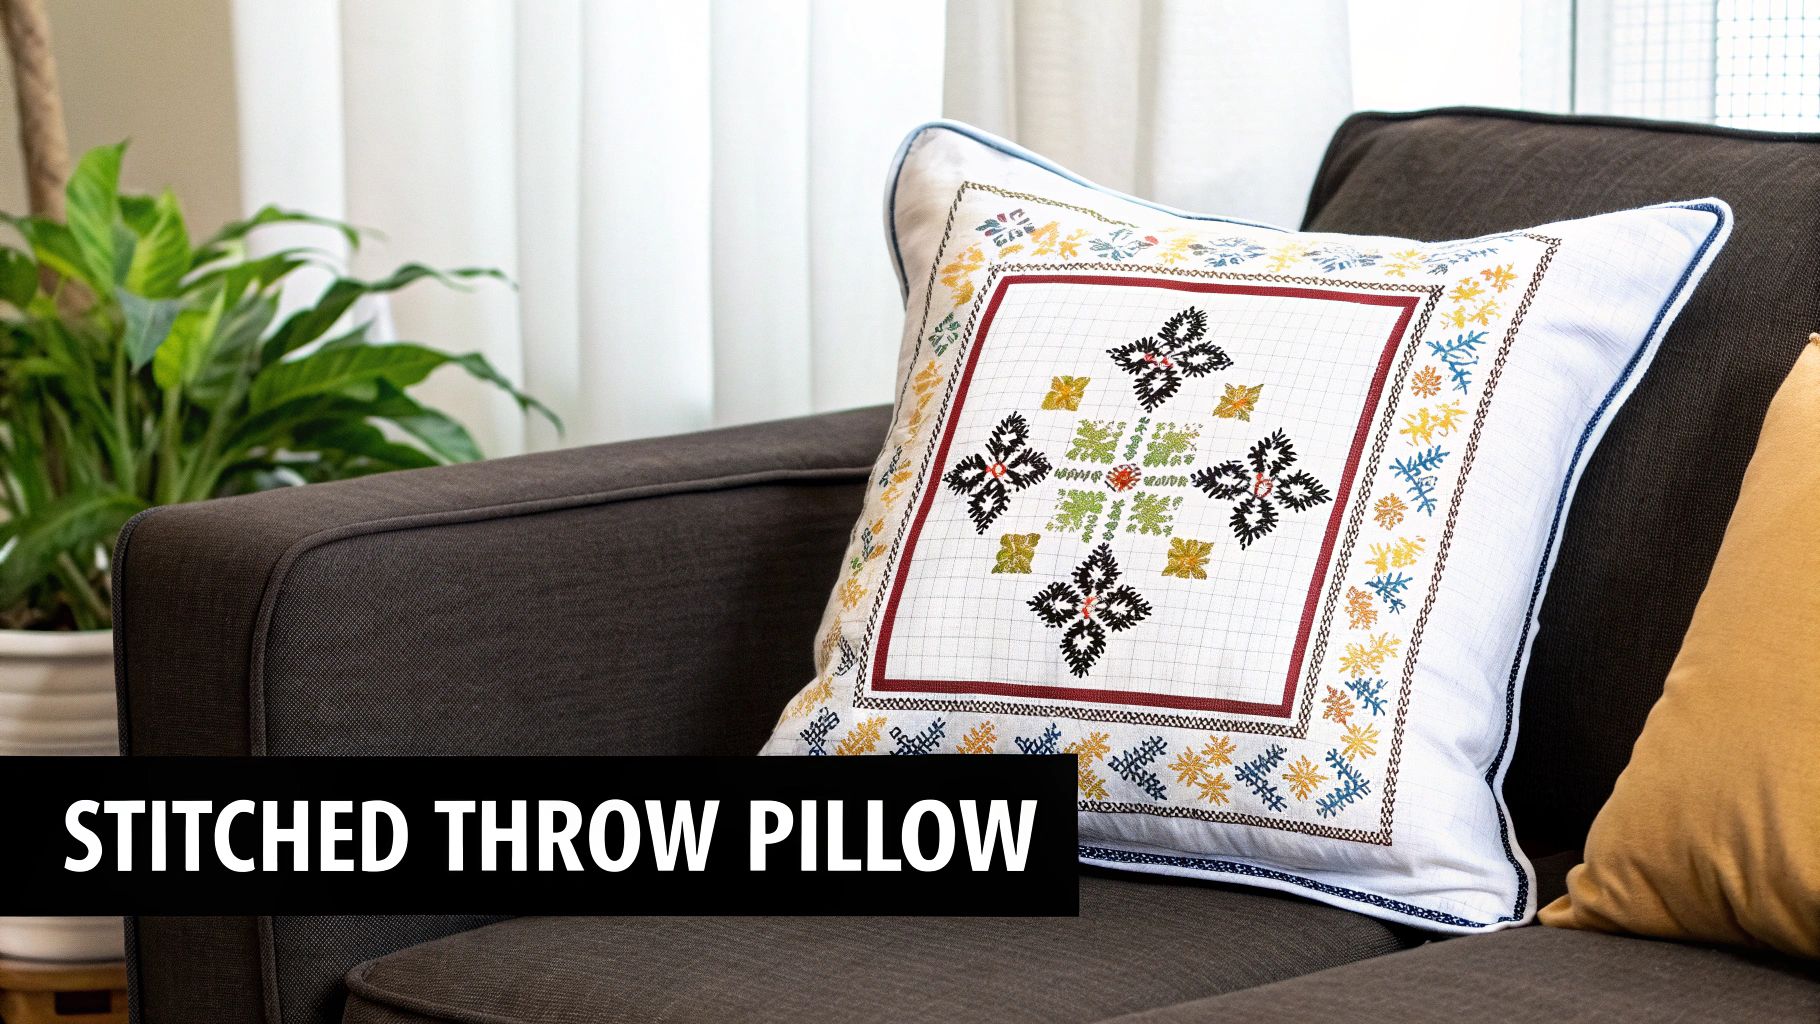
Why Choose Pillow Conversion?
Converting your cross stitch into a pillow is ideal for making your craft a part of your daily life. Unlike a framed piece on a wall, a cushion is meant to be used and appreciated up close. This method is perfect for seasonal decor, allowing you to easily swap out pillows for holidays like Christmas or Halloween. It also makes for an incredibly thoughtful and personal gift, offering a handmade item that is both beautiful and useful.
How to Create a Cross Stitch Pillow
Turning your stitched fabric into a professional-looking pillow requires careful finishing. Follow these steps for a durable and attractive result:
- Prepare Your Fabric: Before sewing, pre-wash both your cross stitch fabric and the backing fabric to prevent any future shrinkage. Iron them carefully, placing a cloth over your stitches to protect them.
- Add a Protective Backing: To protect the back of your stitches and add durability, iron a lightweight, fusible interfacing onto the back of your cross stitch piece.
- Construct the Pillow: Choose a coordinating fabric for the back of the pillow. For a polished look, consider adding piping or a decorative trim around the edges. Sew the pieces together, leaving an opening to insert a pillow form.
- Choose a Closure: For easy cleaning, add a zipper or an envelope-style closure to the back of the pillow cover. This allows you to remove the pillow form and wash the cover as needed. For more guidance on different finishing options, you can explore various cross stitch finishing techniques.
3. Coaster and Small Functional Items
Transforming your needlework into everyday objects is one of the most practical and charming alternatives to framing cross stitch. This method turns small, finished designs into functional items like coasters, magnets, bookmarks, or keychains. Instead of hanging on a wall, your art becomes a part of daily life, adding a touch of handmade beauty to ordinary routines. It’s an excellent way to use up smaller scraps of Aida or finish mini-projects that might otherwise get lost.
This approach gives your cross stitch a tangible purpose beyond decoration. Gifting a set of handmade coasters or a personalized bookmark is incredibly thoughtful, as the recipient can use and appreciate your work regularly. This method is especially popular among craft fair vendors and Etsy sellers who create unique, marketable products that are both beautiful and useful.
Why Choose Functional Items?
The appeal of creating functional items lies in their practicality and gift-ability. This method is perfect for small patterns, monograms, or festive motifs that are quick to stitch. A set of coasters with seasonal designs or a collection of refrigerator magnets featuring a favorite theme makes for a cohesive and delightful gift set. It’s also an ideal solution for stitchers who have limited wall space but still want to showcase their skills.
These small projects are fantastic for using leftover thread and fabric, minimizing waste while maximizing creativity. They are also great for beginners to practice finishing techniques on a smaller, lower-stakes scale before tackling larger, more complex projects.
How to Create Your Functional Items
Turning your stitch work into a durable, everyday item requires a few specific finishing steps to ensure it lasts.
- Prepare the Artwork: Carefully wash, press, and trim your finished cross stitch piece, leaving a small margin around the design. For coasters, you will typically mount the fabric onto a sturdy base like a tile, wood slice, or a purpose-built acrylic coaster blank.
- Protect the Stitches: To make items like coasters waterproof and stain-resistant, apply a clear sealant or a thin layer of resin over the top. For bookmarks, you can laminate the piece or insert it into a clear vinyl sleeve.
- Add a Professional Backing: For coasters, glue a layer of cork or felt to the bottom to protect furniture surfaces. For magnets, attach a strong, flat magnet sheet to the back, ensuring it covers enough surface area to hold securely.
- Assemble with Care: If creating keychains or ornaments, use appropriate hardware like jump rings and keychain clasps. Ensure all components are securely attached for a durable and professional finish.
4. Tote Bag and Apparel Integration
A fantastic and practical alternative to framing cross stitch is to integrate your finished piece directly onto clothing and accessories. This method transforms your embroidery from a static wall decoration into a dynamic, wearable piece of art. By adding a cross-stitch patch to a tote bag, denim jacket, apron, or t-shirt, you create a personalized statement item that showcases your skills and personality in a functional, everyday way.
This approach merges the traditional craft of needlework with modern fashion, allowing you to wear your creativity proudly. It’s an excellent way to upcycle old garments or customize new ones, making them truly one-of-a-kind. The result is a unique, handmade item that is both beautiful and useful, perfect for personal use or as a thoughtful, customized gift.
Why Choose Apparel Integration?
This method is ideal for stitchers who want their work to be seen and used rather than just displayed. It’s perfect for smaller motifs, monograms, or bold graphic designs that can serve as a focal point on a garment. Integrating cross stitch into apparel adds a tactile, bespoke quality that mass-produced items lack. This technique is especially popular among Etsy sellers and DIY fashion enthusiasts who value individuality and sustainable style. While sewing your cross-stitch onto apparel creates a unique textile piece, those exploring further customization options might find a general custom t-shirt printing guide helpful for other projects.
How to Add Cross Stitch to Fabric Items
Securing your cross stitch to a wearable item requires a few extra steps to ensure it lasts. Follow this process for a durable and professional finish:
- Prepare the Garment: Always pre-wash and dry your garment or bag before attaching the cross-stitch piece. This prevents any future shrinkage that could warp your stitching.
- Finish the Cross-Stitch Piece: Trim your finished cross-stitch fabric, leaving about a one-inch border. Fold the raw edges under and press them with an iron to create a clean-edged patch.
- Add Stabilizer: Iron a piece of lightweight interfacing onto the back of your cross-stitch patch. This adds stability and prevents the stitches from unraveling with wear and tear. You can learn more about how to transfer patterns to fabric for direct stitching as well.
- Attach Securely: Position the patch on your item and pin it in place. Carefully hand-stitch or machine-stitch around the edges to attach it securely. A tight blanket stitch or a straight machine stitch works well.
5. Shadowbox and 3D Display Cases
For pieces that deserve a gallery-quality presentation, using a shadowbox is a sophisticated alternative to framing cross stitch. This method involves mounting the finished needlework in a deep-set display case, which adds a sense of dimension and depth that traditional flat frames cannot achieve. The space between the glass and the artwork creates a protective environment while elevating the piece to the status of a treasured artifact.
This approach is perfect for heirloom projects, intricate designs, or pieces that have special significance. By encasing the cross stitch in a shadowbox, you not only preserve it from dust and environmental damage but also give it a formal, museum-like quality. The added depth allows for creative compositions, such as layering the piece with other meaningful objects or mementos to tell a more complete story.
Why Choose a Shadowbox?
A shadowbox display is ideal for projects where you want to emphasize texture and detail or create a three-dimensional scene. It's particularly effective for memorial pieces, wedding or birth samplers, or any cross stitch that you want to present as a significant work of art. The protective nature of the case makes it a superior choice for preserving antique or delicate needlework for generations to come. This method allows you to showcase not just the stitching but the story behind it.
How to Create a Shadowbox Display
Achieving a professional-looking shadowbox display requires careful planning and attention to detail. Follow these tips for a stunning result:
- Select the Right Materials: Always use acid-free matting, backing boards, and mounting materials to prevent discoloration and degradation of your fabric and threads over time.
- Mount Securely: The cross stitch piece should be carefully stretched and mounted on an acid-free foam core board. You can do this by lacing the back or using stainless steel pins along the edges of the board.
- Design Your Composition: Plan the layout before assembling. Decide if you want to include other elements like a nameplate, a photo, or small objects related to the piece. Use complementary backing fabrics or papers to enhance the design without overwhelming it.
- Consider Professional Help: For irreplaceable pieces, consider working with a professional framer experienced in textile conservation. They can ensure the piece is mounted correctly using archival methods that will preserve its integrity.
6. Jar and Container Embellishment
Transform everyday storage into personalized works of art with another creative alternative to framing cross stitch: embellishing jars, boxes, and other containers. This method involves affixing your finished needlework to the surface of a functional item, turning utilitarian objects like glass jars or wooden boxes into beautiful and purposeful decor. It is a fantastic way to blend your crafting hobby with practical home organization and gift-giving.
This approach gives your cross stitch a new life beyond the wall. By integrating your work onto an object that can be used daily, you create a unique, handmade accessory that is both beautiful and useful. It's an excellent solution for using smaller stitched pieces, motifs, or even practice swatches that might otherwise go unused.
Why Choose Container Embellishment?
The appeal of this method lies in its practicality and charm. It is ideal for creating custom labels for craft room storage, making one-of-a-kind holiday cookie tins, or designing personalized keepsake boxes. Imagine a set of kitchen canisters with cross-stitched labels for "Flour," "Sugar," and "Tea," or a special box for storing sewing supplies adorned with a stitched thimble.
This technique is especially popular for creating heartfelt, handmade gifts. A simple jar filled with treats becomes a memorable present when decorated with a personalized cross-stitch design, such as a monogram for a teacher or a festive motif for a friend. It’s a way to make both the gift and its packaging a cherished keepsake.
How to Embellish Your Containers
Applying your cross stitch to a container requires careful preparation to ensure it looks professional and lasts. Follow these steps for a durable and attractive finish:
- Prepare the Piece: Trim your finished cross stitch, leaving a small, clean margin around the design. Fray-check the edges to prevent unraveling.
- Select an Adhesive: Use a strong, acid-free craft adhesive or a decoupage medium like Mod Podge to affix the fabric to the container's clean, dry surface. Apply the adhesive evenly to both the back of the fabric and the container.
- Apply and Smooth: Carefully place the cross stitch onto the surface, smoothing it out from the center to eliminate any air bubbles or wrinkles.
- Seal for Protection: For frequently handled items or containers in a kitchen or bathroom, apply a top coat of clear, waterproof varnish or a thin layer of resin. This protects the fabric from moisture, dirt, and wear, ensuring its longevity.
7. Quilt and Textile Panel Integration
A truly ambitious and rewarding alternative to framing cross stitch involves integrating finished pieces into a larger textile project, such as a quilt or a wall hanging. This method transforms individual works into a cohesive, large-scale piece of art. By sewing your cross stitch blocks together with complementary fabrics, you can create a meaningful and impressive composition, elevating small projects into a significant, heirloom-quality textile.
This approach is perfect for telling a story, commemorating an event, or creating a family legacy. It allows you to combine multiple pieces, perhaps stitched by different people or over many years, into a single, unified display. This method turns your needlework into a functional and deeply personal item, whether it's a family history quilt or a commemorative art installation.
Why Choose Quilt and Textile Panel Integration?
Integrating cross stitch into a quilt is ideal for stitchers who want to create a grand, multi-faceted piece with significant emotional weight. It’s an excellent way to showcase a collection of smaller related designs, such as a series of birth announcements, seasonal motifs, or family portraits. This technique is particularly popular among fiber artists and those involved in heritage projects, as it physically stitches together memories and histories into a tangible form.
How to Integrate Your Cross Stitch into a Quilt
Careful planning is essential for a successful textile project that incorporates cross stitch. Follow these guidelines for a beautiful and lasting result:
- Plan the Layout: Before you begin sewing, arrange your cross stitch blocks and fabric pieces to create a balanced and visually appealing design. Consider sashing and borders to frame each block.
- Choose Complementary Fabrics: Select fabrics that enhance your stitching without overpowering it. The colors and patterns should harmonize with your cross stitch designs.
- Leave Ample Seam Allowance: When preparing your cross stitch pieces, ensure you have enough fabric around the stitched area for a generous seam allowance (at least 1 inch) to prevent unraveling.
- Document Everything: For heirloom projects, keep detailed notes about each piece: who stitched it, when it was completed, and its significance. This documentation adds incredible value for future generations.
8. Resin and Epoxy Embedding
For a truly modern and sculptural finish, encasing your cross stitch in clear epoxy or UV resin offers one of the most unique alternatives to framing cross stitch. This technique transforms your fabric art into a durable, glossy object with a glass-like clarity, preserving the stitches permanently. The resin coating protects the piece from dust, moisture, and wear, making it ideal for creating functional items like coasters, keychains, or decorative paperweights.
This contemporary method elevates your needlework from a flat piece into a three-dimensional keepsake. It’s a bold way to showcase small, detailed works, turning them into solid, tangible art objects that can be handled and admired up close. The result is a sleek, professional finish that feels both handmade and high-end.
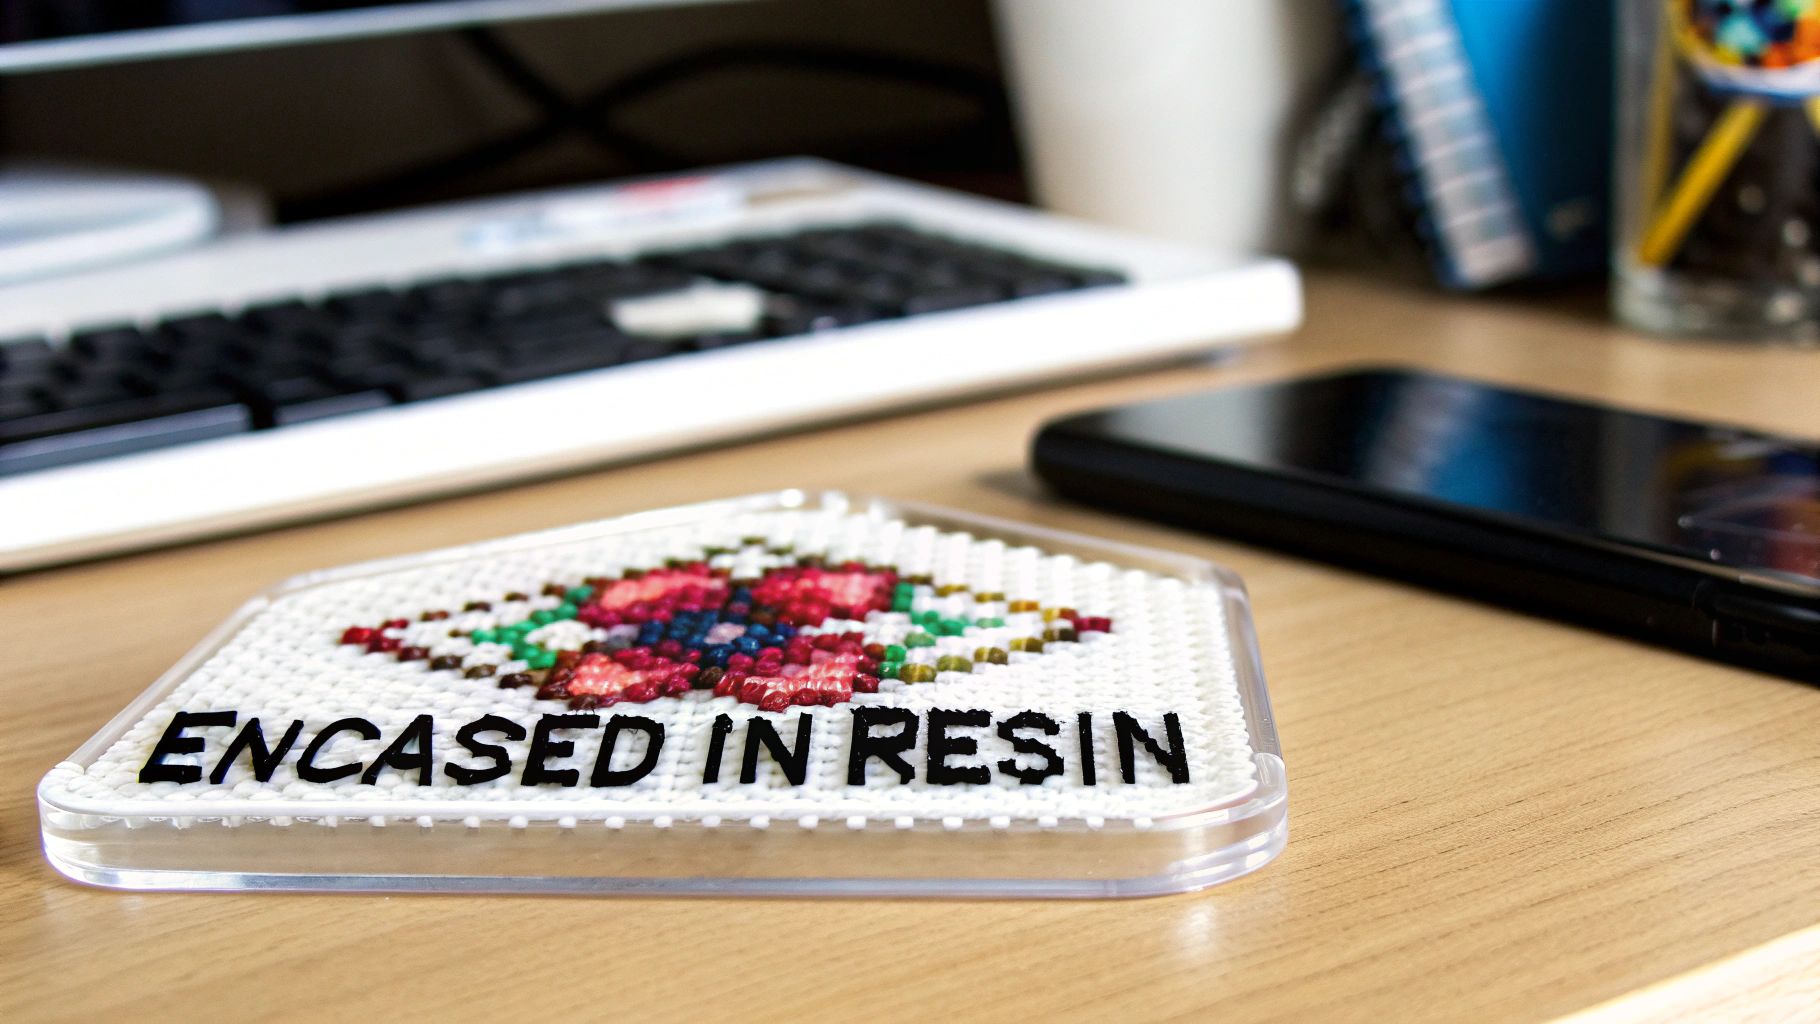
Why Choose Resin Embedding?
Resin embedding is perfect for small motifs, monograms, or miniature scenes that you want to turn into jewelry, ornaments, or personalized gifts. The crystal-clear finish magnifies the detail of your stitching while adding depth and durability. This method is particularly popular among Etsy makers and contemporary crafters who want to create a distinctive product line that stands out from traditional fiber art displays. It's an excellent way to make your cross stitch both beautiful and functional.
How to Embed Your Cross Stitch in Resin
Working with resin requires precision and care, but the stunning results are worth the effort. Always ensure your piece is completely clean before you begin; you can find helpful guidance on how to clean a cross stitch to prepare it properly.
- Seal Your Fabric: Before pouring, seal your finished cross stitch piece with a sealant like Mod Podge. This prevents the resin from soaking into the fabric and causing discoloration or dark spots.
- Prepare Your Workspace: Work in a well-ventilated area and wear appropriate safety gear, including gloves and a respirator. Cover your surface to protect it from spills.
- Mix and Pour: Carefully follow the manufacturer’s instructions to mix your two-part epoxy resin. Pour a thin base layer into your mold, place your sealed cross stitch on top, and then pour the remaining resin over it.
- Remove Bubbles: Use a heat gun, a long-arm lighter, or a toothpick to gently pop any air bubbles that rise to the surface. This step is crucial for achieving a crystal-clear finish.
- Cure Properly: Allow the piece to cure undisturbed for the recommended time, typically 24-72 hours, in a warm, dust-free environment. UV resin offers a much faster curing time using a UV lamp.
8 Cross-Stitch Display Alternatives Compared
| Method | Implementation complexity 🔄 | Resource requirements ⚡ | Expected outcomes ⭐ | Ideal use cases 📊 | Key advantages 💡 |
|---|---|---|---|---|---|
| Hoop Art Display | Low — simple finishing and mounting | Low — hoop, backing fabric, basic tools | Attractive contemporary display; moderate longevity | Small–medium pieces, gallery walls, seasonal swaps | Cost-effective, quick to change; use acid-free backing and avoid over-tightening |
| Pillow and Cushion Conversion | Medium — basic sewing and assembly | Medium — pillow form, backing fabric, zipper/interfacing | Functional decorative item; lifespan depends on use | Home decor, personalized gifts, rotating room accents | Dual-purpose (decor + use); back with interfacing and use removable covers |
| Coaster and Small Functional Items | Low — simple cutting/gluing or laminating | Low — cork/felt backing, adhesive, optional resin | Practical, low-cost items with variable durability | Small leftovers, craft-fair goods, giveaways | Fast and economical; seal surfaces for water resistance |
| Tote Bag and Apparel Integration | Medium–High — secure attachment and reinforcement | Medium — garment base, stabilizer, sewing tools | Highly visible wearable art; durability varies with care | Wearable statements, market items, custom gifts | Creates shareable fashion pieces; use stabilizer and provide care instructions |
| Shadowbox and 3D Display Cases | High — precise mounting or professional framing | High — shadowbox, glass, archival materials, framing services | Gallery-quality presentation with strong archival protection | Heirlooms, exhibitions, high-value pieces | Premium preservation and visual depth; work with textile-savvy framers |
| Jar and Container Embellishment | Low — adhere and seal to flat surfaces | Low — jars/boxes, adhesive, varnish or laminate | Decorative, functional storage; limited archival safety | Organization, themed gifts, craft-room storage | Affordable customization; use acid-free adhesive and appropriate sealing (not always food-safe) |
| Quilt and Textile Panel Integration | High — advanced quilting and design | High — fabrics, batting, sewing time, possible pro quilting | Large-scale, cohesive textile art; heirloom quality | Memory quilts, wall hangings, gallery textile art | Integrates multiple pieces into a unified work; plan layout and use archival materials |
| Resin and Epoxy Embedding | Medium–High — careful resin technique and safety | High — resin, ventilation, molds, safety gear | Glossy, durable, water-resistant finish; permanent encapsulation | Coasters, jewelry, durable keepsakes | Excellent protection and modern look; follow safety protocols and practice first |
Give Your Stitches the Spotlight They Deserve
You have poured hours of dedication, skill, and creativity into every single stitch. Now, it's time to break free from the conventional and give your finished cross stitch a life beyond the traditional picture frame. This exploration has demonstrated that your needlework is not just a picture to be viewed; it's a versatile piece of art ready to become a functional and integral part of your daily life.
By moving past the glass barrier of a frame, you invite interaction and give your art a tangible presence. A stitched design on a pillow offers comfort, a motif on a tote bag becomes a public display of your talent, and a small project embedded in resin can become a cherished keepsake held in your hand. Each of these alternatives to framing cross stitch transforms your hobby into something more dynamic and personal.
Key Takeaways for Creative Finishing
Let's recap the core ideas that can help you choose the perfect finishing method for your next masterpiece:
- Consider Functionality: Think about how you want to use your piece. Does it belong on a couch as a cozy cushion, on a table as a unique coaster, or on your shoulder as part of a stylish bag?
- Match the Aesthetic: The display method should complement the design. A modern, minimalist stitch might look stunning in a simple hoop, while a nostalgic, intricate piece could find a perfect home in a 3D shadowbox display.
- Embrace Experimentation: Don't be afraid to try something new. Combining cross stitch with quilting, resin art, or even jar embellishments can lead to surprisingly beautiful and one-of-a-kind results.
Ultimately, mastering these finishing techniques empowers you to take complete creative control from the very first stitch to the final presentation. It ensures that your work, especially pieces created from deeply personal photos, receives the unique spotlight it truly deserves. Your needlework tells a story, and how you choose to display it is the final, crucial chapter. By exploring these innovative alternatives to framing cross stitch, you are not just finishing a project; you are elevating your craft and weaving your passion directly into the fabric of your home and life.
Ready to start a project that’s truly worthy of a unique display? At Cross Stitched, we transform your most treasured photos into custom, all-in-one cross stitch kits, providing everything you need to create a personal masterpiece. Visit Cross Stitched to turn your favorite memories into your next incredible stitching adventure.


