

Complex cross-stitch patterns are the big leagues. These are the ambitious, breathtaking projects that look more like photorealistic paintings than traditional needlework. They're a massive undertaking, demanding a lot of time and skill, but the result is a true heirloom piece you can be incredibly proud of.
What Makes a Cross Stitch Pattern Complex
Making the leap to a complex pattern is like graduating from a weekend doodle to a full-scale oil painting. The basic skills are the same, but the level of detail and execution is in a completely different universe. It’s not just about the size—though these projects are often huge—the real complexity is woven into the details that bring a piece to life.
The Key Characteristics of an Advanced Pattern
So, what exactly separates a simple project from a major commitment? A few key elements will tell you if you're looking at a serious undertaking.
-
High Color Count: A beginner pattern might have 10-20 colors. A complex one? We're talking over 100 or even 200 distinct shades. This massive palette is what allows for incredible depth, subtle gradients, and realism.
-
Intricate Shading and Blending: These patterns live and die by their shading. They use tons of nuanced color changes to create photorealistic effects, often calling for blended needles (stitching with two different colored strands at once) or fractional stitches to avoid hard edges.
-
Confetti Stitches: If you see areas on a chart that look like a random scattering of different colored single stitches, you've found "confetti." It looks a little chaotic on paper, but it's the secret to creating fine detail, like the sparkle in an eye or the delicate texture on a flower petal. You can see how these appear by exploring different types of cross stitch graphs in our guide.
-
Full Fabric Coverage: Many advanced designs are "full coverage," which means every single square of the fabric gets stitched. This leaves no background showing and creates a rich, tapestry-like look and feel.
To help you spot the difference at a glance, here’s a quick breakdown.
Simple vs Complex Pattern Characteristics
This table compares the typical features you'll find in beginner-friendly patterns versus the more challenging ones we're discussing.
| Feature | Simple Patterns | Complex Patterns |
|---|---|---|
| Color Count | Typically under 20 | Often 100+, sometimes exceeding 200 |
| Stitch Types | Mostly full cross stitches | Full, half, fractional, and backstitches are common |
| Shading | Blocky colors, minimal shading | Nuanced gradients, confetti, and blended threads |
| Fabric Coverage | Partial coverage with visible fabric | Full coverage, no unstitched background |
| Size | Small to medium, finishes quickly | Large, can take months or years to complete |
| Chart Readability | Easy to follow with large symbol blocks | Dense with many similar symbols and confetti |
Seeing these characteristics side-by-side makes it clear what a big jump it is from a simple kit to a full-coverage masterpiece.
The demand for these detailed projects is definitely on the rise. The global embroidery market, which includes complex cross stitch, was valued at USD 3.2 billion in 2023 and is projected to hit USD 6.2 billion by 2032, according to a report from Dataintelo. It seems more and more people are craving deeply engaging, hands-on hobbies.
Tackling a complex pattern is a marathon, not a sprint. The satisfaction comes from watching thousands of individual stitches slowly build a breathtaking image. It’s a testament to patience and precision.
Choosing a Project That Inspires You

Before you even think about fabric counts or thread brands, the single most important choice you'll make for a complex cross-stitch project is the pattern itself. You need to pick something you absolutely love. This isn't a quick weekend project; you're signing up for a journey that could involve hundreds of hours and thousands upon thousands of stitches. Your passion for the final image is what will keep you going.
If you don't feel a real connection to the artwork, your motivation will disappear on a dreary Tuesday night after a long day at work. The design should be something that brings you joy every single time you look at it, whether that's a sprawling fantasy landscape, a treasured family photo, or a stunning fine art reproduction.
Where to Find Your Masterpiece
There are so many places to find incredible, detailed patterns. Some sources are legendary in the stitching community.
Designers like Heaven and Earth Designs (HAED) or Golden Kite are famous for their full-coverage patterns based on licensed artwork. They turn paintings and digital art into stitched masterpieces, and because they're so meticulously charted, you can trust you'll get a high-quality result.
For a project that's truly one-of-a-kind, you can also convert one of your own photographs into a pattern. This is a powerful way to immortalize a memory, a loved one, or a beloved pet. For many of us, stitching something so personal is the ultimate motivator. If that sounds like your cup of tea, our guide on how to turn a picture into a cross stitch pattern walks you through the whole process.
The secret to finishing a massive project isn’t discipline; it’s obsession. Pick a design that you can’t wait to see come to life, and the stitching will feel less like work and more like a calling.
Analyzing the Pattern Before You Commit
Don't just fall in love with the cover image. Before you hit "buy," you need to play detective and analyze what the actual stitching experience is going to be like.
-
Scrutinize the Color Palette: How many different colors does it use? Is it full of large, solid areas of one color (known as "color blocking")? Or is it loaded with "confetti"—tons of single, isolated stitches in different colors all jumbled together? A pattern with 150+ colors and a sky full of confetti is a completely different beast than one with fewer colors and big, satisfying blocks.
-
Look at the Symbol Key: A bad chart can ruin a good project. Are the symbols on the key distinct and easy to tell apart? A chart that uses symbols like an 'X' and a '+' for two similar shades of grey is a recipe for frustration and mistakes.
-
Calculate the Final Size: Pay close attention to the recommended fabric count (like 18-count or 25-count). A design that's 400 stitches wide will finish at about 22 inches on 18-count fabric. But stitch that same pattern on 25-count, and it shrinks to 16 inches. Make sure you have the physical space for the finished piece and, more importantly, the stamina to complete something that big.
A common mistake is biting off more than you can chew. It's far better to pick a slightly smaller but equally beautiful design for your first major piece. This lets you build confidence and learn the ropes. By choosing a pattern that genuinely excites you and aligns with your skill level, you're setting yourself up for an incredibly rewarding journey.
Your Essential Toolkit for Advanced Stitching

When you’re diving into a massive, complex cross-stitch project, the tools you use become more than just accessories—they become your trusted partners. Sure, a basic hoop and needle will get you started, but to truly conquer those intricate designs, a strategic toolkit upgrade is one of the best investments you can make. It’s about efficiency, comfort, and ultimately, the quality of your finished piece.
Think of it like this: you wouldn't paint a giant mural with a tiny brush. In the same way, trying to manage a yard of fabric and a palette of over 100 colors calls for some specialized gear. For many of us, the first big leap is moving beyond the standard embroidery hoop.
Upgrading Your Fabric Management System
A traditional hoop is fantastic for smaller pieces, but with a large-scale project, it can quickly become a real hassle. You’re constantly repositioning it, which risks crushing the stitches you’ve already completed and can create uneven tension across the fabric. Over the months—or even years—it takes to finish a full-coverage piece, that can really take a toll.
This is exactly why so many experienced stitchers swear by scroll frames and Q-snaps.
- Scroll Frames: These are my personal go-to for huge projects. They use two rollers to hold your fabric, letting you just scroll through the piece as you work. This keeps the entire project taut and clean, since you only have the section you’re working on exposed.
- Q-Snaps: These are lightweight, square frames made from PVC pipes. You snap them together and use clips to secure the fabric, giving you that perfect, drum-tight tension without damaging your work.
Both of these options give you far better tension control and help manage the sheer bulk of a big roll of fabric. They’re a game-changer for preventing the wrinkles and distortion that hoops can cause, making a huge difference when it comes time to frame your masterpiece.
Tools for Clarity and Organization
Beyond just holding your fabric, the right accessories can save you from a world of frustration, eye strain, and chaos. There’s nothing that kills the stitching vibe faster than fighting with a sprawling paper chart or a tangled nest of floss.
Embracing modern tools isn't about abandoning tradition; it's about enhancing it. Using a digital app or a great light allows you to focus purely on the art of stitching, not the logistics.
Here are a few things you might want to add to your setup:
- Digital Pattern Apps: An app like Pattern Keeper (for Android users) has become an absolute must-have for so many stitchers. It lets you load your PDF pattern, highlight the stitches you’ve done, search for symbols, and track everything digitally. No more printing out dozens of pages and marking them up with a highlighter.
- Quality Lighting and Magnification: Staring at tiny squares for hours on end can be tough on the eyes, especially if you’re working on high-count fabric or with dark-on-dark colors. A good daylight lamp gives you true-to-color lighting, and a clip-on magnifier can make a world of difference in reducing mistakes and preventing eye fatigue.
- A Floss Organization System: When you’re juggling 150+ colors, leaving them in their original skeins is a recipe for disaster. A solid system—whether it’s plastic bobbins in storage cases or floss drops on rings—is essential. You can pre-cut and label every color, so you can just grab what you need and go. It’s a bit of prep work upfront, but it pays off big time in a smoother workflow.
Getting Your Project Ready for the Long Haul
A good start is half the battle, especially with a complex cross-stitch pattern that might be your companion for months, or even years. Taking the time to prepare everything properly before you even thread your needle is the best thing you can do to avoid headaches later on. This initial setup is what lets you fall into that wonderful, meditative rhythm of stitching instead of constantly stopping to untangle a mess or figure out where you are on the chart.
Think of it like a chef doing their mise en place. They get all their ingredients chopped and ready so the actual cooking is smooth and enjoyable. We're doing the same for our stitching.
Prepping the Fabric
First things first, let's deal with the fabric. The raw edges of Aida and linen love to fray, and the more you handle your project, the worse it gets. You've got to secure those edges.
If you have a serger, a quick run around the perimeter is perfect. A simple zig-zag stitch on a regular sewing machine does the job just as well. No sewing machine? No problem. The old-school method of folding masking tape over the edges works like a charm.
Next up is the single most important prep step for any large or full-coverage piece: gridding. This means marking out a 10x10 stitch grid right onto your fabric. You can use a water-soluble fabric marker or a single strand of a bright, contrasting thread that you'll pull out later.
Gridding is your project's GPS. It keeps you from getting lost in a vast area of similar-looking symbols and makes counting a breeze. It might feel like a chore at the beginning, but trust me, it will save you from hours of frustrating frogging (ripping out stitches).
I tell every stitcher tackling a big project the same thing: grid your fabric. It's the one thing that transforms a daunting chart into a manageable, block-by-block journey.
Kitting Up Your Threads
With your fabric prepped, it's time for one of my favorite parts: "kitting up." This is where you take that big pile of floss skeins and turn it into a beautifully organized palette, ready to go. The goal here is to sort, label, and store your threads in a way that makes sense to you.
This is the general workflow I follow for managing my floss.
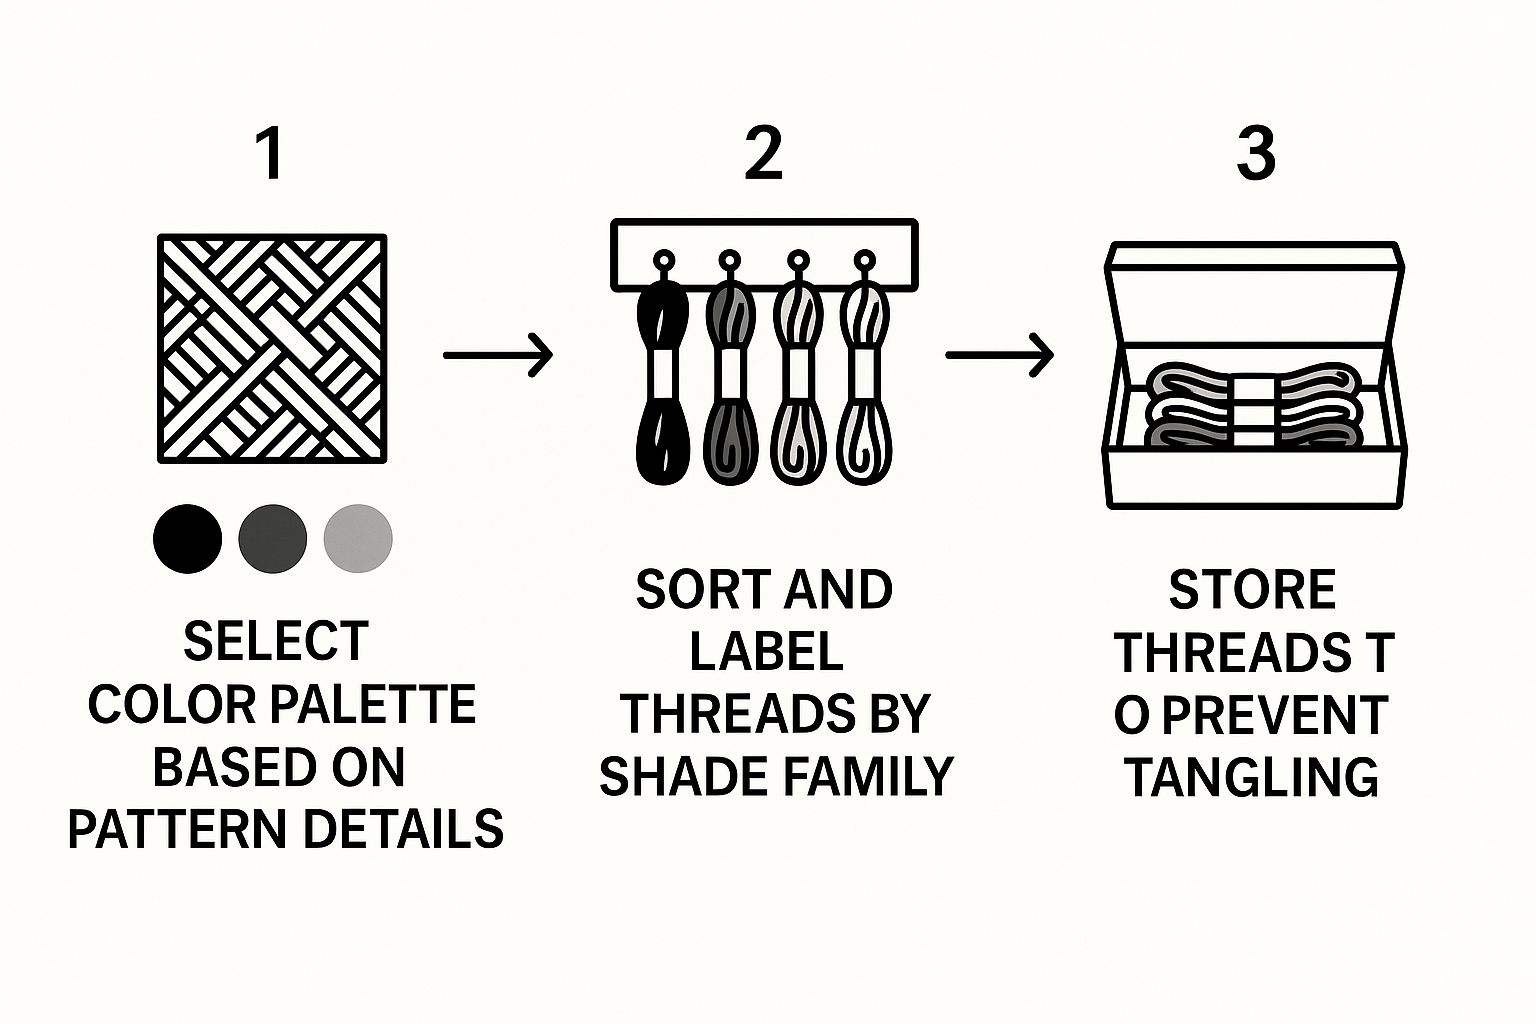
Breaking it down into these stages—choosing your palette, sorting everything out, and then finding the right storage solution—helps you avoid that tangled "thread nest" and makes your whole process much smoother.
Everyone has their preferred method. Some stitchers love winding their floss onto plastic bobbins and filing them in numbered boxes. Others swear by "floss drops," where pre-cut lengths hang from labeled rings. Whatever you choose, just be consistent. For instance, organizing your DMC threads numerically means you can instantly find DMC 310 (black) or DMC 742 (tangerine) without even thinking. This kind of system means more time stitching and less time hunting.
Mastering Advanced Stitching Techniques

With your project all prepped and your tools laid out, it's time to get into the really fun stuff. This is where we go beyond simple Xs and start using the techniques that transform a complex pattern into a genuine work of art. These advanced methods are what create those silky-smooth gradients, crisp details, and the professional finish that makes those massive, full-coverage pieces so jaw-dropping.
If your pattern has a ton of "confetti"—those single, scattered stitches of color—the parking method is going to be your best friend. Instead of finishing all of one color before moving to the next, you stitch a color within a small block (like one of your 10x10 grids). When you get to the end of that color's little run, you simply "park" the threaded needle in the hole where its next stitch will eventually go.
I'll admit, it looks a bit wild at first, with a forest of needles sticking out of your fabric. But trust me, it's a remarkably efficient way to handle complex charts. You'll find yourself making fewer counting mistakes, and you won't be constantly starting and stopping threads. Plus, the back of your work will look unbelievably neat.
Embracing Fractional Stitches and Blended Needles
To avoid that blocky, pixel-art look and create graceful curves, complex patterns lean heavily on fractional stitches. They’re exactly what they sound like: bits and pieces of a stitch that allow for much finer detail.
- Quarter Stitches (¼): Think of these as a short, straight stitch from one corner to the dead center of a fabric square. They're perfect for shaping delicate points and soft curves.
- Three-Quarter Stitches (¾): This one is just a quarter stitch combined with a half stitch. It’s the secret to defining sharp corners and smoothing out diagonal lines so they don't look so jagged.
These can feel a bit fussy when you're just starting, but they are absolutely essential for giving your piece that polished, non-pixelated look. For a closer look at how these work, our guide on the https://cross-stitched.com/blogs/what-is-cross-stitch/different-types-of-embroidery-stitches has some great visual examples.
You'll also see a lot of patterns calling for blended needles. This just means using two strands of different colored floss on the same needle. This simple trick creates a whole new intermediate shade, and it's the key to achieving that subtle, photorealistic shading and soft transitions between colors.
Keeping the back of your work as neat as the front isn't just for show. A tidy back prevents lumps, ensures your fabric lies flat for framing, and stops dark threads from shadowing through to the front of lighter-colored areas.
Maintaining a Tidy Back
A clean reverse side is truly the hallmark of a skilled stitcher. To get there, try to avoid carrying your thread across more than two or three unstitched squares. Long floats of thread on the back are just asking to get snagged, and they can create bulk that shows through your fabric.
Instead of tying knots to start or end a thread, give other methods a try. The loop start is fantastic when you're working with an even number of strands, or you can simply bury the tail under a few completed stitches on the back. These small habits make a huge difference in how your project looks when it's all finished. For more ideas, these tips for beautiful decorative stitches offer great insights for creating flawless designs.
By getting comfortable with these advanced techniques, you can confidently tackle any pattern out there and create a stunning, professional-quality masterpiece that you'll be proud to display.
Common Questions and Expert Answers
Stepping up to a complex cross-stitch pattern is a thrilling challenge, but it naturally brings up a few new questions. Let's tackle some of the most common ones that stitchers run into when they level up their projects.
How Can I Tackle a Huge Pattern Without Feeling Overwhelmed?
The secret is to not look at the mountain, but at the next step. Break that enormous chart down into bite-sized, manageable pieces. I find that working page by page or focusing on one 10x10 grid at a time works wonders. This gives you a steady stream of little victories that keeps you motivated.
It's also about setting realistic, daily goals. You don't have to stitch for hours on end. Just committing to 30 minutes a day, or even aiming to complete 100 stitches per session, builds incredible momentum over time. It turns a marathon into a series of enjoyable sprints.
The best way to finish a massive project isn't a single burst of inspiration; it's a sustainable routine. Consistent, small efforts are what build a masterpiece.
What’s All This Talk About "Confetti," and How Do I Deal with It?
In cross-stitch, "confetti" is the term we use for those single, isolated stitches of different colors scattered all over one area. Designers use them to create stunning detail and realistic shading, but they can be a real pain to stitch. The 'parking' method is a lifesaver here—you leave your threads hanging at the back to easily pick them up again for a nearby stitch.
If parking isn't your style, you can just stitch them as you encounter them. The only catch is you have to be mindful of the thread you carry across the back of your fabric. A good rule of thumb is to never "float" your thread more than 3-4 stitches. Any longer, and you risk the dark thread showing through to the front, which can muddy your design.
How Much Fabric Should I Leave Around the Edge?
Always give yourself more fabric than you think you need. For any piece you plan on framing, a border of at least 3 inches (about 7-8 cm) on all sides is the absolute minimum.
This extra fabric is crucial for a professional framer to properly stretch and mount your work without losing any of your beautiful stitching under the frame. If you're working on a particularly large or heavy piece, I'd even suggest a 4-inch border just to be safe. Do your calculations before you even think about cutting!
Needlework is a craft that blends timeless tradition with modern tools, and its popularity is only growing. The Asia Pacific region is currently leading the global embroidery market, while European stitchers continue to cherish intricate, traditional designs. We're even seeing new tools emerge that help designers create more precise and imaginative patterns. You can dive deeper into the global embroidery market trends on Business Research Insights.
Ready to turn a cherished photo into your next masterpiece? At Cross Stitched, we create custom, all-in-one kits with absolutely everything you need to get started.


