

Think of it like painting by number, but with a needle and thread. That's really the heart of DMC counted cross stitch. It's a wonderfully relaxing craft where you bring detailed images to life by following a chart, one tiny "X" at a time. It’s this perfect blend of a satisfying puzzle and beautiful textile art.
The World of DMC Counted Cross Stitch
At its core, DMC counted cross stitch is a type of embroidery that uses a gridded pattern and a blank, evenly woven piece of fabric. This is different from stamped cross stitch, where the design is already printed on the fabric. With counted cross stitch, you start with a clean slate.
The pattern is your map. You literally count the squares on the fabric to know exactly where to place each and every stitch. It's a method that gives you incredible precision and a really clean, professional-looking finish when you're done.
So, where does "DMC" come in? That’s the brand, and for stitchers, their threads are the gold standard. Founded way back in 1746 in France, DMC (Dollfus-Mieg & Company) has an unmatched reputation for high-quality, colorfast embroidery floss. Their famous six-strand cotton floss is known for its vibrant colors, silky feel, and incredible durability, which means your hard work will stay beautiful for years—even generations—to come.
Why Choose This Method
A huge part of the appeal is how meditative and structured it is. It's an activity that truly lets you slow down and focus, watching a piece of art emerge from a blank canvas. The process is simple, but the result is deeply satisfying.
- Creative Freedom: Even though you're following a pattern, you can always make it your own by changing up the thread colors or fabric.
- Skill Building: You'll quickly learn patience, precision, and a keen eye for detail.
- Stunning Results: The technique creates such neat, uniform stitches, leading to a polished and intricate final piece.
At its core, counted cross stitch is a simple grid-based system. Each symbol on your chart corresponds to a specific DMC thread color, and each square on the chart represents a single cross stitch on your fabric.
This simple system is what makes the craft so approachable for beginners. You don't need to master any complicated freehand stitches right away. If you can count and make a consistent 'X', you can do this. It's a bit like putting together a mosaic, where each tiny stitch is a tile that helps build the bigger picture.
Once you get the hang of it, you’ll discover just how versatile DMC counted cross stitch can be. The brand offers more than just its hundreds of shades of cotton floss. There are specialty threads like shimmering metallics, silky satins, and even tapestry wool to add amazing texture and depth to your projects.
This variety means you can tackle anything, from a quick and modern bookmark to a massive, full-coverage landscape that becomes a family heirloom. It’s a creative journey that starts with just a single stitch and opens up an entire world.
Choosing Your Threads And Fabric Canvas
The heart and soul of any counted cross stitch project are the materials. Think of it this way: the thread is your paint, and the fabric is your canvas. Getting these two choices right from the start is the secret to creating a piece you’ll be proud of for years to come.
This is where the fun begins. We'll dive into the world of iconic DMC threads and then take the mystery out of selecting the perfect fabric. By the end, you'll be able to walk into any craft store and pick your supplies with total confidence.
The image below gives you a fantastic snapshot of the essential tools you'll need to get started on your first project.
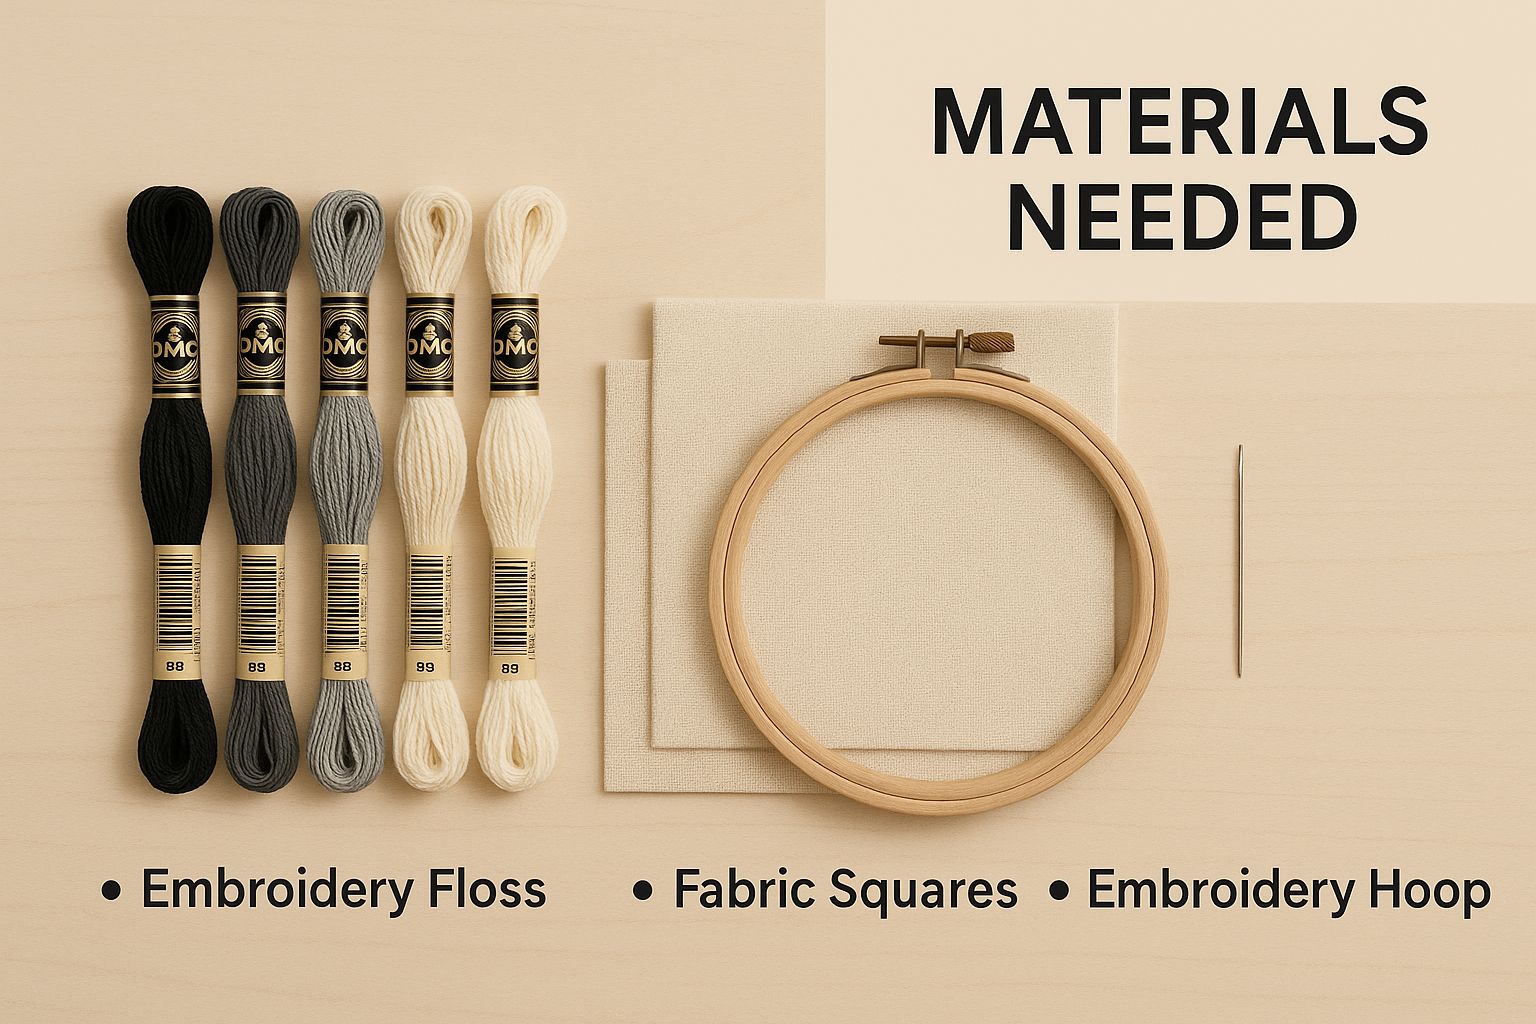
As you can see, you don't need a mountain of gear. With some quality DMC floss, Aida fabric, a hoop to keep things taut, and a needle, you're ready to start stitching.
The Famous DMC Six-Strand Floss
When you think of cross stitch thread, you're probably picturing DMC's Six-Strand Embroidery Floss. It's the gold standard in the needlework world, and for good reason. Every skein is made up of six fine cotton strands that are loosely twisted together.
The real genius of this design is the control it gives you. For most projects, especially on 14-count Aida fabric, you'll gently separate the floss and use just two strands at a time. This simple step is key to making sure your stitches look neat, lie flat, and don't bunch up. By varying the number of strands, you can create all sorts of effects, from delicate, fine lines to bold, solid blocks of color.
But DMC doesn't stop at standard cotton. They also offer a whole playground of specialty threads to give your work that extra "wow" factor.
- DMC Light Effects: This thread has a gorgeous metallic or pearlescent finish. It's perfect for adding a bit of magic—think glistening snow, twinkling stars, or a fairy's wings.
- DMC Satin Floss: Made from super-smooth rayon, this floss has a brilliant sheen that catches the light beautifully. It's a fantastic choice for stitching reflective surfaces like water or silky ribbons.
Playing around with these different types of embroidery floss can add incredible depth and texture to your pieces.
Understanding Your Fabric Canvas: Aida
If you're new to cross stitch, Aida cloth is about to become your best friend. It’s a cotton fabric cleverly woven into a perfect grid, creating obvious square holes that show you exactly where to place your needle. Each of those little squares is where you'll form one perfect cross stitch.
The most important thing to know about Aida is its "fabric count." This number simply tells you how many squares (or stitches) you can fit into one inch of the fabric.
The fabric count is a game-changer. It directly controls both the final size of your project and how detailed it looks. A higher count means smaller squares, resulting in a smaller, more intricate piece. A lower count gives you larger squares for a bigger, faster-to-stitch design.
For instance, 14-count Aida has 14 squares per inch, while 18-count Aida has 18 squares per inch. As you can imagine, the stitches on the 18-count fabric will look much finer. Most beginner kits come with 14-count Aida because the squares are a comfortable size, making it easy on the eyes.
Selecting The Right Aida Fabric
Choosing your fabric count isn't just about the numbers; it’s a creative decision that shapes the entire look and feel of your finished piece. This choice ultimately sets the scale of your artwork.
The table below breaks down the common Aida counts to help you decide which one is right for your next project.
Selecting the Right DMC Aida Fabric
| Fabric Count | Stitches Per Inch | Best For | Difficulty Level |
|---|---|---|---|
| 11-Count | 11 | Kids' projects, beginners, bold designs | Very Easy |
| 14-Count | 14 | Most common, great for beginners, good detail | Easy |
| 16-Count | 16 | Intermediate stitchers, more refined detail | Medium |
| 18-Count | 18 | Experienced stitchers, highly detailed work | Challenging |
As you can see, starting with a lower count like 11-count or 14-count is a smart move for beginners. The larger squares are much easier to see and work with, which is a huge confidence booster. Once you get the hang of it, you can move up to 16-count or 18-count for patterns that require more intricacy.
One of the great things about the cross stitch world is how accessible it is. Many DMC kits are designed to set you up for success, often including pre-cut 14-count Aida (a common size is 9.8x9.8 inches), all the floss you need, and easy-to-follow instructions. These kits are a fantastic, guesswork-free way to get started.
Gathering Your Essential Stitching Tools
Now that you have your DMC threads and fabric, it’s time to talk about tools. You could technically start with just a needle, but a few key items will make your DMC counted cross stitch experience so much better. Think of these as your trusty sidekicks on your stitching journey.
You don't need to break the bank on fancy gear, but investing in a few quality basics will absolutely pay for itself in comfort and precision. Let's walk through the absolute must-haves and a few little extras that can feel like a total game-changer, even on your very first project.
Your Stitching Non-Negotiables
These are the three things you simply can't do without. They form the foundation of a good stitching kit and have a direct impact on how your finished piece turns out. Getting these right will set you up for success.
- Tapestry Needles: These aren't your average sewing needles. Tapestry needles have a blunt, rounded tip and a much larger eye. That blunt tip is a lifesaver—it glides right through the holes in your Aida fabric without splitting the threads, which is the secret to beautifully neat stitches. Plus, the big eye makes threading your floss way less of a chore.
- Embroidery Hoops or Frames: A hoop is your best friend for keeping your fabric tension just right. It holds the material taut, which stops it from puckering and ensures all your little X's are uniform in size and shape. Most beginners start with a simple wooden or plastic hoop, and that's perfect for smaller projects.
- Sharp Scissors: A good pair of small, sharp scissors is non-negotiable. You’ll need them to get a clean snip on your floss, which prevents frayed ends and makes threading your needle a breeze. Look for a pair of embroidery scissors with a fine, pointed tip—they’re great for getting close to the fabric to trim threads neatly.
Having the right needle is especially important, since its size needs to match your fabric count. To see how they pair up, check out our guide on choosing the proper size needle for cross stitch projects.
Helpful Accessories That Make a Difference
Once you've got the essentials covered, a few simple accessories can make your stitching sessions run so much more smoothly. These items aren't strictly necessary, but they solve common frustrations and help keep everything organized and stress-free. They’re the "nice-to-haves" that quickly become "can't-live-withouts."
A well-organized setup means you can focus on the fun part—the actual stitching—instead of hunting for a lost needle or untangling a knotted mess of thread.
The goal of your toolkit is to remove any friction between you and your creativity. The right tools work with you, making the process feel seamless and allowing your vision to come to life one stitch at a time.
Here are a few accessories that seasoned stitchers swear by for keeping their projects in order and their minds at ease.
- Needle Minder: This little gadget is a game-changer. It's a small, decorative magnet that sits on the front of your fabric, held in place by a second magnet on the back. It gives you a safe place to park your threaded needle when you take a break, so it doesn't end up lost in the couch cushions.
- Floss Organizer: As your collection of beautiful DMC colors grows, keeping them tidy is a must. Floss organizers, like simple plastic bobbins and a storage box, are perfect for this. Winding your floss onto bobbins prevents tangles and lets you label each one with the color number, so you can find exactly what you need in seconds.
- A Good Light and Magnifier: Good lighting is your eyes' best friend. It helps prevent strain, especially when you're working on high-count fabrics or with dark colors. A dedicated craft lamp, particularly one with a built-in magnifier, can make a world of difference in your comfort and accuracy.
Building your toolkit is a personal process. Start with the essentials and add accessories as you figure out what works for you. A well-curated kit not only makes stitching easier but also adds to the simple pleasure of this timeless craft.
How to Read a Cross Stitch Pattern Like a Pro
When you first lay eyes on a DMC counted cross stitch pattern, it can feel like you're trying to decipher a secret code. It’s a grid full of cryptic symbols, colors, and lines. But I promise, once you learn its language, that intimidating chart becomes your best friend—a clear, easy-to-follow map for your project.
Think of the pattern as a direct blueprint. Each tiny square on the gridded chart corresponds to one single stitch on your Aida fabric. Your job is to simply transfer the symbol from the paper to the fabric. It’s a beautifully simple system that, once you get the hang of it, opens up a whole world of creativity.
Decoding the Pattern Key or Legend
Every good map needs a legend, and a cross stitch chart is no different. You’ll usually find this key tucked away on the side or bottom of your pattern, and it’s the most important part of your roadmap. It translates every single symbol on that grid into a specific action.
Here’s what you’ll find in the pattern key:
- Symbol: Any square on the chart that needs a stitch will have a symbol in it. This could be a color block, a letter, a number, or even a tiny icon like a star.
- DMC Floss Number: Right next to each symbol, you’ll see a number. This is the official DMC color code for the thread you need to use. For instance, the symbol '■' might correspond to DMC 310 (a classic black).
- Number of Strands: The key will also tell you how many strands of floss to use for your stitches. The standard for DMC counted cross stitch is often two strands, but this can change depending on the desired coverage and fabric count.
Getting familiar with this key is the first—and most critical—step. It takes all the guesswork out of the process, ensuring your finished piece looks just how the designer imagined it.
Understanding the Grid
The grid is where all the action happens, and it’s designed to be easy to navigate. To help you keep your place, you’ll notice heavier lines running every 10 squares, both horizontally and vertically. This creates a tidy 10x10 grid system that makes counting so much easier.
Many patterns also have little arrows or symbols marking the center point of the design. Pay attention to these!
Finding the center of your pattern and the center of your fabric is the easiest way to begin. By starting your first stitch in the middle, you guarantee your design will be perfectly centered on the fabric when you're finished.
To find your fabric's center, just fold it in half lengthwise, then in half again widthwise. The corner where the folds meet is your starting point. This simple trick will save you from the nightmare of stitching a whole design only to find it’s lopsided.
Reading Specialty Stitches
While the classic 'X' is the hero of cross stitch, many patterns use other stitches to add detail, outlines, and interesting textures. Your pattern key will always tell you how these are represented on the chart.
- Backstitch: This is your go-to for outlining shapes, adding fine details like whiskers, or stitching text. On a pattern, backstitch looks like solid lines drawn right over the grid squares. The key will specify the DMC color and the number of strands to use, which is often just one for a delicate look.
- French Knots: These create wonderful little decorative dots. They’re perfect for adding texture for things like eyes, the centers of flowers, or stars in a night sky. A French knot usually shows up as a small, solid dot on the chart, often right at an intersection of grid lines.
- Fractional Stitches: For really detailed designs, you might see grid squares split into smaller triangles. These indicate a quarter stitch (¼) or a three-quarter stitch (¾). Stitchers use these to create smoother curves and avoid a "blocky" look on intricate parts of a pattern.
At first, a chart filled with all these different symbols and lines can seem a bit busy. But just remember, each one has a specific job. Take it one section at a time, keep referring back to your key, and you’ll quickly become fluent in the language of cross stitch. Before you know it, you won't see a page of confusing symbols—you'll see a clear, step-by-step guide to creating something beautiful.
Mastering Your First Stitches
Alright, this is where the magic really happens. You've got your supplies, you've figured out your pattern, and now it's time to put needle to fabric. The techniques we're about to cover are the building blocks for every single DMC counted cross stitch project you'll ever do. Get these down, and your work will look sharp and beautiful right from the start.
The secret to a stunning finish isn't some complicated trick; it's just about developing a few good habits early on. We'll kick things off with the most important one: how to start and end your threads without leaving lumpy knots on the back of your work.
Starting and Ending Without Knots
You can often spot the difference between a beginner's work and a seasoned stitcher's just by flipping it over. A clean, knot-free back isn't just for looks—it keeps ugly bumps from showing through on the front of your piece. And thankfully, it's really easy to do.
The best method for beginners is the loop start. Keep in mind, this trick only works when you're using an even number of strands, like the two strands typically used for 14-count Aida.
Here’s how it works:
- Cut a single strand of floss, but make it double the length you actually want (around 36 inches is a good starting point).
- Fold it exactly in half so the two ends line up.
- Thread the folded, loopy end through the eye of your needle.
- Pull the floss so the two loose ends are hanging together.
Now, when you bring your needle up from the back of the fabric for that very first stitch, don't pull it all the way. Leave a small loop of thread on the back. As you make the first half of your 'X' on the front, just guide your needle through that loop on the back before pulling it snug. That’s it! Your thread is securely anchored, no knot required.
When you’re ready to end a thread, just weave your needle under the last three or four stitches on the back of your fabric, pull it tight, and snip the extra floss off close.
Creating the Perfect Cross Stitch
The cross stitch itself is as simple as it sounds: it’s just two diagonal stitches that cross over each other to form an "X." But there’s one golden rule that will immediately make your work look ten times better: keep your top stitches all facing the same direction.
This little bit of consistency makes all your stitches look beautifully uniform and helps them catch the light in the same way, giving your finished project a smooth, almost professional texture. Most stitchers find it easiest to work in rows, doing all the bottom stitches first (like this: ///) and then working back across the row to complete the tops (like this: \).
Consistency is key. It doesn't really matter if your bottom stitch goes from bottom-left to top-right or the other way around. What does matter is that you pick a direction and stick with it for the entire project.
If you want a closer look at how these stitches are formed, our guide on the basic cross stitch stitches has some great visuals and extra tips.
Preparing Your Floss and Fabric
Before you can even think about stitching, you need to get your materials ready. First up is the floss. DMC's classic six-strand cotton is meant to be separated. To do this without ending up with a tangled nightmare, cut a manageable length—about 18 inches is perfect—from the skein. Pinch one end of the floss and gently pull out a single strand with your other hand. It should slide out smoothly.
Next, get your fabric into its hoop. Place your fabric over the smaller, inner ring, and then press the larger, outer ring down over it. As you tighten the screw, gently pull the edges of the fabric all around to make it taut like a little drum. A nice, firm surface makes it so much easier to create even stitches.
This hands-on process is a huge part of why counted cross stitch has such a passionate community. The popularity of DMC kits has exploded on handmade marketplaces, with platforms like Etsy featuring thousands of incredible kits from independent designers. It’s a testament to a real global interest in creating something personal and beautiful, all supported by the quality of DMC floss and fabric. You can explore the variety of DMC counted cross stitch kits on Etsy to see what this amazing community is creating.
Creative Project Ideas and Modern Inspiration
Once you've got the hang of the basics, a whole world of creativity opens up with DMC counted cross stitch. This isn't your grandmother's hobby anymore—the craft has exploded far beyond traditional samplers, with modern stitchers creating some truly unique and personal art. You can ease into it with smaller pieces and build up to bigger, more ambitious projects.

Quick, satisfying projects are a fantastic way to build your confidence. There’s nothing like seeing a finished piece after just a weekend of stitching! These little creations are also perfect for using up leftover thread and trying out new techniques without the pressure of a massive undertaking.
- Bookmarks: A simple, narrow strip of Aida cloth is all you need for a personalized bookmark.
- Greeting Cards: Stitch a small design, mount it onto blank cardstock, and you’ve got a heartfelt, handmade card.
- Keychains and Pins: You can find tiny plastic or wood blanks designed specifically for turning your mini-masterpieces into wearable art.
Embracing Modern Cross Stitch Trends
Cross stitch has seen a huge resurgence lately, especially among younger creators who are putting a fresh spin on this timeless art form. In the 21st century, counted cross stitch is more popular than ever, and a lot of that is thanks to the rise of 'subversive cross stitch'—think classic floral borders framing witty, modern, or cheeky phrases. You can actually read more about the evolution of cross stitch on Wikipedia.
This modern movement is all about thinking outside the hoop. People are taking their stitches to all sorts of unexpected places, turning everyday items into one-of-a-kind pieces.
Your needle and thread aren't just for wall art. Think of any fabric surface as a potential canvas waiting for a touch of stitched personality.
From custom patches on a denim jacket to intricate florals on a pair of sneakers, the possibilities are truly endless. Many stitchers use waste canvas or water-soluble canvas to add their designs to non-traditional fabrics like tote bags, hats, and even t-shirts. It’s a fantastic way to express yourself and turn ordinary items into custom treasures, proving that counted cross stitch is a dynamic, evolving art form that’s perfect for today.
Your DMC Cross Stitch Questions, Answered
As you get deeper into the world of counted cross stitch, you're bound to have some questions. It happens to every stitcher! Here are some straightforward answers to the things people ask most often, so you can solve little hiccups and get back to what you love—stitching.
Caring For Your Finished Piece
One of the biggest questions I hear is about that nerve-wracking first wash. You've poured hours into your project, so how do you clean it safely?
The key is to be gentle. Always hand wash your piece in lukewarm water with just a tiny drop of a mild, pH-neutral soap. Think something like a gentle dish soap or a dedicated quilt wash. Swish it around softly, but whatever you do, don't wring it out! Twisting the fabric can warp your beautiful, even stitches. Rinse it a few times in cool, clean water until the soap is completely gone.
For drying, lay your project face down on a thick, clean towel. Roll the towel up like a jelly roll with your stitching inside and press down firmly to soak up most of the water. Then, unroll it and lay it flat on a fresh, dry towel to air dry, keeping it out of direct sunlight.
Pro Tip: How should I store my DMC threads? To save yourself from the headache of tangled floss, wind your skeins onto plastic or cardboard bobbins. Use a fine-tip permanent marker to write the DMC color number on each one, then organize them in clear compartment boxes. It’s a game-changer for finding the exact shade you need in seconds.
Technical Stitching Questions
Let's get into the nitty-gritty of threads and patterns. These are the details that really make a difference.
How Many Strands of Floss Should I Use?
This is a classic question, and the answer really depends on your fabric and the effect you're after. For the ever-popular 14-count Aida, using two strands is the gold standard. It gives you nice, full coverage without looking bulky.
If you switch to a fabric with a lower count, like 11-count, you might want to bump up to three strands to get that same plush look. On the flip side, for finer fabrics like 18-count or higher, a single strand is often perfect for capturing delicate details. Your pattern should always be your first guide, though—it will usually tell you what the designer recommends.
Can I Use a Different Brand of Thread for a DMC Pattern?
Technically, yes, but proceed with caution. You'll need a good conversion chart to find the closest color match from another brand. Even then, remember that the sheen, thickness, and dye lots can vary quite a bit between manufacturers. This can subtly change the whole look of your finished piece.
For results you can count on, it’s always best to stick with the DMC floss colors the pattern calls for. That's the only way to ensure your project looks just like the designer intended.
Ready to stitch a memory? At Cross Stitched, we transform your favorite photos into custom cross stitch kits. You get everything you need—premium DMC threads, high-quality fabric, and a personalized pattern—to create something truly special. Start your custom kit today.


