

Welcome to the relaxing and rewarding world of cross stitch! Transforming a blank piece of fabric into a vibrant, textured image is a uniquely satisfying experience. But for a newcomer, the array of threads, fabrics, and techniques can feel overwhelming. This guide is designed to cut through the confusion and provide you with clear, actionable beginner cross stitch tips that will set you up for success from your very first stitch. We'll move beyond the obvious advice and dive into the foundational habits that separate frustrating attempts from beautiful, heirloom-quality creations.
Beyond its artistic rewards, embracing cross stitch can offer practical lifestyle benefits, serving as a mindful escape and a constructive way to implement strategies for reducing screen time. This focused, tactile hobby helps calm the mind while creating something tangible and beautiful.
In this roundup, we will cover seven core principles, from mastering neat stitches with railroading to organizing your floss for an efficient workflow. By learning these concepts, you'll not only avoid common pitfalls but also build the confidence to tackle any project you can imagine. Let's begin your journey to becoming a confident and skilled stitcher.
1. Start with a Beginner-Friendly Kit
Embarking on your cross stitch adventure can feel overwhelming with so many choices for fabric, thread, and needles. One of the most effective beginner cross stitch tips is to start with a pre-packaged kit. These all-in-one bundles are designed specifically for novices, eliminating the guesswork and ensuring all components are compatible.
A good beginner kit contains everything you need to complete a project from start to finish: the right fabric (usually 14-count Aida), a suitable needle, pre-sorted embroidery floss, and a clear, easy-to-follow pattern. This allows you to dive straight into learning the fundamental stitching techniques without the initial hurdle of sourcing and matching materials.
What to Look For in a First Kit
When selecting your first kit, prioritize simplicity to build confidence.
- Fabric Count: Look for kits with 14-count Aida fabric. The larger weave makes it easier to see the holes and guide your needle accurately.
- Design Size: Choose a small design, typically under 5x5 inches. Completing a project quickly provides a satisfying sense of accomplishment.
- Color Palette: Opt for a pattern with a limited color palette, ideally between 5 and 10 colors. This reduces the complexity of changing threads.
- Stitch Types: Ensure the kit only uses full cross stitches. Avoid patterns that include advanced techniques like French knots, backstitching, or fractional stitches until you've mastered the basics.
Brands like Dimensions offer a 'Minis' series perfect for quick projects, while modern Etsy designers like 'The Stranded Stitch' provide fresh, contemporary designs. For an even more guided experience, Bucilla offers stamped cross stitch kits where the pattern is printed directly onto the fabric. To see a curated selection, you can find more information about the best beginner cross stitch kits for adults.
The following graphic outlines the simple, streamlined process you can expect when you open your first kit.
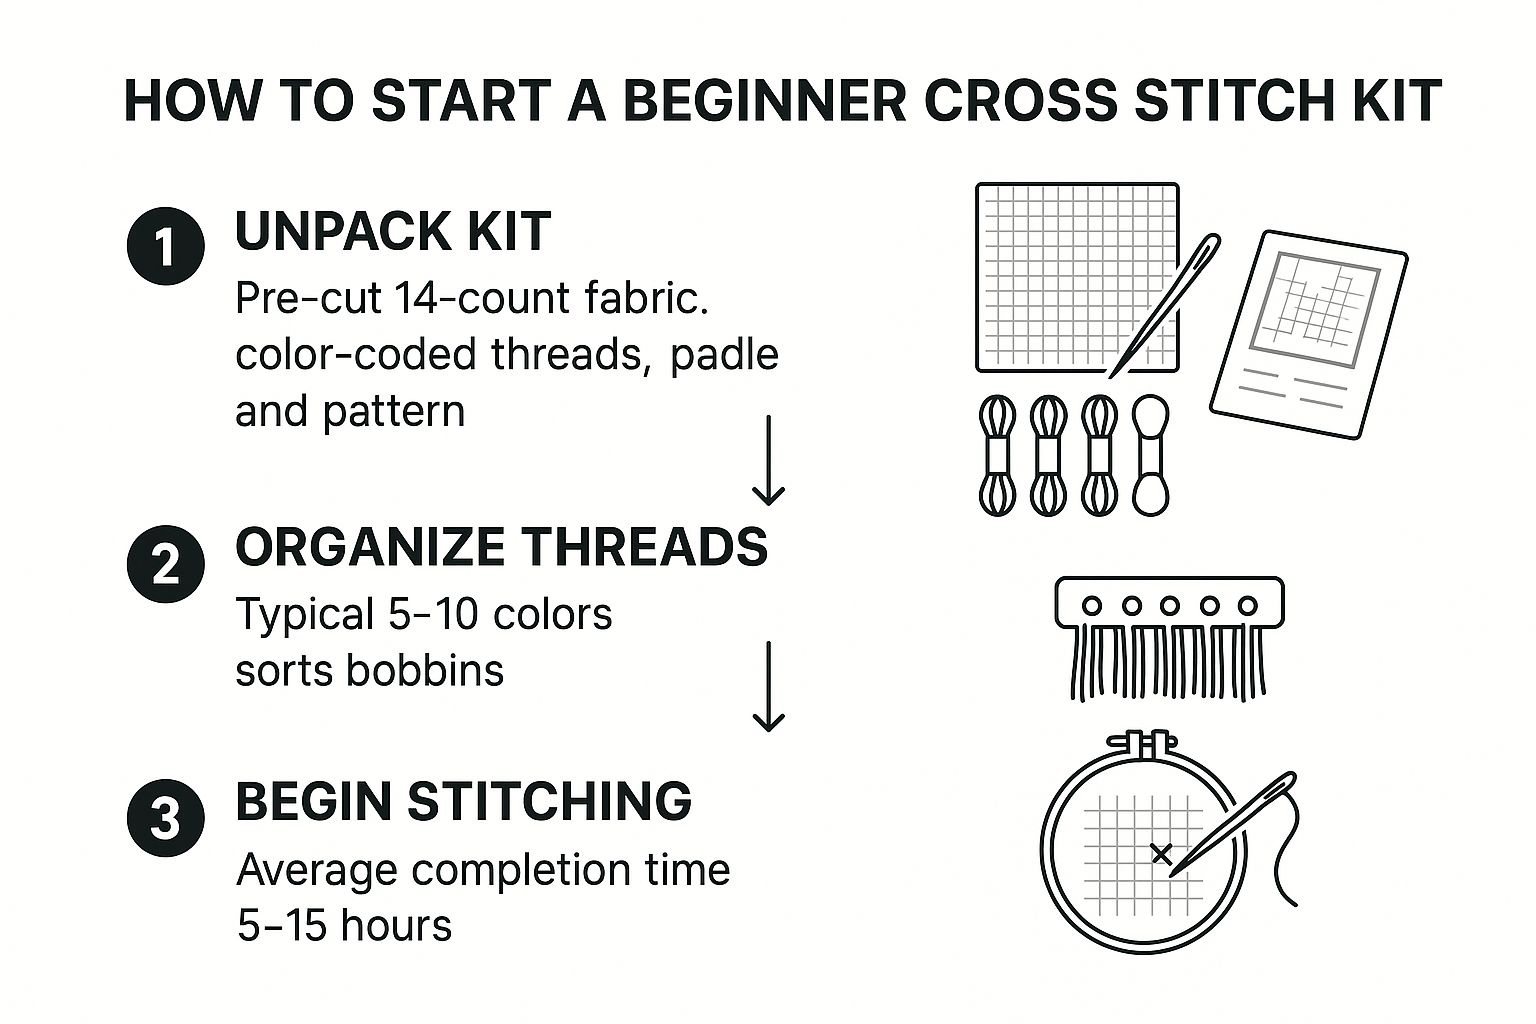
As the infographic illustrates, the journey from unboxing to your first stitch is straightforward, allowing you to focus on learning rather than logistics.
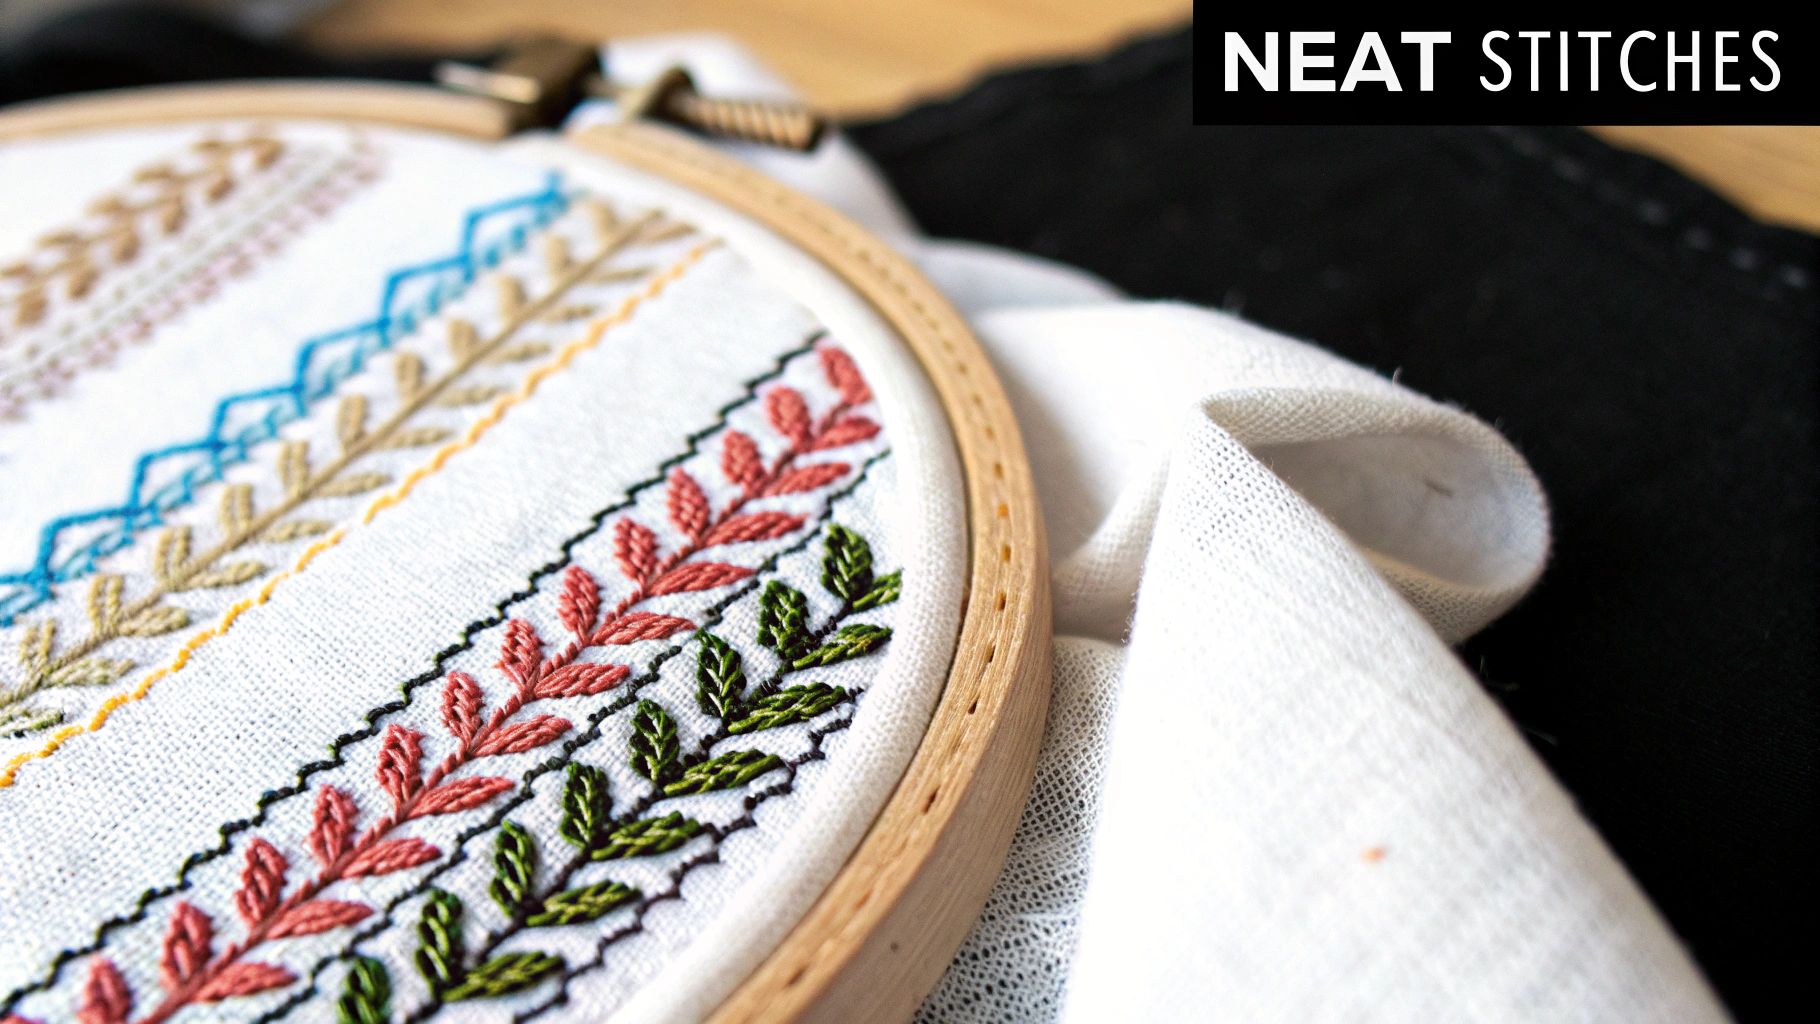
2. Master the Railroading Technique for Neat Stitches
One of the most impactful beginner cross stitch tips for elevating your work is to master railroading. This simple technique ensures your floss strands lie flat and parallel, rather than twisting around each other. The result is smoother, fuller stitches that provide better fabric coverage and a more professional, polished finish.
Railroading involves guiding the strands of your floss to lay side-by-side as you complete each half of a cross stitch. Although it might slightly slow your stitching pace initially, the visual improvement is dramatic. Your finished piece will have a uniform, almost woven appearance, similar to what you might see in museum-quality samplers or competition-level work. Many advanced pattern designers, such as Heaven and Earth Designs, recommend it for achieving the best results.
How to Implement Railroading
Integrating this technique into your stitching routine is straightforward once you get the hang of it.
- Separate the Strands: As you pull the needle up through the fabric, you might notice the two strands of floss are twisted. Use your needle or your non-stitching finger to gently separate them.
- Guide the Floss: As you complete the stitch by bringing the needle down through the fabric, keep the strands separated. You can do this by inserting your needle between the two strands as you pull the thread taut.
- Maintain Even Tension: Avoid pulling your stitches too tight. The goal is for the railroaded threads to rest gently on the fabric surface.
- Practice Makes Perfect: The motion will feel awkward at first. Practice on a spare piece of Aida cloth until the movement becomes second nature.
The following video from Peacock & Fig provides a clear visual demonstration of how to execute the railroading technique for perfectly flat stitches.
As you can see, this small adjustment to your technique makes a significant difference in the final quality and appearance of your project.
3. Organize Your Floss from the Start
A tangle of embroidery floss can quickly turn a relaxing hobby into a frustrating mess. One of the most impactful beginner cross stitch tips is to implement a thread organization system before you even make your first stitch. This involves transferring floss from its original skein onto a storage solution like bobbins, which prevents knots and makes finding the right color effortless.
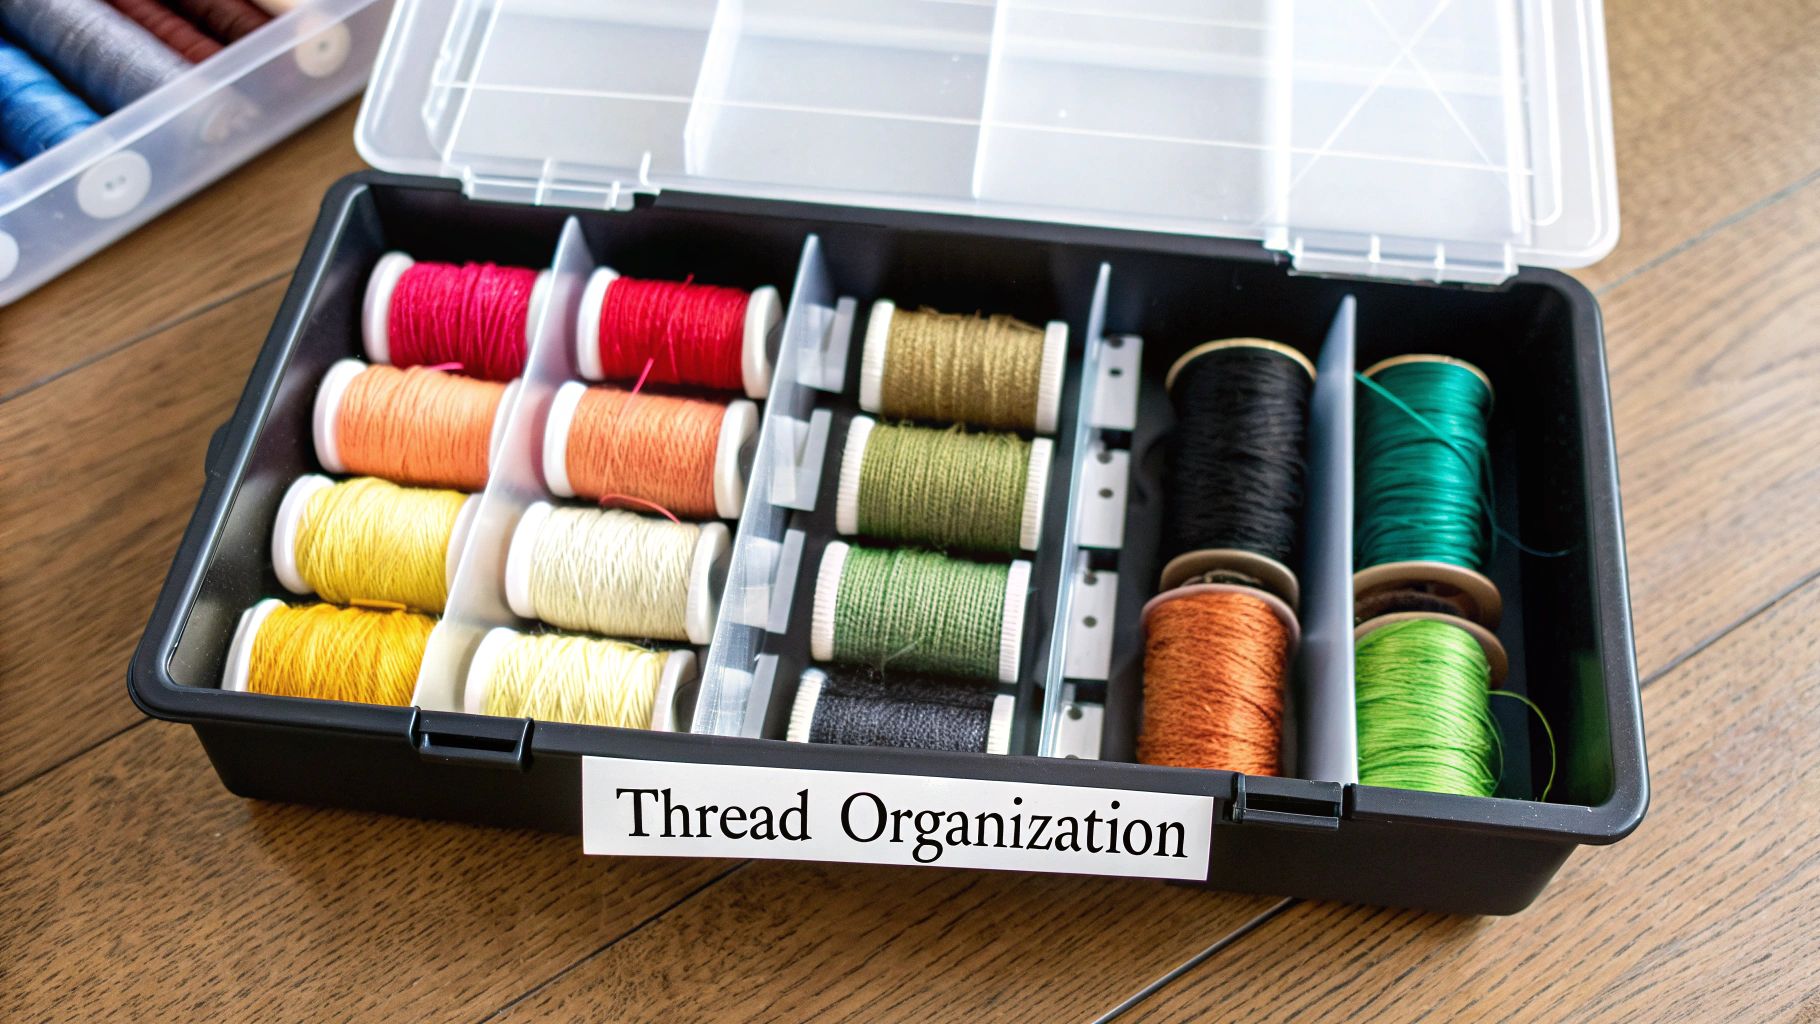
Starting with an organized system saves countless hours of detangling and searching for specific shades. It protects your threads from dirt and dust, and a good system like a DMC bobbin box or Floss Away bags makes your supplies portable. By establishing this habit early, you ensure your stitching process remains smooth and enjoyable from start to finish.
How to Build a Simple Organization System
Creating an effective system doesn't need to be complicated. The goal is to make your threads easy to identify, access, and store.
- Choose Your Method: Plastic bobbins, like those from Darice, are a popular starting point. You wind the floss around the bobbin and store them in a compartmentalized box. Alternatively, thread drops or binder rings can keep floss organized by project.
- Label Everything: Before you remove the paper wrapper from a new skein, write its color number (e.g., DMC 310) on your bobbin or tag. This number is essential for matching colors to your pattern and for buying more thread later.
- Wind Carefully: Wind the floss onto the bobbin with even, medium tension. Winding too tightly can stretch the floss, while winding too loosely can cause it to unravel and tangle in your storage box.
- Sort Logically: Arrange your bobbins numerically. This is the most common and efficient method, as patterns almost always list colors by their number. Some stitchers prefer sorting by color family, which can also be visually helpful.
This initial time investment pays off exponentially. You’ll spend more time stitching and less time wrestling with a bird's nest of thread. For a deeper dive into various storage solutions, explore these ideas for how to organize craft supplies.
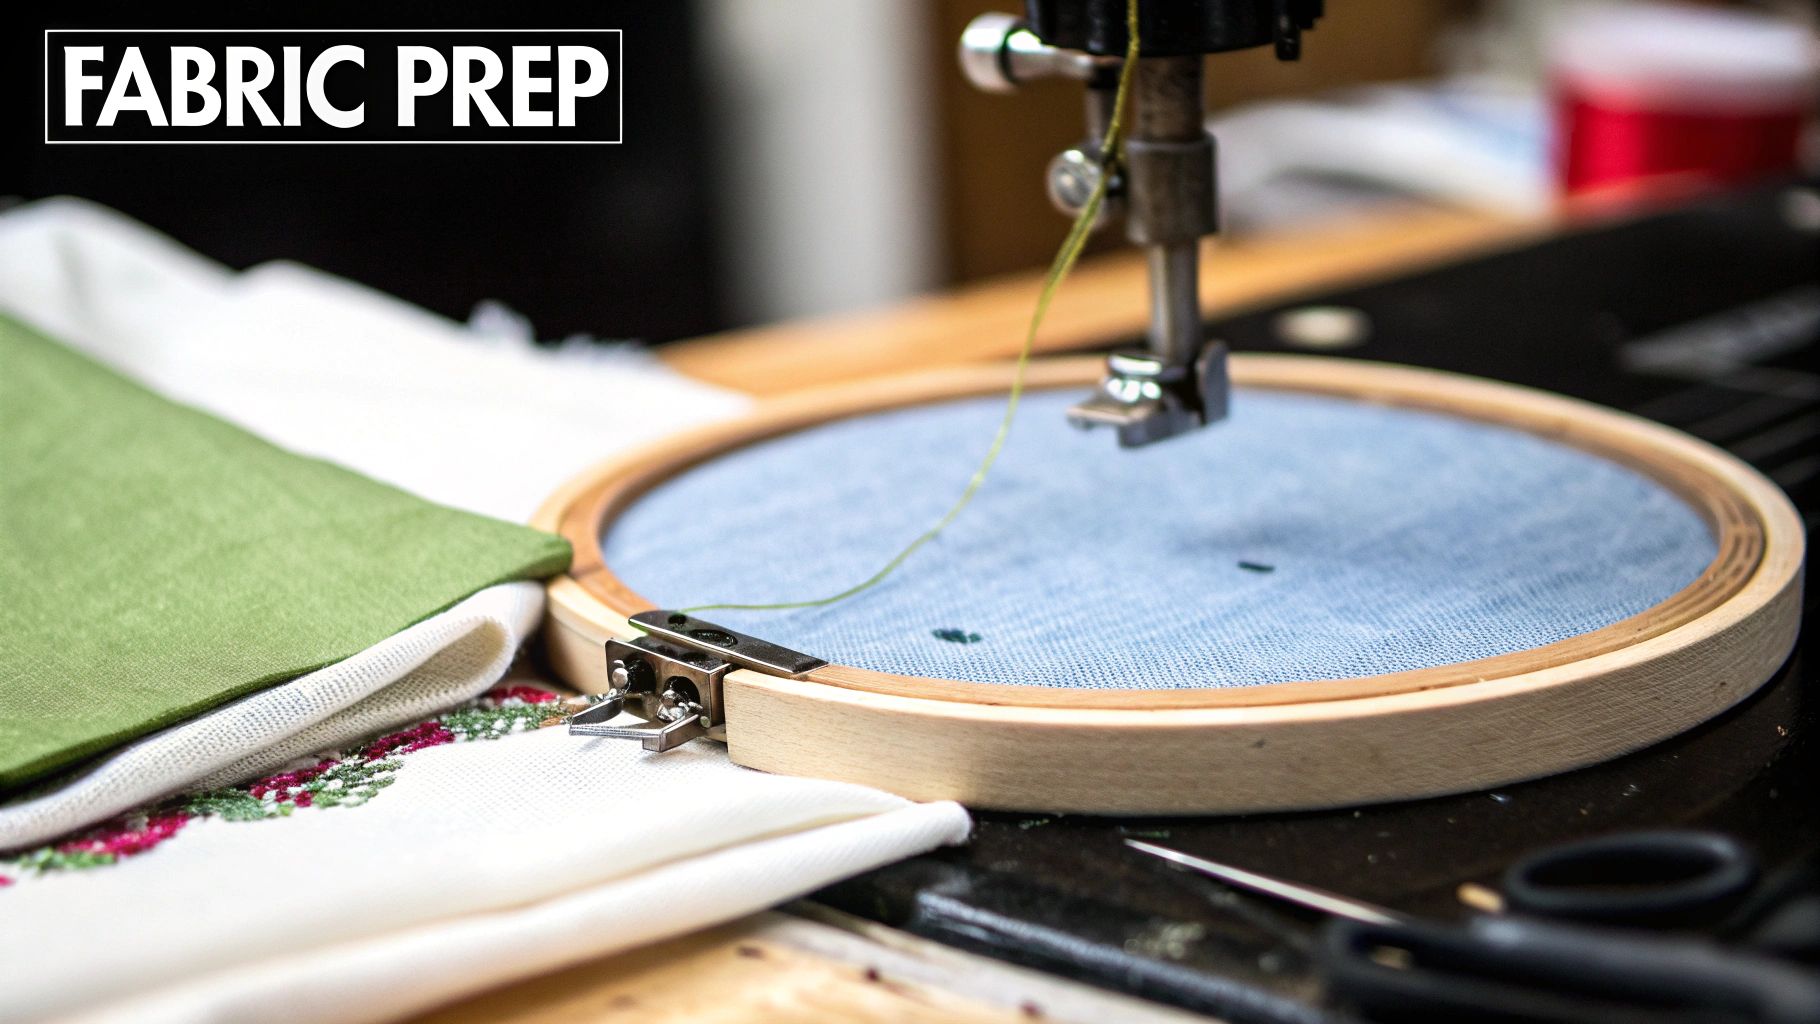
4. Learn Proper Fabric Preparation and Finishing
Many beginners focus solely on the stitches, but one of the most crucial beginner cross stitch tips involves what happens before you even thread your needle and after the last stitch is made. Proper fabric preparation and finishing are essential for creating durable, professional-looking pieces that can be proudly displayed for years. These steps protect your work from damage and ensure your time and effort result in a lasting piece of art.
Skipping these stages can lead to frayed edges, permanent hoop marks, warped designs, and dirt that's difficult to remove. Think of heirloom samplers that have been preserved for generations; their longevity is a direct result of meticulous care from start to finish. Properly preparing your fabric and finishing your project elevates your work from a simple hobby to a potential heirloom.
Key Steps for Preparation and Finishing
Integrating these habits into your stitching process will protect your project and enhance its final appearance.
- Size and Secure: Always cut your fabric at least 3-4 inches larger than the finished design size on all sides. This extra margin is critical for preventing fray and provides ample room for framing. Immediately secure the raw edges with masking tape or a simple zigzag stitch on a sewing machine to stop fraying before it starts.
- Hoop Management: Place your fabric in the hoop so it is taut but not stretched drum-tight, which can distort the weave and your stitches. To prevent permanent marks or creases, it's vital to remove your work from the hoop between stitching sessions.
- Washing Your Work: Once complete, hand wash your piece in lukewarm water with a mild, clear soap. Gently squeeze out the water, but never wring or twist the fabric. To dry, roll it in a clean, thick towel and press firmly to absorb excess moisture.
- Proper Ironing: Place the still-damp piece face down on a thick, clean towel and iron it from the back on a medium heat setting. The towel cushions your stitches, preventing them from being flattened and helping them retain their plump texture.
These methods, often promoted by textile conservationists and professional framers, are foundational to creating high-quality needlework. To delve deeper into these final crucial steps, you can explore a full guide on cross stitch finishing techniques.
5. Understand Thread Management and Anchoring
One of the most valuable beginner cross stitch tips is to master proper thread management. This means learning how to start and stop your threads securely without using knots. Knots are a common beginner mistake; they create unsightly bumps on the front of your work, can pull through the Aida fabric, and may unravel over time, jeopardizing your finished piece.
Adopting professional anchoring techniques from the start elevates the quality and longevity of your projects. Historic samplers and museum-quality needlework are often distinguished by their knot-free, neat backs. This isn't just for aesthetics; a tidy reverse side ensures the project lays flat when framed and that stitches remain secure for decades.
How to Manage Your Threads Like a Pro
Learning a few simple, knotless methods for starting and ending your threads will make a significant difference.
- The Loop Start: This is the cleanest method for starting with an even number of strands (usually two). Fold one long strand of floss in half, thread the two cut ends through your needle, and bring the needle up from the back of the fabric. On the reverse side, pass your needle through the loop of the thread to anchor it before making your first full stitch.
- Securing Your Ends: To end a thread, flip your work over and run your needle under 4-5 existing stitches on the back. This weaving technique holds the thread firmly in place without a knot. Always aim to weave under stitches of the same color to prevent show-through.
- Manage Thread Length: Cut your floss to a manageable length, typically around 18 inches. Longer pieces are prone to tangling, knotting, and fraying as they are repeatedly pulled through the fabric.
- Prevent Twisting: Let your needle and thread dangle freely every few stitches. This allows the floss to untwist naturally, which helps your stitches lay flat and prevents knots from forming.
By practicing these simple habits, you ensure the back of your work is nearly as neat as the front, a hallmark of high-quality cross stitch. Techniques like these are foundational in programs like the Embroiderers' Guild of America (EGA) Master Craftsman program and are consistently taught by experts to ensure durable, beautiful results.
6. Count Carefully and Mark Your Progress
Accurate counting is the foundation of a successful cross stitch project. Misplacing even a single stitch can cause a cascade of errors that are frustrating and time-consuming to fix. One of the most critical beginner cross stitch tips is to develop a systematic approach to counting your stitches and tracking your progress on the pattern from the very start.
This disciplined habit prevents the common beginner mistake of rushing ahead, only to discover later that an entire section is misaligned. By implementing verification methods and marking your chart as you go, you ensure every stitch is placed correctly, saving yourself from the painstaking process of "frogging" or ripping out your hard work.
How to Ensure Stitching Accuracy
To build a flawless finished piece, integrate these counting and tracking methods into your stitching routine.
- Count Twice, Stitch Once: Before you make your first stitch in a new section, count the required squares on your pattern and then count the corresponding squares on your fabric. This simple check is your best defense against errors.
- Work in Grids: Break down the pattern into manageable 10x10 stitch blocks. Stitching one small grid at a time makes counting easier and allows you to spot mistakes before they impact a larger area.
- Use a Working Copy: Never mark your original pattern. Photocopy it or print a digital version so you can freely mark off completed stitches. Use a highlighter to color in the symbols you've stitched, providing a clear visual of your progress.
- Grid Your Fabric: For larger or more complex projects, use a water-soluble fabric marker or a special thread to draw a 10x10 grid directly onto your Aida cloth. This grid mirrors the one on your pattern, making it incredibly easy to navigate and verify your position.
Many modern pattern-tracking apps, such as Pattern Keeper, digitize this process, allowing you to highlight completed sections on your tablet or phone. Similarly, physical tools like magnetic boards with ruler guides can help you keep your place on a paper chart. By adopting these methods, you transform counting from a chore into a reliable part of your crafting process, ensuring your project develops exactly as the designer intended.
7. Practice Consistent Stitch Direction and Technique
One of the most impactful beginner cross stitch tips for achieving a professional finish is to master stitch consistency. A single cross stitch is composed of two diagonal stitches forming an "X." For a polished and uniform look, all the top stitches must slant in the same direction across the entire piece. This seemingly minor detail creates an even surface that reflects light uniformly.
Developing consistent technique from the start is crucial. This includes maintaining even tension so stitches lay flat without puckering the fabric, and choosing a stitching method that works for you. These habits, established early, become automatic and will dramatically improve the quality of all your future projects, distinguishing your work with a clean, expert appearance.
How to Achieve Stitch Consistency
Building muscle memory is key to making consistent stitching second nature. Focus on these elements to elevate your technique.
- Directional Rule: Decide on a direction for your top stitch and stick with it. The most common method is for the bottom stitch to go from bottom-left to top-right () and the top stitch to go from bottom-right to top-left (/). The important part isn't which direction you choose, but that it remains the same.
- Stitching Method: Experiment with the two primary methods. The Danish method (stitching a row of bottom halves, then returning to complete the top halves) is highly efficient for large blocks of a single color. The English method (completing each full "X" before moving to the next) is often better for confetti-heavy patterns with frequent color changes.
- Tension Control: Avoid pulling your floss too tight. Stitches should sit comfortably on top of the Aida fabric, not distort the holes or cause puckering. Let your needle hang periodically to allow the floss to untwist, which helps prevent knots and maintain even tension.
- Regular Checks: Pause every 10-15 stitches to quickly scan your work. It's much easier to correct a wrongly-directed stitch immediately than to unpick it later.
This discipline is a hallmark of high-quality needlework, evident in pieces from traditional embroidery guilds and modern competition entries alike. By focusing on consistency from your very first project, you build the foundational skills needed for flawless results.
7 Essential Beginner Cross Stitch Tips Comparison
| Item | Implementation Complexity 🔄 | Resource Requirements ⚡ | Expected Outcomes 📊 | Ideal Use Cases 💡 | Key Advantages ⭐ |
|---|---|---|---|---|---|
| Start with a Beginner-Friendly Kit | Low - ready-made materials & instructions | Basic materials included ($10-$30) | Confident start, manageable finished projects | Beginners learning cross stitch basics | Eliminates guesswork, compatible materials |
| Master the Railroading Technique | Moderate - requires 2-3 hours practice | Minimal - needle handling skill | Neater, flatter stitches, professional look | Improving stitch quality and appearance | Dramatically improves stitch uniformity |
| Organize Your Floss from the Start | Moderate - initial 15-20 min per 10 colors | Requires bobbins, storage ($15-50) | Efficient workflow, cleaner workspace | Medium to large projects, frequent stitching | Prevents tangling, saves time searching |
| Learn Proper Fabric Preparation and Finishing | Moderate - requires additional prep & finishing steps | Requires supplies ($10-20) for washing, framing | Longer-lasting, professional pieces | Projects valued for longevity and display | Prevents fraying, professional final product |
| Understand Thread Management and Anchoring | Moderate - practice over 1-2 projects | No special supplies needed | Smooth backs, durable and neat stitching | All skill levels, aiming for professional quality | Eliminates knots, consistent tension |
| Count Carefully and Mark Your Progress | Moderate - adds pacing and discipline | Extra tools (rulers, highlighters, pens) | Fewer errors, easier correction, progress tracking | Complex or large projects requiring accuracy | Prevents major errors, builds confidence |
| Practice Consistent Stitch Direction and Technique | Moderate - conscious habit building | No special materials needed | Uniform stitches, polished look | Pieces judged or displayed professionally | Professional appearance, improved visual impact |
Stitching Your Story: From Beginner to Confident Creator
You have now journeyed through the foundational pillars of cross stitching, from selecting that first perfect kit to mastering the techniques that separate good work from great work. The beginner cross stitch tips we've covered are more than just instructions; they are the building blocks of a rewarding and lifelong creative practice. By internalizing these core concepts, you've equipped yourself with a powerful toolkit for success.
Remember, the goal isn't just to complete a project, but to enjoy the process and create something you are truly proud of. Every stitch you place is a small victory, a moment of focused creation in a busy world. The journey from novice to confident stitcher is built on these small, deliberate actions.
Key Takeaways for Your Stitching Journey
Let's distill the most crucial advice into actionable takeaways:
- Preparation is Paramount: Time spent organizing your floss, preparing your fabric, and understanding your pattern will save you hours of frustration later. A well-organized start is the single best predictor of a smooth and enjoyable project.
- Consistency Creates Quality: The two most impactful habits for beautiful results are maintaining a consistent stitch direction (e.g., bottom leg always left-to-right, top leg always right-to-left) and using the railroading technique. These simple disciplines elevate your work from handmade to handcrafted.
- Mindfulness in Every Stitch: The act of counting twice before stitching, marking your progress on the chart, and securely anchoring your threads are mindful practices. They prevent common mistakes and ensure your finished piece is durable and clean on both the front and the back.
Your Path Forward: From Following Patterns to Creating Memories
With these beginner cross stitch tips as your guide, you are no longer just following a chart; you are actively crafting a piece of art. The skills you've learned, like managing thread tension and finishing your fabric edges, are transferable to any project you tackle next. The initial fear of making a mistake will soon be replaced by the confidence to fix it, or even better, the skill to avoid it altogether.
Embrace the learning curve. Your first project is your practice canvas. Don't strive for unattainable perfection, but for progress. Each completed stitch, each finished row, builds muscle memory and sharpens your eye for detail. The patience you cultivate while untangling a knot or re-counting a section is as valuable as the craft itself. Soon, you'll be looking beyond pre-made kits and wondering, "What else can I create?" This is where your unique story begins to unfold through thread. Your hobby evolves from a pastime into a powerful medium for personal expression, allowing you to create heirlooms, personalized gifts, and stitched representations of your most cherished memories.
Ready to turn your favorite photo into your next creative masterpiece? At Cross Stitched, we transform your cherished memories into custom, easy-to-follow cross stitch kits, complete with everything you need to start. Explore our personalized kits and begin your next project today at Cross Stitched.


