

So, you're wondering, is cross-stitching actually hard? Let's get right to it: not at all. In fact, it's one of the most welcoming and beginner-friendly crafts out there. If you can count and hold a needle, you’ve already got the fundamental skills down.
Your Guide to Getting Started
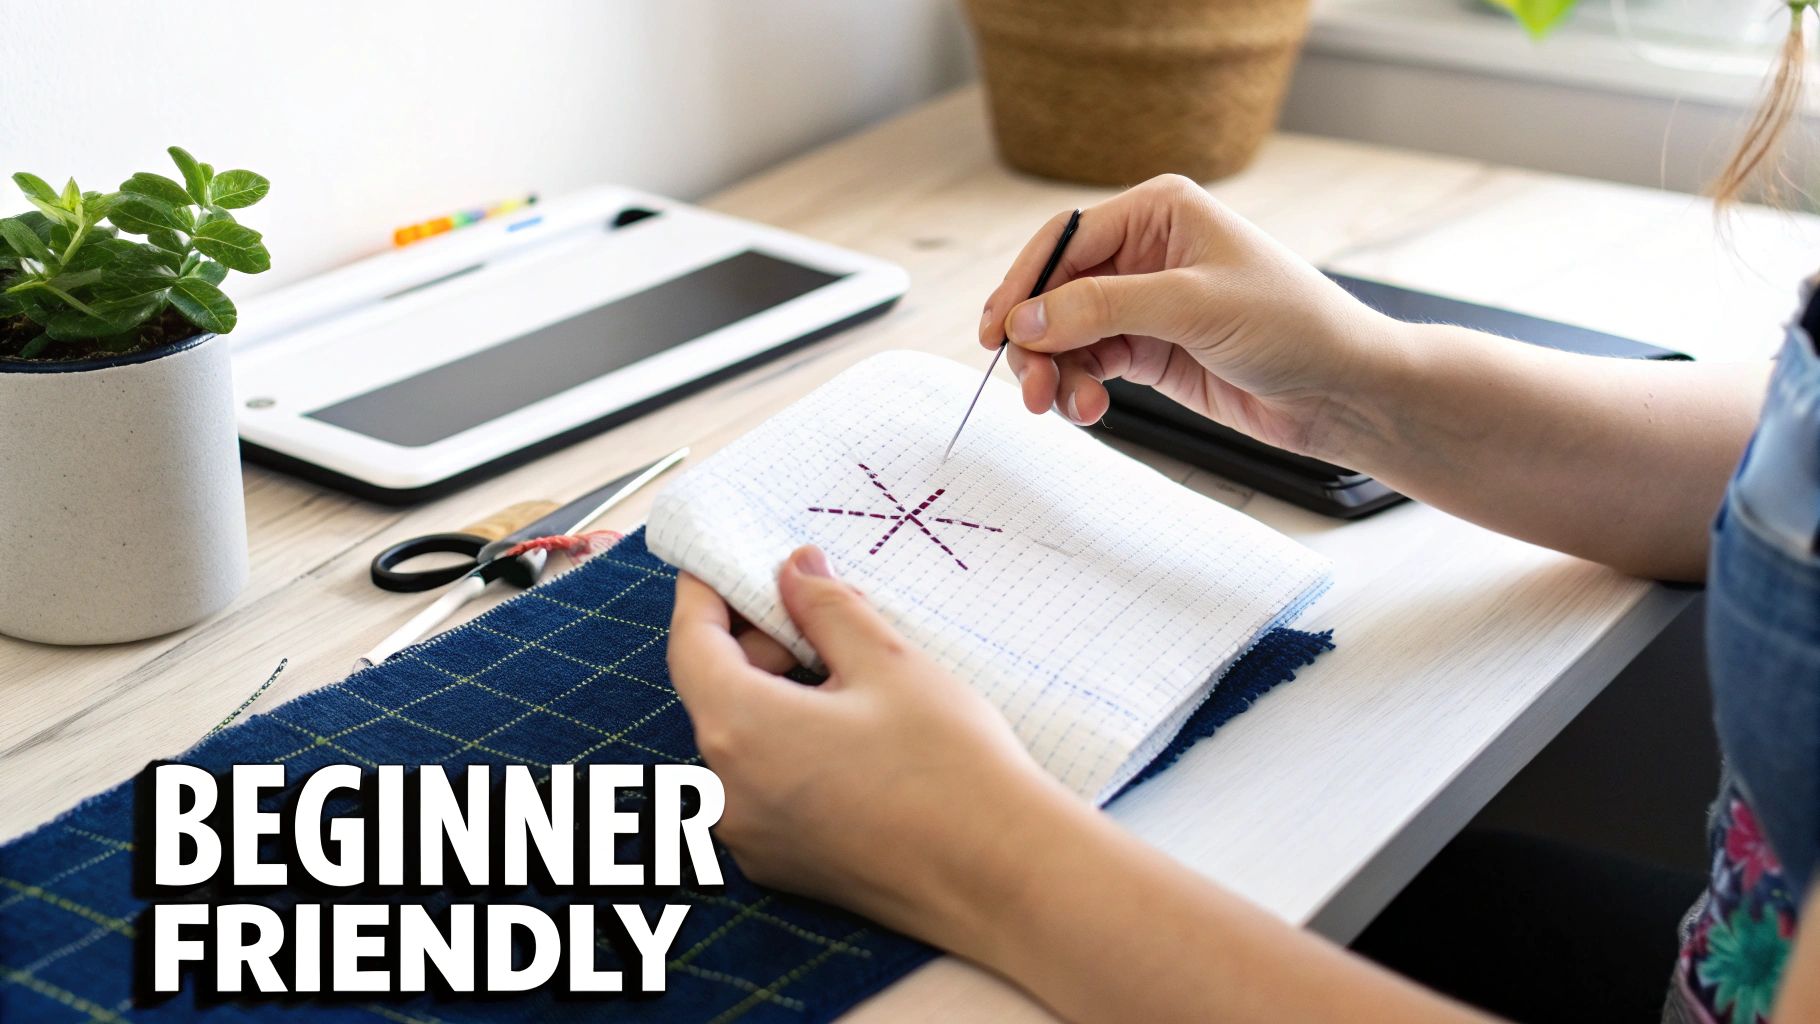
It’s easy to look at a detailed, finished piece and think it must take years of complicated training. The truth? It’s refreshingly simple. Think of cross-stitching less like freehand drawing and more like painting by numbers with thread. The entire craft is built on one single, incredibly easy-to-learn stitch: a tiny 'X'.
You don't need to be a natural artist or have any sewing experience. The whole process is methodical, guided, and wonderfully relaxing because there's no guesswork involved. Two key components work together to make sure every project is straightforward.
How Patterns and Fabric Make It Easy
The secret sauce is in the materials. A cross-stitch pattern is just a grid, a map where every single square has a symbol that tells you exactly what to do.
- The Chart: This is your roadmap. Each symbol on the chart corresponds to a specific thread color.
- Aida Fabric: This is the special fabric designed for cross-stitch. It's woven with a perfect, easy-to-see grid of holes, which makes creating neat, even stitches almost effortless.
Because of this built-in structure, all you're doing is following the chart, square by square. You find the symbol, pick the matching thread, and make your 'X' in the corresponding spot on the fabric. Slowly but surely, a beautiful image starts to appear.
Cross-stitch is remarkably accessible, with expert opinions showing over 80% of new hobbyists find the core technique easy to master within hours. The basics involve forming little 'X's on Aida fabric by following a pattern, making it up to 50-70% simpler for entry-level crafters compared to hobbies like knitting. Learn more about its beginner-friendly nature from crafting experts at Little Lion Stitchery.
To give you a clearer picture, let's break down the essential skills and just how quickly you can pick them up.
Difficulty Breakdown At a Glance
| Skill Component | Beginner Difficulty Level | Time to Learn |
|---|---|---|
| Reading a Pattern | Very Easy | 5-10 minutes |
| Threading a Needle | Easy | 2-5 minutes |
| Making an 'X' Stitch | Very Easy | 5-15 minutes |
| Following the Grid | Easy | 10-20 minutes |
As you can see, the core mechanics are something you can genuinely grasp in under an hour. The rest is just practice and patience as your project comes to life.
Ultimately, that first beautiful piece you create is much, much closer than you think.
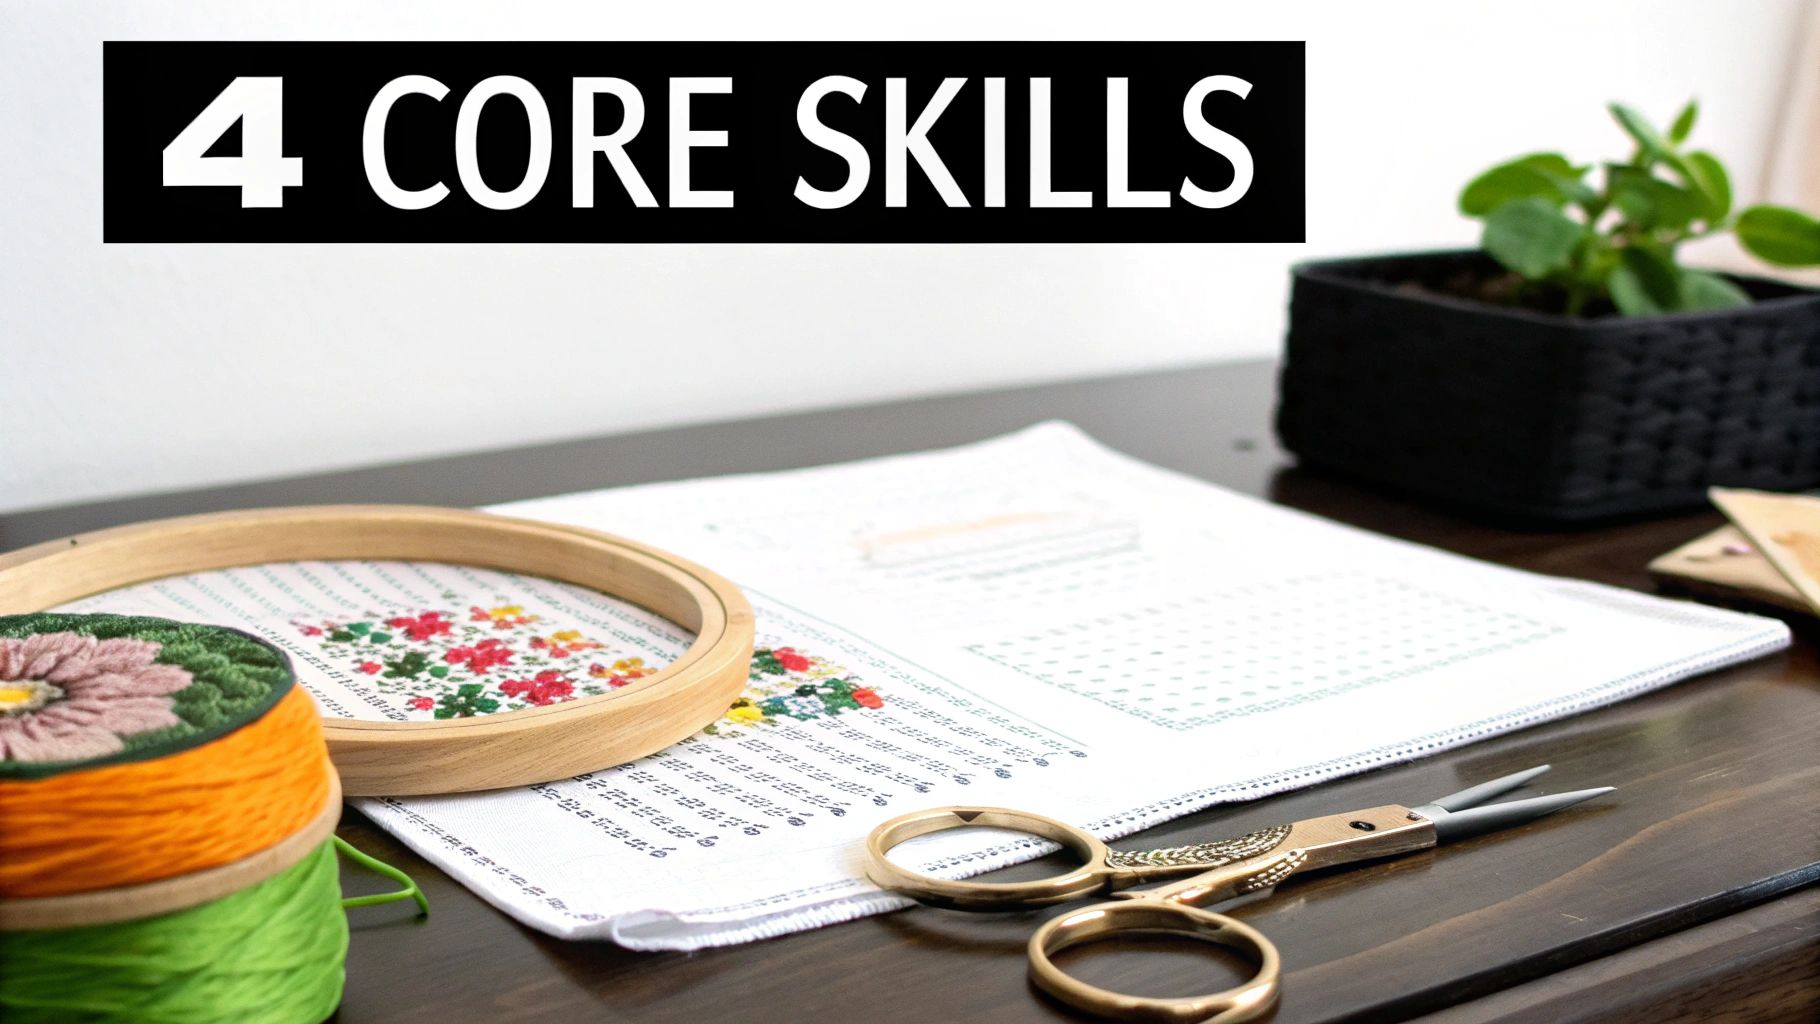
The Four Core Skills You Need to Master
 embroidery hoop, thread, and scissors, with text '4 CORE SKILLS'.">
To show you just how approachable this hobby is, let's pull back the curtain. You don't need to learn dozens of complicated techniques to get started. Honestly, it all comes down to just four simple, repeatable skills that anyone can pick up in an afternoon.
Once you get a feel for these, you'll understand why most stitchers will confidently tell you that cross stitch isn't hard at all. It's just a sequence of easy steps, repeated to create something wonderful.
Skill 1: Reading Your Pattern
Think of a cross stitch chart as a treasure map, but instead of "X marks the spot," it's more like "symbol marks the stitch." The pattern is just a grid filled with different symbols, and each symbol tells you exactly which color thread to use.
Your job is to match the symbol on the chart to the color on the key, then make a little 'X' in the corresponding square on your fabric. A black circle might mean red thread, while a tiny star might mean blue. There's no guesswork involved—just a simple matching game. Any good beginner kit will lay this out for you clearly.
Skill 2: Preparing the Thread
Cross stitch thread, which you'll often hear called embroidery floss, usually comes as a thick strand made up of six smaller threads twisted together. Most patterns look best when you use only two or three of these strands at a time for a neat, defined stitch.
Separating them is a breeze. Just snip off a comfortable length of floss—about 18 inches is a great starting point to avoid tangles—and gently pull out one strand at a time. Once you have the number of strands you need, just thread them through your needle like you would any other sewing thread.
Skill 3: Making the Perfect Cross Stitch
This is the main event! The cross stitch itself is exactly what it sounds like: two tiny diagonal stitches that cross over each other to form an ‘X’.
Here’s how you do it:
- The First Leg: Push your needle up from the back of the fabric through a hole, then go back down through the hole that's diagonally across from it. That's it—you've made a little slash: /.
- The Second Leg: Now, come back up through an adjacent hole and go down through the last empty corner to complete the ‘X’.
That simple two-step motion is the heart of every project, from simple cross stitch letters and alphabets to massive, full-coverage pieces. The real trick to getting that smooth, uniform look is to always make your stitches in the same order. For example, make sure the bottom slash always goes one way (like bottom-left to top-right) and the top slash always goes the other. For a closer look, you can learn more about the different types of stitches right here: https://cross-stitched.com/blogs/what-is-cross-stitch/cross-stitch-stitches.
Skill 4: Securing Your Threads
Last but not least, you need a way to start and stop without making bulky knots, which can create lumps on the front of your work. When you make your very first stitch, just leave a small "tail" of thread on the back of your fabric. As you make the next few stitches, you'll simply catch that tail underneath them, locking it in place.
When you're ready to end a thread, you do the same thing in reverse. Weave the remaining thread under three or four stitches on the back before snipping it close. This keeps the back of your project tidy and, more importantly, ensures your hard work won't unravel.
And that's really all there is to it. Every single cross stitch project you've ever admired, no matter how intricate it looked, was made by repeating these four basic skills over and over again. They're simple, easy to learn, and the foundation of the entire craft.
What Really Makes a Project Easy or Hard?
Not all cross stitch projects are created equal. Even though the basic ‘X’ stitch itself is a piece of cake, a few key factors can turn what should be a relaxing weekend craft into a month-long marathon. If you’ve been wondering, “is cross stitching hard?” the real answer is: it depends entirely on the project you pick up.
Think of it like cooking. A simple cross stitch pattern is like making pasta with your favorite jarred sauce—it’s straightforward, uses just a few ingredients, and you get a satisfying result pretty quickly. A complex one, on the other hand, is like tackling a multi-course French dinner from scratch. Both use the same basic principles, but the complexity, time, and attention to detail are worlds apart.
Understanding what makes a pattern easy or challenging is the secret to picking a first project that builds your confidence, not your frustration.
Pattern and Stitch Complexity
The biggest factor influencing a project's difficulty is the pattern itself. A truly beginner-friendly design will stick almost exclusively to the standard full cross stitch. That’s the simple ‘X’ you've probably seen, and it lets you get into a nice, smooth rhythm without much fuss.
As you get into more advanced patterns, you’ll start seeing different kinds of stitches pop up. These are used to create finer details, but they definitely slow things down and require a bit more precision.
- Fractional Stitches: These are quarter (1/4) or three-quarter (3/4) stitches that are perfect for creating smooth curves or sharp points. Instead of using the existing holes in the fabric, you have to carefully pierce the middle of a fabric square, which takes a steady hand.
- Backstitching: Think of this as drawing outlines on your stitched work. It’s a simple running stitch that adds definition to shapes and makes them pop. It’s not hard, but it is an extra step at the end.
- French Knots: These tiny, decorative knots are often used for details like eyes or the center of a flower. They have a bit of a reputation for being tricky, and getting them just right takes practice.
A pattern loaded with these specialty stitches is going to be a lot more involved than one that just uses good old full stitches.
Fabric Count and Type
The fabric you stitch on makes a huge difference, especially when you're just starting out. Cross stitch fabric is measured by its "count," which tells you how many squares (and therefore, stitches) there are per inch.
A common beginner fabric is 14-count Aida. The lower the count number, the bigger the squares and holes are, making it much easier to see where your needle goes.
A 2023 Craft Industry Alliance report found that 75% of newcomers using standard 14-count fabric complete projects without frustration, thanks to straightforward patterns that remove guesswork.
If you jump straight to a high-count fabric like 18-count or 22-count, you’ll be working with tiny stitches that demand excellent lighting and a lot more precision. For a deeper dive into materials, check out our guide on choosing the right cross stitch fabric.
Color Palette and Project Size
Finally, take a look at the colors and the overall size of the design. A pattern with a limited color palette (say, under 15 colors) and big, solid blocks of color is perfect for your first time. You can settle in and stitch for longer stretches without having to constantly stop and switch your thread.
On the flip side, a photorealistic pattern might have over 100 different colors, many of them just slight variations of each other. This often leads to something stitchers call "confetti"—tons of single, isolated stitches of different colors scattered all over a small area. It requires intense concentration and constant thread changes, which can be pretty draining.
And, of course, size matters. A small 5x7 inch design will be finished much faster than a massive 16x20 inch piece, giving you that wonderful sense of accomplishment much sooner.
Difficulty Factor Comparison
To help you see how these elements stack up, here’s a quick comparison of what makes a project more beginner-friendly versus what makes it a better fit for a seasoned expert.
| Factor | Easier for Beginners | More Challenging for Experts |
|---|---|---|
| Stitch Types | Almost all full cross stitches | Mix of full, fractional, backstitches, and French knots |
| Fabric Count | 11 to 14-count Aida (larger holes) | 18-count and higher (smaller, tighter stitches) |
| Color Palette | Under 15 colors, with large blocks of color | 50+ colors, many similar shades ("confetti" stitches) |
| Project Size | Small designs (e.g., under 8x8 inches) | Large, full-coverage pieces (e.g., 12x16 inches+) |
Choosing a project where most factors fall into the "Easier" column is a surefire way to have a great first experience with cross stitch.
Of course. Here is the rewritten section with a more natural, human-expert tone.
Common Beginner Hurdles and How to Avoid Them
Let's be honest—every new hobby has its little quirks and frustrations, and cross stitch is no different. But the good news is that the most common stumbling blocks for beginners are incredibly easy to overcome once you know the tricks. Think of these not as problems, but as part of the learning process that every single one of us went through.
The number one culprit? Tangled thread. Oh, the knotted mess of floss that has tested the patience of saints. It's so tempting to cut a super long piece of thread so you don't have to re-thread your needle as often, but that's the classic beginner's trap. A good rule of thumb is to keep your thread length to about 18 inches—roughly the distance from your fingertips to your elbow. Any longer, and you're just inviting knots to the party.
Another tell-tale sign of a newcomer is uneven stitches. You might notice some of your little 'X's look tight and pinched, while others are loose and loopy. This is all about tension, and the solution is your new best friend: an embroidery hoop.
Mastering Your Tools and Techniques
Think of an embroidery hoop as a tiny, helpful assistant. Its whole job is to hold your fabric tight and smooth like the top of a drum, giving you the perfect surface to work on. With the fabric held taut, it's so much easier to pull each stitch through with the same, consistent tension.
But just having a hoop isn't enough; you have to use it right. Some fascinating video analyses have shown that jerky, 90-degree turns of the hoop can actually distort up to 25% of your stitched shapes. By simply learning to make smoother, 180-degree rotations when you shift your grip, you can cut down on rework by a whopping 70%. In fact, just using a hoop correctly from the start prevents about 25% of all tension headaches. It’s a small skill that makes a huge difference. You can find more fantastic advice from the pros in these stitching tips from experts at Catkin & Lillie.
Pro Tip: If you ever work on a fabric with a bit of stretch, be careful not to pull it drum-tight in the hoop. You want it to have the same relaxed tension it would have lying flat on a table. Overstretching it will cause the fabric to pucker around your stitches once you take it out of the hoop.
Staying on Track and Fixing Mistakes
"Wait... where was I?" We've all been there, staring at a sea of tiny squares on a pattern and feeling completely lost. Miscounting stitches happens to everyone, but a few simple habits can keep you on track.
- Grid Your Fabric: This is a game-changer. Grab a water-soluble fabric pen and draw a 10x10 grid right onto your fabric, matching the grid on your pattern. Suddenly, navigating your chart becomes foolproof.
- Highlight as You Go: Treat your pattern like a coloring book. As soon as you finish a section of stitches, color it in with a highlighter. It’s immensely satisfying and gives you a clear map of what's done and what's next.
- Try "Parking": For patterns with lots of single, scattered stitches (we call this "confetti"), constantly starting and stopping a thread is a pain. Instead, you can "park" your thread by bringing the needle up at the next spot where that color appears and just letting it hang there until you need it.
So, what happens when you do make a mistake? First, take a breath. It’s not a big deal! Cross stitch is incredibly forgiving. If you catch it right away, you can just gently back the stitches out with your needle. If it's a bit more stubborn, a seam ripper can help.
But honestly? If you spot a small mistake later on, just consider leaving it. Most of the time, no one will ever notice it but you. It just becomes part of the unique, handmade character of your piece. Knowing these little bumps in the road are normal will help you relax and stitch with confidence.
How to Choose Your Perfect First Project
Picking the right first project is probably the single most important decision you'll make. It’s a bit like learning to drive; you wouldn’t jump straight into a stick shift on a steep hill in San Francisco. You’d start with an automatic in an empty parking lot. A beginner-friendly kit is your empty parking lot—it gives you the space to learn without the stress.
So, what does that look like? Your best bet is an all-in-one kit designed specifically for newcomers. These gems take all the guesswork out of the equation so you can just focus on the fun part: stitching.
Your Beginner Kit Checklist
When you’re hunting for that perfect first project, here’s a quick checklist of what to look for. A kit with these features is setting you up for success and helping you sidestep those early frustrations that can trip people up.
- Fabric: Look for 14-count Aida cloth. The grid is larger and the holes are easy to see, which is a huge help for your eyes and makes the whole process much smoother.
- Design: Go for something small and simple with big blocks of color. A pattern with fewer than 15 colors is ideal because you can get into a good rhythm without having to stop and change your thread every five seconds.
- Thread: A kit with pre-sorted cotton floss is a game-changer. It saves you the tedious task of trying to match a jumble of loose threads to a symbol on a chart.
- Chart: The pattern itself should be printed in color, nice and large, with symbols that are easy to tell apart. A tiny, confusing black-and-white chart is just asking for a headache.
Even with the best kit, you'll run into a few little snags. It happens to all of us! But the fixes are usually surprisingly simple.
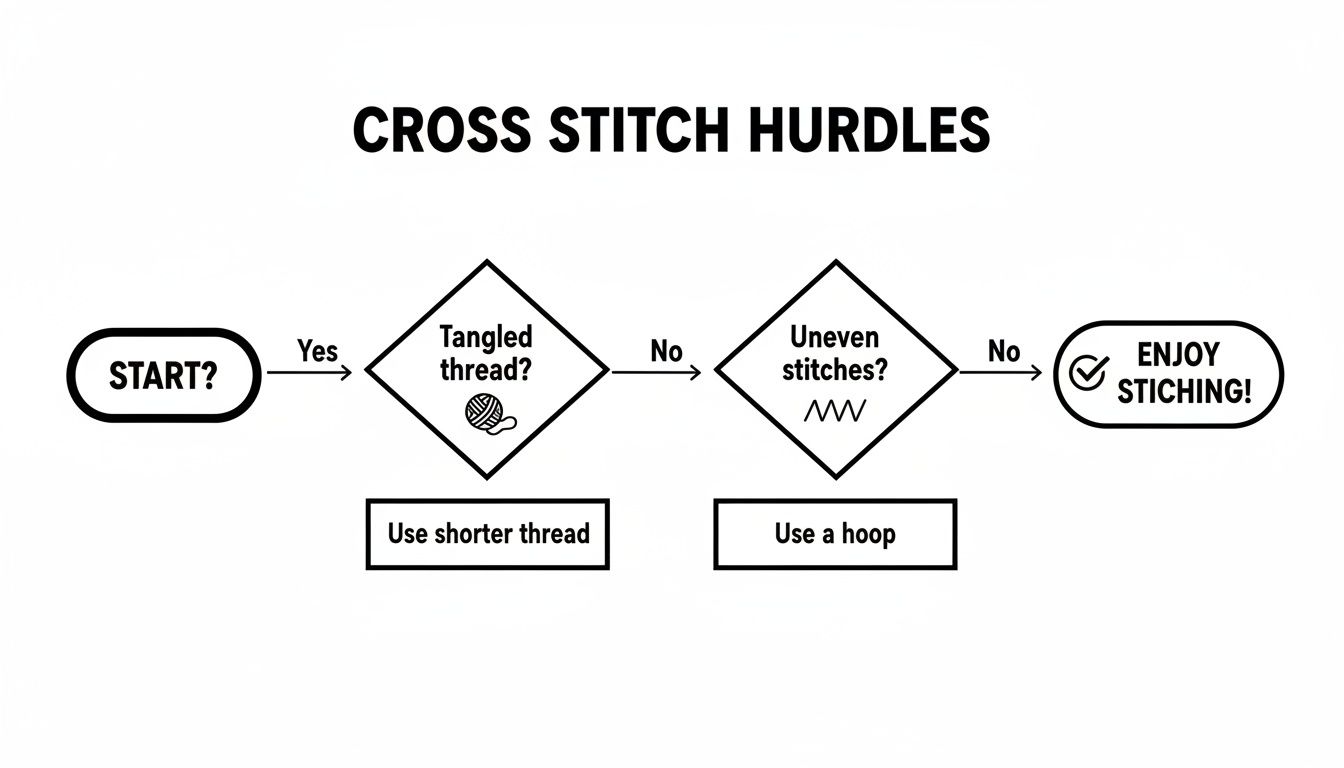
As you can see, things like tangled thread or wonky stitches have really straightforward solutions that you’ll pick up in no time.
The goal of your first project isn't perfection. It's about getting the hang of the rhythm, teaching your hands the motions, and feeling that little spark of magic as an image starts to appear from a blank piece of fabric.
This is exactly why we put so much thought into the all-in-one kits here at Cross Stitched. We've taken care of the curation for you, making sure every kit hits all those beginner-friendly marks. Inside each box, you'll find everything you need to get started—the right fabric, organized threads, a good needle, and a crystal-clear chart.
By choosing a Cross Stitched kit, you get to skip the supply-aisle anxiety and jump right into the calming, creative process of your new favorite hobby.
Your Simple Guide to Getting Started Today
So, you're ready to turn that curiosity into a real, hands-on project? Excellent. Getting started with cross stitch is way more straightforward than most people imagine. The last few steps are all about making one exciting decision that gets a needle and thread into your hands as quickly as possible.
The most important thing? Choose a design that you absolutely love. I can't stress this enough. Whether it's a quirky pattern that made you laugh or a custom kit of a beloved pet, your connection to the final picture is what will keep you motivated and excited to pick it up. Your first project should be something that makes you smile.
From Idea to First Stitch
Once you've got a design in mind, the next move is the smartest one a beginner can make: order an all-in-one kit. Seriously, this is the way to go. It completely removes the headache of wandering through a craft store, trying to figure out which fabric, needles, and threads you need.
A good kit has everything bundled up for you, perfectly matched and ready to go. You can find some great examples in our guide to beginning cross stitch kits. It's all about bypassing the prep work and jumping straight to the fun.
The best part is when that package lands on your doorstep. Unboxing your kit—seeing the crisp Aida fabric, the neatly sorted floss, and the clear pattern—is a little ritual in itself. From that moment on, all that's left to do is thread your needle and make that very first stitch. That first 'X' is a great feeling.
By picking a project you’re genuinely excited about and starting with a comprehensive kit, you sidestep almost every common beginner frustration. The path is cleared for you to have a relaxing, rewarding first experience.
This whole process is set up for you to succeed right away. Follow these simple steps, and you’ll have everything you need to start a wonderfully calming new hobby. You’re ready to create something beautiful, proving to yourself that this timeless craft is for anyone.
Your Cross Stitch Questions, Answered
Jumping into any new hobby brings up a few questions. Let's walk through some of the most common things new stitchers wonder about, so you can feel confident and ready before you even thread your first needle.
How Long Will My First Project Actually Take?
This is probably the number one question I hear, and the honest answer is: it's a marathon, not a sprint. For a small, beginner-friendly kit—something around 5x7 inches—you can expect to spend anywhere from 15 to 25 hours. Of course, this all depends on your personal pace and how often you pick it up.
It helps to think of it less like a race and more like a satisfying puzzle. The real magic is in watching the picture emerge, one tiny 'x' at a time, over a few cozy evenings or weekend afternoons.
Do I Need to Buy Anything Besides the Kit?
A good beginner kit should have you covered. Seriously, they're designed to be an "open and go" experience, with the fabric, pre-sorted threads, a needle, and the pattern all in the box.
That said, a couple of small, inexpensive tools can make the whole process a bit smoother:
- An Embroidery Hoop: I can't recommend this enough. It keeps your fabric tight like a tiny drum, which is the secret to getting beautifully even and consistent stitches.
- Small Scissors: A sharp little pair of scissors, sometimes called embroidery snips, will be your best friend for clean, close cuts.
You can absolutely finish a project without these, but most stitchers find they make the experience more enjoyable.
What’s the Hardest Part When You’re Just Starting Out?
You might be surprised to hear this, but the actual stitching is the easy part! For most newcomers, the biggest hurdle is figuring out how to start and end your threads without making lumpy knots on the back.
The trick is to tuck your thread tails under the stitches on the back of your fabric. It feels a bit clumsy for the first ten minutes, I'll admit. But after a little practice, it clicks and becomes second nature. It's one of those small skills that makes a huge difference in how neat your finished piece looks, and trust me, every stitcher gets the hang of it fast. Once you've got that down, the rest is just simple, relaxing stitching.
Ready to start your own creative journey? Cross Stitched offers all-in-one kits designed for beginners, with everything you need to turn your favorite photos into a beautiful piece of art. Explore our collection and start stitching today.


