

Ready to dive into the wonderfully relaxing world of counted cross stitch? It's a unique kind of embroidery where, instead of following a design printed right on the fabric, you bring a picture to life by following a gridded pattern. Think of it like painting by numbers, but with thread.
You'll be counting squares and placing each stitch precisely, and these simple instructions will get you started on the right foot, beginning with the tools of the trade.
Getting Started With Counted Cross Stitch
 cross stitch supplies including fabric, thread, and scissors.">
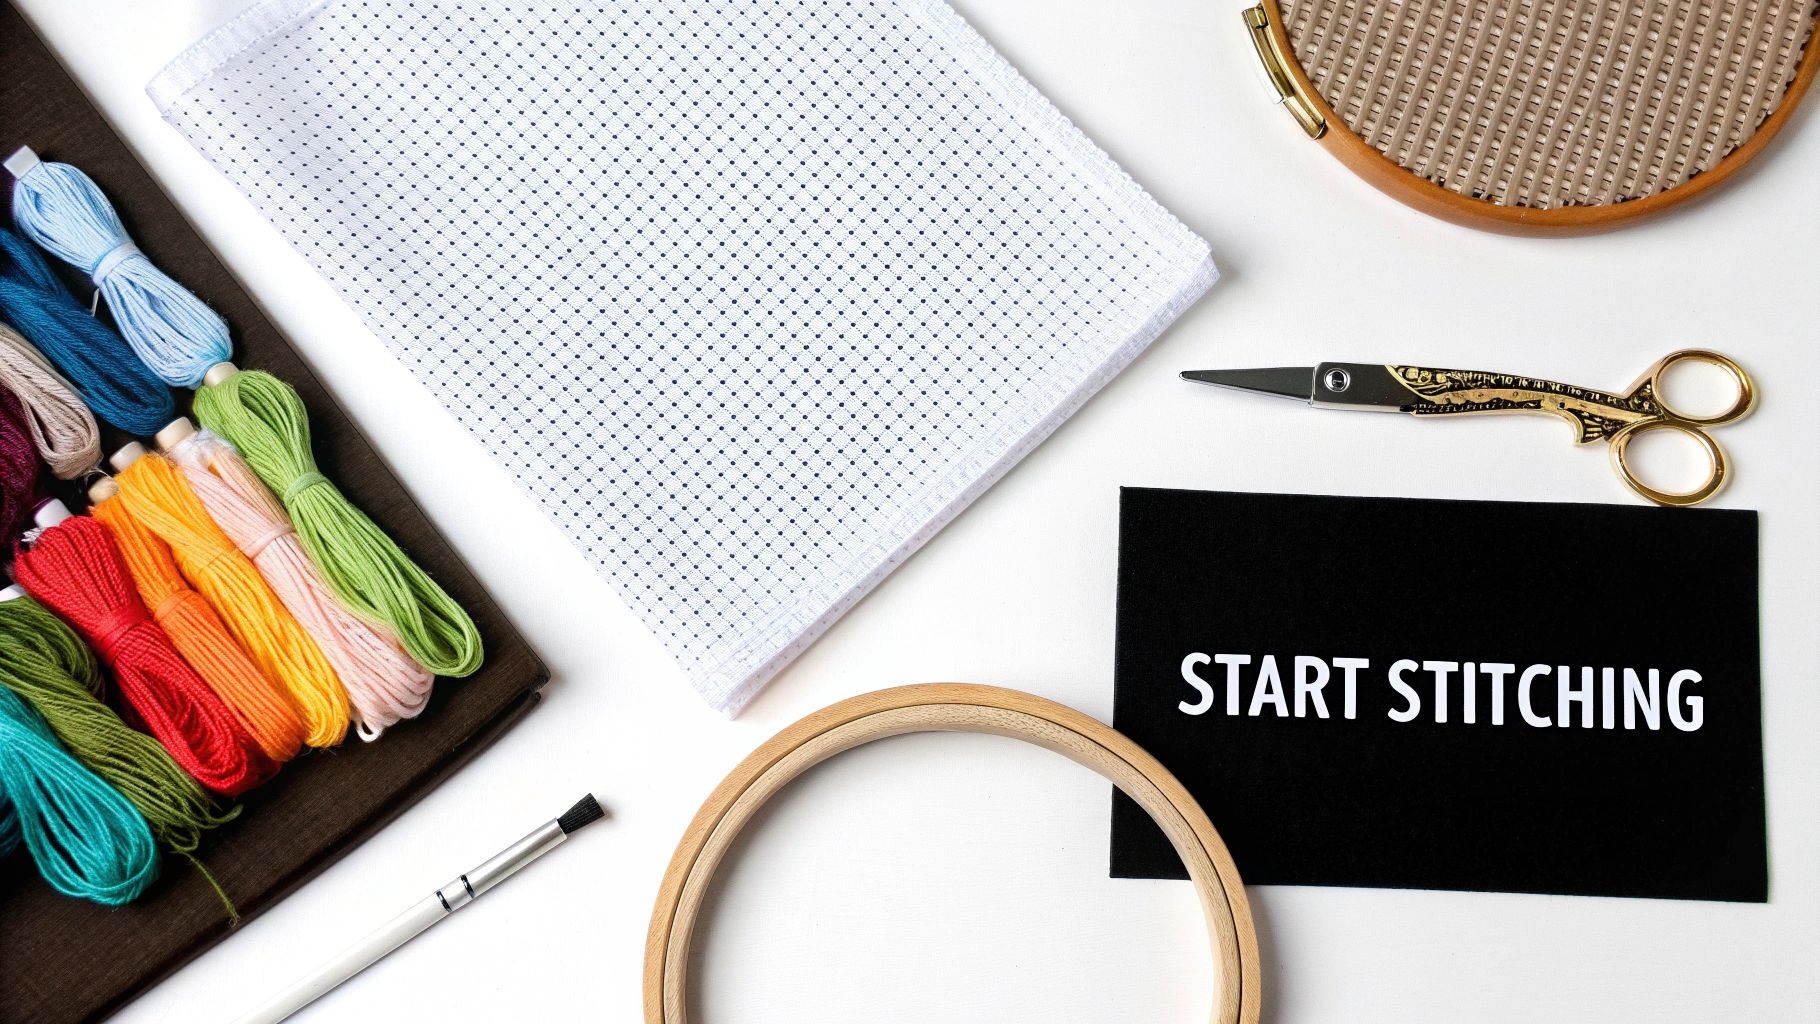
Before you make that first 'X', you need to gather a few essential supplies. The good news is, unlike some crafts that require a huge initial investment, cross stitch is incredibly approachable. Getting the right core items will make your first project a joy to create and ensure your finished piece looks neat and tidy.
Believe it or not, this craft has a long and storied past. The first printed instructions actually appeared way back in the late 16th century, with Germany publishing the earliest known pattern book in 1524. If you're curious about how this hobby came to be, you can learn more about the history of cross stitch.
Your Essential Cross Stitch Toolkit
To get started, let's build your toolkit. Each piece has a specific job to do, and having the right gear makes all the difference. Think of this as your recipe for success.
| Tool | Primary Function | Beginner's Tip |
|---|---|---|
| Fabric | The foundation for your design. | Start with 14-count Aida cloth. Its grid-like weave makes it super easy to see where your needle needs to go. |
| Embroidery Floss | The colorful thread you'll use to create your stitches. | DMC is a fantastic, widely available brand. You'll typically use 2 strands at a time for good coverage. |
| Tapestry Needle | Guides the floss through the fabric. | Look for a size 24 or 26. Its blunt tip and large eye are designed to glide through Aida without snagging. |
| Embroidery Hoop | Keeps your fabric taut for even, consistent stitches. | A 5" or 6" wooden or plastic hoop is a great size for most beginner projects. |
| Scissors | For snipping your floss cleanly. | A small, sharp pair of embroidery scissors will let you snip threads close to the fabric for a tidy back. |
With these items in hand, you’re well on your way. You'll find that understanding why you use a specific tool—like a blunt needle to avoid splitting fabric threads—builds your confidence just as much as learning the stitches themselves.
Cross stitch is just one of many wonderful and easy crafts to do at home, and its meditative rhythm makes it a perfect way to unwind.
How to Read a Cross Stitch Pattern

When you first glance at a cross stitch pattern, it can look a bit like a secret code. But don't worry, it's really just a simple map. The whole design is broken down onto a grid, and every single square on that grid equals one "X" stitch on your fabric. It’s a direct, square-for-square translation from the page to your project.
You'll notice heavier lines on the grid, usually marking off 10x10 square sections. Think of these as your landmarks. They are incredibly helpful for keeping your place and making sure you don't miscount, which is a real lifesaver on bigger, more detailed pieces. Most stitchers like to start from the center of the pattern—often marked with arrows—to make sure the final design is perfectly centered on the fabric.
Decoding the Symbols and Legend
Every pattern lives and dies by its legend, or symbol key. This is basically your decoder ring for the whole project. The legend will show you every symbol used on the grid and tell you exactly which floss color it corresponds to, typically with a brand and number like DMC 310 (a classic black).
I once heard from a stitcher who accidentally tossed her legend mid-project, and it brought everything to a screeching halt. Without that key, the chart was just a page of random shapes.
The legend also packs in other crucial details:
- Number of Strands: It'll tell you how many strands of floss to use for each stitch. The most common is two strands for a standard cross stitch, but this can vary.
- Specialty Stitches: If your design calls for backstitching, French knots, or other unique stitches, the key will explain what the different lines or symbols for those mean.
The legend is your single source of truth for the entire project. It's a great idea to make a working copy before you start so the original stays clean and pristine.
As you get more comfortable, you'll see that a pattern isn't just about individual symbols—it's about how the colors work together. Having a basic grasp of the principles of color theory can really change the game, helping you see how colors will play off each other and even giving you the confidence to substitute your own shades.
For a closer look at how these grids and symbols come together, check out our guide on cross stitch graphs. Once you get the hang of breaking down the chart and its key, any pattern becomes a simple, follow-the-map project.
Getting Your Fabric and Floss Ready to Go
A little bit of prep work now saves a world of headache later. Trust me, spending a few minutes getting your fabric and floss set up properly is the secret to a smooth, enjoyable stitching session and a project you'll be proud of.
First things first, let's find the center of your fabric. This is non-negotiable if you want your design to end up perfectly centered. Just fold the fabric in half one way, then fold it in half the other way. That corner where the two folds meet? That’s your sweet spot. I like to mark it with a pin or a water-soluble marker so I don't lose it. Starting from the center of your fabric (and your pattern) is a habit that separates beginners from seasoned stitchers.
Prepping Your Floss and Hooping Up
Now, for the floss. The standard embroidery floss you buy comes with six strands twisted together, which is almost always too bulky for a clean-looking stitch. Check your pattern instructions, but two strands is the go-to for the very common 14-count Aida fabric.
Cut a piece of floss about 18 inches long. Any longer, and you're just asking for a tangled mess. Gently separate out the number of strands you need.
Pro Tip: The Loop Start Method
If your pattern calls for two strands, this trick is a game-changer for a knot-free start. Instead of separating two strands, pull out just one. Fold that single strand perfectly in half, and thread the two cut ends through your needle. You'll be left with a small loop at the other end. When you bring your needle up from the back for your first stitch, just pass it through that loop to anchor your thread. No bumps, no knots. It's brilliant.
Finally, let's get that fabric into the hoop. Loosen the screw and separate the two rings. Drape your fabric over the inner ring, making sure your center mark is roughly in the middle. Place the outer ring over the top, press down, and start tightening the screw. You're aiming for a surface that's taut like a little drum—this tension is what helps you create beautifully even stitches.
If you're curious about why different fabric counts matter, we break it all down in our guide to what is Aida fabric.
Making Your First Cross Stitch
Alright, this is the moment we’ve been working towards: making that very first stitch. At its heart, a cross stitch is just a little 'X' made with thread. But how you make that 'X' is what sets the rhythm for your entire project and really impacts how the finished piece looks. There’s no single right way to do it, just the way that clicks for you.
Most people land on one of two classic techniques.
The English Method vs. The Danish Method
The English method is where you complete one full 'X' before moving on to the next one. This technique is fantastic for patterns with lots of scattered, individual stitches of different colors—what stitchers often call "confetti." It keeps the back of your work much tidier.
Then there's the Danish method, which is usually the go-to for stitching larger blocks of the same color because it's so much faster. You work in rows, first creating a line of half stitches all going in one direction (like this: ////), and then you come back over that same row to complete the 'X's (like this: \\).
To figure out your preference, just stitch a tiny 5x5 square using each method. You'll quickly get a feel for which one is more comfortable and gives you a result you love. It’s less about which one you pick and more about sticking with it to get a clean, polished finish.
Before you even make that first stitch, though, getting your setup right is key.
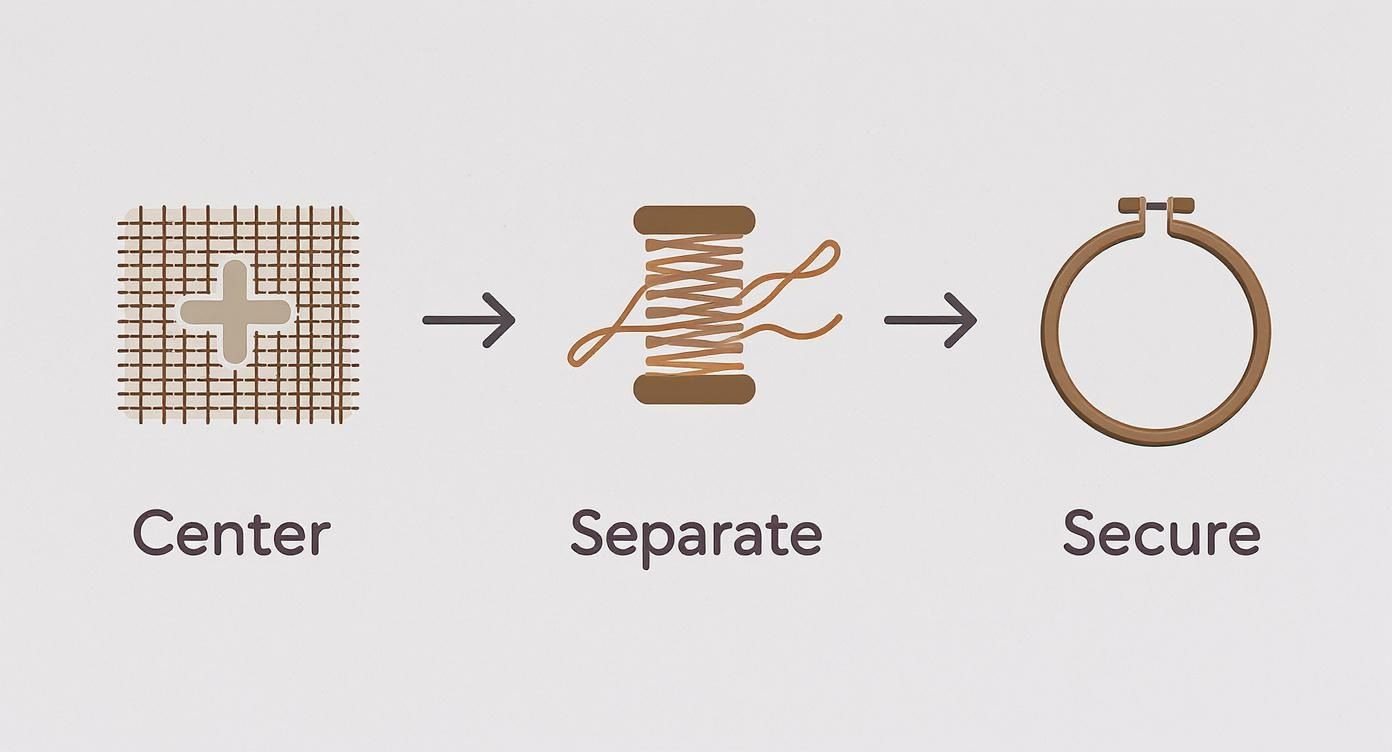
As you can see, finding your fabric's center, separating your floss, and getting the fabric taut in a hoop are the foundational steps for every single stitch you'll make.
The One Rule You Can't Break
No matter which style you adopt, there's one golden rule that every experienced stitcher follows for a beautiful result.
The Golden Rule of Consistency: Make sure your top stitches all cross in the same direction. Whether they all go from top-right to bottom-left (\) or top-left to bottom-right (/), keeping them uniform is non-negotiable. It creates that smooth, professional texture that catches the light perfectly.
When you're ready to end a thread, fight the temptation to tie a knot. Knots create ugly bumps that show through on the front. Instead, just flip your work over and gently weave the tail of your floss under at least three completed stitches on the back. Snip it close to the fabric, and it'll be perfectly secure.
These simple habits are the building blocks that will carry you through every project you tackle from here on out.
Navigating Those Inevitable Stitching Hiccups
Let's be honest—no matter how many projects you've finished, tangled thread and misplaced stitches are going to happen. It's just part of the craft. Seeing these moments as solvable puzzles, not failures, is half the battle. Having a few go-to fixes ready makes all the difference between frustration and a finished piece you're proud of.
One of the most common culprits is wonky stitch tension. You know the look—some of your 'X's are pulled so tight they pucker the fabric, while others look saggy and loose. This almost always comes down to inconsistent pulling. The key is to find a smooth, comfortable rhythm and apply that same gentle tug to every single stitch you make.
Then there are the dreaded knots that form on the back of your work, seemingly out of nowhere. They're a classic annoyance for every stitcher.
The simplest trick I've learned is to work with shorter lengths of floss. Keeping your thread to about 18 inches is a great starting point and seriously cuts down on tangles. Every so often, just let your needle and thread hang down and watch the floss untwist itself—it works wonders.
Fixing Mistakes Without Losing Your Cool
That sinking feeling when you spot a mistake several rows back is all too real. But don't despair; almost every stitch can be undone. If it's just a single stitch in the wrong place, you can often use the tip of your needle to carefully work it back out.
For a bigger section that needs to be removed, a more methodical approach is best. Here’s what I do:
- First, flip your project over. It's much easier to see what you're doing from the back.
- Gently slip the eye of your needle underneath the stitches you need to remove. This lifts them away from the fabric.
- With a pair of sharp embroidery scissors, carefully snip the lifted thread. You can then pull the cut ends out from the front side.
Working this way is much safer for your fabric and prevents accidental snags. Knowing you can tackle any little problem that comes up will give you the confidence to see any project through to the end.
Putting the Finishing Touches on Your Masterpiece
That feeling when you pull the needle through for the very last time? It’s pure magic. But don't rush to frame it just yet! Taking a little time to properly finish your cross-stitch will make the difference between a project and a true work of art that’s ready to be shown off.
A Gentle Cleaning
First things first, let's give your piece a quick, gentle bath. Even with the cleanest hands, oils and dust can accumulate over the hours you've spent stitching.
- Fill a clean sink or basin with lukewarm water.
- Add just a tiny drop of a mild, clear soap—like a gentle dish soap or a specialized textile wash.
- Let your piece soak for about 15 minutes. You'll be surprised what this lifts away!
- After its soak, rinse it thoroughly under cool, running water until all the suds are gone.
The Secret to a Perfect Press
Now for the pressing. This is where you get those crisp, professional-looking results. The trick is to protect your stitches.
Lay your damp cross-stitch face down on a thick, fluffy towel. The towel acts as a cushion, allowing the fabric to get flat while your stitches sink into the pile, keeping them plump and defined.
Set your iron to a medium setting with no steam. Gently press the back of your fabric, moving the iron around until it's completely dry and wrinkle-free.
A word of caution from experience: Never, ever iron the front of your cross-stitch. The direct heat will crush your beautiful, textured stitches and can even scorch the delicate floss, robbing it of its natural sheen.
With your piece now perfectly clean and pressed, you're ready for the fun part: deciding how to display it! Whether you're thinking of a classic frame, mounting it on a sticky board for a modern look, or even turning it into a pillow or a unique bookmark, you’ve now prepped your work for a beautiful finish.
Of course, here is the rewritten section with a more natural, human-written feel.
Got Questions? We've Got Answers.
As you start your cross-stitch journey, a few questions are bound to come up. It happens to everyone! Let's tackle some of the most common ones you'll encounter when reading a counted cross-stitch pattern.
What's the Deal with Fabric Count?
If you're just starting out, 14-count Aida cloth is your best friend. Seriously, it's what most of us learned on.
The "count" simply means how many squares there are in one inch of the fabric. A lower number like 14 means bigger squares, which are much easier on the eyes. As you get more comfortable, you can move on to higher counts like 16 or 18 for a finer, more detailed finish.
A quick tip from experience: A higher fabric count will make your finished project smaller, while a lower count makes it larger. Always double-check what your pattern suggests, as this will affect the final dimensions of your piece.
How Many Strands of Floss Should I Actually Use?
That colorful embroidery floss you bought comes as a single thread, but it's actually made of six smaller strands twisted together. You'll almost never use all six at once.
For 14-count Aida, using two strands is the sweet spot. It gives you nice, full stitches that cover the fabric well without looking chunky or crowded.
Your pattern is your ultimate source of truth here, though. It will tell you exactly how many strands to use. You might use a single strand for delicate details like backstitching or even three strands if you want a really bold, vibrant look.
Ready to transform a favorite photo into a stitched keepsake? Cross Stitched has everything you need, from custom kits to stunning patterns. Start your next project today!


