

Learning to cross stitch is a simple, relaxing hobby that involves creating pictures by stitching small 'X' shaped stitches onto fabric. It’s like painting by numbers with thread, making it one of the most accessible forms of embroidery for complete beginners. With a basic kit, you can start creating beautiful handmade art in just a few hours.
Your First Step into the World of Cross Stitch
Welcome to the wonderfully calm and creative world of cross stitch. If you’ve ever looked at a piece of handmade art and thought, "I could never do that," I'm here to show you that you absolutely can. Learning this craft is far less intimidating than it looks; it all boils down to following a chart and placing colored stitches on a grid-like fabric.
The real beauty of cross stitch is in its simplicity and the meditative rhythm you fall into while pulling the needle and thread. Each tiny 'X' builds upon the last, slowly revealing a detailed image. This deliberate process is exactly why so many people find it incredibly relaxing—it's a perfect way to practice a little mindfulness.
Why Start Cross Stitching Now
If you're feeling the pull to pick up this timeless hobby, you're in good company. Needlecrafts are having a major moment, and it's more than just a passing trend. The global cross-stitch market was valued at around USD 0.15 billion and is expected to climb to USD 0.22 billion by 2033.
This boom is happening for a reason. We now have access to a huge variety of modern patterns, all-in-one DIY kits, and helpful online tutorials that make starting easier than ever. Watching a picture emerge from a blank piece of fabric is an amazing feeling and offers a tangible sense of accomplishment that’s often missing in our digital lives.
Cross stitch is more than just a craft; it's an opportunity to slow down, disconnect from screens, and create something beautiful and lasting with your own hands. It’s a quiet rebellion against the fast pace of modern life.
What to Expect on Your Journey
Think of this guide as your friendly companion, here to demystify the entire process for you. We'll walk through everything from the essential materials you'll need to figuring out how to read a pattern. The goal is to get you from your very first stitch to a finished piece you’ll be proud to display.
Here's a quick look at what makes cross stitching so approachable for newcomers:
- Minimalist Supplies: You really only need fabric, floss (that's the thread!), a needle, and a pattern to begin.
- Simple Techniques: The main stitch is a basic 'X,' which you'll get the hang of in no time.
- Structured Creativity: Patterns give you a clear roadmap, so you can stop guessing and just focus on the enjoyable act of stitching.
My aim here is to give you the confidence to just dive in. For a comprehensive look at the basics, you should also check out our detailed guide on the fundamentals of learning cross stitch.
Alright, let's get you started on your very first project.
Building Your Beginner Cross Stitch Toolkit
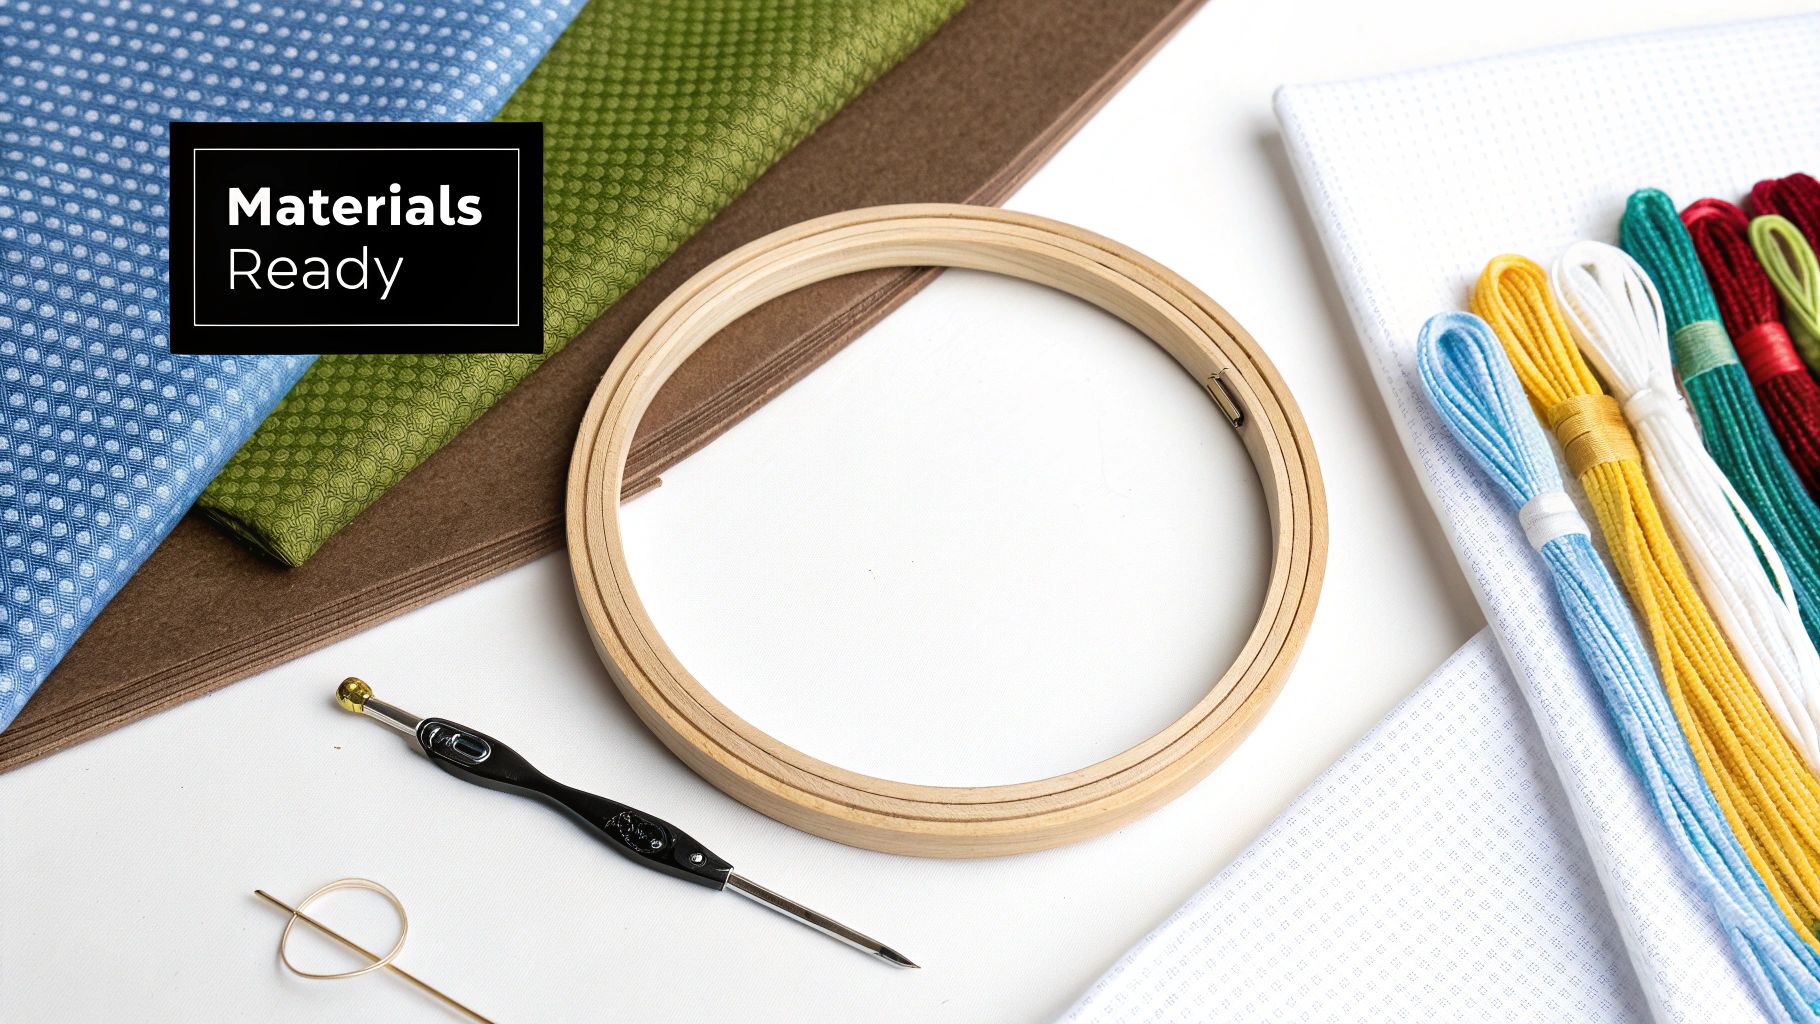
Walking into a craft store can feel a bit overwhelming, but the good news is you don’t need a mountain of gear to start cross stitching. The basic toolkit is surprisingly simple and won't break the bank. Think of it as assembling your artist's palette—each item has a job to do, and getting the right ones from the get-go makes the whole process smoother and way more fun.
Let's break down exactly what you'll need. We'll go over the "why" behind each piece so you can make smart choices right away and avoid any rookie mistakes.
Fabric and Floss: The Heart of Your Project
The foundation of any cross stitch piece is the fabric you stitch on and the thread (called "floss") you stitch with. These two choices have the biggest impact on how your finished design looks and feels.
For anyone just starting out, Aida cloth is your best friend. It’s a cotton fabric woven into a perfect grid of squares, which takes all the guesswork out of where to put your needle. Aida comes in different "counts," like 14-count or 16-count. That number just tells you how many squares (or stitches) fit into one inch of fabric.
My advice? Stick with 14-count Aida for your first project. The squares are big enough to see clearly, which saves you from a lot of eye strain and makes stitching feel easy and natural.
Next up is the fun part: the color! Embroidery floss is the thread that brings your design to life. The most common brand you’ll see is DMC, and their floss comes in a dizzying array of colors, each with a unique number on the paper band.
If you look closely at a skein of DMC floss, you'll see it's made of six tiny strands twisted together. For most projects on 14-count Aida, you'll only use two of these strands at a time. You'll need to gently separate them before you start—this is the secret to getting neat, flat stitches that don't look bulky or crammed.
Needles, Hoops, and Other Handy Tools
Now that you have your canvas and your colors, you just need a few tools to put it all together.
The Right Needle Makes All the Difference
You can't just grab any old sewing needle. For cross stitch, you specifically want a tapestry needle. These are different in two key ways: they have a blunt tip and a much larger eye.
The blunt tip is designed to glide easily into the holes of the Aida fabric without splitting the threads, which keeps your grid intact. The big eye? It just makes threading those two strands of floss a whole lot less frustrating. For 14-count Aida, a size 24 tapestry needle is the perfect match.
Keeping Your Tension Just Right
To keep your fabric taut while you work, you’ll want an embroidery hoop. It's made of two rings that clamp your fabric tightly, creating a firm, drum-like surface that makes stitching much easier. A simple 5-inch or 6-inch wooden hoop is inexpensive and absolutely perfect for a beginner.
A few other small things can be lifesavers:
- A good pair of scissors: Small, sharp embroidery scissors are a must for snipping threads cleanly and close to the fabric.
- A needle minder: This is a game-changer! It's a small decorative magnet that holds your needle on your fabric when you take a break, so you don’t have to worry about it getting lost in the sofa cushions.
I’ve put together a quick table to summarize the absolute must-haves for your first project.
Essential Supplies for Your First Project
Here’s a quick-reference list of the core tools you'll need to start cross stitching, with practical recommendations for beginners.
| Item | What to Look For | Why It's Essential |
|---|---|---|
| Fabric | 14-count Aida cloth | Its clear, open grid makes it incredibly easy for beginners to place stitches evenly. |
| Floss | DMC six-strand embroidery floss | A high-quality thread that’s widely available and comes in a massive range of colors. |
| Needles | Size 24 tapestry needles | The blunt tip prevents you from splitting the fabric threads, and the large eye simplifies threading. |
| Hoop | 5" or 6" wooden embroidery hoop | This keeps your fabric tension even, which is the key to creating neat, uniform stitches. |
| Scissors | Small embroidery scissors | Allows for precise, clean cuts right next to your fabric without risking any damage. |
Once you've gathered these key items, you've officially built your starter kit. You're ready to thread that needle and start bringing your first pattern to life
Mastering Your First Stitches
Alright, you've got your supplies—now for the fun part. This is where a blank piece of fabric and some colorful thread start to turn into actual art. We’ll walk through the essential techniques together, making sure you build a solid foundation for clean, even stitches right from the start.
Prepping Your Thread and Needle
Before you can make a single stitch, you need to get your needle threaded properly. Most embroidery floss, like the popular DMC brand, comes as a thick thread made of six individual strands. For standard 14-count Aida fabric, you'll almost always use just two of those strands. This gives you perfect coverage—not too skimpy, not too bulky.
First, cut a length of floss about 18 inches long. A good rule of thumb is the distance from your fingertips to your elbow. Any longer and it’s prone to tangling.
Now, you need to separate two strands from the group of six. Don't just pull two out at once—that’s a recipe for a knotted mess. Instead, pinch the end and gently pull the strands out one by one. Once you have your two strands, you're ready for my favorite trick for starting a project.
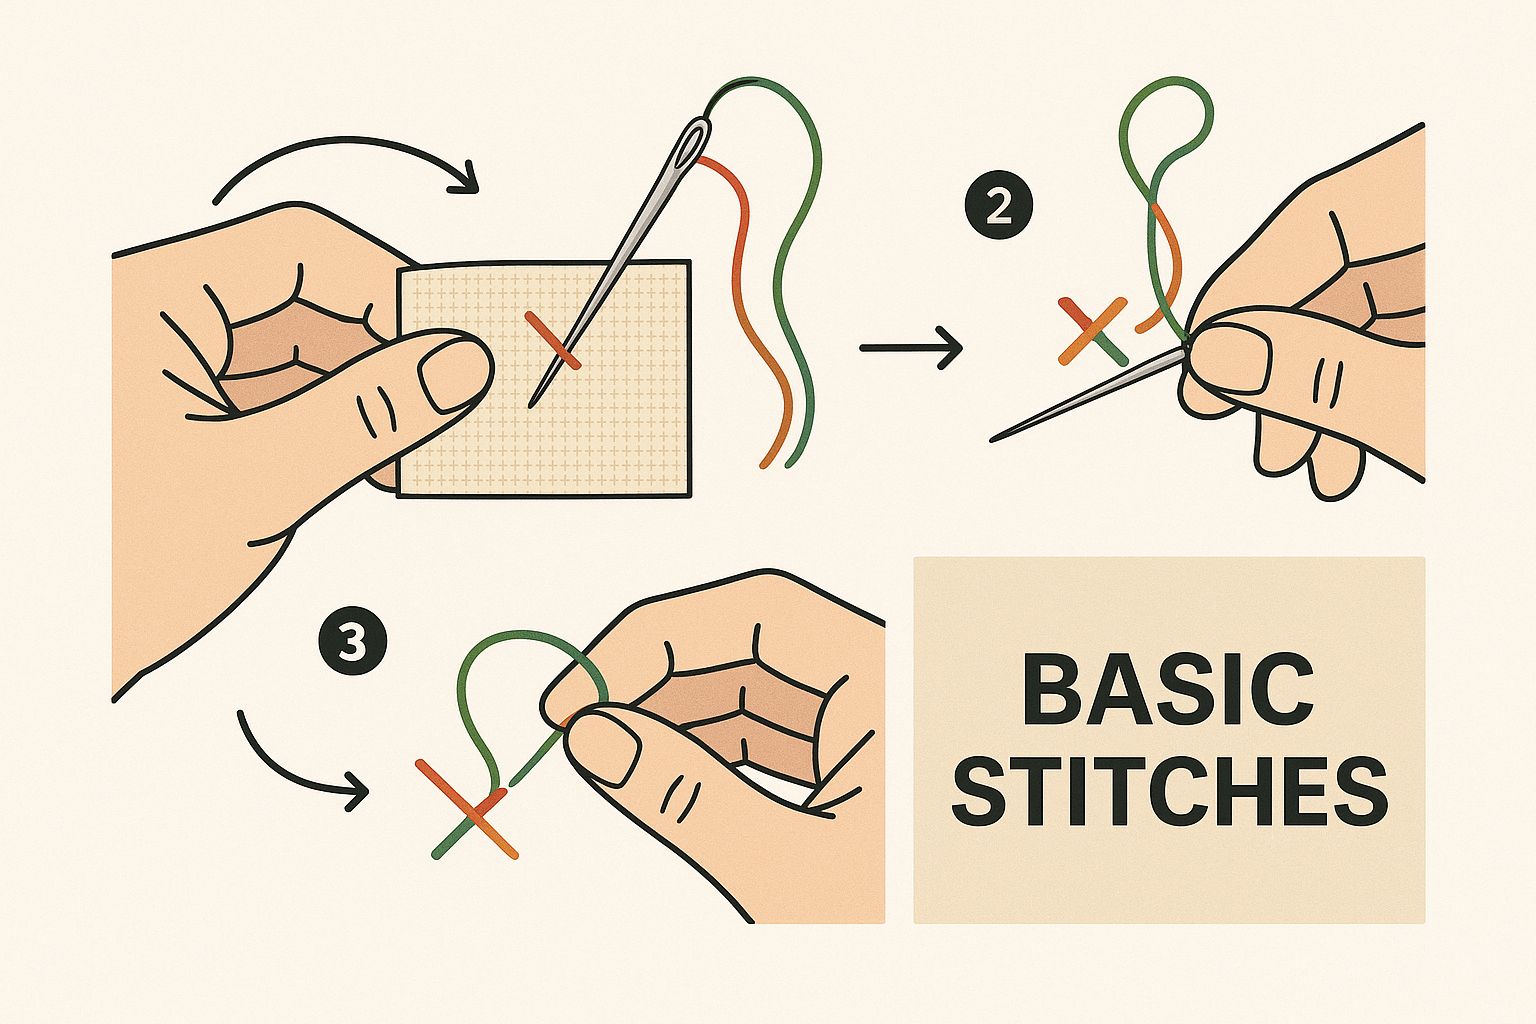
The Game-Changing Loop Start Method
Forget about tying clunky knots on the back of your work. The loop start is an elegant little trick that keeps the back of your project incredibly neat and prevents bumps from showing on the front. Honestly, it's a game-changer.
Here's how you do it:
- Take one of your separated strands and fold it perfectly in half.
- Thread the folded end through the eye of your needle, creating a loop at the tail end.
- Push your needle up from the back of the fabric at your starting point. Don't pull it all the way through! Let that little loop hang out at the back.
- Make the first half of your cross stitch, bringing the needle down through the fabric.
- Now, flip your work over. Pass your needle through the loop on the back and gently pull the thread taut.
Voilà! Your thread is securely anchored without a single knot. It’s a small detail that makes a huge difference in the finished quality of your piece.
The loop start method is more than just a tidy trick; it's a foundational habit for clean stitching. Mastering it early on will elevate the look of every project you create, giving the back of your work a professional finish that's just as impressive as the front.
Creating the Perfect Cross Stitch
The heart of this craft is the cross stitch itself—a simple 'X' formed by two diagonal stitches. The secret to a polished, professional look is consistency. Every single top stitch across your entire project needs to slant in the same direction. It doesn't matter if they all go right-over-left (/) or left-over-right (), just pick a direction and stick with it.
This is what you're aiming for up close:
This visual really helps to see how neatness comes from that consistent technique. You'll generally form these stitches in one of two ways, and knowing when to use each will make you a much more efficient stitcher.
English vs. Danish Method: Which to Choose?
You'll hear experienced stitchers talk about two main approaches: the English method and the Danish method. Neither is right or wrong, but they each have their moments to shine.
- The English Method: This is where you complete one full 'X' before moving on to the next. It’s your best bet for areas with "confetti" stitches—those random, scattered colors where you're only placing one or two stitches at a time.
- The Danish Method: With this approach, you stitch a whole row of bottom halves first (like this: /////) and then work your way back across the row, completing the top halves to form the Xs (like this: \\). This method is so much faster and uses thread more economically when you're working on big blocks of the same color.
For most beginners, the Danish method is the way to go because it helps you get into a nice, steady rhythm. But knowing both lets you tackle any pattern with confidence. If you want to dive deeper, our guide on basic cross stitch stitches explores even more techniques to add to your toolkit.
Securing Your Thread Without a Knot
Just as you started clean, you'll want to finish clean. When your thread starts running short (about 3-4 inches left) or you've finished all the stitches for one color, it's time to secure it.
Simply flip your hoop over to the back. Carefully slide your needle under three or four completed stitches nearby, pulling the thread through snugly. Then, just snip the excess tail off close to the fabric.
This simple weaving technique holds the thread securely without creating a bulky knot, ensuring your masterpiece won’t unravel and keeping the back just as tidy as the front.
How to Read a Cross Stitch Pattern Like a Pro
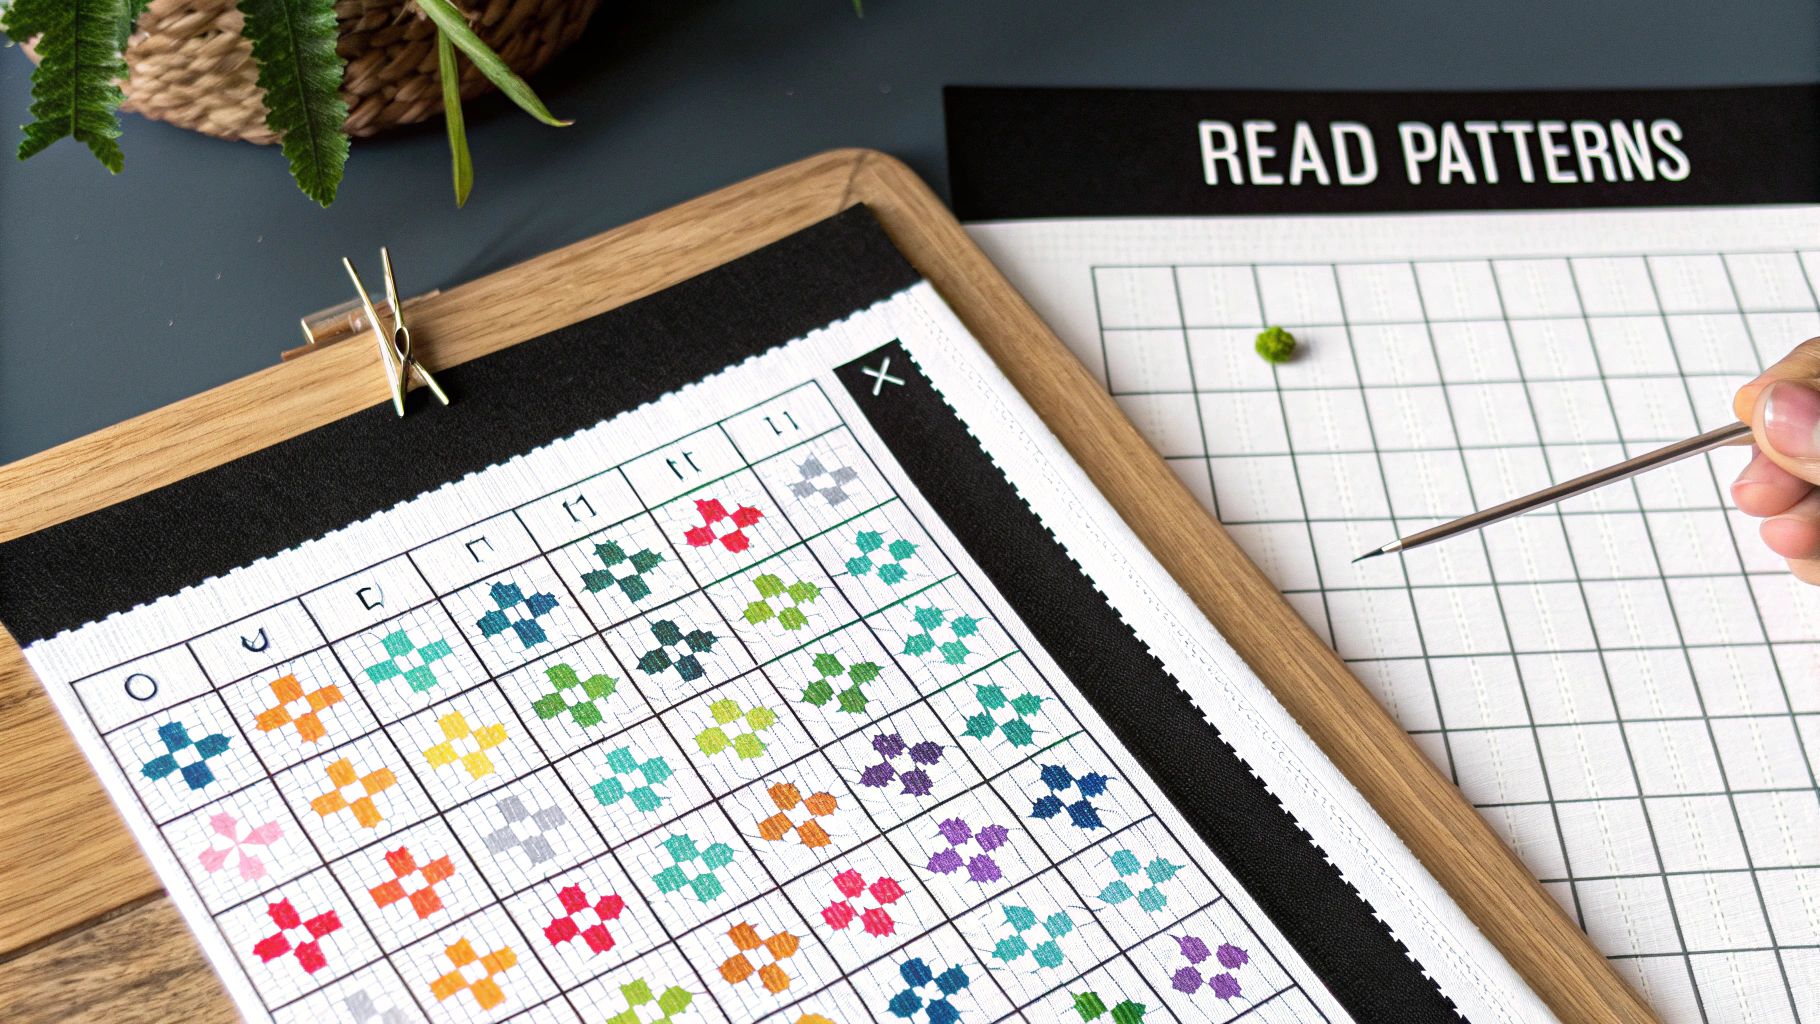
At first glance, a cross stitch pattern can look like a secret code—a chaotic grid of symbols, lines, and numbers. But I promise, once you learn its language, you’ll realize it's just a simple map guiding you stitch by stitch. Learning to read this map confidently is one of the most satisfying parts of getting started.
Think of the pattern as a pixelated version of your final masterpiece. Each square on that grid corresponds to one square on your Aida fabric, and the little symbol inside tells you exactly which color of thread to use. It’s a beautifully straightforward system that takes all the guesswork out of creating something beautiful.
Decoding the Pattern Key
Every single pattern comes with a color key, sometimes called a legend or a floss list. This is your Rosetta Stone. It translates each symbol on the grid into a specific thread color, keeping your work accurate and organized.
Your key will typically list three crucial pieces of info for each color:
- Symbol: The unique character (like ★, ⚫, or ▲) you'll see on the pattern's grid.
- Floss Number: This is almost always a DMC number (e.g., 310 for black or 743 for a perfect buttery yellow). This number is essential for buying the exact shade the designer intended.
- Color Name: A helpful description, like "Medium Yellow" or "Christmas Red."
Before you even thread your needle, take a minute to match your floss skeins to the numbers in the key. A little prep work goes a long way. Many stitchers, myself included, use a floss organizer or bobbins labeled with both the symbol and the DMC number. This simple step can save you from frustrating mix-ups later on.
Your pattern key is the single most important part of your chart. Double-checking that your floss color matches the correct symbol before you begin a new section is a small habit that prevents big mistakes down the road.
Finding Your Starting Point
One of the first questions every beginner asks is, "Where do I even start?" The secret to a perfectly centered design is to begin stitching right in the middle of both your fabric and your pattern. Most charts make this easy by marking the center with arrows along the edges or a special symbol right on the grid.
Here’s a simple, foolproof method I use to get it right every time:
- Find the Fabric Center: Gently fold your piece of Aida fabric in half lengthwise, then fold it in half again widthwise. The point where the two creases meet is the exact center. I like to mark this spot with a pin or a temporary fabric marker.
- Locate the Pattern Center: Look for the arrows on the top and side margins of your pattern chart. Just follow them inward with your fingers until they meet on the grid. That’s your starting point.
- Start Stitching: Find that central symbol on your key, prep your thread (the loop start method is great for this), and make your very first stitch right on that center mark of your fabric.
Starting in the middle and working your way out ensures your project won't run off the edge of the fabric—a surprisingly common hiccup for newcomers!
This methodical approach is one reason the craft has seen such an incredible comeback. The needlecraft patterns market, which includes cross stitch, was valued at approximately USD 34 billion and is projected to reach an amazing USD 63.8 billion by 2035. This boom is fueled by DIY culture and e-commerce making gorgeous, unique patterns accessible to everyone. To see how these trends are shaping the industry, you can explore more insights on the needlecraft patterns market.
Tracking Your Progress
It is so easy to lose your place on a dense pattern, but a few simple tricks can keep you on track. How you do this really depends on whether you prefer working with a paper chart or a digital one.
- For Paper Patterns: A good old-fashioned highlighter is your best friend. As you complete a section of stitches, just color them in on your paper chart. This gives you a clear, satisfying visual of what's done and what's left.
- For Digital PDF Patterns: So many stitchers now use tablets to view their patterns. Apps like Pattern Keeper (for Android) or Markup R-XP (for iOS) are game-changers. They let you tap and highlight completed stitches, search for specific symbols, and track your overall progress automatically.
Understanding Special Stitches
As you get more comfortable, you'll find patterns with more than just basic cross stitches. The key will also define symbols for these little details, which add amazing texture and definition to a design.
Two of the most common ones you'll see are:
- Backstitch: Usually shown as a solid line on the pattern, this stitch is what you'll use for outlining shapes and adding fine details, like lettering or the whiskers on an animal.
- French Knots: Often represented by a small, filled-in circle or dot, these create tiny, decorative knots. They're perfect for adding eyes, the centers of flowers, or stars in a night sky.
Don't let these intimidate you! They are simple additions that really elevate a design from good to great. Once you understand these core elements, you've unlocked the ability to read pretty much any cross stitch pattern out there.
Finishing and Displaying Your Cross Stitch Art
There’s a special kind of magic in that very last stitch. You've officially turned a blank piece of fabric and a jumble of threads into a real piece of art. But hold on—before you rush to find a nail and hammer, taking a little time for a few finishing steps can elevate your work from a cool project to a true showpiece.
Honestly, these final touches are just as crucial as the stitching itself. They’re what make your piece look polished, professional, and ready to be admired for years.
Preparing Your Piece for Display
After hours of being held, your fabric has likely picked up some natural oils from your hands or maybe a few light marks from the embroidery hoop. A gentle wash is the perfect way to freshen it up and make those colors really pop.
This is definitely not a job for the washing machine, though. A quick, careful hand-wash is all you need.
- Grab a clean sink or basin and fill it with lukewarm water. Add just a couple of drops of a mild, clear dish soap.
- Let your cross stitch piece soak for about 15 minutes. Whatever you do, don't scrub or wring it out—that’s a surefire way to distort your stitches.
- Rinse it really well under cool, running water until every last bubble is gone.
- To dry, lay your piece flat on a thick, clean towel. Roll it up like a burrito and press gently to soak up the excess water.
Pro Tip: Seriously, never wring out your cross stitch fabric. The twisting can pull your stitches out of shape and warp the Aida cloth for good. A gentle squeeze inside a towel is all it takes.
While it’s still damp, it’s time to iron. Place your project face-down on another clean, thick towel and press it with a warm iron from the back. Ironing on a soft surface like a towel protects your stitches, keeping them from getting flattened so they stay looking plump and defined. Keep the iron moving until the fabric is completely dry and perfectly smooth.
Creative Ways to Showcase Your Art
Alright, now that your piece is clean and pressed, the real fun begins: deciding how to show it off. It's fascinating to think that cross stitch is part of the much larger embroidery industry, a market valued at a whopping USD 2.5 billion and set to grow even more. This boom is fueled by people wanting more personalized touches in their home décor, and your finished piece is part of that amazing trend. You can see just how much the industry is growing by exploring the latest industry insights.
Ready for some ideas? Here are a couple of my favorite ways to display a finished project.
The Classic Hoop Frame
An embroidery hoop isn't just a tool; it can also be a fantastic frame. It gives off a modern, rustic vibe that works so well with contemporary patterns. Just center your design in a clean wooden hoop, pull the fabric taut, and tighten the screw. Trim the extra fabric around the back, leaving about an inch. You can then glue this flap to the inner ring or, for an even cleaner look, cover the back with a circle of felt.
The Traditional Picture Frame
For a more formal or classic presentation, you can’t go wrong with a standard picture frame. To get it ready, you'll want to mount your work on a piece of acid-free foam or mat board cut to fit the frame. The best way to secure it is by lacing the back with a sturdy thread. This technique creates perfect, even tension, ensuring your art stays centered and beautifully flat inside the frame. For a full walkthrough, check out our guide on advanced cross stitch finishing techniques.
Taking the time for these final steps is so rewarding. It’s the process that turns all your hard work into a polished piece you can be proud to hang on your wall or give as a truly heartfelt, handmade gift.
A Few Common Cross-Stitch Questions
As you get into the rhythm of stitching, you're bound to run into a few head-scratchers. That’s totally normal! Feeling a bit lost at first is part of learning any new craft, but getting clear answers to common problems will help you stitch with a lot more confidence.
Let's walk through some of the questions I hear most often from new stitchers. From pesky thread tangles to choosing the right fabric, these are hurdles everyone faces. The great news? The solutions are usually surprisingly simple.
How Can I Stop My Floss from Tangling?
There's nothing quite as frustrating as getting into a good stitching groove, only to be stopped by a knotted mess of floss. If you find your thread is constantly twisting up, it's usually down to two things: the length of your thread and the simple mechanics of stitching.
First off, resist the temptation to use a super long piece of thread. I know it seems like it will save time, but it's the number one cause of knots. A length of about 18 inches—roughly from your fingertips to your elbow—is the sweet spot. You'll re-thread your needle a bit more often, but you'll more than make up for it by not having to wrestle with tangles.
Here’s the other trick, and it's a game-changer. Every few stitches, just let your needle and thread dangle from your project. You'll see it immediately start to spin as it unwinds itself. This little habit releases all the built-up tension from pulling the floss through the fabric and is the easiest way to keep things smooth.
Think of it this way: every time you complete a stitch, you're putting a tiny twist into the thread. Letting the needle hang is like hitting a reset button, allowing the floss to go back to its natural, untwisted state.
What Do I Do If I Make a Mistake?
First, take a deep breath. A mistake isn't a catastrophe—it's proof that you're actually doing something! Every single person who stitches, no matter how long they've been at it, has to pull out stitches from time to time. We even have a special name for it: frogging (because you "rip-it, rip-it").
The official tool for the job is a seam ripper, but honestly, your needle works perfectly for small fixes.
If you spot the mistake right away, just use the tip of your needle to gently lift the wrong stitch and pull the thread out. If you notice a bigger blunder much later, you might have to carefully snip and remove a whole section. The key here is to be patient and gentle. You don't want to tug so hard that you warp or damage your fabric.
And remember, a slightly imperfect stitch is part of the charm of a handmade piece. Don't stress over tiny flaws that, trust me, no one but you will ever see.
Can I Use a Different Fabric Count?
Absolutely! While 14-count Aida is the standard for beginners because it's so easy to see, switching fabric counts is a great way to change the look of your projects. You just need to know how it affects the final piece.
Here's the basic rundown:
- Higher Count (like 18-count or 22-count): The woven squares are smaller, which means your finished design will also be smaller and look more detailed, almost like a pixelated image. You’ll probably only need to use one strand of floss instead of the usual two.
- Lower Count (like 11-count or 8-count): Here, the squares are much bigger. This makes your finished piece larger and is fantastic for kids or anyone wanting a quick, chunky-looking project. You'll likely want to use three or more strands of floss to get good, full coverage on the fabric.
The main thing to remember is to adjust the number of floss strands you're using. You want the "X" to cover the fabric square nicely without being too bulky or too thin. Playing around with different fabrics is a really fun part of growing as a stitcher, so don't be afraid to experiment. Just don’t forget to resize your fabric cut to match!
Ready to turn your favorite photos into timeless art? At Cross Stitched, we make it simple to create a personalized cross-stitch kit from any picture. Preserve a cherished memory or craft the perfect handmade gift with our all-in-one kits. Start your custom project today.


