

Let's be honest, we've all been there. You're ready to settle in for a relaxing stitching session, but first, you have to spend ten minutes untangling a bird's nest of floss, hunting for your scissors, or trying to find that one specific needle. It’s enough to make you put the project away altogether. This is where a cross stitch project bag becomes your best friend.
Think of it as the command center for your hobby, designed specifically to keep everything neat, tidy, and right where you need it.
Your Essential Companion for Every Stitching Adventure
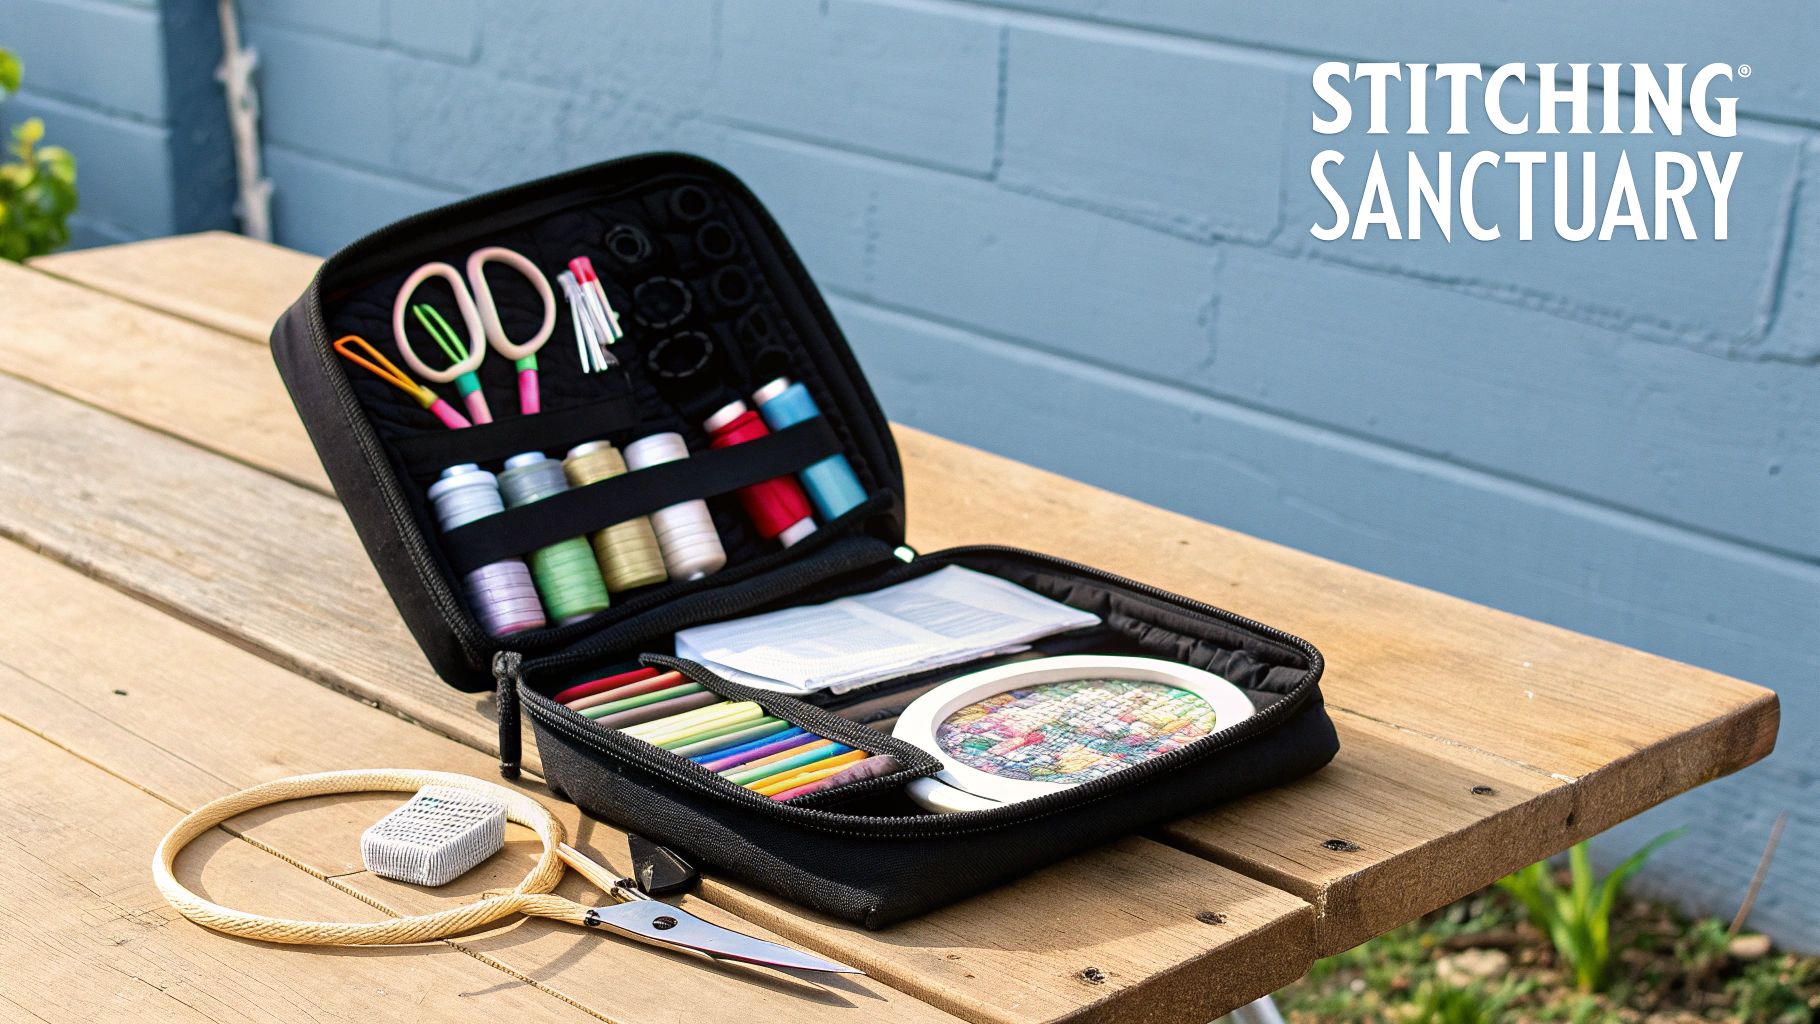
A good project bag is so much more than just a simple tote. It’s a thoughtfully designed system built to bring a sense of calm and order to your stitching life. Instead of chaos, you get efficiency.
With a proper bag, every single tool has its own designated spot—from your hoop and fabric right down to the tiniest needle minder. This kind of organization isn't just about saving time; it's about protecting your precious work-in-progress from dust, pet hair, or an accidental coffee spill.
The Rise of Organized Crafting
Cross stitch has seen a huge resurgence, with the global market valued at around $500 million back in 2018 and growing ever since. It's no surprise that as more people pick up a needle, they want to do it right. In fact, a whopping 72% of stitchers say they've bought accessories like project bags specifically to get their supplies in order.
This isn't just about being tidy for the sake of it. It's about making the creative process smoother and more enjoyable. When your supplies are organized, you create a more peaceful, focused space for yourself, letting you sink into that wonderful, meditative rhythm of stitching.
If you're just getting started and want to build your perfect kit from scratch, our guide on what you need for cross stitch is a great place to begin.
A well-chosen bag is the key to a serene and efficient stitching experience, ensuring every moment spent on your project is a joy, not a hunt for misplaced supplies.
At the end of the day, a cross stitch project bag is a small investment in your hobby that pays off big time. It makes your craft portable, protects your hard work, and just makes everything easier. That way, you can focus on what really matters: creating something beautiful, one stitch at a time.
Anatomy of the Perfect Cross stitch Project Bag

So, what really makes a good cross stitch project bag different from, say, a regular old tote bag? While you can technically use any bag to haul your stuff, the right one is built from the ground up with a stitcher's needs in mind. It's all about keeping your project safe, sound, and ridiculously organised.
Think of it like this: a professional photographer doesn't just toss their expensive camera into a backpack. They use a specialised camera bag with padded dividers, secure latches, and pockets for every lens and memory card. A proper project bag does the same thing for your fabric, floss, and tools.
Once you know what to look for, you'll be able to spot a great bag from a mile away and pick one that becomes your go-to stitching companion. Let's dig into the details.
What Is It Made Of? Material Matters
The fabric of your bag is its first line of defense against the outside world. The best choice really depends on how and where you stitch.
- Quilted Cotton: There's a reason this is such a popular choice. The soft, puffy layers create a cushioned home for your work, protecting it from getting squashed or creased. It's fantastic for keeping your hoops and Q-Snaps from getting bent out of shape.
- Durable Canvas: If you're someone who stitches on your commute or takes projects on holiday, canvas is your best friend. It’s tough, stands up to a lot of abuse, and won't mind being jostled around in a larger suitcase or carry-on.
- Clear Vinyl: A clear vinyl front is a brilliant feature, especially if you're a multi-project stitcher like me. It lets you see exactly which work-in-progress is inside without having to open a single zipper.
Honestly, some of the best bags combine these elements. You might find one with a rugged canvas exterior and a soft, padded cotton lining, giving you the best of both worlds—durability and protection.
How Does It Close? Construction Is Key
The way your bag opens and shuts might seem like a small detail, but it's incredibly important. A weak closure is just asking for a disaster of lost needles or a "floss-plosion" at the bottom of your bag.
A secure closure is the gatekeeper of your project. It’s what stands between your pristine Aida cloth and everything else—from dust bunnies at home to a sudden downpour on your way to a stitch-along.
My advice? Always look for a bag with a sturdy, high-quality zipper. Zippers create the most secure seal, keeping every last thread and tool safely inside. Snaps or magnetic buttons might seem quicker, but they can easily pop open, letting small treasures like your favourite needle minder or tiny scissors make a break for it.
Pay attention to the bag's overall structure, too. Does it feel firm, or is it floppy? A well-made bag will have something called fusible fleece or interfacing sewn between the fabric layers. This gives the bag its shape and adds that crucial layer of padding that prevents your delicate work from being crushed. A great cross stitch project bag is basically a little fortress for your art.
Finding the Right Size and Style for Your Projects
Think of picking a cross stitch project bag like choosing a suitcase. You wouldn't pack for a two-week European vacation in a tiny carry-on, right? In the same way, the little pouch that’s perfect for a Christmas ornament kit just won’t cut it for a huge, full-coverage piece stretched on an 11-inch Q-Snap. The whole idea is to find a bag that's a perfect match for both your project and how you actually stitch.
It really comes down to matching the bag to your personal workflow. Forget searching for one "perfect" bag that does it all. Instead, focus on finding the right bag for the project you’re working on right now. Are you someone who stitches in the same cozy chair every night, or do you like to take your projects with you to appointments, on your commute, or on vacation? Knowing this will point you in the right direction.
Matching Bag Size to Your Project
Here's a simple rule of thumb: measure your hoop or frame, then add at least two inches to both the length and width. That little bit of extra room is a game-changer. It means you won't have to wrestle with the zipper, and more importantly, it keeps your fabric from getting all wrinkled and crushed.
- Small Pouches (around 8" x 10"): These are your go-to for tiny projects on a 4- to 6-inch hoop. Think ornaments, greeting cards, or a cute biscornu. They’re small enough to just toss in your purse.
- Medium Bags (around 11" x 13"): This is the workhorse size. It’s a great fit for most average projects on an 8- or 9-inch hoop. You’ll have plenty of space for your project, floss, and a few key tools without feeling like you're lugging around a giant tote.
- Large Totes (13" x 15" and up): When you're tackling the big stuff, you need one of these. They’re designed to easily hold an 11x11 inch Q-Snap or a larger scroll frame, making them a must-have for those epic, full-coverage pieces.
Choosing a Style That Suits You
Size is just one part of the equation. The actual design of the bag makes a huge difference in how you'll use it every day. Different styles work better for different people, depending on how organized (or chaotic!) you like to be.
Your project bag is basically your mobile stitching studio. The style should feel natural to your creative process, whether you're a minimalist or you need a portable command center with a designated spot for absolutely everything.
Simple, flat "envelope" style bags are wonderfully sleek and slide easily into a backpack or another larger bag. But if you need more room, look for a gusseted bag. That flat bottom allows it to stand up on its own and gives you more interior space for bulkier things like floss boxes or grime guards.
It's no surprise that within the cross-stitching world, something like 65% of stitchers use a dedicated bag for exactly this reason. If you browse through any craft marketplace, you'll notice that sizes like 13.5 x 15 inches—perfect for 11x11 QSnaps—are everywhere. This trend clearly shows that stitchers want bags that can handle their more ambitious projects. For anyone curious about the wider craft market, you can explore more insights on DimensionMarketResearch.com.
At the end of the day, the best cross stitch project bag is the one that feels like a natural part of your hobby. It’s there to make things easier, not add another layer of hassle. By thinking about the size of your projects and your own personal stitching habits, you’ll find a bag that makes every single stitch that much more organized and enjoyable.
How to Pack Your Project Bag for Peak Efficiency
A well-organized cross stitch project bag is your secret weapon for a truly relaxing stitch session. I like to think of it like a chef prepping their ingredients before they start cooking—that whole mise en place concept. When everything has its place, the creative process just flows. Packing your bag with that same intention turns it from a simple pouch into your personal stitching sanctuary.
The whole point is to make stitching easier. You want to spend your precious time with needle and thread, not digging through a jumbled mess for your scissors or trying to untangle a knot of floss. A smartly packed bag means every tool is exactly where you expect it to be, ready to go the moment you are.
This simple, three-step approach helps you think through what bag you need before you even start packing.
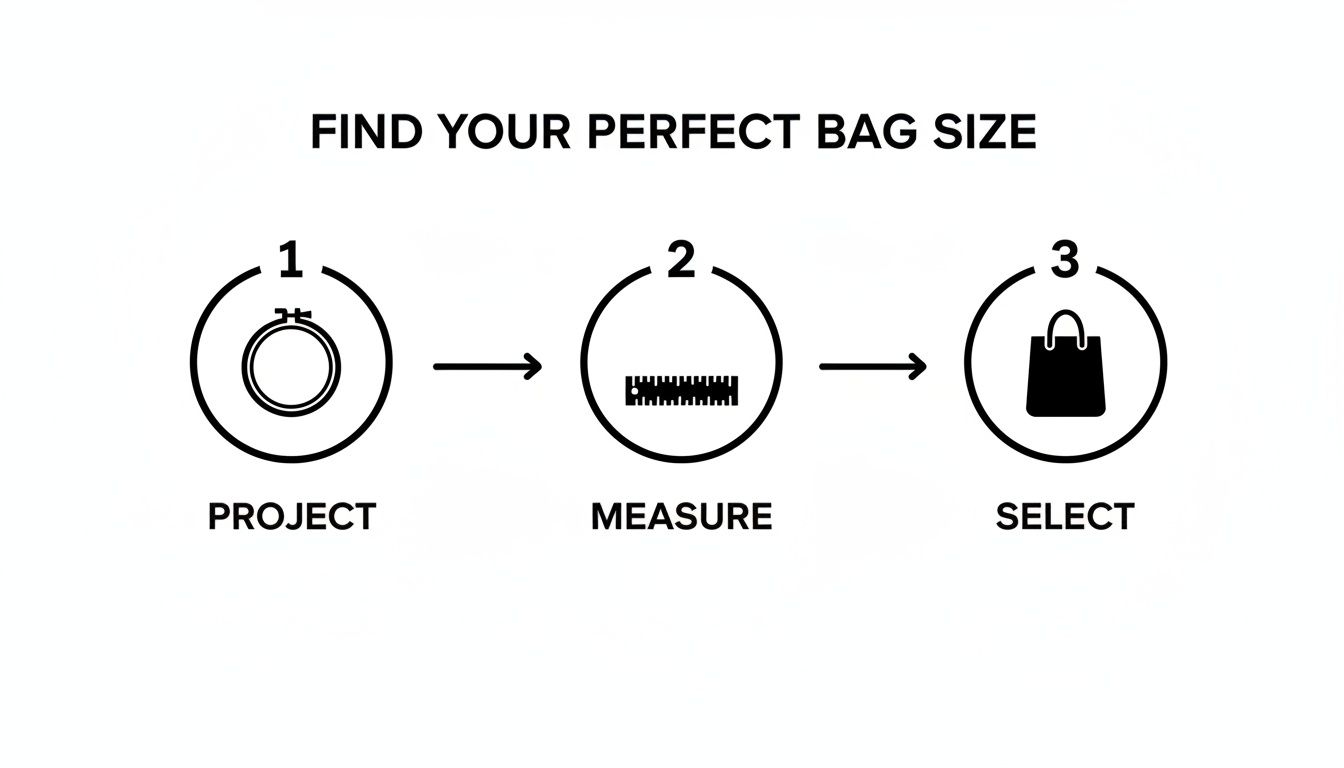
The idea is simple: start with your project's size—including the hoop or frame—and then find a bag that gives it plenty of room without being too big.
The Core Foundation: Your Project
First things first, let's get your actual work-in-progress settled. Gently place your fabric, already mounted in its hoop, Q-Snap, or scroll frame, into the main compartment. This is the heart of your kit, and everything else will fit in around it.
Make sure it lies flat and isn't crammed in. Forcing it can leave nasty creases in your fabric or even damage your frame. If your bag has a padded section, that's the ideal spot for it.
Layering Your Essential Tools
With your project safely tucked away, it's time to add your tools. I find it helps to think in layers, going from the biggest items down to the smallest. This method keeps your tiny, easy-to-lose notions from vanishing into the bottom of the bag.
- Your Pattern: Whether you're working from a paper chart or a tablet, slide it into a separate pocket. I always slip my paper patterns into a plastic sleeve—it’s saved me from more than one coffee spill!
- Scissors and Snippers: Pop your embroidery scissors into a dedicated interior pocket. This keeps their sharp tips safely away from your project fabric and threads.
- Needles and Minders: A magnetic needle minder is a game-changer. Keep it right on your fabric so your needle in use is always secure. I store my spare needles in a little magnetic case or a small tube.
A well-packed bag should work like a perfectly organized toolkit. You shouldn't have to hunt for anything. Each tool should have its own home, making your stitching time that much more peaceful.
Taming the Thread
And now, for the floss. This is usually what causes the most chaos in a project bag. Tossing loose skeins in is just asking for a tangled nightmare. Instead, commit to a system.
- Bobbins: Winding your floss onto bobbins and keeping them in a small, clear case is a classic for a reason. It works.
- Floss Drops: For projects with tons of colors, floss drops on a metal ring are fantastic. You can see everything at a glance.
Whatever system you choose, put it in its own small pouch or a large interior pocket. Keeping your floss contained is the final, crucial step to creating a perfectly tidy little world inside your bag. If you're ready to tackle your entire stash, we've got more tips in our guide on how to organize craft supplies.
Must-Have Accessories to Elevate Your Organization
A great cross stitch project bag is your home base, but the right accessories are what truly transform it into a portable, perfectly organized stitching sanctuary. These are the little things that work with your bag to make sure every tool has its place and your project stays flawless from the first stitch to the last.
Think of it less like just adding more stuff and more like building a smart, complete toolkit. The goal is simple: spend less time digging for a needle and more time actually stitching.
Smart Tools for a Tidy Kit
The best add-ons are the ones that make you wonder how you ever stitched without them. They're often small, simple solutions to those incredibly frustrating little problems, like knotted floss or a needle that’s vanished into thin air.
- Magnetic Needle Minders: Honestly, these are a non-negotiable for me. A needle minder is just a tiny, decorative magnet set that holds your needle securely on your fabric when you pause. No more lost needles in the sofa!
- Grime Guards: If you work on larger projects, you need one of these. It's a simple elasticated fabric cover that fits snugly around your hoop or Q-Snap, keeping the edges of your Aida clean from the natural oils on your hands.
- Floss Organizers: Get ahead of the thread chaos before it even thinks about starting. Whether you prefer winding your floss onto plastic bobbins and storing them in a case or using floss drops on a ring, having a system is key. It keeps your colors sorted, untangled, and ready to go.
A well-accessorized project bag is like a chef's prepped mise en place. Everything is clean, organized, and right where you need it, letting you get lost in the creative flow without any frustrating interruptions.
Expanding Your Organizational Power
To really take your setup to the next level, think about adding another layer of organization inside your bag. Using smaller, separate pouches to group items is a fantastic trick. You can take this even further, as many stitchers have found, by using packing cubes for superior organization. They're perfect for corralling a full floss set for one project or keeping all your scissors and snips together.
By adding just a few of these key pieces, you turn your bag from a simple storage tote into a highly efficient, grab-and-go system. For a deeper look into all the handy tools out there, be sure to check out our complete guide to essential cross-stitching accessories that make the hobby even more of a joy.
Caring for Your Bag So It Lasts for Years
Your cross stitch project bag is more than just a carrier; it's a trusty sidekick on your creative journey. And just like any good tool, a little bit of care will ensure it stays with you through countless projects to come. A few simple habits can protect your investment and keep your bag looking and working great.
Think of it this way: you wouldn't toss your best scissors in a dusty drawer, right? Giving your bag the same attention prevents small issues from turning into major wear and tear down the line.
Keeping Your Bag Clean
Most bags will come with care instructions from the maker, but if yours didn't, don't worry. Here are some solid rules of thumb to follow. Just remember to always test any cleaning method on a small, hidden spot first!
-
Cotton & Canvas: The workhorses of the project bag world! Many handmade bags made from these sturdy fabrics can be popped into the washing machine on a gentle, cool cycle. To give it extra protection, place the bag inside a mesh laundry bag first. Always, always let it air dry to avoid any shrinking or misshaping.
-
Vinyl Windows: If your bag has one of those handy clear vinyl windows, keep it away from the washing machine. A simple wipe-down with a soft, damp cloth is all it needs to stay crystal clear.
-
Spot Cleaning: For those little "oops" moments like a coffee drip or a pen mark, spot cleaning is your best friend. Mix a tiny bit of mild detergent with water, dab it gently onto the spot with a clean cloth, and you're good to go.
Just as proper cleaning extends the life of your bag, caring for all your creative essentials is key. For example, learning about maintaining your crafting tools can preserve them for years of enjoyment.
Proper storage is just as important as cleaning. Try to keep your bag out of direct sunlight for long periods, as that can cause the beautiful fabric colors to fade. It's also a good idea not to overstuff it—that puts a lot of stress on the zippers and seams over time.
Your Project Bag Questions, Answered
Jumping into the world of stitching accessories can feel a little overwhelming. When you're trying to pick the perfect cross stitch project bag, a few common questions always seem to pop up. Let's get them cleared up so you can find a bag that genuinely makes your hobby better.
A big one I hear a lot is, "Can't I just use a regular tote bag?" And sure, you absolutely can. But a bag designed specifically for stitching is a game-changer for protecting your work. These bags often have soft linings that stop your fabric from snagging and secure zipper closures—things most totes just don't have. It's the difference between tossing your project in a bag and giving it a safe, dedicated home.
What's the Best Material for a Project Bag?
This really comes down to your personal stitching style and where you take your projects. Quilted cotton is a huge favorite in the community, and for good reason. The layers offer fantastic padding, which helps protect your hoops and frames from getting bent or damaged.
If you're a stitcher on the go, you can't go wrong with canvas. It's incredibly durable and built to last. Many of the best bags actually use both, pairing a tough canvas exterior with a soft, protective interior. Another feature I absolutely love is a clear vinyl front—it lets you see exactly which work-in-progress is inside without even opening the bag. It’s perfect for those of us who can't help but have multiple projects going at once!
The right cross stitch project bag does more than just hold your stuff. It creates a portable, organized sanctuary that makes your stitching time calmer and way more productive.
How Do I Stop My Floss from Tangling in the Bag?
Ah, the dreaded floss tangle! Keeping your threads neat is the secret to a happy stitching session. The best way to prevent a knotted mess inside your bag is to get your floss organized before you even start packing.
Winding your threads onto plastic bobbins and keeping them in a small organizer box is a classic for a reason—it just works. For bigger projects with a ton of colors, I find floss drops on a metal ring are a lifesaver. Whichever method you choose, tuck your organized floss into its own separate pouch or a dedicated pocket inside your bag. This little step stops tangles before they ever have a chance to start.
What Size Bag Do I Need for My Q-Snap?
Figuring out the right size for a Q-Snap frame is easier than you think. Just lay your frame flat, measure its length and width, and then add at least one to two inches to both of those measurements.
So, if you have an 11x11 inch Q-Snap, you'll want a bag that’s at least 13x13 inches. That little bit of extra room is crucial! It lets you zip the bag closed without a struggle and, more importantly, keeps your fabric from getting all creased and wrinkled.
Ready to find the perfect home for your next masterpiece? Take a look at the wonderful collection of patterns and accessories over at Cross Stitched. You can build a personalized kit to turn one of your own cherished photos into a work of art. Discover your next project today!


