

So, you're curious about cross stitch? A beginner kit is, without a doubt, the best way to get your feet wet. It’s essentially a project in a box—everything you need is right there, which means you can skip the confusing trip to the craft store and get straight to the fun part: stitching.
Your Journey into Cross Stitch Starts Here
Jumping into a new hobby can be intimidating. Walk into any craft store and you'll see a whole wall of different fabrics, a rainbow of threads, and a dozen kinds of needles. It's a lot to take in! The beauty of a good beginner kit is that it cuts through all that noise. Someone has already picked out the perfect fabric, counted out the right amount of thread, and included the right size needle, so you can just relax and learn the rhythm of stitching.
This isn't just a happy accident. We're seeing a huge comeback in hands-on hobbies as people look for a real, tangible way to unwind. In fact, the global market for needlecraft patterns is expected to climb from $34.0 billion in 2025 to $63.8 billion by 2035. It's clear that more and more people are rediscovering the joy of making something with their own two hands.
What’s Inside the Box?
Every piece in your kit has a job to do, and they all work together to help you create your final piece. Once you understand the role of each tool, the whole process feels much less mysterious. Think of the fabric as your canvas and the colorful threads as your paint—each element is there to make sure your first project is a success.
A great beginner kit doesn’t just give you materials; it gives you a clear path from start to finish. It takes the frustration out of the learning curve and lets you focus on the pure enjoyment of watching a picture appear from your very first stitch.
As you get started, you'll find that keeping your new tools in order makes the whole experience much smoother. For some fantastic tips on creating a calm and tidy workspace, check out this guide to organizing your sewing supplies.
Let's take a closer look at the essential tools you'll find in nearly every beginner kit.
Anatomy of a Cross Stitch Beginner Kit
Here's a quick look at the essential tools inside a standard kit and the role each one plays in your project.
| Component | What It Is | Its Role in Your Project |
|---|---|---|
| Aida Fabric | A cotton fabric woven with a handy grid of easy-to-see squares. | This is your canvas. The grid makes it simple to place your stitches perfectly. |
| Embroidery Floss | Colorful thread, usually cotton, that can be split into six smaller strands. | This is your "paint." You'll use it to create the picture, one "X" at a time. |
| Tapestry Needle | A needle with a blunt tip and a big eye, making it easy to thread. | It's designed to slide cleanly through the holes in Aida fabric without snagging. |
| Pattern Chart | Your printed guide, full of symbols that tell you which thread color to use. | Think of it as your map or blueprint, showing you exactly where every stitch goes. |
| Embroidery Hoop | A pair of rings (often wood or plastic) that clamp your fabric tightly. | This keeps your fabric taut, helping you make neat, even stitches. |
With these five simple tools, you have everything you need to create a beautiful piece of art.
Decoding The Materials In Your Kit
Opening your first cross stitch kit feels a bit like unlocking a small treasure chest. Inside, you'll find everything you need to get started, with each piece carefully chosen to make your first project a fun and rewarding success. Let's take a look at what's inside and why it's there.
This simple breakdown shows how the core components—fabric, thread, and a needle—are the foundation of any kit.
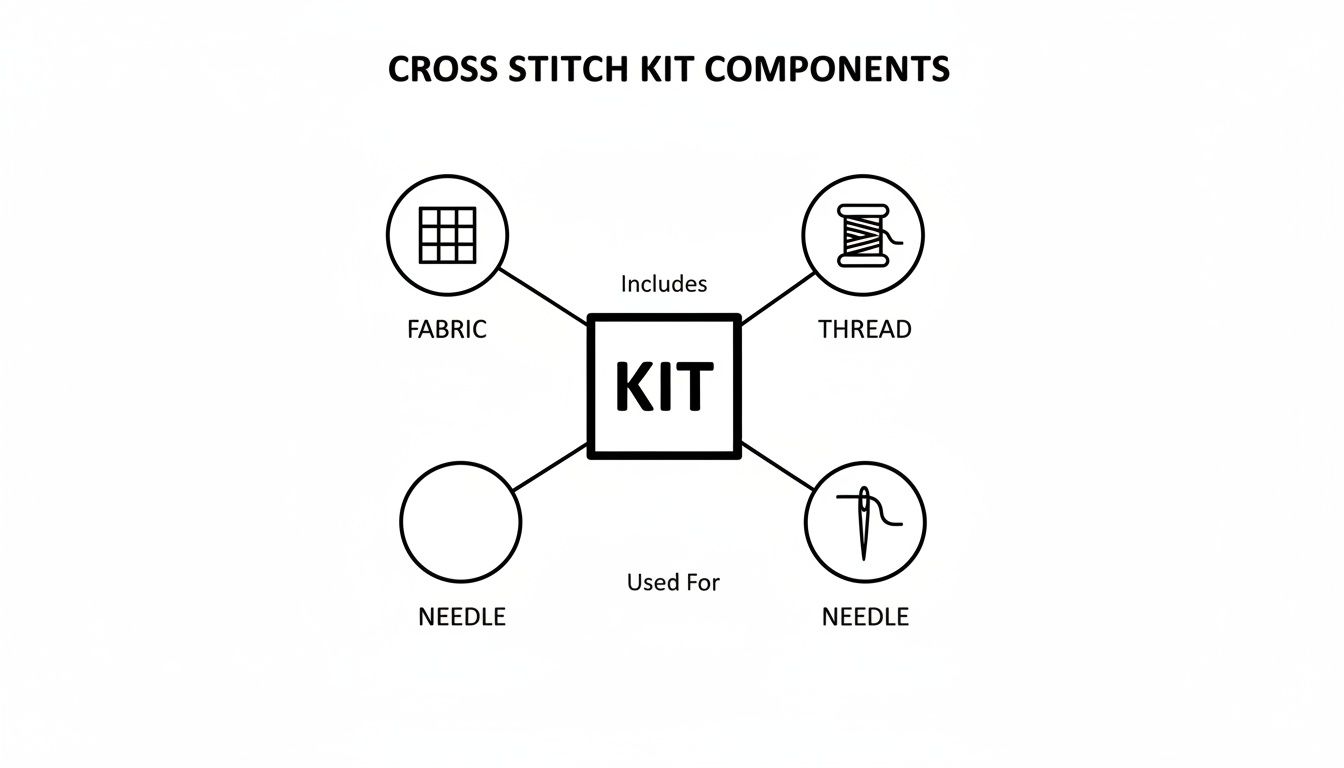
Think of it this way: every single element works together to help you turn that blank canvas into a finished piece of art.
Understanding Your Canvas: Aida Fabric
The fabric included in a beginner's kit is almost always Aida cloth. It's the perfect learning canvas, designed with a natural grid of tiny woven squares that makes it incredibly easy to see exactly where your needle needs to go. This structure helps ensure your stitches come out looking uniform and neat, which is a massive confidence booster when you're just starting out.
The most important thing to know about Aida is its "count." This number simply tells you how many squares (and therefore, stitches) fit into one inch of the fabric. A lower count means bigger squares, and bigger squares make for a much easier stitching experience.
For a first-timer, a low-count Aida fabric is your best friend. It reduces eye strain and makes the process of forming each 'X' much more forgiving, letting you focus on the rhythm of stitching rather than searching for the right hole.
Most beginner kits come with 14-count Aida. It's pretty much the industry standard, hitting that sweet spot between being easy to see and detailed enough for a beautiful final picture. It’s large enough to work with comfortably but small enough to create a clear, crisp image once you're done.
To get a better sense of how this works, take a look at how different Aida counts can change the whole look and feel of a project.
How Aida Count Shapes Your Project
See how the fabric's 'count' (stitches per inch) influences the size, detail, and difficulty of your design.
| Aida Count | Stitches Per Inch | Ideal For | Final Appearance |
|---|---|---|---|
| 6-10 | 6 to 10 | Children's projects, quick stitches, chunky yarn | Very large, blocky stitches; low detail |
| 11-14 | 11 to 14 | Beginners, clear designs, standard projects | Well-defined stitches, good detail |
| 16-18 | 16 to 18 | Intermediate stitchers, more detailed patterns | Smaller, tighter stitches; finer detail |
| 20+ | 20 and up | Advanced stitchers, highly detailed photorealism | Very fine, almost seamless pixel-like appearance |
As you can see, starting with a 14-count is the perfect way to ease into the craft without feeling overwhelmed.
The Heart Of Your Project: Thread And Needles
Next up is the most colourful part of your kit: the embroidery floss. This is the "paint" you'll use to bring your design to life. Most high-quality kits, including ours, use DMC brand cotton floss. It’s a favourite among stitchers everywhere for its vibrant, fade-resistant colours and overall durability.
You'll notice that each length of floss is actually made of six individual strands twisted together. Your pattern will tell you exactly how many strands to use for each stitch—it's usually two for the main design and one for fine details or outlines. Sticking to this is key for getting the right texture and coverage.
Your kit also includes a special tapestry needle. Unlike a sharp sewing needle, a tapestry needle has a blunt tip and a larger eye. This is totally intentional. The blunt tip glides easily through the holes in the Aida fabric without snagging the threads, and the large eye makes threading your floss so much less frustrating. You can dive deeper into all the essential tools in our detailed guide to cross stitching materials.
Your Roadmap: The Pattern Chart
Finally, the most critical piece of guidance in your kit is the pattern chart. This is your map, your blueprint, your stitch-by-numbers guide. It might look like a confusing grid of symbols at first glance, but it's actually a beautifully simple system.
Here's how it works:
- Each square on the grid corresponds to one square on your Aida fabric.
- Each symbol inside a square represents a specific colour of floss.
- A colour key or legend is always included, matching each symbol to its unique DMC thread number.
You just find a symbol on the chart, grab the matching thread, and make a cross stitch on the corresponding square of your fabric. It’s a wonderfully logical process that breaks a complex image down into simple, manageable steps.
How to Choose the Right Beginner Kit for You
Diving into the world of cross stitch is exciting, but let's be honest—the sheer variety of designs can feel a little overwhelming at first. When you're faced with so many options, how do you find the perfect cross stitch beginner kit? The secret is surprisingly simple: pick a design you absolutely love.
Think of it like choosing a book. You're way more likely to finish a story that grabs you from the first page. It’s the exact same with stitching. Your enthusiasm is the most important tool you have, and a pattern that genuinely excites you will keep you stitching all the way to that proud final-stitch moment.
Start with a Design That Sparks Joy
Before you get tangled up in the technical details, just browse. What catches your eye? Are you drawn to quirky quotes, charming florals, modern geometric shapes, or cute little animals? Your personal taste is what matters most. A project should feel like you, not like a chore.
When you have a real connection to what you're making, the craft becomes so much more than just a hobby. You'll find a genuine sense of calm and satisfaction in every little 'X' you make. That feeling is crucial when you're just starting out and building momentum.
Keep It Simple, Keep It Small
Once you've got a style in mind, it's time to narrow it down by looking at the project’s complexity. For your first go, simplicity is your best friend. Look for kits that have:
- Fewer Colours: A design with 10-15 colours is much easier to manage than one with 40. You’ll spend less time fussing with changing threads and more time getting into a smooth, relaxing rhythm.
- Big Blocks of Colour: Patterns with large, solid areas of one colour are fantastic for learning. They let you practice making your stitches neat and even without the headache of changing floss every two seconds—a common feature in more advanced "confetti" patterns.
- Smaller Dimensions: A small project means a fast finish. Completing a little 4x4 inch design over a weekend gives you an incredible confidence boost. It’s a quick win that makes you eager to tackle something bigger next time.
Choosing a small, simple kit for your first project is like learning to ride a bike with training wheels. It gives you the stability to learn the ropes and the satisfaction of a quick success, making you feel ready for bigger challenges without the frustration.
This approach makes sure your first experience is a great one, setting you up for a lifetime of happy stitching. Our guide on the best beginner cross stitch kits has even more tips for finding that perfect first project.
The Magic of a Personalised Photo Kit
Want a first project that’s guaranteed to keep you motivated? Turn a favorite memory into a cross stitch pattern. A custom photo-to-pattern kit, like the ones we create here at Cross Stitched, can transform a picture of a beloved pet, a family photo, or a snapshot from a dream vacation into your own unique piece of art.
This adds a powerful emotional connection to your crafting. Stitching the face of someone you love or a place that means the world to you makes the project more than just a craft—it becomes a treasured keepsake in the making. These kits are designed to be totally beginner-friendly, with everything you need to bring your photo to life, one stitch at a time.
Choosing a Kit as a Thoughtful Gift
A cross stitch beginner kit is also a fantastic gift, giving someone a chance to slow down, unwind, and create something beautiful with their own hands. When picking one out for a friend or family member, think about what they love.
- For the Nature Lover: Find a kit with botanical prints, a peaceful landscape, or their favorite animal.
- For the Bookworm: How about a design with a quote from a classic novel or a fun literary theme?
- For the Homebody: A cozy scene, a welcoming phrase, or a modern pattern that will look great with their decor is always a winner.
Matching the kit to their personality shows you put real thought into it and makes them that much more excited to start. For an extra special touch, a personalized photo kit is an incredibly heartfelt gift, turning a shared memory into something they can create and cherish forever.
Your First Stitches: A Step-by-Step Guide
Alright, the moment of truth. You’ve got your cross stitch beginner kit, you’ve unboxed all the goodies, and now it’s time to actually make that first stitch. This part can feel a little intimidating, but trust me, it’s the gateway to a wonderfully relaxing and satisfying hobby. Let go of perfection for now—the only goal here is to get started and find your rhythm.
Think of this as a friendly walkthrough to get your materials ready and create those first few foundational stitches. It's less about rigid rules and more about getting you comfortable and on your way. Let's dive in.
Preparing Your Fabric and Thread
Before you make that first 'X', a little prep work will make everything go so much smoother. Getting your fabric and thread ready from the get-go helps you sidestep some common frustrations right out of the gate.
First up, the fabric. Your Aida cloth is likely pre-cut, but it might have some creases from being folded in the package. If it's wrinkly, a quick pass with an iron on a low setting will sort it out (pop a tea towel between the iron and the Aida just to be safe).
Next, you need to find the center of your fabric. This is super easy: just fold it in half one way, then fold it in half the other way. The point where the two creases cross is your center. You can stick a pin in it or use a water-soluble fabric marker to mark the spot. Your pattern will also have its center marked, usually with arrows. Starting in the middle guarantees your design will be perfectly centered when it’s all done.
Now for the thread. The embroidery floss in your kit is made up of six tiny strands all twisted together. Your pattern will tell you how many strands to use, but for most beginner projects, it’s usually two strands.
- Cut a piece of floss about 18 inches long—a good rule of thumb is the length from your fingertips to your elbow.
- Gently pull two individual strands away from the other four. Do it slowly and they’ll separate without getting into a tangled mess.
- Thread these two strands through the eye of your needle.
Reading Your Pattern Chart
Your pattern is your roadmap. At first glance, it might look like a cryptic grid of symbols, but it's actually a beautifully simple system. Think of it like a paint-by-numbers, but with thread.
Every single square on that chart represents one cross stitch on your Aida fabric. Inside each square is a symbol, which tells you what color thread to use for that stitch. Your kit includes a key or legend that matches each symbol to a specific thread color number (for example, a black circle might correspond to "DMC 310," which is black). Your job is to simply match the symbol on the chart to the right color, and make your 'X' on the fabric.
A pattern chart is a genius way of breaking down a complex image into simple, manageable steps. It takes all the guesswork out, so you can just relax into the meditative motion of stitching and watch the picture appear.
Creating Your First Cross Stitch
With your fabric prepped and needle threaded, it's go-time. We're going to use what's called the “Danish method,” which is great for beginners. It involves stitching a whole row of half stitches first (///), and then coming back across the row to complete the 'X's. This technique keeps the back of your work looking surprisingly neat.
- Start Your First Half Stitch: From the back of the fabric, bring your needle up through the bottom-left hole of one square. Pull the thread all the way through, leaving a little tail at the back (you can hold it in place with your finger).
- Complete the Half Stitch: Now, push the needle down through the top-right hole of the same square. You've just made a single diagonal half stitch: /.
- Continue the Row: Come up again in the bottom-left hole of the square right next to it and repeat the process. Keep going until you have a neat row of parallel stitches: ///.
- Complete the Crosses: When you get to the end of the row for that color, it's time to head back. Bring your needle up through the bottom-right hole of the very last square you stitched.
- Finish the 'X': Go down through the top-left hole. Boom! You’ve made your first complete cross stitch. Continue this all the way back along the row, turning all your half stitches into full 'X's.
That simple, rhythmic motion is the heart and soul of cross stitch. For a closer look at different stitching methods, like the knotless loop start, be sure to check out our guide to basic cross stitch stitches.
And just like that, you're officially a cross stitcher. Congratulations
Common Beginner Mistakes and How to Fix Them
Every creative journey has a few bumps in the road, and cross stitch is no exception. Trust me, every single expert stitcher once tangled their thread into an unsalvageable knot or miscounted an entire row. These little hiccups aren't failures; they’re how you really learn the craft. A good cross stitch beginner kit gives you the tools, but learning to navigate these slip-ups is what gives you the confidence to finish your project with pride.
Think of these early mistakes as your official initiation into the stitching community. There's a reason the demand for these kits is soaring—it's largely driven by wonderfully welcoming online groups where beginners can show off their progress and ask for help. It’s part of a huge crafting boom, with platforms like Etsy seeing millions in sales from starter kits as more people discover the joy of creating something with their own hands. If you're curious about the numbers, you can read the full market research on needlecraft patterns.
Let's walk through some of the most common snags and turn those potential frustrations into easy fixes.
Managing Pesky Thread Knots
Ah, the dreaded thread knot. It’s the number one frustration for almost every newcomer. You're happily stitching along, and then suddenly you feel a snag. You flip your work over to find a tangled bird's nest. This usually happens for one of two reasons: your thread is way too long, or it's gotten twisted up as you stitch.
The fix, thankfully, is wonderfully simple. First, always use shorter lengths of floss. I recommend an 18-inch piece, which is roughly the length from your fingertips to your elbow. It’s long enough that you aren't constantly re-threading your needle, but short enough to keep tangles at bay.
Second, get into the habit of letting your needle dangle every few stitches. As you work, the thread naturally twists on itself. By just letting your needle and thread hang free for a second, it will automatically untwist, stopping knots before they even start.
Achieving Consistent Stitch Tension
Ever look at your work and notice that some of your 'X's are tight and puckered while others are loose and loopy? That’s a tension issue. The goal is to create stitches that lie flat and smoothly cover the fabric without warping it. When your tension is all over the place, the final piece can look bumpy and uneven.
Here’s how to get that smooth, professional finish:
- Use an Embroidery Hoop: This is non-negotiable for beginners. A hoop keeps your fabric taut like a tiny drum, giving you a stable surface that makes it so much easier to pull each stitch with consistent pressure.
- Don't Pull Too Tight: Think of your stitches as gently hugging the fabric, not strangling it. Each leg of the 'X' should be just taut enough to lie flat without pulling on the Aida cloth.
- Let the Needle Do the Work: The blunt tapestry needle in your kit is designed to glide right through the holes in the Aida. Trust it. There's no need to force it or yank the thread through.
"Perfect tension isn't about pulling hard; it's about finding a gentle, consistent rhythm. Your stitches should look like they are resting comfortably on the fabric, not fighting with it. Relax your hands, and your stitches will relax too."
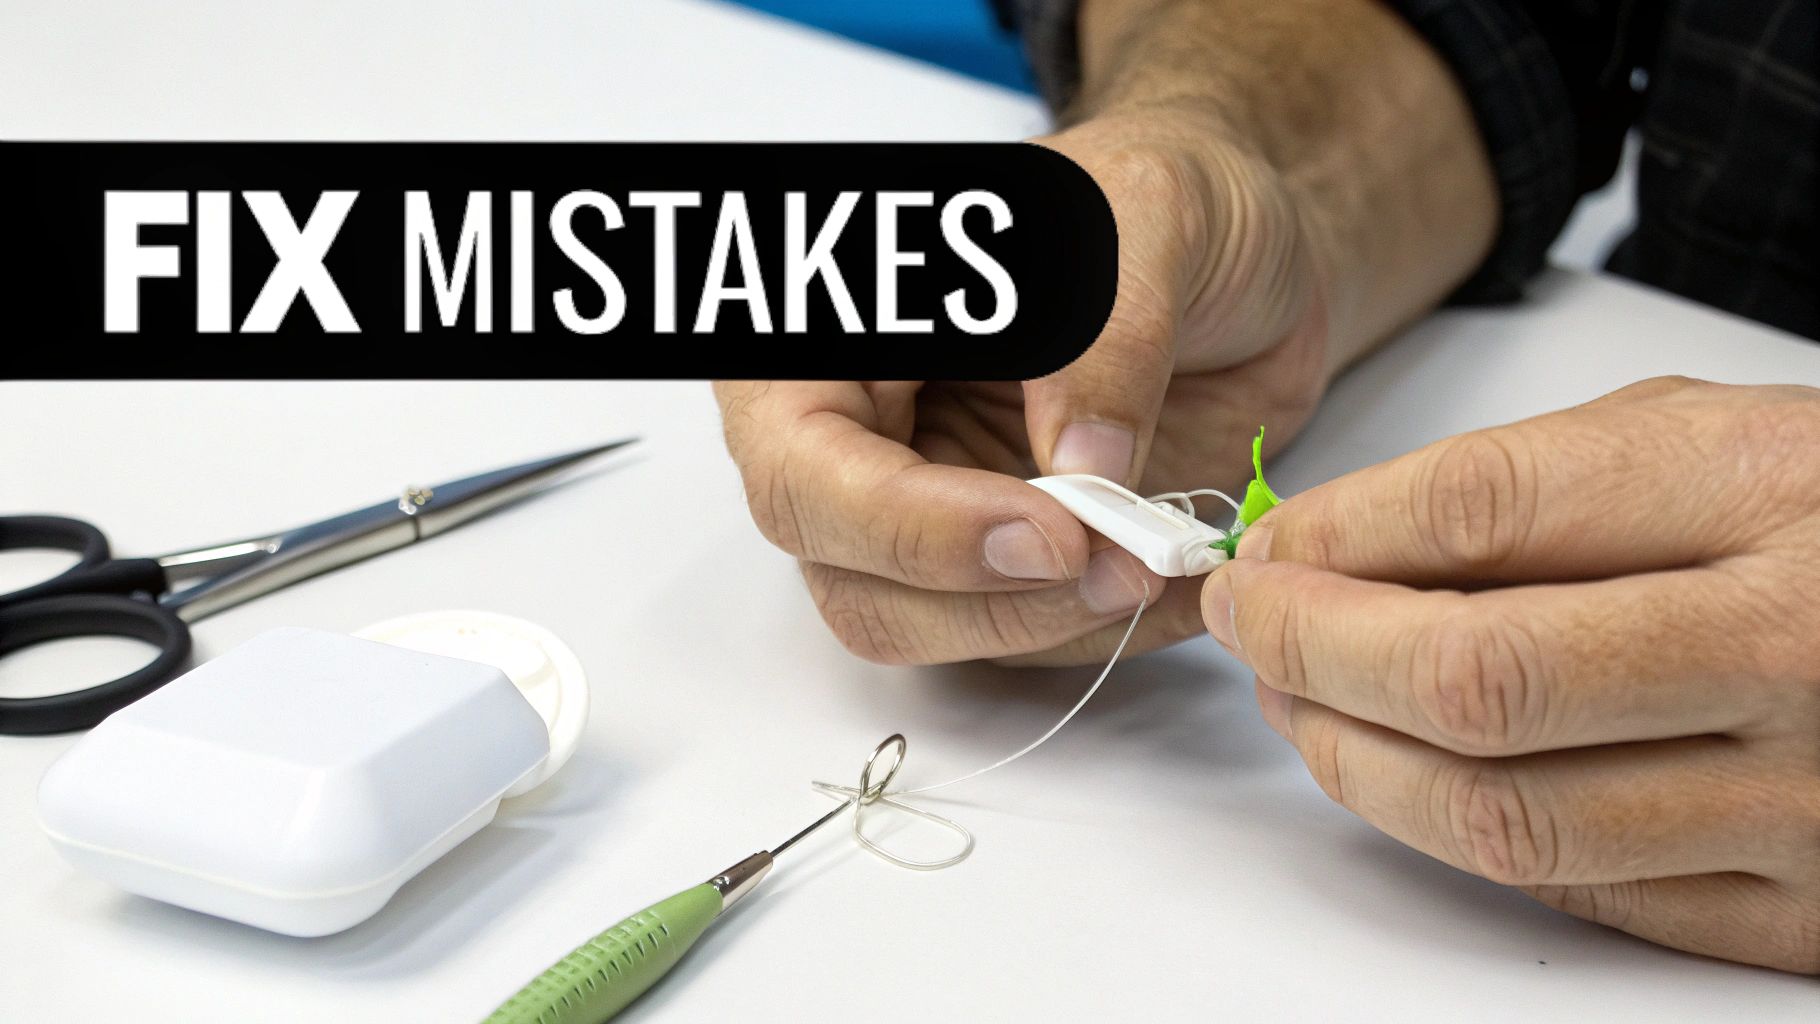
Fixing Miscounted Stitches
It happens to all of us. You get into a rhythm, stitching away, and suddenly you realize you’ve put five blue squares in a spot that was supposed to have only four. Don't panic! Welcome to the art of "frogging." It's called that because you have to "rip-it, rip-it" (get it?).
To frog your stitches, just turn your hoop over and use the tip of your needle to gently slide under the last part of the incorrect stitch on the back. Carefully pull, and the stitch on the front will undo itself. Work backward one stitch at a time until you're back to where you went wrong.
It’s always better to fix a small mistake as soon as you spot it. Taking a moment to correct your path is so much less painful than discovering the error ten rows later and ensures your masterpiece looks exactly as you envisioned.
Finishing and Displaying Your Creation
That feeling when you make the very last stitch? It's pure magic. But you're not quite done yet! Now comes the fun part: turning your project into a little piece of art that’s ready to show off. These finishing touches are what make your work look polished and professional, ensuring it lasts for years.
First things first, let's give it a gentle wash. All those hours of stitching mean oils from your hands and a bit of dust have probably settled on the fabric. Just hand wash it in some cool water with a tiny drop of mild soap. Swish it around carefully, rinse it well, and then roll it up in a clean towel to squeeze out the extra water. Whatever you do, don't wring it out!
Let it air dry on a flat surface. When it's still just a little bit damp, place it face down on a thick, clean towel and press it with an iron from the back. Use a low-to-medium heat setting. This nifty trick gets rid of any hoop marks and wrinkles without squashing your beautiful, plump stitches.
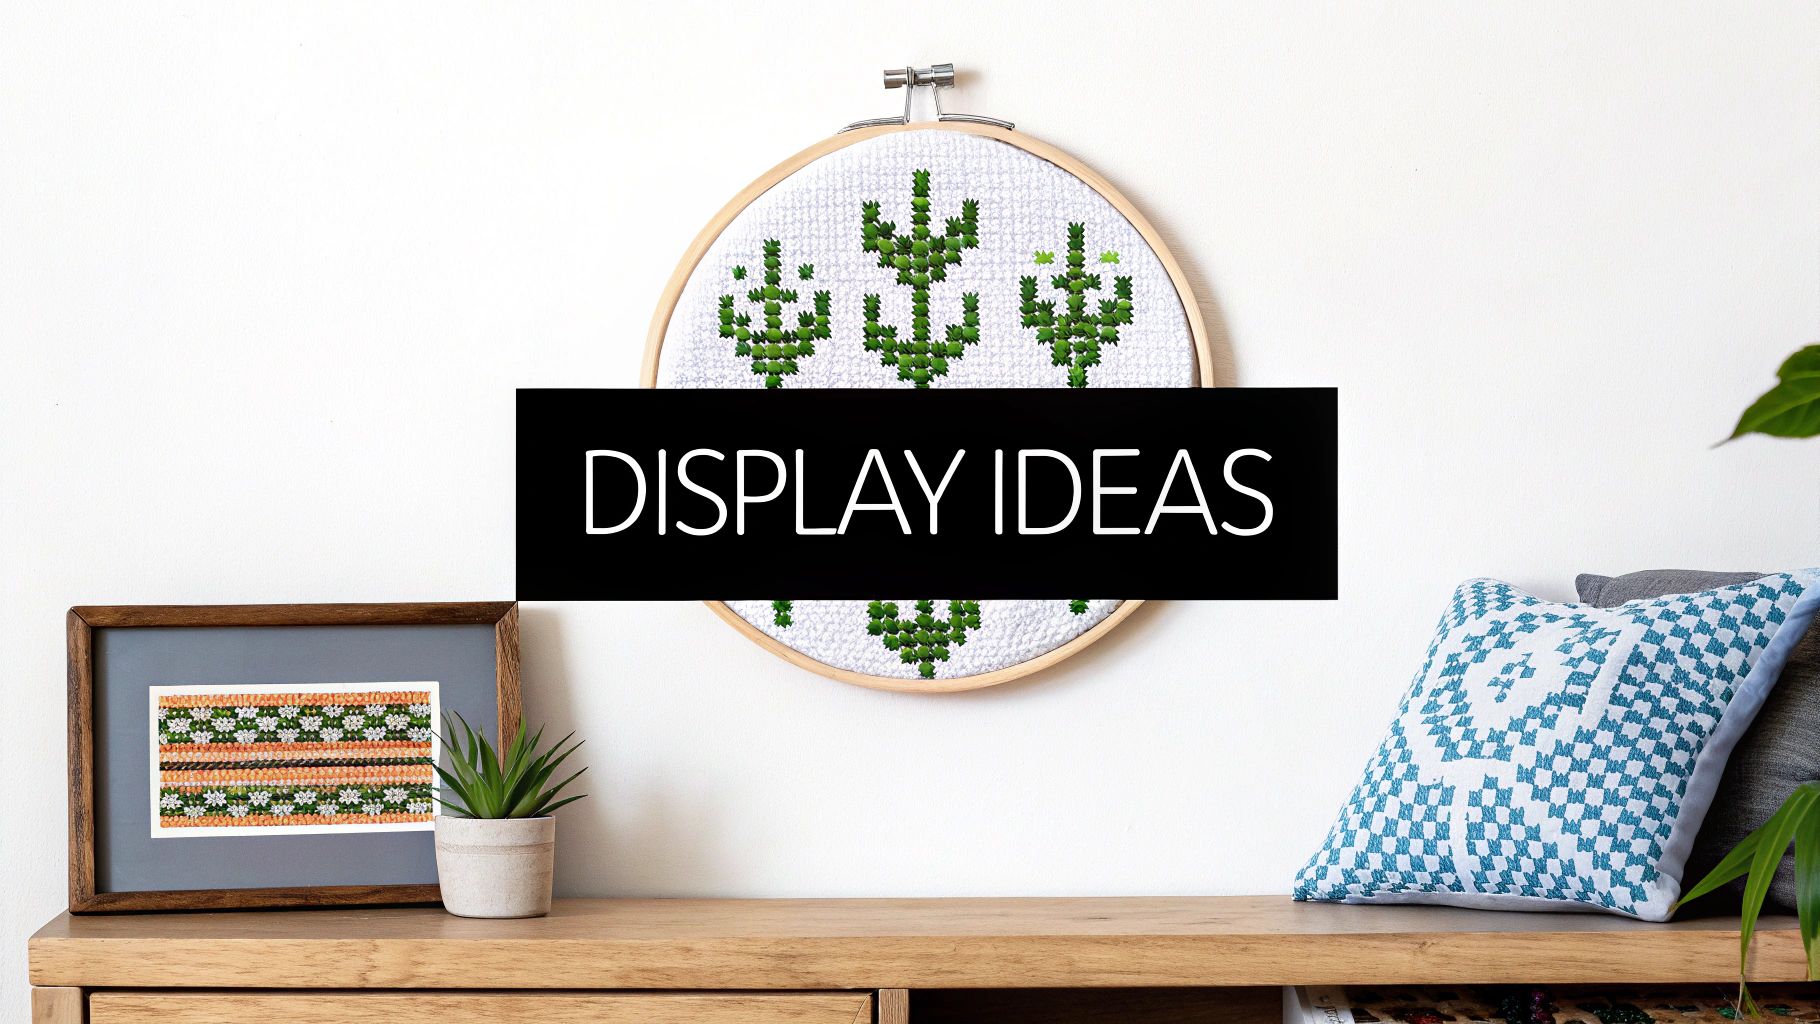
Creative Ways to Showcase Your Work
Putting your piece in a traditional frame is a classic for a reason, but the possibilities don't stop there. So many modern stitchers are finding clever ways to display their art, often using the tools of the craft itself.
One of the most popular and charming methods is to finish the piece right in its embroidery hoop. It’s a wonderfully rustic, modern look that’s also incredibly simple. All you have to do is trim the extra fabric around the back of the hoop. You can either glue it down to the inside of the inner ring or gather the fabric with a quick running stitch to create a neat, tidy backing.
Showcasing your art doesn't have to be complicated. The goal is to celebrate your hard work and integrate your new skill into your daily life, turning a simple craft into a personal statement.
Think beyond the hoop, too! Your cross stitch beginner kit project can become something totally unique and useful. Even a small design can be transformed into:
- A one-of-a-kind patch for a denim jacket or tote bag.
- A beautiful, handmade coaster to protect your coffee table.
- The centerpiece for a small throw pillow or a sweet-smelling sachet.
Playing with these ideas does more than just complete a project—it opens your mind to all the amazing things you can create now that you have this wonderful new skill.
Got Questions? We've Got Answers
Even with the best guide in hand, a few little questions can pop up when you're itching to get started. Let's tackle some of the most common ones we hear from new stitchers so you can feel totally confident threading that first needle.
How Long Will It Take to Finish My First Kit?
Ah, the million-dollar question! The honest answer is: it depends. A small, simple cross stitch beginner kit might take a newcomer anywhere from 5 to 10 hours to finish. If you pick something a bit larger or with more color changes, you could be looking at 20 hours or more.
My best advice? Don't even think about the clock. Cross stitch is your time to unwind and relax. The real magic is in the process, watching the image appear one little 'x' at a time.
Help! What If I Run Out of a Thread Color?
First, don't panic! It happens. While good kits usually give you plenty of extra thread, sometimes you might run short on a color you use a lot.
Luckily, this is an easy fix. Just look at your pattern chart. You'll see a color code listed next to the symbol, something like DMC 310 (for classic black). You can walk into almost any craft store or hop online and buy a single skein of that exact color. Your project will look seamless.
Remember, everyone's tension and thread habits are a little different. Running out of a color doesn't mean you've done something wrong—it's just a normal part of the crafting journey.
Do I Really Need to Use an Embroidery Hoop?
Technically, you can stitch without one, but I wouldn't recommend it, especially when you're just starting out. A hoop is your best friend for a reason! It keeps the fabric tight and smooth, which is the secret to making beautifully even stitches.
Using a hoop also prevents your hand from cramping up and helps you maintain consistent tension across the whole piece. It just makes the entire process easier and more enjoyable, which is why you'll find one in almost every good beginner kit.
Ready to turn a favorite photo into a stitched work of art? At Cross Stitched, our custom photo-to-pattern kits provide everything you need to create a masterpiece that’s uniquely yours. Explore our custom kits and start stitching your story today!


