
If you're looking to get into the wonderfully relaxing world of cross stitch, the absolute best place to start is with a kit. Think of it as a "project in a box"—these all-in-one packages take all the guesswork out of the equation, giving you every single thing you need to create a beautiful piece from your very first stitch.
Why a Kit Is the Best Way to Start Cross Stitch
Walking into a craft store for the first time can feel like trying to cook a gourmet meal without a recipe. You see the finished product in your mind, but the aisles of strange ingredients and tools are just plain overwhelming. A cross stitch kit is that perfect, pre-measured recipe card. It sets you up for success right from the start.
This streamlined approach is a huge part of why the craft is seeing such a revival. The global cross-stitch market was valued at approximately USD 0.15 billion in 2024 and is expected to keep growing as more people rediscover mindful, hands-on hobbies. You can dive deeper into the business side of this trend and its growth on businessresearchinsights.com.
Remove the Initial Overwhelm
Let's be honest, the embroidery floss aisle alone is enough to send a newcomer running. With hundreds of colors, different types of fabric, and a whole host of needle sizes, it’s incredibly easy to get bogged down by choice. A kit slices right through that confusion.
Beginner kits are designed to make you feel successful. By bundling the exact materials needed for one specific design, they let you focus on what really matters: learning the simple, rhythmic motion of the stitch.
The Perfect Recipe for Relaxation
So many people are drawn to cross stitch for its meditative qualities. There's something incredibly calming about the simple, repetitive action of making little 'X's with a needle and thread. It’s a way to quiet your mind, much like the focused attention you might get from finding calm in an anxiety coloring book.
When you start with a kit, you get to skip the stressful setup and jump straight to the good part.
Let's take a quick peek at what you'll typically find inside one of these curated boxes.
What's Inside a Beginner Cross Stitch Kit
Here’s a quick look at the essential tools and materials included in most starter kits for adults.
| Component | Purpose | Why It's Great for Beginners |
|---|---|---|
| Aida Fabric | The gridded weaving of this fabric creates obvious holes, making it easy to see where to place your stitches. | It’s the go-to learning fabric. The clear grid takes the guesswork out of stitch placement and size. |
| Embroidery Floss | This is the colored thread you'll use to create your design. A kit includes every color you need. | The floss is pre-sorted and often labeled with symbols that match the pattern, so there's no confusion. |
| Tapestry Needle | A blunt-tipped needle with a large eye, designed to pass through Aida fabric without splitting the threads. | A blunt tip is safer and prevents you from accidentally piercing the fabric fibers instead of going through the holes. |
| Pattern Chart | This is your map! It uses symbols or colors in a grid to show you exactly where each stitch goes. | The chart is the heart of the project. A good beginner pattern is clear, simple, and easy to follow. |
| Embroidery Hoop | A plastic or wooden hoop that holds your fabric taut, making it much easier to stitch evenly. | A taut canvas is a game-changer. It prevents your fabric from puckering and keeps your tension consistent. |
With everything you need right at your fingertips, you can see why choosing from the fantastic array of beginner cross stitch kits for adults is the smartest first move. It turns what could be a confusing scavenger hunt into a delightful, ready-to-go creative adventure.
Understanding Everything in Your First Kit
Opening your first cross-stitch kit feels like a little moment of creative magic. Inside, you'll find everything you need to bring a design to life, and each piece has a very specific job. Let's walk through what’s in the box so you feel totally comfortable getting started.
The fabric in your kit is your canvas. Most of the time, this will be something called Aida fabric, a cotton material woven with a very helpful grid pattern. That grid is your best friend as a beginner—it guides your needle and makes it easy to form perfectly even stitches right away.
Decoding Your Fabric and Floss
You'll see Aida fabric described with a "count," like 11-count, 14-count, or 16-count. Don't let the term intimidate you! It simply tells you how many little squares (and therefore, stitches) you can fit into one inch of the fabric.
- Lower Count (e.g., 11-count): This means the squares are bigger and there are fewer of them per inch. It’s fantastic for your first project because the holes are large and easy to see.
- Higher Count (e.g., 16-count): This fabric has smaller, more numerous squares per inch, which allows for a more detailed, refined final picture.
Most beginner kits stick with 11 or 14-count Aida, which is a great balance. It's easy enough for new eyes to handle but still produces a beautiful result. If you're curious to learn more, we have a complete guide on what Aida fabric is and why it's a stitcher's go-to.
Now for the fun part: the embroidery floss. This is the colorful thread you'll use to paint your picture. Take a close look at a single piece of floss, and you'll see it’s actually made of six smaller strands twisted together. For most cross-stitching, you’ll gently separate these and work with just two strands at a time.
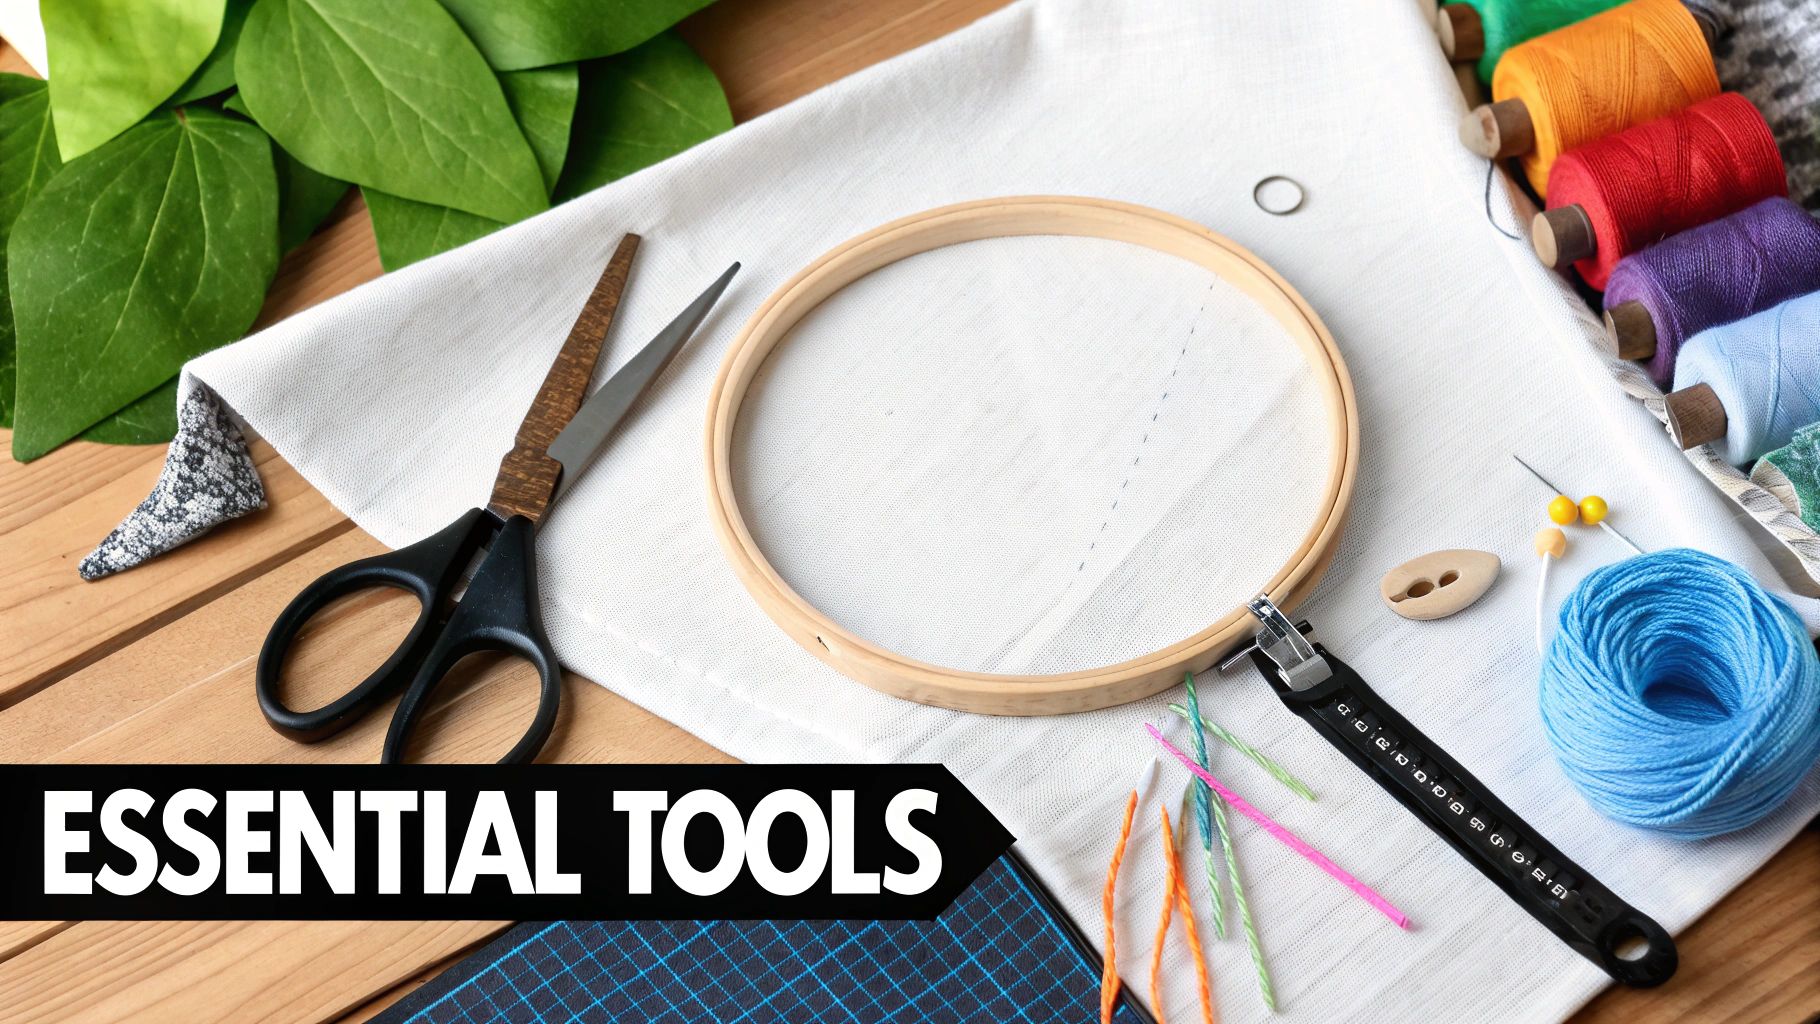
This image gives you a great visual breakdown of what you can expect to find in different types of kits.

As you can see, a good all-in-one kit removes all the guesswork by bundling every single thing you need to get started and finish your project.
Comparing Fabric Counts for Beginners
Choosing the right fabric count can make a huge difference in your first stitching experience. Here’s a quick breakdown of the common options you'll find in beginner kits to help you understand what to expect.
| Aida Count | Stitches Per Inch | Difficulty Level | Best For |
|---|---|---|---|
| 11-count | 11 stitches | Very Easy | Absolute beginners, children, or anyone with vision concerns. |
| 14-count | 14 stitches | Easy | The most common choice for kits; great balance of detail and ease of use. |
| 16-count | 16 stitches | Intermediate | Stitchers ready for a more detailed look with smaller, tighter stitches. |
| 18-count | 18 stitches | Challenging | Experienced stitchers looking for a highly detailed, "pixel-art" finish. |
For your first project, sticking with an 11 or 14-count kit is a surefire way to set yourself up for a fun and successful experience.
Your Essential Stitching Tools
Finally, let’s talk about the tools that pull it all together. A well-thought-out beginner kit should give you everything you need so you don't have to run to the store for anything else.
Expect to find pre-cut Aida fabric (usually 11-count), all the necessary embroidery floss presorted by color, one or two tapestry needles, and a clear pattern or chart. Many kits will also include an embroidery hoop, which is a huge help for keeping your fabric tight and your stitches even.
The needle included in a kit is a tapestry needle, and it's different from a regular sewing needle. Its tip is blunt, not sharp, and the eye is much larger. This is completely by design—the blunt tip passes cleanly through the holes in the Aida without splitting the fabric threads, and the big eye makes threading your floss a whole lot less frustrating.
Now when you look at that box of supplies, you can see it for what it truly is: a complete system, designed for success and just waiting for you to turn it into something beautiful.
How to Choose Your Perfect First Project
Picking the right first project is the secret to falling head-over-heels for cross stitch. Think of it like learning to cook; you wouldn't start with a five-course gourmet meal. You'd start with something simple and delicious that makes you proud of what you made. It’s the same idea when you’re looking at all the beginner cross stitch kits for adults out there.
The goal here is to set yourself up for that "I made this!" feeling. A great first experience builds momentum and makes you genuinely excited to pick up your needle and thread for the next project. Let's walk through how to pick a winner.
Start with Simple Designs
This is not the time to tackle a massive, photorealistic masterpiece. For your first go, look for designs that keep things straightforward and fun.
- Limited Color Palette: Juggling tons of different thread colors right away is a recipe for confusion. A design with 5-10 colors is perfect. It lets you get the hang of your stitching without constantly stopping to re-thread your needle.
- Clear, Blocky Shapes: Patterns with big blocks of a single color are so much easier to follow than ones with tiny, scattered details. Those little isolated stitches are called "confetti" in the cross-stitch world, and they can be a real headache for newcomers.
- Minimal Backstitching: Backstitching is just an outline stitch used to add detail. It looks great, but it’s another technique to learn. It’s best to find a kit where the design pops without needing a lot of it.
This approach lets you nail the basics and build confidence, one stitch at a time.
Consider the Project Size
So much of the joy in cross stitch is watching the picture slowly appear on the fabric. A smaller project gives you that satisfying payoff much faster. Look for something in the ballpark of 3x3 or 5x5 inches.
A small, charming project you can finish in a weekend is infinitely better than a huge, ambitious one that ends up half-finished in a drawer. Quick wins are the best motivation.
That feeling of accomplishment is what gets so many people hooked. It proves to you that you can do it, and it leaves you itching to start the next one.
Pick a Theme You Absolutely Love
Honestly, this might be the most important tip. You'll stick with it if you're genuinely excited to see the finished piece. Whether it’s a snarky quote, a simple floral pattern, or a cute little animal, pick something that makes you smile. The craft market has a massive variety, and with consistent monthly sales of beginner kits, there’s always something new to discover. You can find more insights on craft trends over on accio.com.
When you love the design, stitching feels less like practice and more like bringing something you love to life. It's the difference between a chore and a passion. By finding that sweet spot—a simple design with a theme you adore—you'll find the perfect kit to guarantee a fantastic first experience.
Mastering Your First Stitches
Alright, you've got your kit and you're ready to go. This is the fun part—where the design starts coming to life with every single stitch. The first few can feel a bit awkward, but we'll walk through it together. Getting this foundation right sets you up for a hobby that's more relaxing than frustrating.
First thing's first: you have to learn how to read your pattern. Think of the chart in your kit as a map. Each square on that paper grid matches a square on your Aida fabric, and the little symbol inside tells you exactly which color thread to grab.
Preparing for Your First Stitch
A little prep work now saves a ton of headaches later. Getting everything set up correctly ensures your stitches will be smooth and even right from the start.
-
Prepare Your Thread: Grab one of the pre-cut lengths of embroidery floss. If you look closely, you'll see it’s actually made of six smaller strands twisted together. Gently pull out just two strands to thread your needle. This is the sweet spot for most beginner cross stitch kits for adults—it gives your stitches good coverage without looking bulky.
-
Secure Your Fabric: Loosen the screw on your embroidery hoop and separate the two rings. Lay your Aida fabric over the smaller, inner ring. Now, press the outer ring down over it, making sure your fabric is centered and pulled taut, kind of like a little drum. Tighten the screw, and you're all set. A nice, tight fabric is the secret to avoiding puckered stitches.
With your fabric secure and your needle threaded, you're officially ready to make that little 'X' that gives cross stitch its name.
Executing the Perfect Cross Stitch
The wonderful thing about cross stitch is its simplicity. The whole craft boils down to one basic stitch. To get your stitches looking neat and consistent, the best way to work is in rows. You'll complete all the bottom halves of the stitches first, then double back to complete the 'X'.
Here's the easiest way to do it:
- Push your needle up from the back of the fabric through the bottom-left hole of one square.
- Now, go down through the top-right hole of that same square. That’s your first half-stitch: /.
- Keep doing this for the whole row of that color, creating a line of diagonal stitches: /////.
- Once you reach the end of the row, just work your way back. Bring the needle up through the bottom-right hole and down through the top-left to complete the 'X'.
A simple trick to a professional-looking finish? Make sure all your stitches cross the same way. If your bottom stitches all slant like ///, make sure your top stitches all slant the opposite way, like \\. That consistency is what makes the final piece look so polished.
Starting and Stopping Without Knots
Here’s a pro-tip that will make a huge difference in your finished work: learn to start and stop your thread without knots. Knots create little bumps on the back of your fabric that can sometimes be seen from the front.
Instead, when you make your very first stitch, just leave a one-inch "tail" of thread on the back. As you make the next few stitches, just make sure to catch that little tail under them on the back side. It secures the thread perfectly. When you're ready to end a thread, just weave your needle under the last three or four stitches on the back before snipping it. This keeps the back of your project almost as neat as the front!
For a closer look at this and other techniques, take a peek at our guide on the most popular basic cross stitch stitches.
Navigating Common Beginner Hurdles
Every new crafter hits a few bumps in the road. It’s a totally normal part of learning something new, so don't sweat it. Think of this section as your friendly guide to troubleshooting the little hiccups you might face with your first beginner cross stitch kits for adults.
Learning how to handle these small challenges is what keeps cross-stitching fun and relaxing. Instead of getting frustrated, you'll feel confident knowing you can fix any little mistake that pops up.
Taming Tangled Thread
One of the first frustrations for any new stitcher is the dreaded thread knot. A tangled mess of floss can really kill your momentum, but thankfully, it's usually easy to prevent.
More often than not, the culprit is a piece of floss that's just too long. A good rule of thumb is to cut your thread to about 18 inches—that’s roughly the distance from your fingertips to your elbow. This shorter length is much less likely to twist up on itself. Another great trick? Just let your needle dangle every few stitches. This lets the thread naturally unwind.
Keeping Your Stitches Even
Ever notice your fabric starting to pucker or your stitches looking a little wonky? That’s all about tension, which is just a fancy way of saying how tightly you pull your thread. It's a classic beginner move to pull way too hard.
Your goal is a stitch that lies flat and smooth against the fabric. It should look relaxed, not like it's straining or squishing the Aida cloth.
The embroidery hoop in your kit is your best friend here. Before you start stitching, make sure the fabric is pulled taut like a little drum. This gives you a stable surface, making it so much easier to create nice, even stitches with the same gentle pressure every time.
Fixing Common Stitching Mistakes
Mistakes happen. In fact, they’re proof that you’re actually learning! The best part is that most slip-ups are surprisingly easy to fix without having to undo hours of work.
- Put a stitch in the wrong spot? If you catch it right away, just slide the tip of your needle under the stitch and gently lift it out. Easy peasy.
- Used the wrong color? For a single stitch, you can often get away with just stitching over it with the correct color. If it’s a whole section, you'll have to carefully unpick those stitches.
- Lost your place on the pattern? It happens to the best of us! To avoid this, grab a highlighter or pencil and mark off sections of the chart as you finish them. This little bit of tracking will save you a ton of recounting later on.
Finishing and Displaying Your First Piece
That moment when you pull the needle through for the last time? It's pure magic. You've taken a blank canvas and some thread and created a little piece of art. Now comes the grand finale: the finishing touches that make your masterpiece ready for its debut.
Before you show it off, a quick, gentle bath can work wonders. This little step washes away any oils from your hands and gets rid of those pesky hoop marks, leaving your work looking crisp, clean, and professional.
Preparing Your Piece for Display
Washing your finished cross-stitch isn't scary, I promise. It’s a simple process that helps your project look its best and last for years.
-
Wash Gently: Grab a clean sink or basin and fill it with lukewarm water. Add just a tiny drop of a mild, gentle soap (like a clear dish soap). Swish your project around for a few minutes, then give it a good rinse under cool, running water until the suds are gone.
-
Press Carefully: Never wring out your work! Instead, lay the damp piece face-down on a thick, clean towel. Place another clean towel on top and press down firmly to soak up the excess water. Finally, with your project still face-down on a dry towel, press it with an iron on a low setting. This protects your stitches from getting squashed.
This gentle cleaning is your secret weapon for preservation. It gets rid of any oils or dirt that could attract dust or cause the fabric to yellow over time, keeping your hard work looking vibrant.
Creative Ways to Show Off Your Work
With your piece all clean and pressed, it’s time for the really fun part—deciding how to display it! You don't need to get complicated to make a big impact.
One of the most popular and modern ways to finish a piece is to frame it right in the embroidery hoop you used to stitch it. It's simple, rustic, and lets the work speak for itself.
Of course, a classic picture frame always gives your art a polished, gallery-ready look. If you're feeling a bit more adventurous, you could even turn a small design into a tiny decorative pillow or a fragrant sachet. If you want to dive deeper, there are so many creative cross stitch finishing techniques out there to explore and find the perfect fit for your style.
Got Questions About Cross-Stitch Kits? We've Got Answers
Starting any new hobby feels like stepping into a new world, and it's totally normal to have a few questions before you take the plunge. Let's clear up some of the most common ones people ask about beginner cross-stitch kits so you can start your first project with confidence.
How Long Does a Beginner Kit Take to Finish?
One of the best things about a good beginner kit is that it's designed for a quick, satisfying win. You can usually knock out a small project over a weekend, with most taking somewhere between 5 to 10 hours from the first stitch to the last.
This means you get that fantastic feeling of accomplishment without having to sink a ton of time into it right away. It's the perfect way to see if you enjoy the craft.
Is Cross-Stitch an Expensive Hobby?
Not in the slightest! It’s actually one of the most affordable crafts out there. A really good, high-quality beginner kit will typically set you back only $15 to $30, and that includes everything you need to get started.
That low barrier to entry makes it super easy to just give it a try without worrying about a big investment.
A great starter kit comes with all the essentials. The only other thing you might want is a small, sharp pair of scissors for snipping thread, but honestly, any pair you have at home will do the job just fine.
What if I Run Out of Thread?
It's a common fear, but kit designers are usually pretty generous with the amount of floss they include. Still, it can happen, especially if you have to re-do a section. Don't panic!
The threads in your kit will almost always be labeled with a standard color code, like the numbers used by DMC. Just jot down that number, pop over to any craft store, and you can buy an identical skein to finish your project perfectly. It’s an easy and cheap fix.
Ready to turn one of your favorite photos into a work of art? Cross Stitched creates custom, all-in-one kits that make it simple for absolutely anyone to get started. Find your perfect project today and begin your stitching journey.


