

Cross-stitching is a timeless craft that transforms simple thread and fabric into stunning works of art. Whether you're a beginner eager to make your first stitch or a seasoned crafter aiming for a more professional finish, the right techniques can make all the difference. This comprehensive guide moves beyond basic instructions to provide specific, actionable tips on cross stitching that will refine your skills, reduce common frustrations, and help you create projects you're proud to display. Mastering these methods elevates the quality of your work, ensuring cleaner stitches, more uniform tension, and greater accuracy in complex patterns.
We will cover everything from foundational fabric preparation and strategic thread management to advanced techniques like gridding and the parking method. Each tip is designed to solve a specific challenge, making your stitching process more efficient and enjoyable. For those looking to turn a cherished photo into a needlepoint masterpiece, platforms offering custom kits provide the perfect canvas to apply these expert strategies. By implementing these insights, you can ensure each stitch you make is a confident step toward creating a flawless, beautiful piece. Let's dive into the techniques that will significantly improve your craft.
1. Start with the Right Fabric Count and Organization
Your cross-stitching journey begins long before you make the first stitch. The foundation of any successful project is the fabric you choose and how you prepare it. Selecting the right fabric count, which refers to the number of stitches you can make per inch, directly impacts the final look and the ease of the stitching process. Proper organization and preparation prevent common frustrations like fraying, puckering, and misaligned patterns.

For newcomers, 14-count Aida cloth is the universally recommended starting point. Its larger, more visible holes make it easy to see where to place your needle, reducing eye strain and helping you build confidence. Reputable brands like DMC, Zweigart, and Charles Craft are industry standards known for their quality and consistent weave. As your skills advance, you might transition to higher counts like 18-count or even 28-count linen for more detailed and delicate designs, such as intricate portraits or heirloom samplers.
Actionable Steps for Fabric Preparation
Getting your fabric ready is a crucial step that sets you up for success. Follow these tips on cross stitching to ensure your material is perfectly prepared:
- Calculate and Cut: Always purchase more fabric than your pattern requires. A good rule of thumb is to add at least 3-4 inches to all four sides. This extra margin provides ample room for handling, framing, or finishing your piece into a pillow or other object.
- Prevent Fraying: The cut edges of Aida and other stitching fabrics can unravel easily. Secure them before you start by applying masking tape along the borders, sewing a simple zigzag stitch with a machine, or using a fray-prevention liquid.
- Find Your Center: Most patterns are designed to be started from the center. Fold your fabric in half both vertically and horizontally to find the exact middle point. Mark this intersection with a water-soluble fabric pen or a temporary guide stitch.
- Maintain Tension: Stitching on loose, floppy fabric leads to uneven tension and distorted stitches. Use a hoop, Q-snap, or scroll frame to keep the material taut and smooth while you work.
Key Insight: Proper preparation is a non-negotiable step for a professional-looking finish. Taking 15 minutes to secure edges and find the center can save hours of frustration later. A well-organized workspace also contributes significantly to an enjoyable crafting session. For an in-depth look at setting up your creative area, learning how to organize craft supplies can transform your entire process. To further understand the different types of fabrics and their uses, you can explore this detailed guide about cross stitch materials.
2. Master the Proper Thread Management Technique
How you handle your embroidery floss is just as important as the stitches you make. Effective thread management is the art of preparing, using, and storing your floss to achieve the smoothest, most professional-looking results. It involves using the correct thread length, separating strands properly, and maintaining consistent tension. Without these practices, you risk dealing with tangled messes, unsightly knots, and stitches that look bulky or uneven, which can detract from the beauty of your finished project.
The secret to a flawless finish lies in techniques like railroading, where you guide the threads to lie parallel to each other rather than twisting around one another. This technique creates stitches with a distinctively flat, ribbon-like appearance that offers superior fabric coverage and a subtle sheen. Professional designers and competition-winning stitchers consistently use meticulous thread techniques to elevate their work from a simple craft to a piece of art. Adopting these habits early is one of the most impactful tips on cross stitching for improving your work.
Actionable Steps for Flawless Thread Handling
Implementing a few key habits can transform your stitching experience and the quality of your work. Follow these steps to manage your floss like an expert:
- Use the Right Length: Cut your floss to a manageable length, typically around 18 inches or the distance from your fingertips to your elbow. This length is long enough to complete a good number of stitches but short enough to prevent excessive twisting and knotting.
- Separate Strands Correctly: Standard embroidery floss has six strands. To separate them without creating a tangled mess, hold the floss with one hand and gently pull one strand straight up and out. Repeat for each strand you need, then recombine them before threading your needle.
- Practice Railroading: To railroad your stitches, slide your needle under the two threads of the top leg of your cross stitch just before you pull it tight. This simple action forces the strands to lie flat and parallel. Alternatively, use a laying tool or even your finger to smooth the threads as you stitch.
- Prevent Twisting: Every few stitches, let your needle and thread hang freely. This allows the floss to untwist naturally, which reduces the likelihood of knots forming on the back of your fabric.
- Anchor Without Knots: Avoid using traditional knots to start or end a thread, as they can create bumps on the front of your piece. Instead, use a loop start for an even number of strands or a waste knot to secure your thread discreetly.
Key Insight: Consistency in thread management is what separates good stitching from great stitching. Techniques like railroading and proper strand separation are not just for experts; they are foundational skills that significantly improve stitch quality and coverage for everyone. Taking the time to master these details will pay off in every project you create. To get a better understanding of the floss you're working with, you can explore the properties of cotton embroidery thread.
3. Follow the 'Complete All Cross Stitches in the Same Direction' Rule
One of the foundational rules for creating a visually stunning cross-stitch piece is maintaining consistent stitch direction. This principle dictates that all top stitches must cross in the same direction throughout the entire project. This uniformity ensures light reflects evenly across the surface, giving your work a smooth, professional, and cohesive finish instead of a patchy or chaotic appearance. It's a subtle detail that makes a significant difference in the final quality.
The most common and widely accepted method is to make the bottom stitch from the lower-left to the upper-right (/) and the top stitch from the lower-right to the upper-left (), forming a perfect 'X'. This technique is not just a modern preference; historical samplers from the 18th and 19th centuries display this same meticulous discipline. All professionally published patterns and award-winning competition pieces are built on this fundamental rule of directional consistency.
Actionable Steps for Stitch Consistency
Adhering to this rule requires focus and a systematic approach. Incorporate these tips on cross stitching into your routine to master stitch direction and elevate your craft:
- Stitch in Rows: For areas with blocks of the same color, use the "English method." Stitch a row of bottom-half stitches (all / / /) across the pattern, and then work your way back, completing each 'X' with the top-half stitches (\ \ ). This is the most efficient way to ensure every top stitch faces the same way.
- Isolate Individual Stitches: Use the "Danish method," where you complete one full 'X' before moving to the next, only for isolated stitches or confetti-like patterns. Even when using this method, ensure the top leg of each 'X' is consistent with the rest of your project.
- Check Your Work Frequently: Pause every 10-15 minutes to scan the section you just completed. It's much easier to spot and fix a single stitch going the wrong way than to discover a large patch of incorrect stitches later.
- Stitch in Good Lighting: Proper lighting is crucial for seeing your stitch orientation clearly, especially when working with dark threads on dark fabric. A well-lit workspace helps prevent unintentional errors and reduces eye strain.
Key Insight: Consistency is the secret ingredient that separates a good project from a great one. While the process of making the stitch remains the same, the direction you choose and stick with creates a unified texture. This discipline is a hallmark of skilled stitchers and is a critical step in producing heirloom-quality work. For a visual tutorial on this technique, watching videos on how to cross stitch for beginners can be incredibly helpful. If you want to dive deeper into stitching theory, The Embroiderers' Guild of America provides excellent resources on needlework fundamentals.
4. Use Proper Lighting and Magnification
One of the most overlooked yet critical aspects of an enjoyable stitching experience is your environment, specifically your lighting and ability to see your work clearly. Proper lighting and magnification are essential for preventing eye strain, reducing frustrating mistakes, and maintaining the joy of the craft over long sessions. Investing in the right tools ensures you can stitch comfortably for hours, no matter the fabric count or thread color.
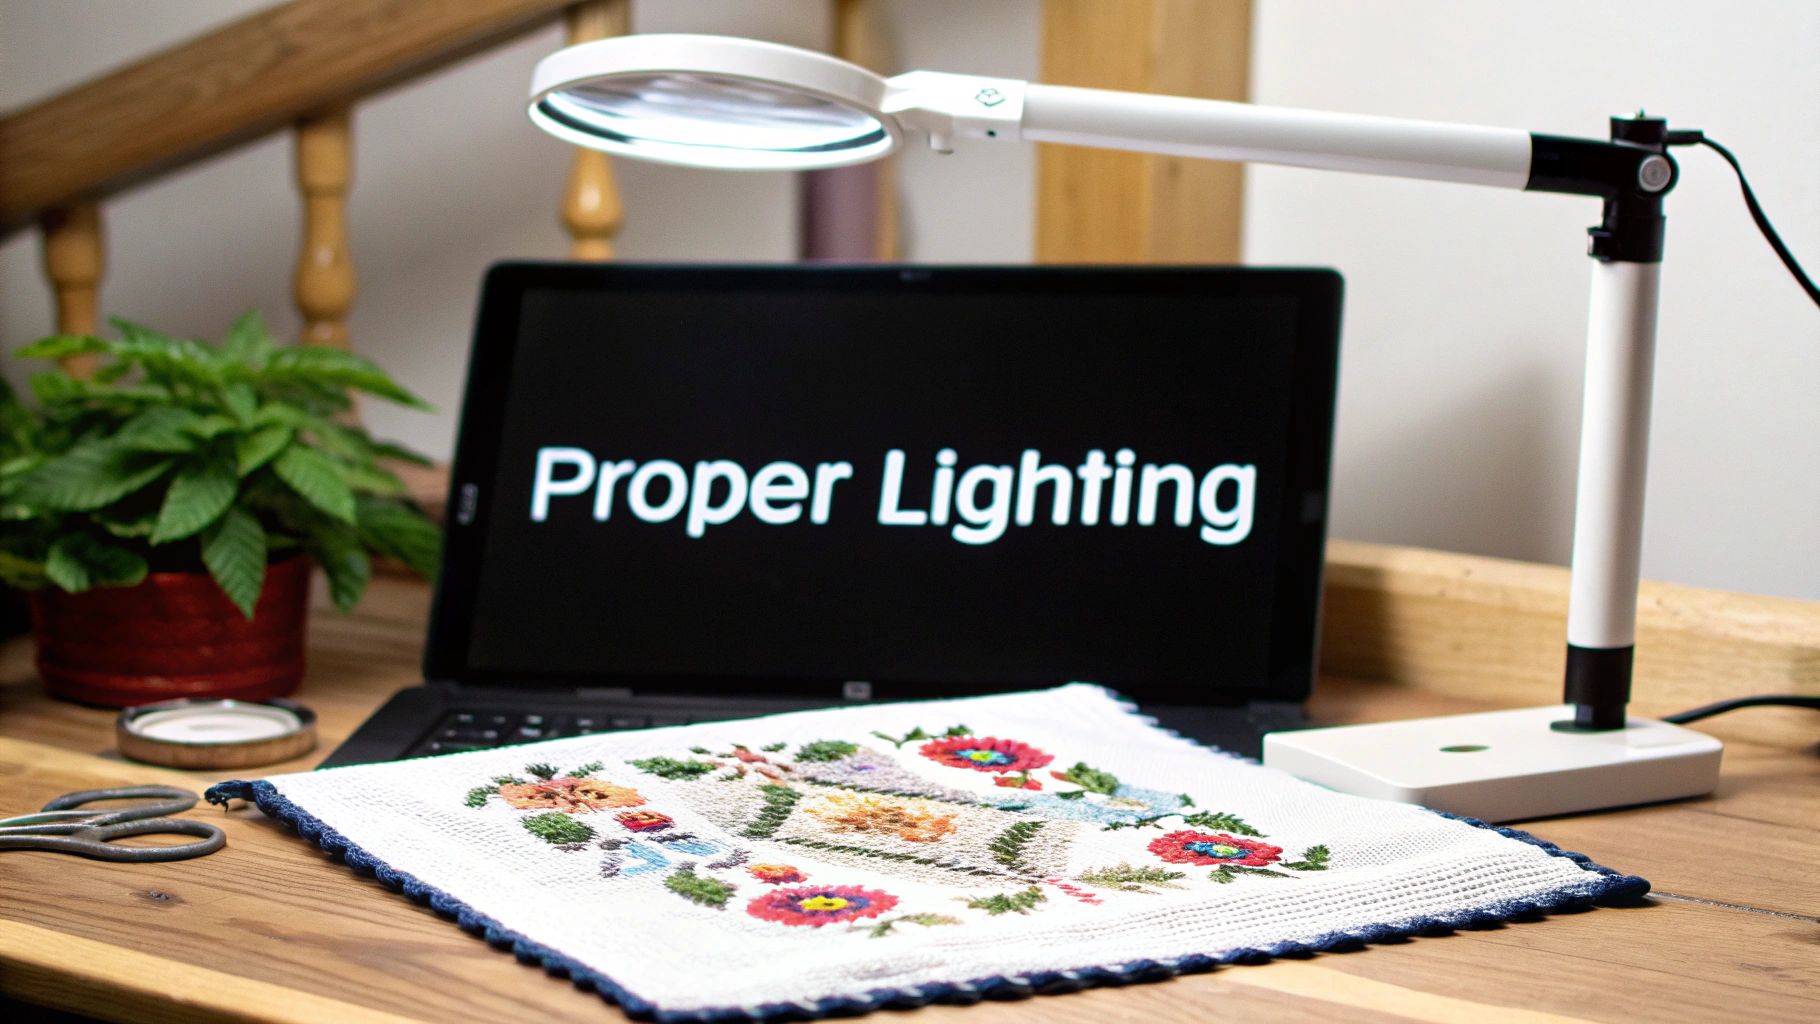
For the best results, use a daylight-spectrum LED lamp with a color temperature between 5000-6500K. This type of light mimics natural daylight, providing the most accurate color representation for your threads and reducing eye fatigue. Renowned brands like OttLite and the Daylight Company offer floor lamps and desk models designed specifically for crafters. When working on high-count fabrics or with dark threads on dark fabric, magnification becomes indispensable. Tools range from simple reading glasses to specialized crafting lamps with built-in magnifiers and hands-free headset magnifiers like the Optivisor.
Actionable Steps for Better Visibility
Optimizing your visual setup will dramatically improve your accuracy and comfort. Follow these tips on cross stitching to create the perfect viewing environment:
- Position Your Light Source: Place your lamp slightly above and to the side of your project. This angle illuminates the fabric without casting shadows from your hands or hoop.
- Invest in Adjustability: Choose a lamp with an adjustable arm or head. This allows you to reposition the light as you move around your project, ensuring every corner is well-lit.
- Embrace Magnification: Don’t be afraid to use a magnifier. For intricate work, consider a level of magnification slightly higher than you think you need to prevent squinting. While using magnifiers can greatly assist with detailed work, some crafters have valid concerns about reading glasses. However, for close-up tasks, they are a game-changer.
- Take Regular Breaks: Protect your eyes by following the 20-20-20 rule. Every 20 minutes, look at something 20 feet away for 20 seconds to give your eyes a chance to refocus and rest.
- Use Natural Light for Color Matching: While stitching, artificial light is great, but always double-check your thread colors in natural daylight before starting a new section to ensure they match your pattern perfectly.
Key Insight: Excellent lighting is not a luxury; it is a fundamental tool for precision and comfort. Many award-winning stitchers cite their lighting setup as a key factor in their success. A small investment in a quality lamp or magnifier pays for itself through fewer mistakes and a more enjoyable, strain-free crafting hobby.
5. Grid Your Fabric for Accurate Counting
For anyone tackling a pattern with intricate details, large color blocks, or a full-coverage design, gridding is a game-changing technique. This method involves marking your fabric into a 10x10 stitch grid that mirrors your pattern chart. This simple preparation transforms the daunting task of counting hundreds of stitches into manageable, bite-sized sections, drastically reducing the risk of miscounting and saving you from the frustrating process of frogging (ripping out stitches).
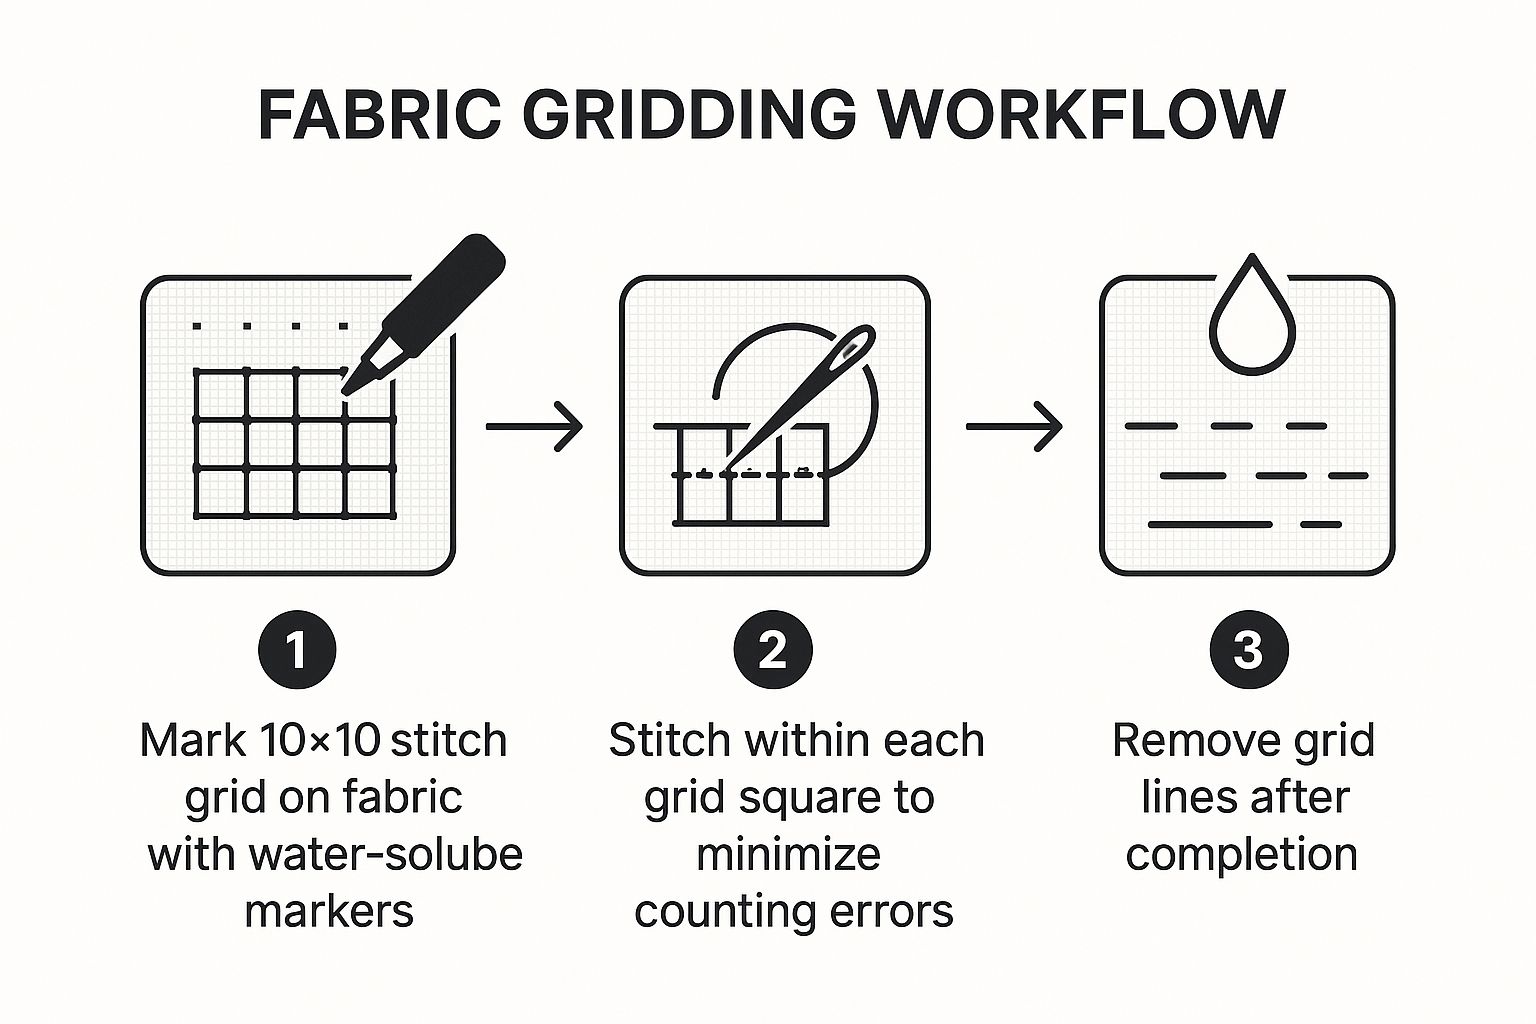
The process flow diagram above illustrates the straightforward workflow of gridding your fabric. Following this simple, three-step approach ensures your project starts on a foundation of accuracy.
While you can purchase pre-gridded fabric, learning to grid your own is a valuable and economical skill. It’s considered standard practice in communities dedicated to large-scale projects, such as those tackling Heaven and Earth Designs (HAED) patterns. Stitchers on platforms like Flosstube consistently showcase gridding as a non-negotiable step for achieving precision in their work.
Actionable Steps for Flawless Gridding
Properly gridding your fabric requires a bit of upfront time, but it’s an investment that pays off with every stitch. Follow these tips on cross stitching to create an accurate and easy-to-use grid:
- Choose Your Method: The most common gridding tools are water-soluble fabric markers, specialized gridding thread, or monofilament fishing line. Markers are fast, while thread or line must be stitched in but is easily removed without washing.
- Start from the Center: Just like with your pattern, find the center of your fabric and grid outward. This ensures your grid is perfectly aligned with your pattern's starting point. Use a light box or a bright window to help see the fabric holes clearly and keep your lines straight.
- Test and Mark Carefully: Before marking your entire piece with a water-soluble pen, always test it on a scrap of the same fabric. Ensure it washes out completely without leaving a trace.
- Count and Double-Check: As you draw or stitch each 10x10 block, count the squares carefully. Recounting as you go is much easier than discovering an error halfway through your project. For threaded grids, consider using a different color line every 50 or 100 stitches to make navigating large areas even easier.
Key Insight: Gridding is the ultimate insurance policy against counting errors. It turns a complex visual map into a simple coordinate system, allowing you to focus on the joy of stitching rather than the stress of counting. For a deep dive into gridding methods, especially using thread, Sulky's blog offers a fantastic tutorial that covers the process in detail.
6. Learn and Apply the Parking Method for Multi-Color Projects
For stitchers tackling complex, full-coverage designs with dozens of colors, the parking method is a game-changing technique. Instead of completing all stitches of one color before moving to the next (the cross-country method), parking involves working across the fabric row by row or in small blocks. You stitch a color until you reach its end within that block, then you bring the needle up at the starting point of its next appearance and "park" it there, ready for the next section.
This systematic approach minimizes the constant starting and stopping of threads, which in turn reduces thread waste and creates a smoother, more uniform back. It’s particularly effective for large-scale, confetti-heavy patterns like those from Heaven and Earth Designs (HAED), where color changes are frequent. While it has a learning curve, mastering this method is one of the most impactful tips on cross stitching for serious hobbyists aiming for a professional finish on intricate pieces.
Actionable Steps for Implementing the Parking Method
Adopting the parking method requires organization and a methodical mindset. Follow these tips to integrate it into your workflow:
- Start Small: Don't attempt to use parking for the first time on a massive project. Practice on a small, multi-color motif or a corner of your main piece to build confidence and understand the rhythm.
- Work in Gridded Blocks: This technique works best on gridded fabric. Focus on completing one 10x10 square at a time, either row by row or column by column, to maintain control and easily track your progress.
- Park on the Front: Always bring your parked thread to the front of your work. This prevents the back from becoming a tangled mess and makes it easy to see which thread belongs to which upcoming stitch. Use a needle minder to keep parked needles organized and out of your way.
- Use a Digital Assistant: Apps like Pattern Keeper are invaluable for parking. They highlight the active stitch and symbol, making it incredibly easy to see where each color goes next without constantly consulting a paper chart.
- Complete Rows Systematically: A common approach is to work across a 10-stitch row, completing all the bottom legs of the cross stitches first. Then, you can work your way back across the same row to complete the top legs, parking threads as you go.
Key Insight: The parking method is less of a stitching technique and more of a project management system. Its primary benefit is efficiency and consistency in complex designs. By keeping multiple needles threaded and parked, you eliminate the mental and physical friction of constantly changing colors, allowing you to enter a state of flow and complete large projects much faster.
6 Essential Cross Stitch Tips Comparison
| Aspect | Start with the Right Fabric Count and Organization | Master the Proper Thread Management Technique | Follow the 'Complete All Cross Stitches in the Same Direction' Rule | Use Proper Lighting and Magnification | Grid Your Fabric for Accurate Counting | Learn and Apply the Parking Method for Multi-Color Projects |
|---|---|---|---|---|---|---|
| Implementation Complexity 🔄 | Moderate - fabric prep and edge finishing | Moderate - strand separation, tension, railroading | Low to Moderate - requires consistent stitch direction | Low - requires setup of lighting and magnification | Moderate - initial time investment to mark grid | High - managing multiple needles and threads |
| Resource Requirements ⚡ | Moderate - quality fabric, washing, ironing, edge tape | Moderate - thread conditioners, separation tools | Low - no special tools required | Moderate to High - quality LED lamps, magnifiers | Low to Moderate - water-soluble markers or thread, pre-gridded fabric | High - multiple needles, needle organizers, pattern apps |
| Expected Outcomes 📊 | ⭐⭐⭐⭐ Clear fabric holes, proper detail visibility, reduced errors | ⭐⭐⭐⭐ Smooth, flat stitches with minimal tangling | ⭐⭐⭐⭐⭐ Professional, uniform stitch appearance | ⭐⭐⭐⭐ Reduced eye strain, improved accuracy | ⭐⭐⭐⭐⭐ Minimized counting errors, faster progress | ⭐⭐⭐⭐ Efficient multi-color stitching, less thread waste |
| Ideal Use Cases 💡 | Beginners to experienced stitchers choosing fabric | Stitchers seeking professional stitch quality | All stitchers aiming for polished, exhibition-quality projects | Stitchers experiencing eye strain or working on high-count fabric | Large, complex patterns with extensive counting | Full-coverage, multi-color, confetti-heavy designs |
| Key Advantages ⭐ | Reduces eye strain, prevents fabric distortion, pattern clarity | Prevents tangling, improves stitch coverage, saves stitching time | Creates uniform light reflection and texture | Enables longer, comfortable stitching sessions | Virtually eliminates counting mistakes, increases confidence | Saves time, reduces thread changes, neater backs |
Stitch with Confidence and Create Your Masterpiece
You have journeyed through some of the most impactful tips on cross stitching, moving beyond basic instructions into the realm of true craftsmanship. This journey is not merely about putting thread to fabric; it is about building a foundation of skill that transforms a simple hobby into an art form. By embracing these techniques, you are setting yourself up for success, ensuring each project is less about frustration and more about the joy of creation.
The power of these methods lies in their synergy. Proper fabric preparation and meticulous gridding prevent the counting errors that can derail a complex pattern. Meanwhile, disciplined thread management and the parking method work hand-in-hand to tame even the most confetti-heavy designs, resulting in a cleaner back and smoother stitching rhythm. These aren't just isolated tricks; they are components of a holistic system for producing high-quality, beautiful work.
From Knowledge to Action: Your Stitching Blueprint
The most crucial step is turning this knowledge into muscle memory. Don't feel pressured to implement everything at once. Instead, choose one or two techniques to focus on for your next project.
- For your next small project: Try meticulously gridding your fabric before you make the first stitch. Notice how it changes your speed and accuracy.
- For a project with moderate color changes: Focus on mastering the loop start and keeping your stitch direction consistent. This will immediately elevate the neatness of your work.
- When you feel ready for a challenge: Tackle a pattern with significant color complexity and commit to trying the parking method. It may feel slow at first, but the organized approach will soon become an indispensable part of your process.
Mastering these tips on cross stitching is about more than just a polished final product. It is about building confidence. It is about developing a process that allows you to fully immerse yourself in the meditative flow of stitching, knowing you have the skills to handle any pattern that inspires you. Each perfectly formed 'X' is a small victory, a testament to your growing expertise and dedication. You are no longer just a stitcher; you are an artist in control of your medium, ready to create heirlooms that will be cherished for years.
Ready to put these advanced techniques into practice on a project that truly matters? Transform your favorite photo into a one-of-a-kind pattern with a custom kit from Cross Stitched. We provide everything you need, from premium threads to perfectly printed fabric, so you can focus on the art of stitching. Visit Cross Stitched to start creating your personalized masterpiece today.


