

Quick answer: Cross stitch requires five core materials: even-weave fabric (most commonly 14-count Aida), stranded cotton embroidery floss, a blunt tapestry needle, an embroidery hoop or frame, and a charted pattern. Optional extras include scissors, a needle minder, and a light pad for dark fabrics.
Frequently asked questions
What do you need to start cross stitching?
To start cross stitching you need Aida cloth or evenweave fabric, stranded cotton floss (e.g. DMC), a size 24 or 26 tapestry needle, an embroidery hoop, and a pattern. Most beginner kits bundle all these items together.
What fabric is used for cross stitch?
Aida cloth is the most popular cross stitch fabric for beginners. It is a stiff, evenweave cotton with a visible grid of holes. Linen and other evenweave fabrics are preferred by advanced stitchers for finer detail.
What thread is used for cross stitch?
Stranded cotton embroidery floss is the standard thread for cross stitch. DMC and Anchor are the two most widely used brands. The floss comes in six strands; most cross stitch uses two strands at a time on 14-count Aida.
What size needle do I need for cross stitch?
A size 24 tapestry needle is correct for 14-count Aida. For finer 18–28 count fabrics, use a size 26 or 28 needle. Tapestry needles have blunt tips that pass through fabric holes without splitting threads.
Do I need an embroidery hoop for cross stitch?
A hoop or frame keeps fabric taut and improves stitch evenness, but is not strictly required. Many experienced stitchers work without one. Beginners generally find a plastic snap hoop helpful for maintaining consistent tension.
So, you’re ready to dive into the wonderfully relaxing world of cross stitch. Fantastic! Before you can bring your first design to life, you'll need to gather a few key supplies. Think of it like getting your ingredients together before you start cooking—having the right cross stitch materials on hand makes the whole process smoother and a lot more fun.
Your First Stitch: A Guide to Essential Supplies
Starting a new hobby like cross stitch is a pretty exciting feeling. Part of the magic is its simplicity; with just a handful of basic tools, you can turn a plain piece of fabric into a unique work of art. It’s no wonder this craft has seen a huge comeback, becoming a go-to for anyone wanting to create one-of-a-kind home decor or heartfelt gifts.
This isn't just a feeling, either—the numbers back it up. The global cross-stitch market was valued at around USD 0.15 billion in 2024 and is set to keep growing, all thanks to the boom in DIY crafts and the endless supply of patterns online.
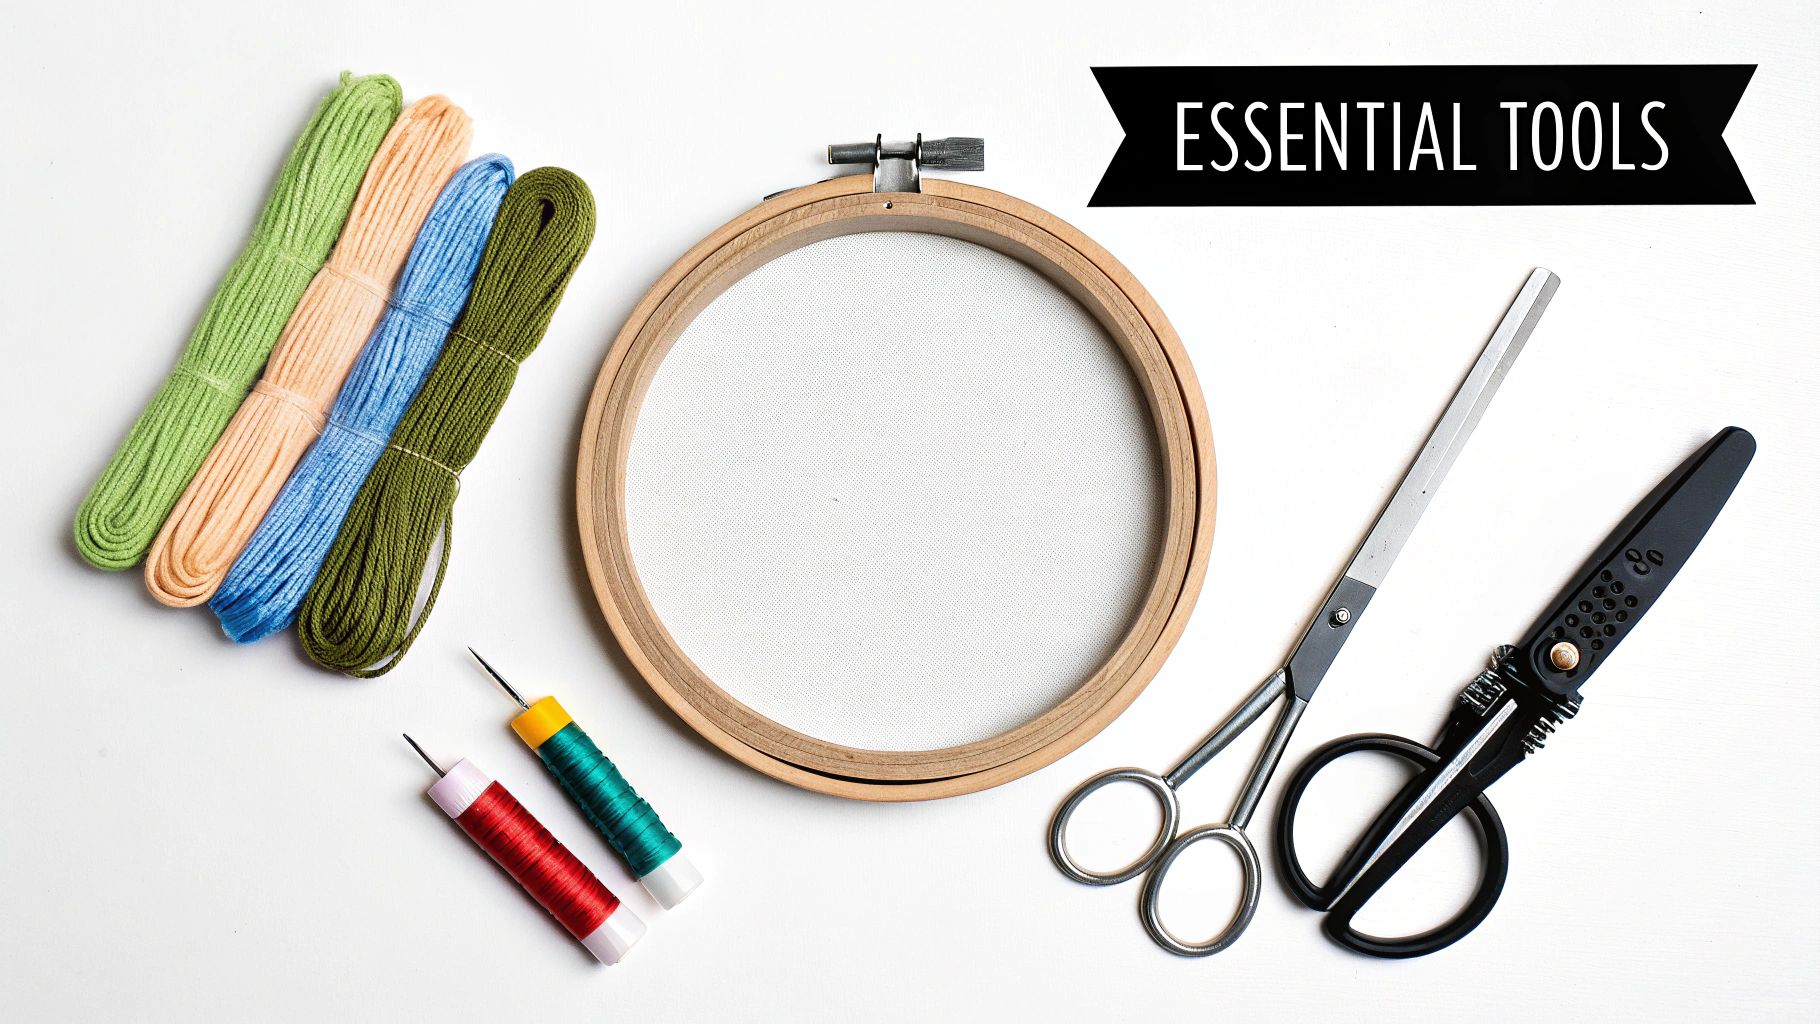
The Core Toolkit Every Stitcher Needs
The good news? You don't need to buy out the entire craft store to get started. The essential cross stitch materials boil down to a core toolkit that will see you through your first project and many more to come. These are the absolute non-negotiables.
- Fabric: This is your canvas, the woven grid where your design will unfold.
- Thread (Floss): This is your paint, bringing all the color and personality to your piece.
- Needle: The trusty tool that carries the thread through the fabric to create each stitch.
- Hoop or Frame: This holds your fabric tight, which is the secret to beautifully even stitches.
Starting with decent quality supplies really does set you up for success. Good materials help you sidestep common frustrations like constantly tangled thread or wonky stitches, letting you relax and enjoy the rhythm of the craft.
If you're just starting out, the easiest way to get everything you need is with a bundled package. Our guide on the best beginner cross stitch kits can point you toward an all-in-one option that removes all the guesswork. Once you have these basics in hand, you’ll see just how simple it is to start your stitching adventure.
Choosing Your Canvas: An Introduction to Stitching Fabrics
The fabric you stitch on is quite literally the foundation of your entire project. Think of it like a painter choosing a canvas—the texture and quality of that surface will shape everything that comes after. Getting your cross stitch materials right starts here, and your fabric choice influences not just the final look of your art, but the whole experience of stitching it.
The world of cross stitch fabric can feel a little overwhelming at first, but it really boils down to three main players: Aida, Evenweave, and Linen. Each one has its own personality, and picking the right one often comes down to the project you have in mind and your own comfort level. Let’s break them down.
Decoding Fabric Count
Before we get into the different types, let's clear up one of the most important terms you'll encounter: fabric count. You’ll see numbers like "14-count" or "28-count" on fabric packaging. This number simply tells you how many stitching squares (or threads) there are in one linear inch of the fabric.
It’s pretty simple: a lower count means fewer, bigger squares per inch, which gives you larger stitches. A higher count means more, smaller squares, which is perfect for creating finer, more detailed work.
Key Takeaway: The fabric count directly controls the final size of your stitched piece. A pattern stitched on 14-count Aida will come out much larger than the same pattern stitched on 18-count Aida.
Understanding this is key to planning your projects. For example, if your pattern is 140 stitches wide and you use 14-count fabric, your finished piece will be 10 inches wide (that's just 140 stitches ÷ 14 count = 10 inches). This quick bit of math is your best friend for making sure you buy enough fabric and that your project will fit in the frame you picked out!
The infographic below gives a great visual overview of the common fabric types and the counts you'll typically find them in.
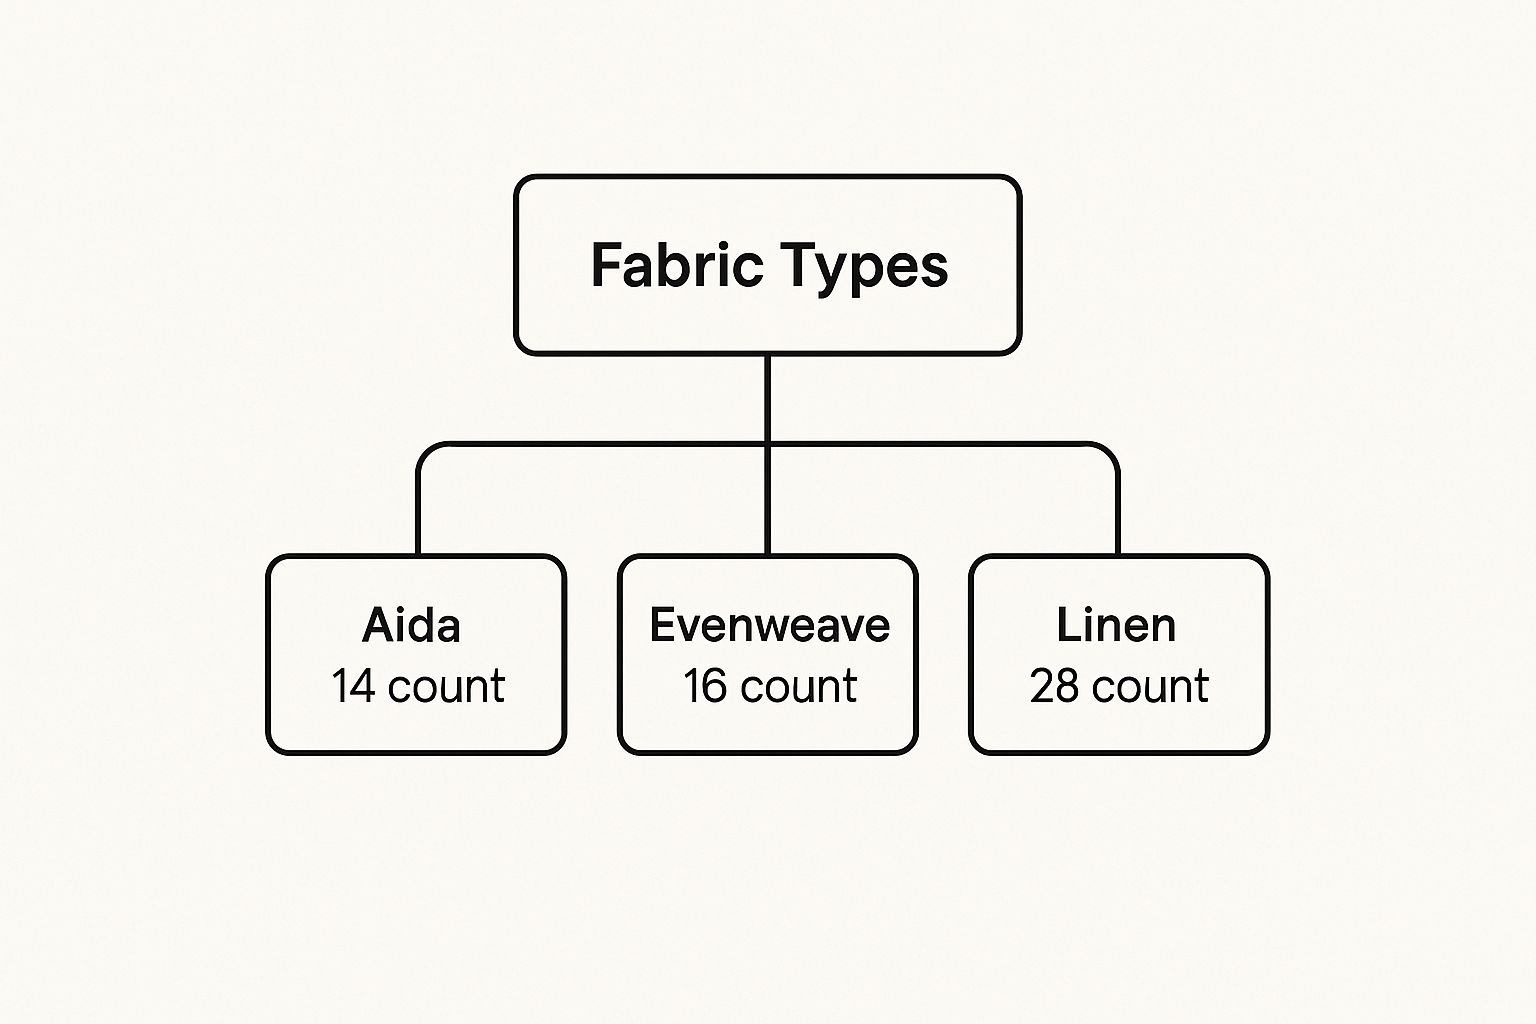
As you can see, there’s a natural progression from the easy-to-use Aida all the way up to the more refined Linen, with each offering a different stitching experience.
The Big Three: Aida, Evenweave, and Linen
Now, let's get to know the three most common fabrics you'll come across. They each have a unique feel and present different levels of challenge, so your choice is often a personal one.
-
Aida Cloth: This is the fabric almost everyone starts with, and for good reason. Made from 100% cotton, Aida is woven into a perfect grid of easy-to-see squares, so you never have to guess where to put your needle. It's naturally a bit stiff, which helps it hold its shape while you work, and it comes in lots of counts—with 14-count being the most popular by far.
-
Evenweave: Just like the name implies, this fabric has an perfectly even number of threads woven horizontally and vertically. Instead of stitching into a single square like on Aida, you typically stitch "over two" threads. This little change creates a much smoother, less "grid-like" background for your stitching, making it a fantastic next step up from Aida.
-
Linen: Often considered the gold standard for heirloom pieces, linen has a gorgeous, natural texture that’s hard to beat. Its threads can have tiny, natural variations in thickness (called slubs), which adds a beautiful, rustic character. That same quality, however, makes it trickier to work with. Just like evenweave, you’ll usually stitch over two threads on linen.
To help you decide, here's a quick comparison of these fabrics and what they're best suited for.
Cross Stitch Fabric Comparison
| Fabric Type | Best For | Pros | Cons |
|---|---|---|---|
| Aida | Beginners, projects with full coverage, kids' crafts | Easy to count, holes are obvious, stiff, widely available | Can look blocky, not ideal for fractional stitches |
| Evenweave | Intermediate stitchers, projects with open space, samplers | Smooth and refined appearance, softer than Aida | Holes aren't as clear, requires counting "over two" |
| Linen | Experienced stitchers, heirloom projects, delicate designs | Beautiful drape, unique and natural texture | Can be expensive, thread slubs make it challenging to count |
Ultimately, the best fabric is the one that feels right for you and your project. Don't be afraid to experiment!
If you want to go even deeper, we have a complete guide on how to choose the best fabric for cross stitch. Taking a moment to select the right canvas is the first and most important step toward creating a piece you’ll be proud of for years.
2. Painting with Thread: A Look at Floss and Fibers
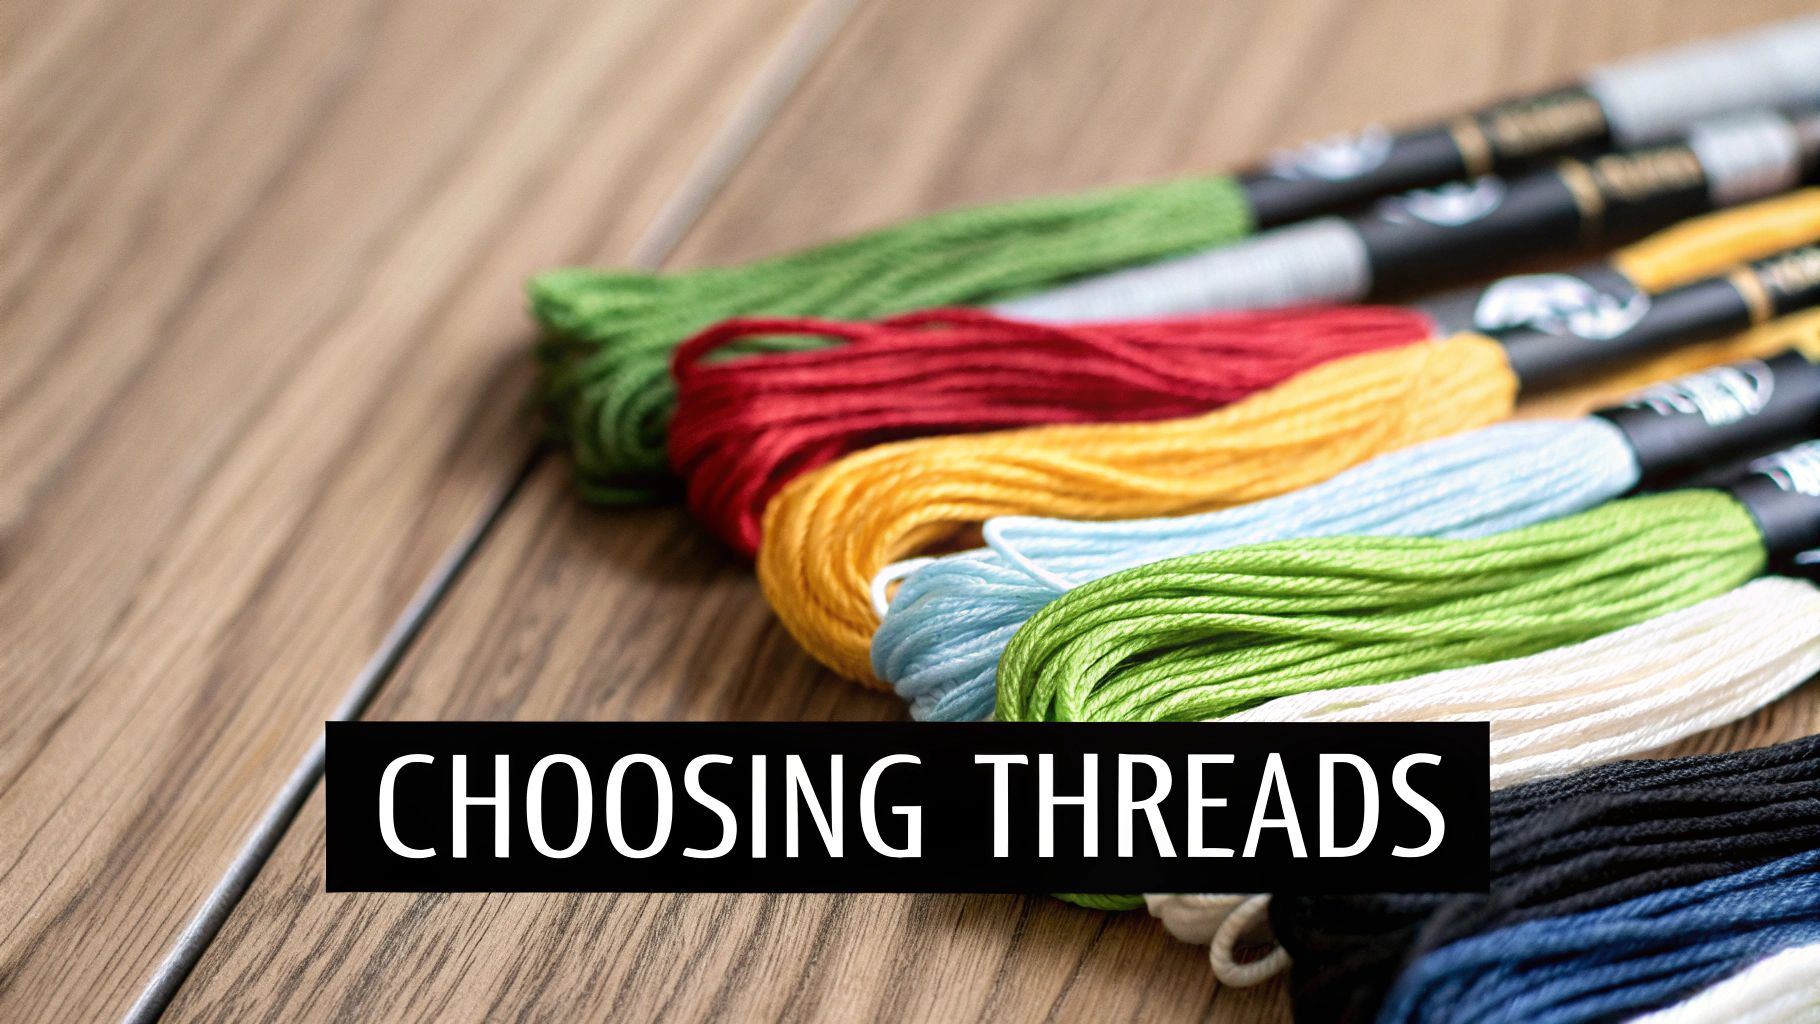
If your fabric is the canvas, then embroidery floss is your paint. This is where your project truly comes to life, bursting with color, texture, and personality. As you start gathering your cross stitch materials, you'll quickly discover that six-strand cotton embroidery floss is the undisputed star of the show. It's the go-to thread used in almost every pattern and kit you'll come across.
Each bundle of this floss, known as a skein, is made up of six individual strands of thread that are loosely twisted together. This clever design gives you incredible control over the thickness of your stitches, allowing you to easily separate the strands to get the exact look you want.
Mastering the Strands
Before you even think about threading your needle, you'll almost always need to separate your floss. Your pattern will tell you exactly how many strands to use for a particular section. For most projects on 14-count Aida, the magic number is two strands. This creates lovely, full stitches that cover the fabric squares perfectly without looking bulky.
The number of strands you choose has a huge impact on how your finished piece looks:
- One Strand: Perfect for creating delicate, fine lines. This is the ideal choice for backstitching, which adds sharp outlines and tiny details like lettering or facial features.
- Two Strands: This is your bread and butter. It provides excellent coverage for standard cross stitching on 14-count and 16-count fabrics, making it the most common choice.
- Three or More Strands: Want a bold, plush look? Using three or more strands creates thick, textured stitches with heavy coverage. It's fantastic for making certain elements pop or when working on lower-count fabrics like 11-count Aida.
Think of it this way: by changing the number of strands, you're adding depth and dimension to your work. A flower stitched with three strands will look bolder and feel closer to the viewer than a background stitched with the standard two. You're in control of the artwork's perspective.
The love for high-quality thread is a big deal, and it reflects just how popular this craft is worldwide. The broader embroidery market, cross stitch's close cousin, was valued at a massive USD 2.57 billion in 2021 and is only expected to grow. This growth fuels the demand for premium materials, including the beautiful floss every stitcher depends on.
Beyond the Basics: Exploring Specialty Threads
While standard cotton floss is the reliable workhorse in your stitching basket, specialty threads are the fun special effects. They introduce unique textures and finishes that can take a project from beautiful to absolutely breathtaking. Once you've got the hang of the basics, don't hesitate to play around with them.
Here are a few popular options to experiment with:
- Variegated Floss: This thread is a game-changer. It’s dyed with several colors that gently shift along its length, creating stunning, subtle gradients with just one continuous strand.
- Metallic Thread: Want to add some sparkle? Infused with shimmering filaments, this thread is perfect for holiday designs, magical accents, or just a bit of glamour.
- Satin Floss: Made from rayon, this floss has a high-sheen, silky finish. It gives your stitches a luxurious, smooth appearance that really catches the light.
- Light Effects Floss: This category includes all sorts of fun options, like glow-in-the-dark thread, that can add a surprising and playful element to your work.
Getting to know these different fibers opens up a whole new world of creative possibilities. For a closer look, be sure to check out our detailed guide on the different types of embroidery floss and see how they can transform your next project.
Getting Your Stitching Kit Together
Once you've got your fabric and floss, you'll need a few more tools to make the magic happen. Think of these as the supporting cast in your stitching adventure. They're the things that make the whole process smoother, more precise, and frankly, a lot more fun. Investing in a few quality basics right from the start will save you a world of frustration down the road.
First up is the humble tapestry needle. This isn't your average sewing needle. Instead of a sharp point, it has a blunt, rounded tip and a much larger eye. This design is pure genius for cross stitch—it’s made to slip easily through the holes in your Aida or evenweave fabric, not to pierce it. That simple difference is what lets you create those perfectly uniform "X" stitches without snagging the fabric threads.
Matching Your Needle to Your Fabric
Picking the right needle size is one of those little details that makes a huge difference. The sizing can be a bit counterintuitive: the higher the number, the smaller and finer the needle. You want a needle that slides through the fabric holes cleanly without stretching them out, which can make your stitches look wonky.
Here’s a simple guideline I always follow:
- For 11-14 count fabric, a size 24 tapestry needle is your best bet.
- For 16-18 count fabric, you’ll want to step down to a finer size 26 needle.
- For those really high-count fabrics like linen (28 count and up), a delicate size 28 needle is the way to go.
Think of your needle as a key and the fabric hole as a lock. The right size needle fits perfectly, letting the thread pass through without damaging the weave. Using one that's too big is like forcing the wrong key—it’ll stretch the hole and mess everything up.
Keeping Your Work Taut with Hoops and Frames
Another absolute must-have is an embroidery hoop or a frame. Its one and only job is to keep your fabric pulled tight and even while you work. This tension is the secret ingredient for beautiful, consistent stitches and it prevents the fabric from puckering up as you fill it in. Trust me, stitching on a taut canvas is infinitely easier and faster.
You’ve got a few great options to choose from:
- Wooden Hoops: The classic choice. They have a great feel and provide a really firm grip.
- Plastic Hoops: Many of these have a little ridge or lip that gives them an extra-secure lock on the fabric.
- Q-Snap Frames: These are modern, lightweight plastic frames. They're easy to put together and use simple clamps to hold the fabric drum-tight.
Finally, you’ll want a small, sharp pair of embroidery scissors. Their fine, pointed tips are perfect for snipping your thread right up against the fabric. This gives you a super neat and tidy finish on both the front and the back of your project. They're an indispensable part of any stitcher's toolkit.
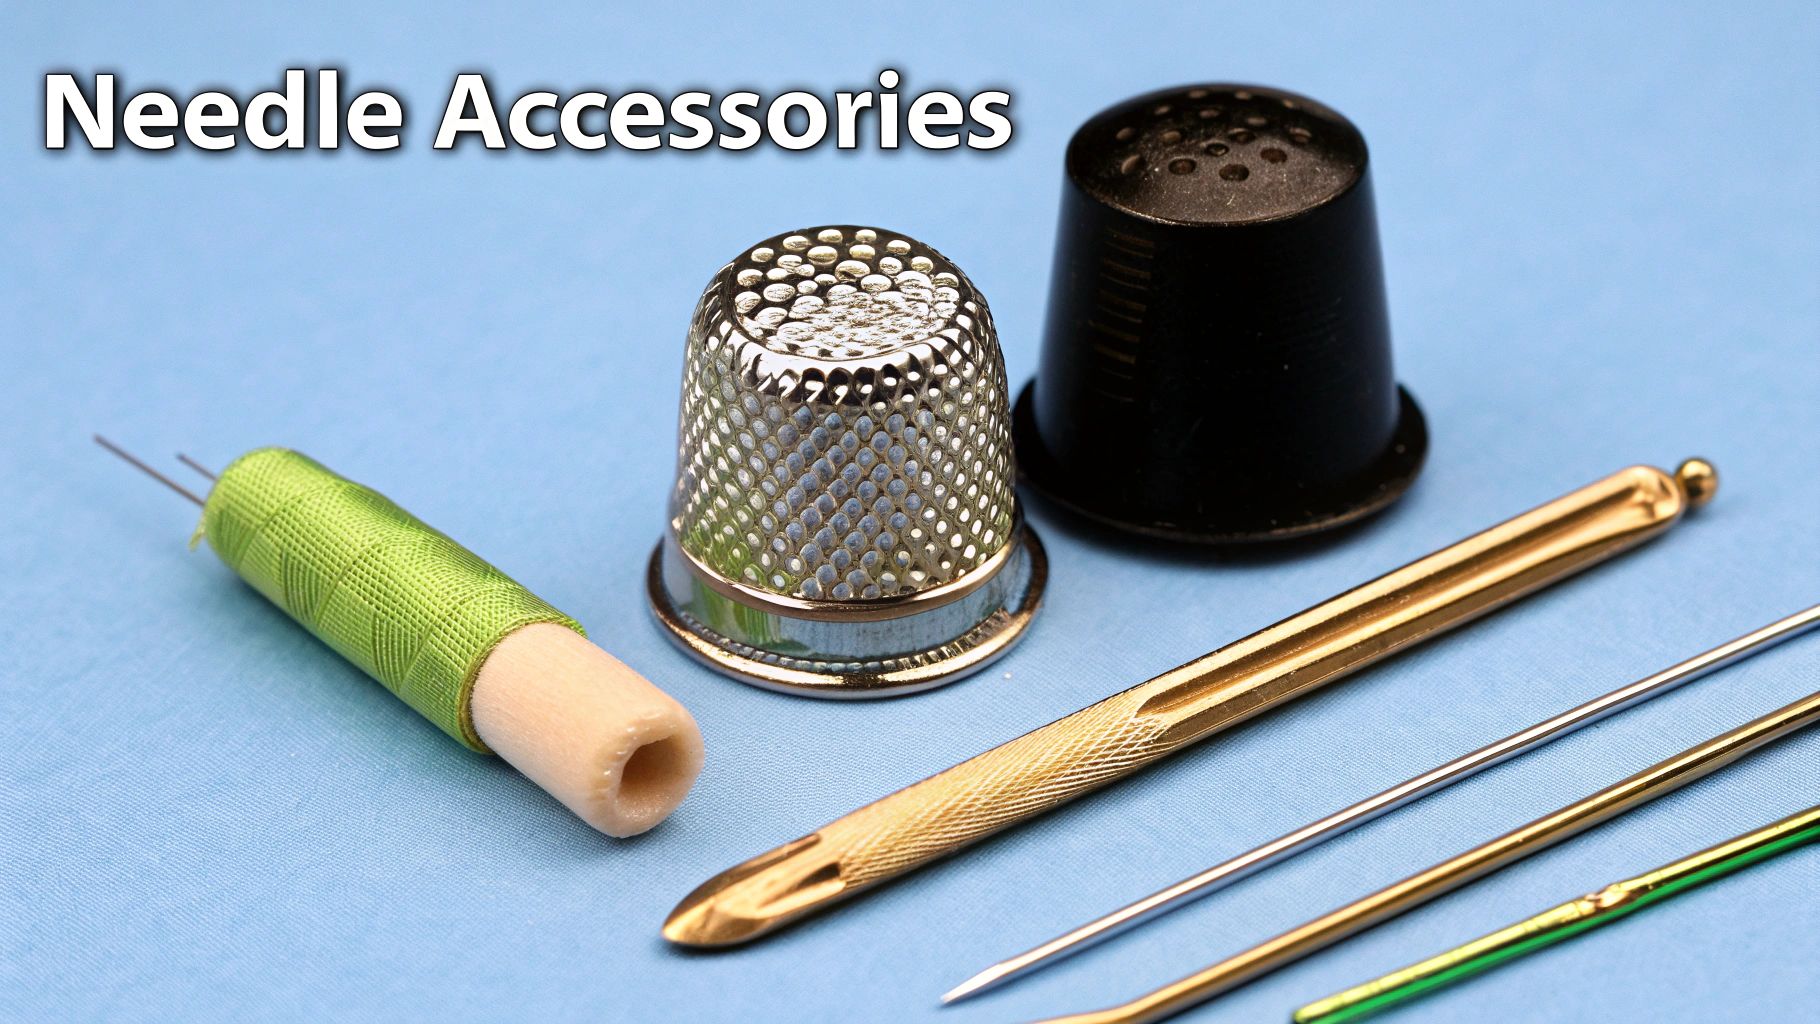
Helpful Accessories for a Better Stitching Experience
Once you've got the essentials—fabric, thread, and a needle—you can start to explore a whole world of clever accessories designed to make your stitching life easier and more enjoyable. While you don't need any of these to finish a project, they solve a lot of the common little frustrations that can crop up. Think of them as quality-of-life upgrades for your hobby.
The first thing we need to talk about is your pattern, or chart. This is your roadmap, the key that tells you which color to stitch and where. Patterns typically come in two flavors: good old-fashioned paper charts or modern digital files, usually PDFs that you can pull up on a tablet or your phone.
Keeping Your Supplies in Order
Tangled floss and runaway needles are a stitcher’s rite of passage, but they don’t have to be. A few simple gadgets can put an end to that chaos, so you can spend less time untangling and more time actually stitching.
- Floss Bobbins and Organizers: Winding your floss onto little cardboard or plastic bobbins is step one for taming your thread collection. Pop them into a clear organizer box, and suddenly you can see your entire color palette at a glance. It's a game-changer.
- Needle Minders: These are a lifesaver! They're basically a pair of small, decorative magnets. One part goes behind your fabric, the other sits on top, giving you the perfect magnetic spot to park your needle when you take a break. No more lost needles in the couch cushions.
Investing in a bit of organization isn't just about being tidy. It's about creating a calm, seamless workflow so you can lose yourself in the relaxing rhythm of stitching without interruption.
This organized approach is getting a big boost from digital tools. The market for needlecraft patterns, which was valued at around USD 500 million in 2025, is growing in part because it's so easy now to find and manage patterns online. If you're curious about how tech is changing the craft world, you can learn more by exploring needlecraft pattern trends.
Enhancing Comfort and Precision
As you move on to bigger or more complex projects, a couple of extra tools can save your eyes and protect your beautiful work. They're especially useful if you enjoy long, relaxing stitching sessions.
A grime guard is a simple but brilliant invention—it’s just a tube of fabric with elastic at both ends that fits snugly around your hoop or frame. It keeps the oils from your hands off the edges of your fabric, preventing any dingy discoloration over time.
Good lighting and magnification are your best friends, especially when you're working on high-count fabric with tiny stitches. A dedicated craft lamp that mimics natural daylight helps you see colors accurately and cuts down on eye strain. Likewise, a magnifier, whether it's a clip-on or a floor-standing model, makes a world of difference, ensuring your stitching stays neat and the whole process remains fun, not frustrating.
Taking Care of Your Stash and Finished Pieces
That last stitch might feel like the end, but your creative work isn't quite done. Taking good care of your cross-stitch supplies and your finished art is every bit as important as the stitching itself. Think of it as protecting your investment—it ensures your tools last and your projects become beautiful, long-lasting keepsakes.
The first step is simply good storage. Keep your floss out of direct sunlight, which is a notorious color-fader. I always recommend winding your threads onto bobbins and tucking them into organizer boxes. It’s a little bit of work upfront, but it saves you from the inevitable frustration of a tangled mess later.
Getting Your Project Ready for its Debut
Once you’ve tied off that final thread, a couple of finishing touches will give your project that polished, professional look. These steps are all about cleaning away any oils from your hands, smoothing out those pesky hoop marks, and really making your stitches stand out.
I always give my finished pieces a gentle hand-wash. Just use lukewarm water and a tiny drop of a mild, clear soap (a specialized quilt wash works wonders too). Let it soak for a bit, swish it around gently, and then rinse it thoroughly with cool water. Whatever you do, don't wring it out! The best way to dry it is to roll the damp piece up in a thick, clean towel to soak up most of the water.
Here's a pro-tip for ironing: lay your project face down on another thick, clean towel. Press it from the back with your iron on a warm setting. This little trick prevents you from squashing your beautiful stitches and actually helps them look more defined and plump.
The Final Finish and Framing
Now that your piece is clean and pressed, it’s ready for the spotlight. How you choose to finish your work can completely transform it from a piece of stitched fabric into a genuine work of art.
You've got so many creative options that go way beyond just sticking it in a frame:
- Framing: This is the classic for a reason. It protects your hard work behind glass and gives it a timeless look.
- Pillows: A fantastic way to turn your stitching into a cozy, handmade piece of home decor.
- Wall Hangings: For a more modern vibe, you can use a small dowel or a decorative hanger.
- Ornaments: Small projects, especially holiday-themed ones, make for perfect little ornaments.
These final touches are what truly preserve all the time and effort you poured into your project, making sure it’s something you can cherish for years to come.
Common Questions About Cross Stitch Materials
Diving into the world of cross stitch can feel a bit like learning a new language, and it's totally normal to have a few questions. Getting the basics down early on will make your stitching journey so much more enjoyable. Let's clear up some of the most common things new stitchers wonder about.
What Do I Absolutely Need to Start?
It's easy to get overwhelmed by all the gadgets and gizmos, but you really only need four things to get started. Think of it as your essential toolkit—enough to create something beautiful right away.
- Fabric: Start with a piece of 14-count Aida. It's the gold standard for beginners because its grid is so easy to see and count.
- Floss: You just need a handful of colors of standard six-strand cotton embroidery floss to get going.
- Needle: A size 24 tapestry needle is your best bet. It’s designed to slide perfectly through the holes in 14-count Aida without splitting the fabric.
- Hoop: A simple embroidery hoop, maybe 5 or 6 inches in diameter, will keep your fabric tight and your stitches even. That's it!
Honestly, the easiest way to begin is with a beginner's kit. It packages up all these essential cross stitch materials with a pattern and instructions, so you can skip the guesswork and get right to the fun part.
Can I Just Use Regular Sewing Thread Instead of Floss?
I hear this one a lot, and it's a great question! But the short answer is no, you really want to stick with embroidery floss. That lovely, full look you see in finished cross stitch pieces comes from the thickness of the floss. It's specifically designed to create plump, neat little 'X's that cover the fabric squares completely.
Sewing thread, on the other hand, is much, much thinner. If you tried to use it, your stitches would look skinny and sparse, leaving a lot of the fabric visible. It just won't give you that classic, satisfying cross stitch texture. For a piece you'll be proud of, always go for the proper floss.
Ready to turn your favorite photos into timeless keepsakes? At Cross Stitched, we provide custom, all-in-one kits with everything you need to start your next masterpiece. Explore our collections and create your personalized kit today.


