

There's nothing quite like turning a cherished family photo into a handmade piece of art. Creating your own cross stitch patterns from photos is the perfect way to capture a special memory, turning a moment in time into something you can hold. This is where modern tech meets a timeless craft, and it opens up a world of possibilities for creating truly personal heirlooms.
Turn Your Favorite Memories Into Stitched Art
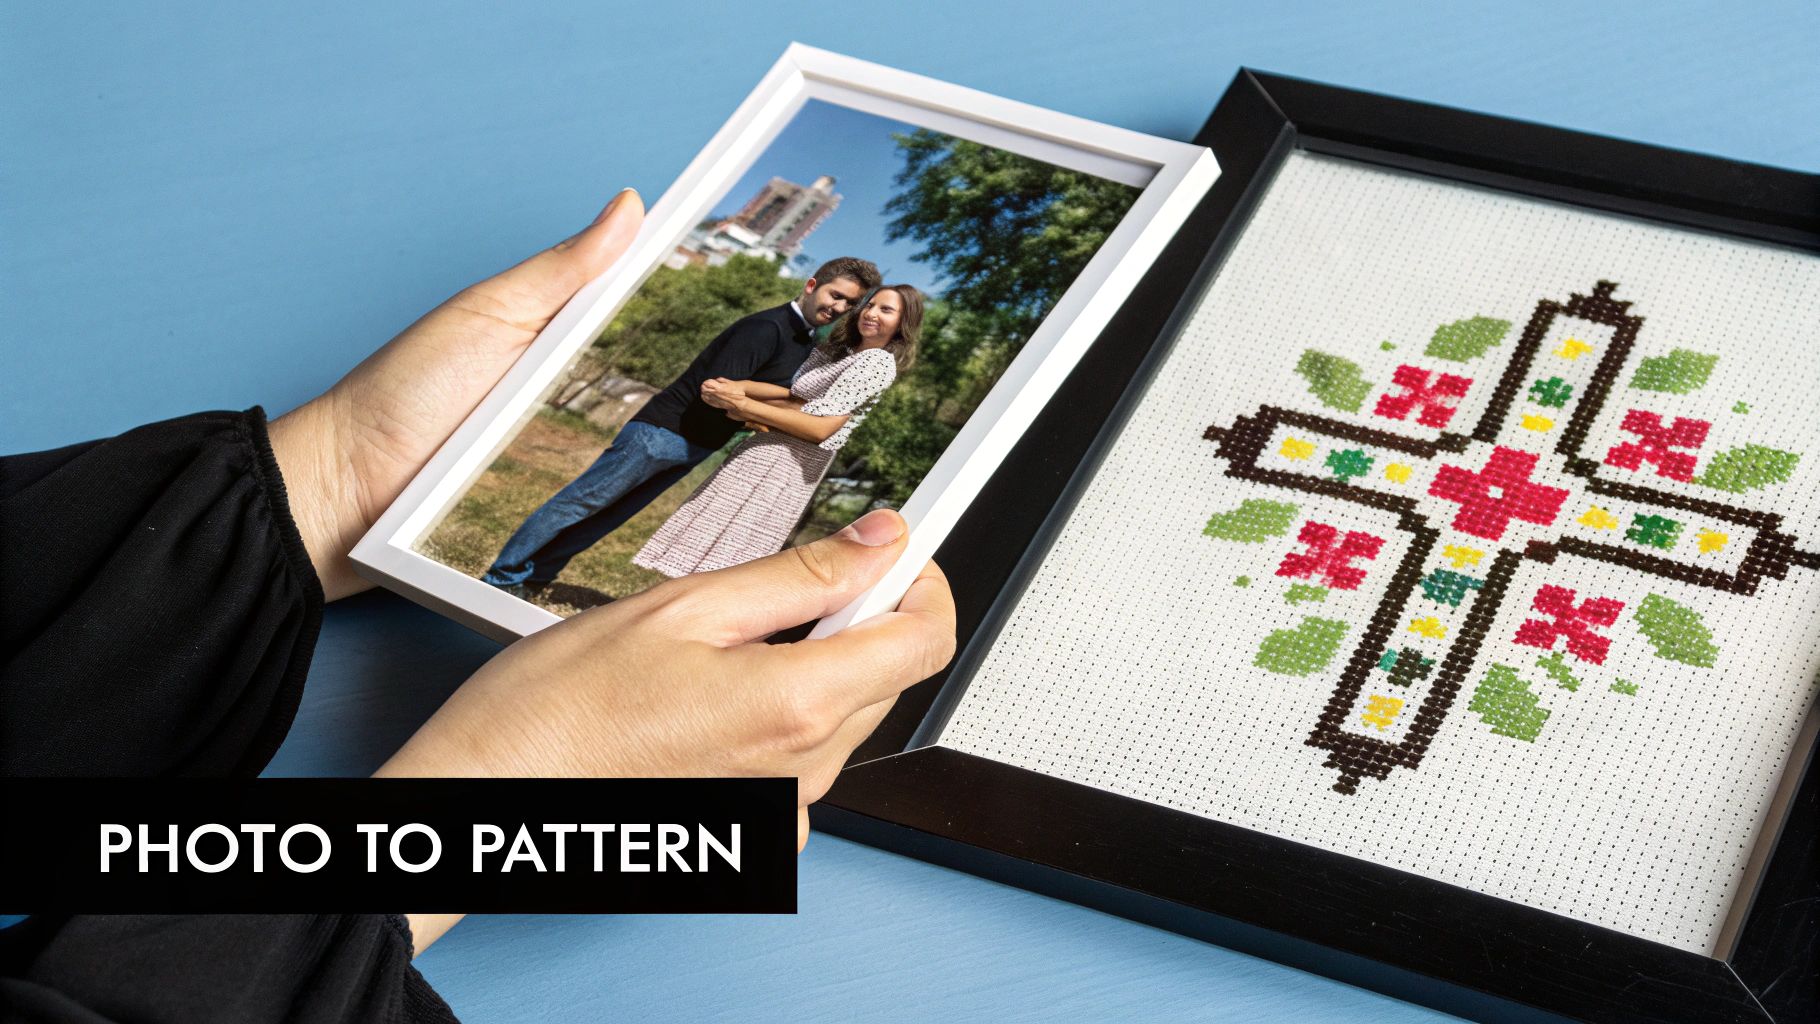
Stitching a design with personal meaning is a special kind of magic. A portrait of a loved one, a snapshot of a goofy pet, or that unforgettable vacation sunset—a custom pattern tells a story in a way no store-bought kit ever could. The great news is that the process is more straightforward than you might think, mixing your creative vision with some simple digital tools to make something one-of-a-kind.
This guide will walk you through exactly how to create beautiful cross stitch patterns from your photos, with clear, actionable advice to help you along the way. I'll skip the heavy technical jargon and focus on what really makes a difference.
You'll learn how to:
- Pick the right kind of image that will translate well into thread.
- Use software to convert that photo into a stitchable pattern.
- Tweak the digital design to clean up messy "confetti" stitches.
- Get your fabric and floss ready for a smooth and enjoyable stitching experience.
Why This Craft Is More Popular Than Ever
The love for personalized crafts is booming, and cross-stitch is leading the charge. The global market for this hobby was valued at around USD 0.15 billion and is expected to keep growing, with a compound annual growth rate (CAGR) of about 4% through 2033. This growth is all about the DIY trend and our desire for unique home decor and gifts that truly come from the heart. For a deeper look, check out the full cross-stitch market report.
By the time you finish this guide, you won't just have a pattern. You’ll have the know-how to create a personal heirloom that tells your story, one stitch at a time.
Comparing Photo to Pattern Methods
Before we get into the nitty-gritty, it helps to know the different ways you can approach this. Here’s a quick look at the most common methods for turning a photograph into a cross stitch pattern. Each one has its pros and cons, depending on your goals, budget, and how much hands-on control you want.
| Method | Best For | Skill Level | Cost |
|---|---|---|---|
| Online Converters | Quick, simple projects and beginners wanting to experiment. | Beginner | Free to Low |
| Desktop Software | Crafters seeking maximum control over colors and details. | Intermediate | Mid to High |
| Full-Service Kits | Stitchers who want an all-in-one solution without the prep work. | All Levels | High |
For this guide, we're going to focus mainly on using software and online tools. This puts you in the driver's seat, giving you full creative control from start to finish. So, let’s get started by picking the perfect photo for your project.
Choosing and Preparing the Perfect Photo
The single most important decision you'll make in this whole process happens right at the beginning: choosing your photo. Honestly, the quality of your finished cross-stitch piece depends almost entirely on the quality of the image you start with. A fantastic photo gives the pattern-making software everything it needs to create a design that's a genuine joy to stitch.
Think of it this way: even the most advanced pattern generator can't invent detail that isn't there. If you feed it a blurry, poorly-lit photo, you'll get a muddy, confusing pattern in return. It’s a classic "garbage in, garbage out" situation. So, before you even open a piece of software, let's get the source image right.
If you want a deeper dive into photography itself, you might find these tips on taking amazing photos useful for capturing that perfect shot from the start.
What to Look For in a Photo
As you scroll through your camera roll, you need to develop an eye for what will translate well into thread. Not every picture is a good candidate, and learning to spot the winners will save you a ton of frustration later on.
Keep these qualities at the top of your list:
- High Resolution: This is non-negotiable. You need a sharp, clear image. The more pixels the software has to work with, the more nuance and detail it can capture in the final pattern.
- Good, Even Lighting: Soft, natural light is your best friend. It avoids the harsh shadows and blown-out highlights that translate into big, ugly blocks of color in a stitch pattern.
- A Clear Subject: The star of your photo—be it a person, a pet, or a landscape—needs to stand out. If it’s hard to tell what you're supposed to be looking at, the pattern will be a mess.
- Simple Backgrounds: This one is huge. A busy, cluttered background just creates "confetti"—those annoying single stitches of random colors that make a piece look noisy and amateur.
Here's a trick I use: squint your eyes and look at the photo from a few feet away. Can you still easily make out the main subject and its key features? If yes, you've probably got a winner.
A Little Editing Goes a Long Way
Once you’ve picked your photo, don't just throw it into the converter. A few minutes of simple editing can radically improve your final pattern. You don't need to be a Photoshop pro; basic tweaks are all it takes. The goal is simply to make the image easier for the software to "read."
The most powerful edit you can make is cropping. Get in there and crop tightly around your subject. This instantly removes background noise and forces the focus right where you want it.
Most basic photo editors have a simple cropping tool that lets you reframe the image perfectly.
This one action does so much heavy lifting. It tells the software exactly what's important and prevents it from getting distracted by a random tree or a car in the background.
Next, play with the light and color. Bumping up the contrast just a little can make edges pop and bring out details you didn't even notice. If the background is still a bit distracting, see if your editor has a simple blur tool. Softening the background makes your subject jump forward. I also sometimes find that reducing the color saturation by about 10% helps the software choose a more harmonious and manageable floss palette.
Photos to Avoid at All Costs
Just as important as knowing what works is knowing what doesn't. Some photos are doomed from the start, and it’s far better to pick another one than to try and force a bad image to work.
Do yourself a favor and steer clear of these:
- Low-Resolution Shots: Never, ever use a photo you saved from social media or that was sent to you over a messaging app. These are almost always compressed to a tiny size, and the detail is gone forever. Always work from the original, full-size file.
- Harsh, Dramatic Shadows: That cool, artistic photo with a deep shadow across someone's face? It will become a giant, featureless blob of black or dark grey thread, completely wiping out the details you love.
- Busy Group Photos: Trying to convert a picture with lots of tiny faces or intricate, overlapping people is a recipe for disaster. The software just can't render that much small detail, and you'll end up with a muddled, unrecognizable blob.
Putting in this little bit of effort upfront makes all the difference. By being picky and prepping your image, you’re setting yourself up for a cleaner pattern, a much more enjoyable stitching experience, and a finished piece you’ll be incredibly proud of.
Finding the Right Pattern Generation Tool
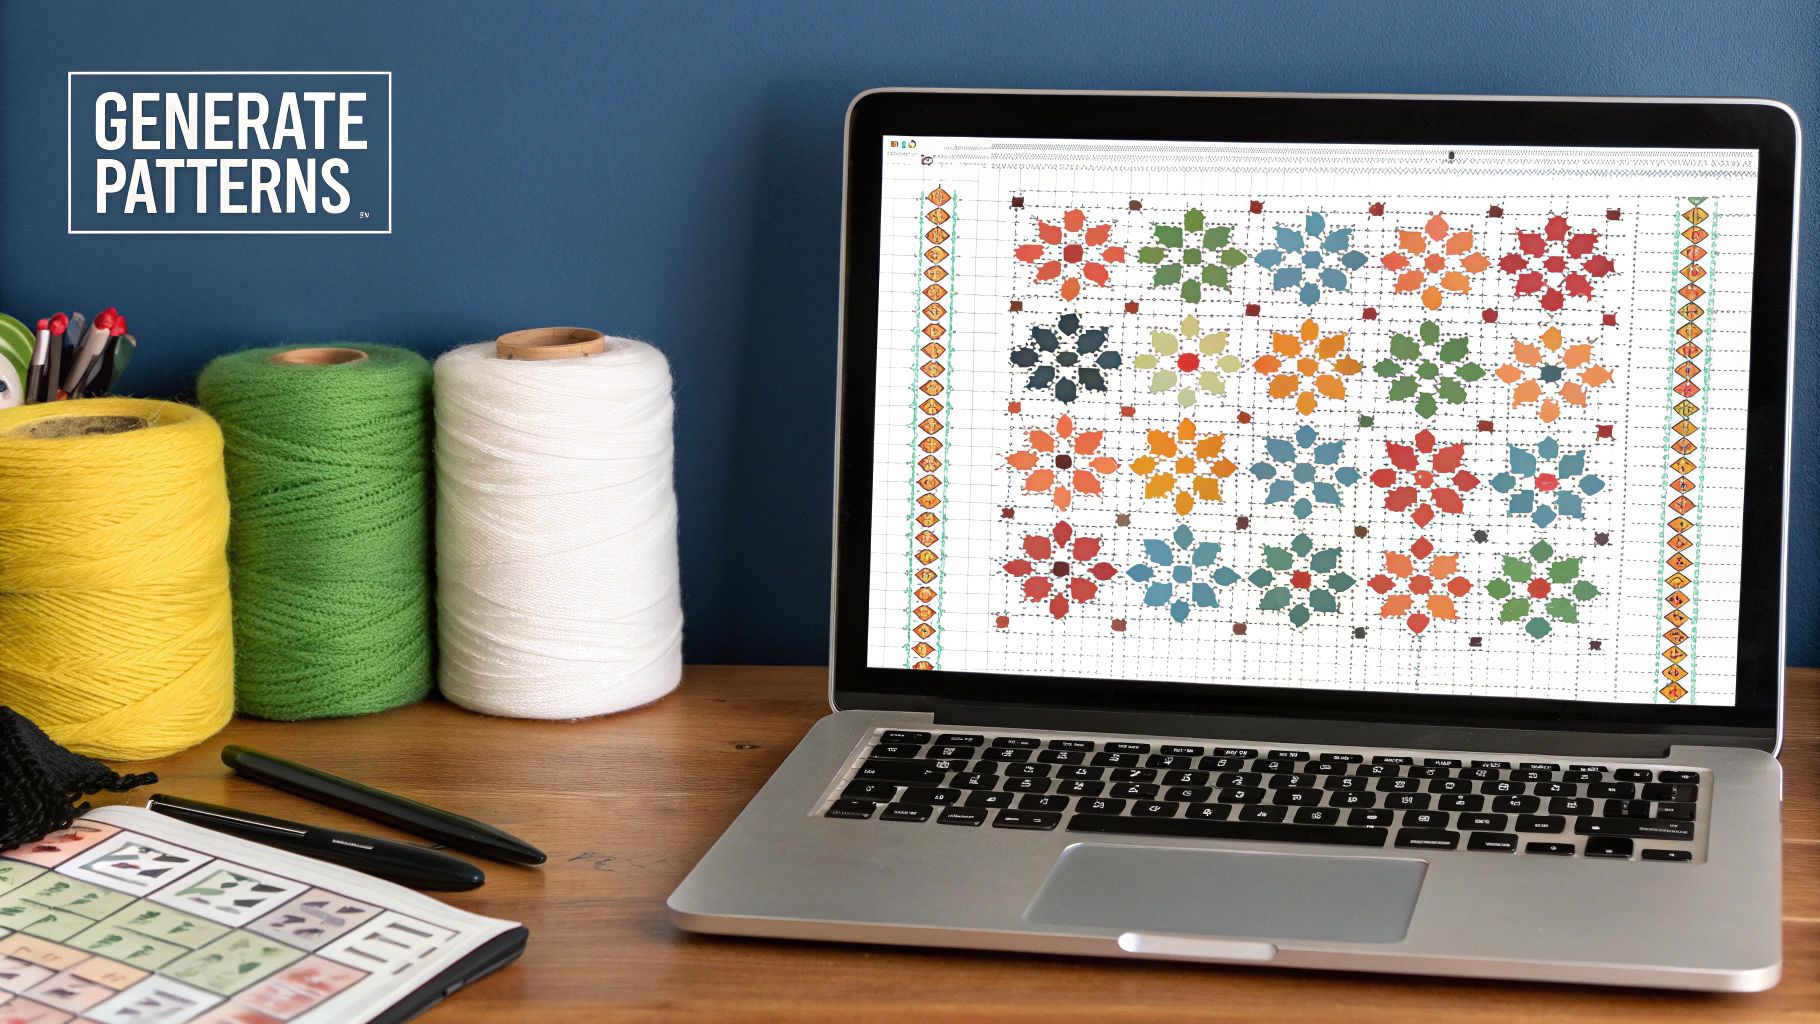
Alright, you've got your photo prepped and ready to go. Now for the fun part: choosing the right tool to turn that image into a stitchable chart. This is where the magic happens, and the software you pick will have a huge impact on your final piece.
The market is full of options, from free, one-click websites to powerful desktop programs packed with features. Your best bet depends on your budget, how tech-savvy you feel, and just how detailed you want your finished cross-stitch to be. Let's break down how to create cross stitch patterns from photos using the main types of tools available.
Free Online Converters: A Great Starting Point
If you're just dipping your toes into making your own patterns, free online converters are the perfect place to start. There's no financial commitment, so you can experiment freely. These browser-based tools are incredibly easy to use—you just upload your picture, tweak a couple of settings like size and the number of colors, and you’ll have a pattern in seconds.
They're fantastic for a few specific scenarios:
- Testing an idea: Not sure if a photo will translate well to cross-stitch? A free converter gives you a quick-and-dirty preview.
- Simple, graphic images: Photos with clean lines, bold shapes, and not a lot of colors tend to convert beautifully with these simple tools.
- Smaller projects: If you're just whipping up a small gift or a quick project for yourself, the simplicity of a free generator is often more than enough.
But that simplicity comes with some trade-offs. You get very little control. Most free tools won't let you specify which brand of floss you're using (like DMC or Anchor), and you can forget about advanced editing features. They also have a reputation for producing patterns with some weird color choices or a ton of "confetti"—those annoying, single stitches of one color scattered all over the place.
Dedicated Cross Stitch Software
When you're ready to level up and get serious about quality, dedicated desktop software is the way to go. These programs are built from the ground up for needlework, giving you complete command over every single stitch and color.
Think of it like using a point-and-shoot camera versus a DSLR. Both get the job done, but the DSLR gives you the creative control to get the exact shot you envision. Paid software does the same for your patterns.
With dedicated software, you can manually tweak the color palette, merge similar shades to get your floss count down, and edit the chart stitch-by-stitch to clean up that pesky confetti. This level of refinement is what makes the difference between a good pattern and a truly stunning one.
This is especially critical for complex images like portraits or detailed landscapes, where subtle shading is everything. You can dial in your fabric count, set a hard limit on the number of colors, and even add backstitching to define edges. Our comprehensive guide offers more tips on how to transform a picture into a cross stitch pattern and really nail these details.
Comparing Your Options at a Glance
So, which path should you take? It’s a personal call based on what your project demands. This little cheat sheet should help clarify the main differences.
| Feature | Free Online Converters | Paid Desktop Software |
|---|---|---|
| Cost | Free | One-time purchase (usually $30-$100) |
| Ease of Use | Super simple; great for beginners | Moderate learning curve |
| Color Control | Limited; usually automated | Full control; specify brands & palettes |
| Editing Ability | None to minimal | Advanced; stitch editing & backstitching |
| Best For | Beginners, simple designs, testing ideas | Detailed portraits, landscapes, experts |
The explosion of these digital tools has been a game-changer for the craft. The counted embroidery segment, which includes cross-stitch, actually holds about a 45% share of the entire global embroidery market. The ability to create custom cross stitch patterns from photos has directly fueled this popularity, empowering stitchers everywhere to create deeply personal and intricate designs.
Ultimately, it comes down to your ambition. If you're just starting out or making something simple, a free converter is a fantastic, no-risk option. But if you're aiming to create an heirloom-quality piece that truly captures the soul of your photograph, investing in dedicated software will give you the control you need to make it happen.
Tweaking Your Digital Pattern for the Perfect Stitch
So, you've run your photo through a pattern generator and have the initial design in hand. That's a great first step, but the real magic happens now, in the editing phase. Think of the automatically generated pattern as a rough draft—it’s got the basic structure, but it’s full of little quirks that a machine just can’t catch.
This is where your stitcher’s eye comes in. A little manual cleanup can transform a pixelated, computer-generated chart into a beautiful, stitchable work of art. It’s the difference between a project that looks like a photo run through a filter and one that looks like a handcrafted heirloom. Let’s get into the nitty-gritty of making those edits.
This visual breaks down how the software takes the complex colors from a photo and translates them into a workable palette of DMC floss.
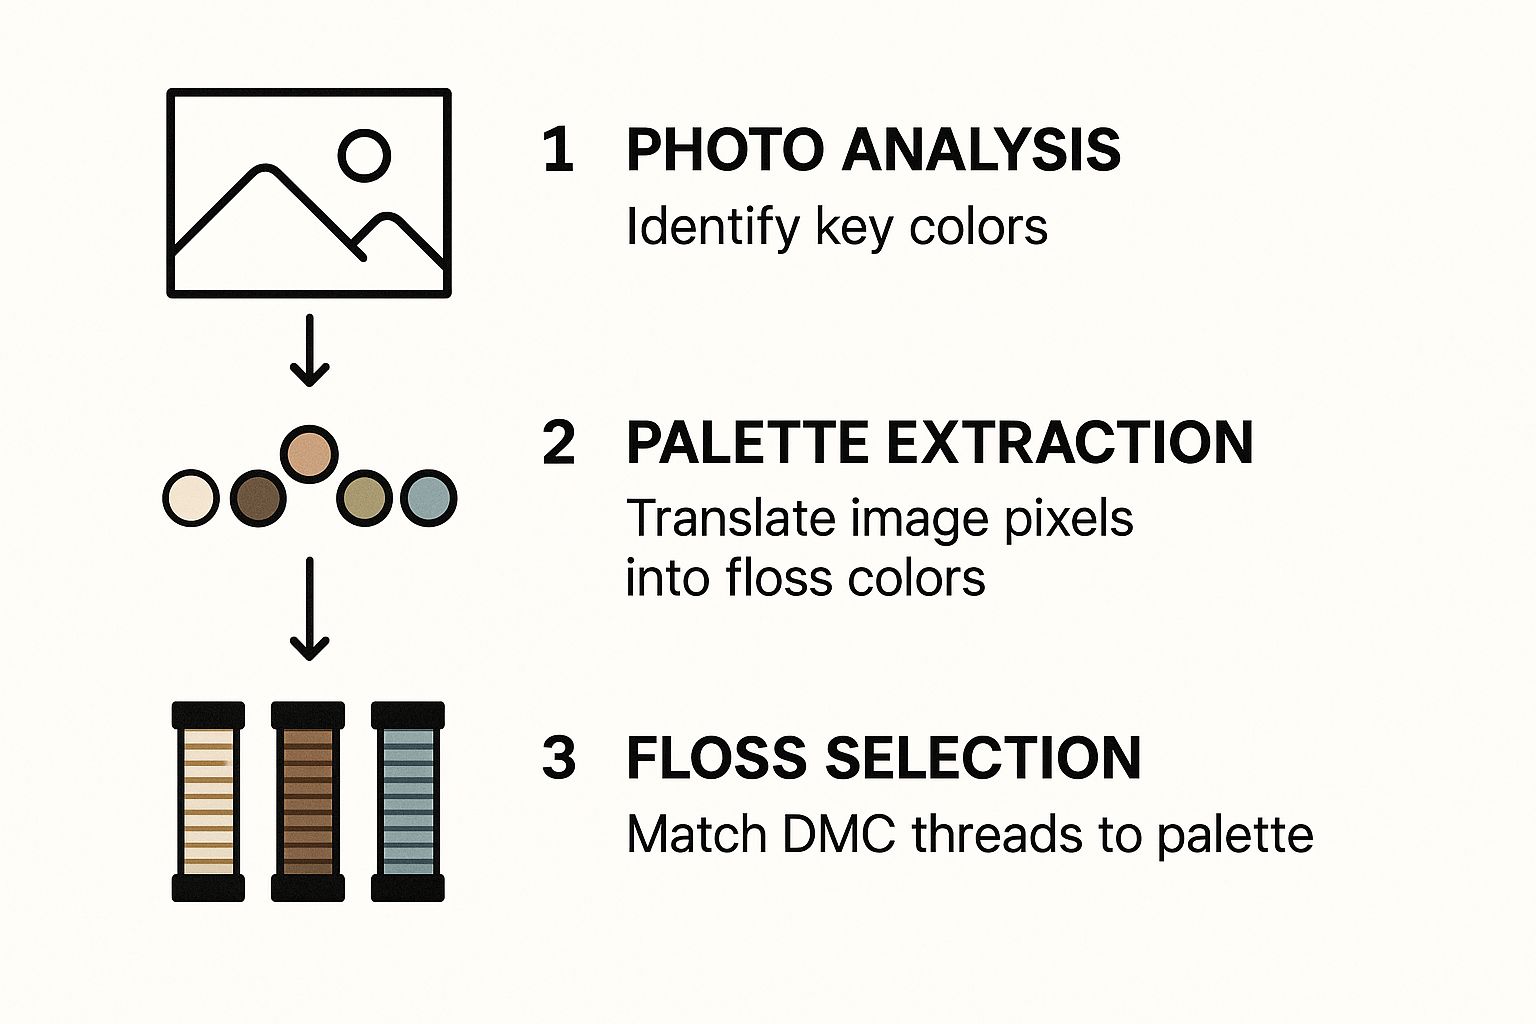
It’s a fantastic illustration of how the software simplifies vast color data into something you can actually stitch.
Cleaning Up the "Confetti"
One of the most common headaches with computer-generated patterns is what stitchers call "confetti." These are the random, single stitches of color scattered like sprinkles across a section where they don't belong. They make the design look noisy and are a total pain to stitch.
Your first mission is to sweep up this confetti. Most pattern-making software will let you click on a thread color to highlight every single stitch using that floss. Hunt down those lonely, isolated stitches.
Maybe you spot a single bright blue stitch in the middle of a warm, brown background. Just change it to match one of the colors right next to it. By doing this over and over, you'll smooth out the color transitions and make the whole design look much cleaner and more intentional.
Key Takeaway: Getting rid of confetti is the single best thing you can do to improve a generated pattern. It not only makes the finished piece look better but also makes the stitching process so much more enjoyable. You'll spend less time snipping threads and more time finding your rhythm.
Streamlining Your Color Palette
Another tell-tale sign of a machine-made pattern is an overstuffed color palette. The software might pick five shades of grey for a tiny shadow when two would do the job perfectly. These super-similar colors often look identical once stitched, needlessly complicating your shopping list and your stitching.
It’s time to put on your color editor hat. Go through your floss list and look for shades that are practically twins. For example, if the generator chose DMC 3752, 3753, and 963 for a small patch of sky, you could probably merge them all into DMC 3753 without losing any important detail.
This takes a bit of personal judgment, but the payoff is huge. A tighter, more curated palette results in a more cohesive piece. You can often reduce your total color count by 10-20% just by making these smart merges. For a deeper look at color theory in pattern making, our guide on how to turn a picture into a cross stitch pattern has some great advanced tips.
Computer-generated patterns can be a fantastic starting point, but they often come with predictable issues. Here’s a quick troubleshooting guide to help you spot and fix the most common problems.
Common Pattern Problems and How to Solve Them
| Issue | Why It Happens | How to Fix It |
|---|---|---|
| "Confetti" Stitches | The software tries to perfectly replicate every color nuance from the photo, resulting in isolated, single-color stitches. | Manually edit these stray stitches. Change them to match a nearby, dominant color to create smoother color blocks. |
| Muddled Details | Important features like eyes, mouths, or text look blurry because the software blends colors too much. | Add backstitching! Use a single strand of a dark color (like black or dark brown) to outline and define these key areas. |
| Bloated Color Palette | The program selects multiple, nearly identical shades of floss (e.g., three different off-whites) to capture subtle gradients. | Review your floss list and merge similar colors. If two shades are barely distinguishable, pick one and use it for both areas. |
| "Posterized" Look | Large areas of color look flat and lack depth because the software didn't create enough shades for a smooth gradient. | This is trickier. You may need to manually add an intermediate "transition" color between two shades to soften the jump. |
By learning to spot these common flaws, you can quickly elevate your pattern from a simple conversion to a polished, professional-looking design.
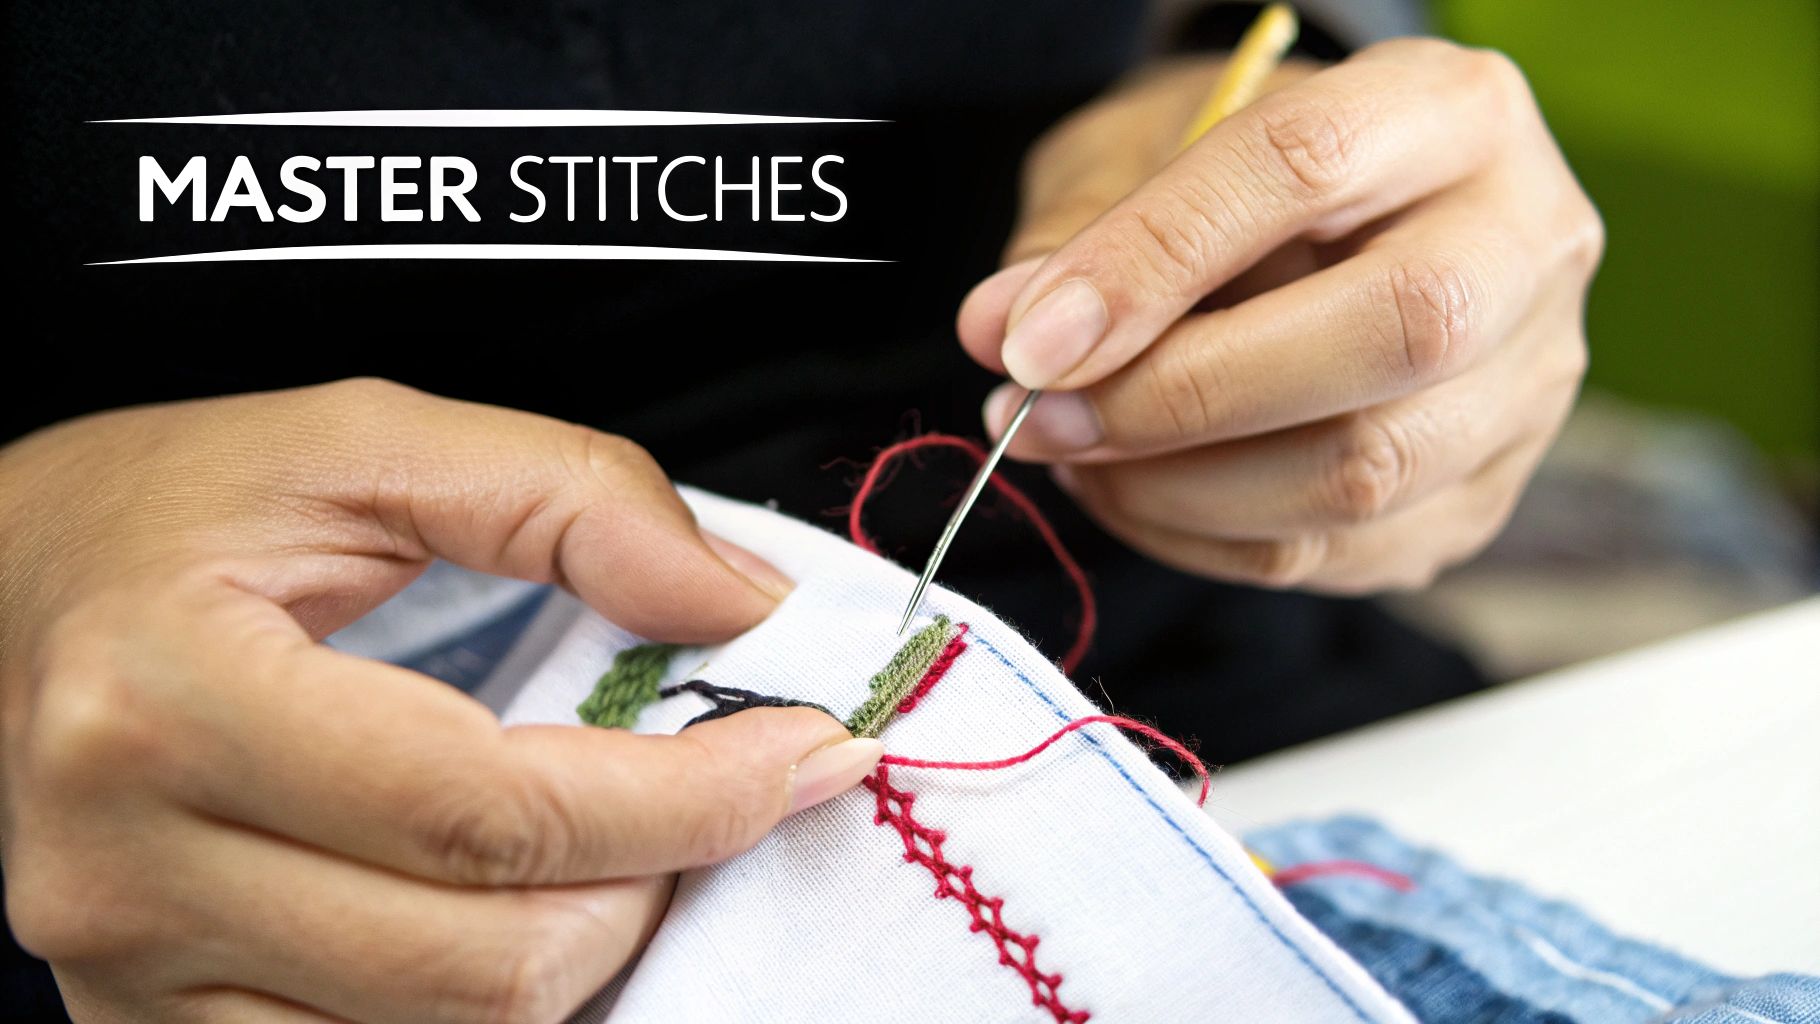
Defining Features With Backstitching
Sometimes, even after cleaning up the colors, a pattern can lack sharpness. This is especially true for portraits, where eyes might look a bit vacant or a smile gets lost in the surrounding skin tones. The solution? Backstitching.
Most pattern converters don't add backstitching automatically, so this is a crucial manual step. It’s essentially drawing with thread—using a single strand of black or dark brown floss to outline the most important details and give them definition.
Think about where your design needs a crisp edge:
- Around eyes, eyebrows, and lips to bring a portrait to life.
- To outline text and make it legible.
- To separate small objects from their background.
Adding a few well-placed backstitches is the finishing touch that makes a project truly pop. It guides the viewer’s eye and adds a level of polish that a purely automated process just can't replicate. With these refinements, you’re no longer just following a machine’s instructions—you’re the artist.
From Screen to Fabric: Prepping Your Project
This is where the magic really starts to happen—translating your digital pattern into something you can actually hold and stitch. You’ve done the hard work on the computer, and now it's time to gather your materials and set yourself up for a relaxing, enjoyable stitching session.
Trust me, a little prep work now saves a ton of headaches later. Getting everything in order before you thread your first needle means no more mid-project sprints to the craft store because you ran out of a key color.
Printing Your Pattern for Easy Stitching
First, you'll want to get that pattern off the screen and into your hands. While some people enjoy working from a tablet, I find that a physical copy is much easier on the eyes for those long, cozy stitching nights. Your software will spit out a PDF, usually several pages long, that includes both the chart and a key for all the symbols and colors.
A few tips I've learned for making your printed pattern work for you:
- Always print in color if you can. It makes deciphering the symbols so much quicker when you have the color blocks as a guide.
- Don't cheap out on the paper. A slightly heavier stock won't tear or get ratty as you handle it over and over.
- Go big! If the chart looks a bit tiny, don't hesitate to scale it up to 125% or even 150% at the printer. Your future self will thank you.
Once it's printed, I usually tape the pages together so I can see the entire design at a glance. As I work, I use a highlighter to mark off completed sections. There's nothing more satisfying than watching that yellow highlight creep across the page, knowing your fabric is mirroring that progress.
Choosing and Sizing Your Fabric
Now for the foundation of your project: the fabric. The type and count you choose will have a huge impact on the final look and size of your piece. When it comes to cross stitch patterns from photos, I almost always recommend a higher-count fabric, like an 18-count or even 22-count Aida. The smaller stitches act like pixels, blending the colors together more smoothly for a realistic, photo-like finish.
My Golden Rule: Always, always, always leave a generous border. I aim for at least three extra inches of fabric on all four sides of the design area. This gives you plenty of room for your hoop or frame and is absolutely essential if you plan on getting it professionally framed later.
Figuring out how much fabric you need is simple math. Just grab the stitch count from your pattern (for example, 140 stitches wide by 196 stitches high) and divide those numbers by the count of your fabric.
Let's Do the Math (Using 14-Count Aida):
- Width: 140 stitches ÷ 14 stitches per inch = 10 inches
- Height: 196 stitches ÷ 14 stitches per inch = 14 inches
This means your finished design will be 10x14 inches. To add that crucial three-inch border all around, you'll need a piece of fabric measuring 16x20 inches (10 + 3 + 3 by 14 + 3 + 3).
Building Your Floss Shopping List
Your pattern comes with a handy key that lists every DMC floss color you'll need. The first thing I do is "shop my stash," going through the list and pulling every color I already have.
For the remaining colors, make a clean shopping list. I jot down the DMC number and, if the software provides it, the estimated stitch count for each one. This little detail is a lifesaver for knowing when to buy a second skein, especially for large blocks of color like a sky or background.
Creating cross stitch patterns from photos has become so popular that you can now find services that do all this prep work for you. Many companies will send you a complete kit based on your photo, which includes the pattern, the perfectly sized fabric, and all the floss pre-sorted and ready to go in standard sizes like 30x30 cm or 50x50 cm.
Finally, even before you make that first stitch, it’s a good idea to think about how you’ll display your finished masterpiece. Having a goal in mind can be a great motivator! For some great ideas, check out our guide on various cross-stitch finishing techniques. With your pattern printed, fabric ready, and floss organized, you’re all set to bring your cherished photo to life, one stitch at a time.
Your Photo Cross Stitch Questions, Answered
Turning a treasured photo into a cross stitch pattern is an exciting process, but it's bound to bring up a few questions. When you’re moving from a digital picture to a physical, stitchable chart, a little guidance can go a long way.
Let’s walk through some of the most common hurdles and questions people have. Think of this as your go-to guide for getting the best possible results and avoiding those frustrating "I wish I'd known that" moments.
What Kind of Photos Make the Best Patterns?
The success of your entire project really boils down to the photo you start with. Not all pictures are cut out for this kind of transformation.
For the absolute best results, you need a high-resolution photo. That means digging up the original file from your camera or phone—not one you’ve saved from a social media feed, which is always compressed and loses detail.
Good, even lighting is just as crucial. Photos with soft, natural light work wonders. You want to avoid harsh shadows cutting across someone's face or obscuring key details, as this will translate into strange, dark patches in your pattern. An ideal candidate has a clear, focused subject against a simple background, which helps the pattern software know exactly what to focus on.
Here's a trick I've used for years: step back from your screen and squint at the photo. If the main subject and its key features are still easy to make out, you've probably got a winner.
How Many Thread Colors Should I Really Use?
Figuring out the right number of colors is a true balancing act. Go with too few, and your beautiful photo can end up looking blocky and posterized, completely missing the subtle shades that make it look realistic. On the other hand, using too many can leave you swimming in "confetti"—those pesky single stitches of color—and a project that feels more like a chore than a joy.
For most projects, like a standard 8x10 inch piece, aiming for somewhere between 30 and 50 colors is the sweet spot. This range gives you enough of a palette for good shading and detail without making the process a nightmare. Most pattern generators let you set this number, so play around! See what it looks like with 40 colors, then bump it to 60. Compare the two and decide which one captures the soul of your photo without overwhelming you.
Can I Actually Turn Any Photo Into a Cross Stitch Pattern?
The short answer is yes, you can technically feed any image file into a converter. The more important question is, should you?
A blurry, low-resolution, or poorly lit photo is going to give you a muddled, disappointing pattern. It’s a classic "garbage in, garbage out" situation. The software can't invent detail that simply isn't there in the original picture. It will struggle to define edges and assign colors, often resulting in something that looks more like a vague blob than a cherished memory.
Always, always start with the best quality photo you have. Spending a little extra time upfront to select the right picture will save you countless hours of stitching frustration later.
What's the Best Fabric Count for a Photo Pattern?
When your goal is photo-realism, a higher fabric count is your best friend. It helps to think of each stitch as a single pixel. The smaller and tighter those "pixels" are, the smoother and more blended your final image will look.
Here’s a quick breakdown of common choices:
- 14-Count Aida: A fantastic, all-purpose fabric, but it can make detailed photo patterns look a bit "pixelated." This can be a cool stylistic choice, but it might not be the realistic look you're after.
- 16-Count or 18-Count Aida: This is the go-to range for most photo-to-pattern projects. The stitches are smaller, allowing for much finer detail and smoother transitions between colors. I almost always recommend this for portraits and landscapes.
- 22-Count Hardanger or 28-Count Evenweave (stitched over one): For the truly dedicated stitcher! These high counts produce stunning, almost photographic detail. Your finished piece will be smaller and incredibly intricate, but be ready for a more intense stitching experience.
Ready to turn your own memories into a work of art? At Cross Stitched, we take the guesswork out of it. Use our easy tool to create your own custom kit, and we'll send you everything you need to start stitching. Create your personalized cross stitch kit today!


