

If you've ever felt that 14-count Aida was a bit too blocky but weren't quite ready to squint at 18-count, then 16-count Aida fabric is about to become your best friend. Simply put, the "count" refers to the number of squares, or stitches, you can fit into one linear inch of the fabric. With 16 squares per inch, this fabric hits a real sweet spot.
It's the perfect middle ground in the cross-stitch world. You get significantly more detail than with a 14-count, but you can still see the holes clearly without reaching for a magnifier. It’s the go-to choice for stitchers who are serious about getting that sharp, almost-painted look in their finished pieces.
The "Just Right" Fabric for Most Stitchers

Think of fabric count like the resolution on a screen. Aida 14 is like standard definition—the stitches are bigger and more obvious, great for starting out. Higher counts, like 22 or 28, are like 4K Ultra HD, offering incredible detail but with pixels (or stitches) so tiny they can be a real challenge.
Aida fabric 16 count is your high-definition display. It delivers a crisp, clear image, perfect for capturing those beautiful, subtle color changes and fine lines. This makes it a fantastic next step for beginners looking to tackle more complex patterns and a trusty staple for seasoned experts.
A Perfect Balance of Detail and Comfort
The real magic of 16-count Aida is how it balances everything so perfectly. It sits right in that gap between the chunkier, beginner-friendly fabrics and the finer linens that demand more patience. That versatility is what makes it a powerhouse for all kinds of projects.
Because it produces such a beautiful, smooth finish, 16-count Aida has become the default fabric for custom photo-to-pattern conversion kits. It's just dense enough to capture the delicate shading in a portrait without making the project overwhelmingly large or difficult.
This isn't just a hunch, either. The numbers back it up. In the cross-stitch community, 16-count Aida fabric reigns supreme, making up around 42% of global fabric sales. For comparison, 14-count comes in at about 28%, and the finer 18-count is preferred by only 15% of stitchers.
Why Do So Many Stitchers Love It?
When you break it down, the reasons for its popularity are pretty clear.
- Amazing Detail: It makes your stitches smaller and tighter, allowing for much more nuance than you can get on 14-count.
- Great Floss Coverage: Two strands of standard cotton floss usually give you full, plump stitches with no distracting fabric peeking through.
- Easy on the Eyes: The squares are still distinct enough that you can stitch for hours without feeling the eye strain that often comes with higher-count fabrics.
This fabric is more than just a grid to stitch on; it’s the canvas that helps you create something truly special. To get a better handle on the basics of this essential stitching material, take a look at our complete guide on what is Aida fabric.
Finding Your Perfect Needles and Floss
Think of picking the right needle and floss for your 16-count Aida like a chef choosing the perfect knife. The right tools don't just get the job done; they make the entire process smoother and the final result so much better. Your goal is to glide your needle through the fabric's existing holes, not to punch new ones.
A needle that's too big will stretch the Aida's woven squares, leaving you with distorted stitches and visible gaps. Nobody wants that! You need a needle that’s slim enough to pass through easily but not so flimsy that it bends while you work.
The Right Needle for the Job
For 16-count Aida, your go-to will almost always be a tapestry needle in size 26 or 28. These needles are designed for this kind of work, with a blunt tip and a large eye that lets them slip cleanly through the fabric's weave without snagging.
A size 26 needle is a fantastic all-rounder for this fabric count and my personal starting point. If you find it’s a bit snug, especially with thicker threads, dropping down to a finer size 28 can make for an even smoother ride. For a deeper dive, check out our complete guide to cross stitch needle sizes.
Getting that Perfect Floss Coverage
With your needle sorted, it's time to think about floss. The gold standard for 16-count Aida is using two strands of a standard six-strand embroidery floss, like the kind from DMC. This combination gives you lush, full stitches that cover the fabric beautifully, creating a rich, solid look.
Two strands are what I recommend for a professional finish, making sure no distracting specks of fabric peek through your stitches. It's especially important for designs with big blocks of color where you want a solid, impactful appearance.
But here's the thing: that "two-strand rule" is really more of a guideline. Experienced stitchers know that adjusting your thread count is a powerful way to add artistic flair to a piece.
The number of floss strands you use is a creative choice that directly impacts the texture and detail of your work. Don't be afraid to experiment to find the perfect look for your project.
When to Break the Two-Strand Rule
Playing with your floss strand count can add incredible depth and dimension to your work. Here’s how you can mix it up for different effects:
- For Delicate Details: Using a single strand is perfect for backstitching or creating fine, crisp lines. This is how you add sharp outlines, text, or tiny details like facial features without making them look clunky.
- For Bold Texture: Bumping up to three strands creates a bolder, more textured look. This technique is fantastic for making certain elements in your pattern pop, giving them an almost three-dimensional feel.
Understanding these little nuances is what helps turn a simple pattern into a true work of art. In fact, many high-quality photo-to-pattern kits rely on 16-count Aida and pre-sorted DMC threads for this very reason. It’s a reliable and beautiful combination.
There's a reason it's so popular. Data from marketplaces like Etsy shows that 78% of 16-count listings earn 4-5 star reviews for their ease of use, especially in beginner projects. Its popularity is growing, with global adoption increasing by about 25% annually. Today, roughly 50% of hobbyists choose 16-count for its stability and beautiful finish, making it a go-to for preserving memories in needlework. If you're curious about how it's used in different projects, you can see examples on this crafting resource page.
How to Calculate Your Fabric Size Correctly
There's nothing worse than getting halfway through a project only to realize you’re about to run out of fabric. It’s a classic stitcher’s nightmare! Fortunately, a little bit of simple math is all you need to make sure you cut the perfect piece of 16-count Aida every single time.
The whole process boils down to one simple formula. First, find the stitch count on your pattern (it will look something like 160w x 192h). With that number, you're ready to figure out the exact dimensions of your finished design.
The Simple Formula:
(Number of Stitches Wide / 16) = Finished Width in Inches
(Number of Stitches High / 16) = Finished Height in Inches
Let's walk through it with a real pattern. Say your chart is 160 stitches wide and 192 stitches high.
- Calculate the Width: 160 stitches ÷ 16 stitches per inch = 10 inches
- Calculate the Height: 192 stitches ÷ 16 stitches per inch = 12 inches
That’s it! Your final stitched masterpiece will measure exactly 10 by 12 inches. If you ever want to double-check your math or are working with a more complex pattern, our handy cross stitch size calculator can do the work for you.
The Golden Rule of Fabric Borders
Now, just because your design is 10x12 inches doesn't mean you should cut a piece of fabric that size. This is where the most critical step comes in: adding a border. This extra fabric around the edges is non-negotiable for a few key reasons.
- Easier Handling: It gives you a safe place to hold the fabric or clamp it into a hoop or frame without crushing your beautiful stitches.
- Fray Prevention: Aida has a tendency to fray at the edges, and a generous border acts as a crucial buffer zone.
- Professional Framing: Framers need that extra fabric to properly stretch and mount your piece, ensuring a tight, gallery-quality finish.
The rule of thumb is to add at least 2 to 3 inches of extra fabric on all four sides. For our 10x12 inch design, that means adding 6 inches to the width (3 on the left + 3 on the right) and 6 inches to the height (3 on the top + 3 on the bottom). This brings your total fabric cut size to a much safer 16x18 inches.
This chart is a great quick reference for the needles and floss strands that work best with 16-count Aida.
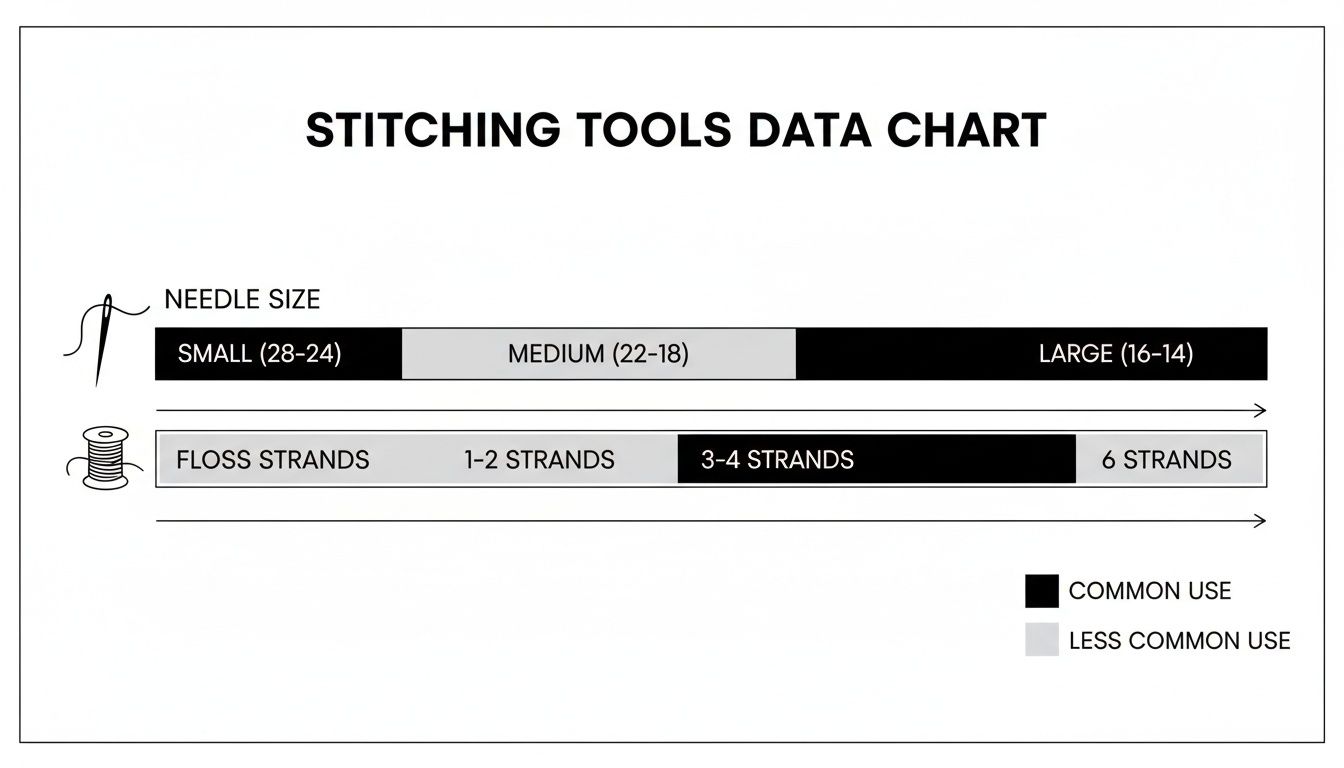
As you can see, a size 26 or 28 needle and two strands of floss is the sweet spot for most stitchers, giving you fantastic coverage and smooth stitching.
How Aida Count Changes Everything
To really appreciate why 16-count Aida is so popular, it helps to see the direct impact fabric count has on the final size of a project. A lower count (like 14) has fewer stitches per inch, so the same pattern will come out much larger. Let's see how a pattern that is 160 stitches by 240 stitches would look on different fabrics.
This table really puts it into perspective.
Finished Design Size Comparison Across Aida Counts
| Aida Count | Finished Design Size (Inches) | Total Fabric Cut with 3-inch Border (Inches) |
|---|---|---|
| 14 Count | 11.4 x 17.1 inches | 17.4 x 23.1 inches |
| 16 Count | 10 x 15 inches | 16 x 21 inches |
| 18 Count | 8.9 x 13.3 inches | 14.9 x 19.3 inches |
As you can see, moving from 14-count to 16-count makes the design noticeably more compact without making it too tiny. It’s that perfect middle ground that gives you great detail while still being easy on the eyes.
The Best Fabric for Photo Cross-Stitch Kits

There’s a special kind of magic in turning a favorite photograph into a cross-stitch masterpiece. You’re not just stitching; you’re translating pixels into thread, transforming a digital moment into a physical heirloom. The fabric you choose is the canvas for this magic, and it's what makes the final piece truly shine.
When it comes to this type of project, Aida fabric 16 count is, hands down, the best choice. Its fabric density is just right for capturing the subtle details of a photograph—the soft curve of a smile, the gentle fade of colors in a sunset. It provides the clarity you need to make a portrait instantly recognizable and full of life.
Finding the Sweet Spot for Detail
In a photo conversion, fabric count is everything. A lower count, like 14, has larger squares. This creates bigger stitches that can make your finished portrait look blocky or pixelated, almost like viewing a high-resolution photo on an old, low-res screen. You lose those tiny details that make a person’s face theirs.
On the flip side, you have 18-count Aida. The smaller stitches create incredible detail, which sounds great in theory. The catch? That higher density can dramatically increase the project's size and complexity. A portrait that feels manageable on 16-count can become a massive, daunting task on 18-count, which is a recipe for stitcher burnout.
Aida fabric 16 count is the perfect middle ground. It's fine enough to render facial expressions and intricate shading with stunning clarity but still large enough to keep the project enjoyable from the first stitch to the last.
This balance is exactly why high-quality custom photo kits almost always recommend 16-count Aida. It allows for a high number of stitches within a reasonable frame size, ensuring the final piece is both beautiful and, most importantly, achievable.
Capturing Memories, One Stitch at a Time
Ultimately, a photo-to-stitch project is about creating a true work of art that captures a treasured memory. The technical qualities of 16-count Aida are what make this possible, giving you the ideal foundation for these deeply personal projects.
Companies that specialize in creating custom photo patterns rely on this fabric's capabilities. For instance, a large 24"x32" canvas stitched on 16-count Aida can hold over 30,000 stitches—more than enough detail to create breathtaking family portraits with incredible accuracy. The results speak for themselves, with customer feedback often showing 92% satisfaction rates for kits using this specific fabric count.
If you're ready to start your own photo project, you can explore the many 16-count Aida fabric options available to find the perfect color and size for your memory.
Getting That Polished, Professional Look When You're Done
Taking that final stitch feels amazing, but your masterpiece isn't quite ready for its debut. The magic really happens in the finishing, which is what elevates your project from a piece of stitched fabric to a true work of art. With aida fabric 16 count, a few simple techniques can make all the difference, giving your work that crisp, clean look.
Believe it or not, a professional finish starts with your very first stitch. Keeping the back of your work as neat as the front isn't just for show—it actually helps your project lay perfectly flat once it's framed. Little tricks like the loop start method are fantastic for avoiding bulky knots, which can create annoying bumps and shadows you can see from the front.
Keep It Clean, Keep It Taut
One of the keys to a beautiful result is maintaining even tension across your fabric as you stitch. While a standard embroidery hoop is fine for smaller designs, bigger projects on 16 count Aida really shine when you use a scroll frame.
- Hoops: They're portable and great for quick, small patterns. The downside? They can leave behind some stubborn creases and might even warp your stitches if the fabric is held tight for too long.
- Scroll Frames: These are the way to go for larger projects. They hold the entire piece with perfectly even tension and, best of all, they don't squish the stitches you've already completed. This helps keep everything looking uniform and clean.
No matter what you're using, it's a good habit to take your fabric out of the hoop or frame when you're done stitching for the day. This lets the Aida cloth relax and helps prevent those dreaded permanent creases from setting in.
Think of finishing as creating the perfect stage for your stitches. A clean, flat, and beautifully pressed piece lets every single X you made shine, truly honoring all the time and care you poured into it.
The Final Wash and Press
Once all your stitching is done, it's time to give your project a gentle bath. This quick wash gets rid of any oils from your hands, dust, or marks left by your hoop, leaving the fabric looking bright and fresh.
- Grab a clean sink or basin and fill it with cool or lukewarm water. Add just a tiny drop of a mild, clear soap or a special wash made for quilts.
- Gently place your piece in the water and let it soak for about 15-20 minutes. Try not to scrub or agitate it too much, as that could fray your stitches.
- Rinse it carefully under cool, running water until the water is clear and all the soap is gone.
- Gently squeeze out the extra water—but never, ever wring it out! A much better way is to roll it up in a thick, clean towel and press down firmly to soak up the moisture.
- To get it perfectly flat, lay the piece face-down on another thick, dry towel. Using a medium heat setting on your iron, press the piece from the back, always keeping the iron moving. This technique protects your stitches, preventing them from getting flattened and giving them a lovely, slightly puffed look.
This level of care has been a hallmark of needlework for centuries. The 16 count Aida fabric we use today has its roots in the German textile company Zweigart, founded way back in 1877. They were the innovators who, by the early 20th century, perfected and standardized 16 count Aida to offer that ideal mix of fine detail and ease of use. This legacy continues today, making it a go-to for stitchers everywhere. You can learn more about how these essential crafting materials came to be over at Cross Stitched.
Common Questions About 16 Count Aida
Even after you've got the basics down, jumping into a new fabric count always brings up a few questions. From how to prep your fabric to what to do when you inevitably make a mistake, having some quick answers on hand can make all the difference. Let's dig into some of the most common things stitchers ask about aida fabric 16 count.
Think of this as your practical troubleshooting guide. These are the kinds of questions that tend to pop up right in the middle of a project, and knowing the answers will help keep your stitching session smooth and fun.
Should I Pre-Wash My 16 Count Aida?
Ah, the great debate in the cross-stitch world! Honestly, the short answer is: it depends. Most Aida you buy today, especially from trusted brands like Zweigart or Charles Craft, is colorfast and ready to stitch right out of the package. I usually don't bother pre-washing it.
But there are a couple of times when you might want to.
- Hand-Dyed Fabrics: If you’ve got a beautiful, richly colored hand-dyed Aida, giving it a rinse can prevent any excess dye from bleeding onto your floss later on.
- Stiff Fabric: Some Aida can feel a little stiff from the sizing used in manufacturing. A quick, gentle hand wash can soften it up and make it much more pleasant to handle.
If you do wash it, stick to cool water and a tiny bit of mild soap. Rinse it well, roll it gently in a towel to blot out the extra water, and then let it air dry flat. Whatever you do, don't wring it out—that's a surefire way to distort the weave.
Is It Harder to Use Than 14 Count?
Moving from 14-count to 16 count Aida is a really natural next step. The squares are just a little bit smaller, so for most stitchers, it’s not a dramatic leap that will cause eye strain. In fact, a lot of people try it and find they prefer it almost immediately.
The only real adjustment is getting used to the slightly denser grid. You'll quickly see the payoff in how much crisper and more filled-in your stitches look. If you're comfortable working on 14-count, you absolutely have the skills to tackle 16-count.
The transition from 14 to 16 count Aida is often where stitchers feel their work starts to look truly professional. The tighter weave creates a smoother, more 'painted' appearance that elevates the final piece.
The popularity of this fabric really tells the story. During the huge crafting boom in 2020, sales for cross-stitch supplies went through the roof, and 16 count Aida quickly became the go-to fabric, showing up in 55% of beginner kits. Bestsellers like Charles Craft's Fiddlers Light Oatmeal are still in high demand, which just shows how much stitchers at all levels love it. You can see more about Aida fabric sales trends on major craft retail sites.
What Do I Do If I Make a Mistake?
First off, relax! Mistakes happen to every single one of us, from total newbies to people who have been stitching for decades. The great thing is, mistakes are almost always fixable on aida fabric 16 count. Your best friend here is a good seam ripper or a sharp pair of embroidery scissors.
Just gently slide the tip of your tool under the stitch you want to remove and carefully snip the floss. Then, use your needle to pick out the leftover bits of thread from the front and back of the fabric. The key is to go slow so you don't accidentally snag the Aida itself. Once the rogue stitch is gone, you're all clear to stitch over the area correctly.
Ready to turn one of your own cherished photos into a work of art? At Cross Stitched, we transform your memories into beautiful, custom cross-stitch kits using high-quality 16 count Aida fabric. Start your personalized project today at https://cross-stitched.com.


